Page 73 of 100

• If the light remains lit with the engine running, your vehicle will usually be drivable;however, see an authorized service center immediately. If the light is flashing when the
engine is running, immediate service is required and you may experience reduced
performance, an elevated/rough idle or engine stall and your vehicle may require
towing.
- Air Bag Warning Light
• If the light is not on during starting, stays on, or turns on while driving, have the vehicleserviced by an authorized service center immediately.
IF YOUR ENGINE OVERHEATS
• In any of the following situations, you can reduce the potential for overheating by takingthe appropriate action.
• On the highways — slow down.
• In city traffic — while stopped, place the transmission in NEUTRAL, but do not increase engine idle speed.
NOTE:
There are steps that you can take to slow down an impending overheat condition:
• If your air conditioner (A/C) is on, turn it off. The A/C system adds heat to the engine cooling system and turning the A/C off can help remove this heat.
• You can also turn the temperature control to maximum heat, the mode control to floor and the blower control to high. This allows the heater core to act as a supplement to the
radiator and aids in removing heat from the engine cooling system.
CAUTION!
Driving with a hot cooling system could damage your vehicle. If the temperature gauge
reads HOT (H), pull over and stop the vehicle. Idle the vehicle with the air conditioner
turned off until the pointer drops back into the normal range. If the pointer remains on
HOT (H), and you hear continuous chimes, turn the engine off immediately, and call for
service.
WARNING!
You or others can be badly burned by hot engine coolant (antifreeze) or steam from your
radiator. If you see or hear steam coming from under the hood, do not open the hood
until the radiator has had time to cool. Never try to open a cooling system pressure cap
when the radiator or coolant bottle is hot.
WHAT TO DO IN EMERGENCIES
71
Page 74 of 100
 in the tire tread can be sealed with TIREFIT.Foreign objects (e.g., screws or nails) should not be removed from the tire. TIREFIT can
be used in out")
TIREFIT KIT
• Small punctures up to 1/4 in (6 mm) in the tire tread can be sealed with TIREFIT.Foreign objects (e.g., screws or nails) should not be removed from the tire. TIREFIT can
be used in outside temperatures down to approximately -4°F (-20°C).
• This kit will provide a temporary tire seal, allowing you to drive your vehicle up to 100 miles (160 km) with a maximum speed of 55 mph (88 km/h).
TIREFIT Storage
• The TIREFIT kit is located in the trunk.
TIREFIT Kit Components And Operation
1. Sealant Bottle 5. Mode Select Knob
2. Deflation Button 6. Sealant Hose (Clear)
3. Pressure Gauge 7. Air Pump Hose (Black)
4. Power Button 8. Power Plug
Using The Mode Select Knob And Hoses
• Your TIREFIT kit is equipped with the following symbols to indicate the air or sealant
mode.
Selecting Air Mode
• Turn the Mode Select Knob (5) to this position for air pump operation only. Use the Black Air Pump Hose (7) when selecting this mode.
Selecting Sealant Mode
• Turn the Mode Select Knob (5) to this position to inject the TIREFIT Sealant and to inflate the tire. Use the Sealant Hose (clear hose) (6) when selecting this mode.
Using The Power Button
• Push and release the Power Button (4) once to turn On the TIREFIT kit. Push and release the Power Button (4) again to turn Off the TIREFIT kit.
WHAT TO DO IN EMERGENCIES
72
Page 75 of 100
 to reduce the air pressure in the tire if it becomes over-inflated.
TIREFIT Usage Precautions
• Replace the TIREFIT Sealant Bottle (1) a")
Using The Deflation Button
• Press the Deflation Button (2) to reduce the air pressure in the tire if it becomes over-inflated.
TIREFIT Usage Precautions
• Replace the TIREFIT Sealant Bottle (1) and Sealant Hose (6) prior to the expirationdate (printed on the bottle label) to assure optimum operation of the system. Refer to
“Sealing a Tire with TIREFIT” section (F) “Sealant Bottle and Hose Replacement”.
• The Sealant Bottle (1) and Sealant Hose (6) are a one tire application use. After each use, always replace these components immediately at an authorized dealer.
• When the TIREFIT sealant is in a liquid form, clean water, and a damp cloth will remove the material from the vehicle or tire and wheel components. Once the sealant dries, it
can easily be peeled off and properly discarded.
• For optimum performance, make sure the valve stem on the wheel is free of debris before connecting the TIREFIT kit.
• You can use the TIREFIT air pump to inflate bicycle tires. The kit also comes with two needles, located in the Accessory Storage Compartment (on the bottom of the air
pump) for inflating sport balls, rafts, or similar inflatable items. However, use only the
Air Pump Hose (7) and make sure the Mode Select Knob (5) is in the Air Mode when
inflating such items to avoid injecting sealant into them. The TIREFIT Sealant is only
intended to seal punctures less than 1/4 in (6 mm) diameter in the tread of your
vehicle.
• Do not lift or carry the TIREFIT kit by the hoses.
Sealing A Tire With TIREFIT
(A) Whenever You Stop To Use TIREFIT:
1. Pull over to a safe location and turn on the vehicle’s Hazard Warning flashers.
2. Verify that the valve stem (on the wheel with the deflated tire) is in a position that is near to the ground. This will allow the TIREFIT Hoses (6) and (7) to reach the valve
stem and keep the TIREFIT kit flat on the ground. This will provide the best positioning
of the kit when injecting the sealant into the deflated tire and running the air pump.
Move the vehicle as necessary to place the valve stem in this position before
proceeding.
3. Place the transmission in PARK (auto transmission) or in Gear (manual transmission) and turn Off the ignition.
4. Set the parking brake.
(B) Setting Up To Use TIREFIT:
1. Turn the Mode Select Knob (5) to the Sealant Mode position.
2. Uncoil the Sealant Hose (6) and then remove the cap from the fitting at the end of the hose.
WHAT TO DO IN EMERGENCIES
73
Page 76 of 100
 onto the valve stem.
5. Uncoil")
3. Place the TIREFIT kit flat on the ground next to the deflated tire.
4. Remove the cap from the valve stem and then screw the fitting at the end of theSealant Hose (6) onto the valve stem.
5. Uncoil the Power Plug (8) and insert the plug into the vehicle’s 12 Volt power outlet.
6. Do not remove foreign objects (e.g., screws or nails) from the tire.
(C) Injecting TIREFIT Sealant Into The Deflated Tire:
• Always start the engine before turning ON the TIREFIT kit.
NOTE:
Manual transmission vehicles must have the parking brake engaged and the shift lever in
NEUTRAL.
• After pressing the Power Button (4), the sealant (white fluid) will flow from the Sealant Bottle (1) through the Sealant Hose (6) and into the tire.
NOTE:
Sealant may leak out through the puncture in the tire.
• If the sealant (white fluid) does not flow within 0 – 10 seconds through the Sealant
Hose (6):
1. Press the Power Button (4) to turn Off the TIREFIT kit. Disconnect the Sealant Hose (6) from the valve stem. Make sure the valve stem is free of debris. Reconnect the
Sealant Hose (6) to the valve stem. Check that the Mode Select Knob (5) is in the
Sealant Mode position and not Air Mode. Press the Power Button (4) to turn On the
TIREFIT kit.
2. Connect the Power Plug (8) to a different 12 Volt power outlet in your vehicle or another vehicle, if available. Make sure the engine is running before turning ON the
TIREFIT kit.
3. The Sealant Bottle (1) may be empty due to previous use. Call for assistance.
NOTE:
If the Mode Select Knob (5) is on Air Mode and the pump is operating, air will dispense
from the Air Pump Hose (7) only, not the Sealant Hose (6).
• If the sealant (white fluid) does flow through the Sealant Hose (6):
1. Continue to operate the pump until sealant is no longer flowing through hose (typically takes 30 - 70 seconds). As the sealant flows through the Sealant Hose (6), the
Pressure Gauge (3) can read as high as 70 psi (5 kPa). The Pressure Gauge (3) will
decrease quickly from approximately 70 psi (5 kPa) to the actual tire pressure when
the Sealant Bottle (1) is empty.
2. The pump will start to inject air into the tire immediately after the Sealant Bottle (1) is empty. Continue to operate the pump and inflate the tire to the pressure indicated
on the tire pressure label on the driver-side latch pillar (recommended pressure).
Check the tire pressure by looking at the Pressure Gauge (3).
WHAT TO DO IN EMERGENCIES
74
Page 77 of 100
 pressure within 15 minutes:
• The tire is too badly damaged. Do not attempt to drive the vehicle further. Call for assistance.
NOTE:
If t")
•If the tire does not inflate to at least 26 psi (1.8 kPa) pressure within 15 minutes:
• The tire is too badly damaged. Do not attempt to drive the vehicle further. Call for assistance.
NOTE:
If the tire becomes over-inflated, press the Deflation Button to reduce the tire pressure to
the recommended inflation pressure before continuing.
• If the tire does not inflate to at least 26 psi (1.8 kPa) pressure within 15 minutes:
1. Press the Power Button (4) to turn off the TIREFIT kit.
2. Remove the Speed Limit sticker from the top of the Sealant Bottle (1) and place the sticker on the instrument panel.
3. Immediately disconnect the Sealant Hose (6) from the valve stem, reinstall the cap on the fitting at the end of the hose, and place the TIREFIT kit in the vehicle storage
location. Quickly proceed to (D) “Drive Vehicle”.
(D) Drive Vehicle:
• Immediately after injecting sealant and inflating the tire, drive the vehicle 5 miles (8 km) or 10 minutes to ensure distribution of the TIREFIT Sealant within the tire.
Do not exceed 55 mph (88 km/h).
(E) After Driving:
Pull over to a safe location. Refer to “Whenever You Stop to Use TIREFIT” before continuing.
1. Turn the Mode Select Knob (5) to the Air Mode position.
2. Uncoil the Air Pump Hose (7) (black in color) and screw the fitting at the end of hose (7) onto the valve stem.
3. Uncoil the power plug and insert the plug into the vehicles 12 Volt power outlet.
4. Check the pressure in the tire by reading the Pressure Gauge (3).
• If tire pressure is less than 19 psi (1.3 kPa), the tire is too badly damaged. Do not
attempt to drive the vehicle further. Call for assistance.
If the tire pressure is 19 psi (1.3 kPa) or higher:
1. Press the Power Button (4) to turn on TIREFIT and inflate the tire to the pressure indicated on the tire and loading information label on the driver-side door opening.
2. Disconnect the TIREFIT kit from the valve stem, reinstall the cap on the valve stem and unplug from 12 Volt outlet.
3. Place the TIREFIT kit in its proper storage area in the vehicle.
4. Have the tire inspected and repaired or replaced at the earliest opportunity at an authorized dealer or tire service center.
5. Replace the Sealant Bottle (1) and Sealant Hose (6) assembly at your authorized dealer as soon as possible. Refer to “(F) Sealant Bottle and Hose Replacement.”
WHAT TO DO IN EMERGENCIES
75
Page 78 of 100

NOTE:
If the tire becomes over-inflated, press the Deflation Button to reduce the tire pressure to
the recommended inflation pressure before continuing.
NOTE:
When having the tire serviced, advise the authorized dealer or service center that the tire
has been sealed using the TIREFIT service kit.
(F) Sealant Bottle And Hose Replacement:
1. Uncoil the Sealant Hose (6) (clear in color).
2. Locate the round Sealant Bottle release button in the recessed area under the sealantbottle.
3. Press the Sealant Bottle release button. The Sealant Bottle (1) will pop up. Remove the bottle and dispose of it accordingly.
4. Clean any remaining sealant from the TIREFIT housing.
5. Position the new Sealant Bottle (1) in the housing so that the Sealant Hose (6) aligns with the hose slot in the front of the housing. Press the bottle into the housing.
An audible click will be heard indicating the bottle is locked into place.
6. Verify that the cap is installed on the fitting at the end of the Sealant Hose (6) and return the hose to its storage area (located on the bottom of the air pump).
7. Return the TIREFIT kit to its storage location in the vehicle.
CAUTION!
• The metal end fitting from Power Plug (8) may get hot after use, so it should be handled carefully.
• Failure to reinstall the cap on the fitting at the end of the Sealant Hose (6) can result
in sealant contacting your skin, clothing, and the vehicle’s interior. It can also result
in sealant contacting internal TIREFIT kit components which may cause perma-
nent damage to the kit.
WHAT TO DO IN EMERGENCIES
76
Page 79 of 100

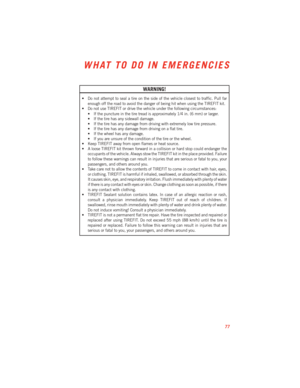
WARNING!
• Do not attempt to seal a tire on the side of the vehicle closest to traffic. Pull farenough off the road to avoid the danger of being hit when using the TIREFIT kit.
• Do not use TIREFIT or drive the vehicle under the following circumstances:
• If the puncture in the tire tread is approximately 1/4 in. (6 mm) or larger.
• If the tire has any sidewall damage.
• If the tire has any damage from driving with extremely low tire pressure.
• If the tire has any damage from driving on a flat tire.
• If the wheel has any damage.
• If you are unsure of the condition of the tire or the wheel.
• Keep TIREFIT away from open flames or heat source.
• A loose TIREFIT kit thrown forward in a collision or hard stop could endanger the
occupants of the vehicle. Always stow the TIREFIT kit in the place provided. Failure
to follow these warnings can result in injuries that are serious or fatal to you, your
passengers, and others around you.
• Take care not to allow the contents of TIREFIT to come in contact with hair, eyes,
or clothing. TIREFIT is harmful if inhaled, swallowed, or absorbed through the skin.
It causes skin, eye, and respiratory irritation. Flush immediately with plenty of water
if there is any contact with eyes or skin. Change clothing as soon as possible, if there
is any contact with clothing.
• TIREFIT Sealant solution contains latex. In case of an allergic reaction or rash,
consult a physician immediately. Keep TIREFIT out of reach of children. If
swallowed, rinse mouth immediately with plenty of water and drink plenty of water.
Do not induce vomiting! Consult a physician immediately.
• TIREFIT is not a permanent flat tire repair. Have the tire inspected and repaired or
replaced after using TIREFIT. Do not exceed 55 mph (88 km/h) until the tire is
repaired or replaced. Failure to follow this warning can result in injuries that are
serious or fatal to you, your passengers, and others around you.
WHAT TO DO IN EMERGENCIES
77
Page 80 of 100

JUMP-STARTING
• If your vehicle has a discharged battery itcan be jump-started using a set of
jumper cables and a battery in another
vehicle or by using a portable battery
booster pack.
• Jump-starting can be dangerous if done improperly so please follow the proce-
dures in this section carefully.
NOTE:
When using a portable battery booster pack
follow the manufacturer’s operating instruc-
tions and precautions.
Preparations for Jump-Start
• The battery is stored under an access cover in the trunk. Remote battery posts are located on the left side of the engine compartment for jump-starting.
NOTE:
The remote battery posts are viewed by standing on the left side of the vehicle looking over
the fender.
• Set the parking brake, shift the transmission into gear and turn the ignition to OFF.
• Turn off the heater, radio, and all unnecessary electrical accessories.
• If using another vehicle to jump-start the battery, park the vehicle within the jumper cables reach, set the parking brake and make sure the ignition is OFF.
Jump-Starting Procedure
• Connect the positive (+) end of the jumper cable to the remote positive (+) post of the discharged vehicle.
• Connect the opposite end of the positive (+) jumper cable to the positive (+) post of the booster battery.
• Connect the negative end (-) of the jumper cable to the negative (-) post of the booster battery.
• Connect the opposite end of the negative (-) jumper cable to the remote negative (-) post of the vehicle with the discharged battery.
• Start the engine in the vehicle that has the booster battery, let the engine idle a few minutes, and then start the engine in the vehicle with the discharged battery.
Once the engine is started, remove the jumper cables in the reverse sequence:
• Disconnect the negative (-) jumper cable from the remote negative (-) post of the vehicle with the discharged battery.
• Disconnect the negative end (-) of the jumper cable from the negative (-) post of the booster battery.
WHAT TO DO IN EMERGENCIES
78