2013 DODGE GRAND CARAVAN key
[x] Cancel search: keyPage 63 of 132
• You will see a favorite star indicator in the upper right side of the screen below the “SAT”soft-key and a pop up will alert you that a favorite song or artist is currently playing on one
of the SiriusXM satellite radio channels.
NOTE:
Refer to your Uconnect® 730N or 430/430N
User's Manual for more information.
Display SAT Favorites List
• Touch the “Search/Browse” soft-key and select “Favorites” from the SAT Browse
screen.
• Touch the desired favorites soft-key to switch the SAT tuner to the corresponding
channel.
• You may use the “LIST” soft-key to toggle between:• Favorite Songs
• Favorite Artists
• Currently playing favorites
Replay
• While you are in SAT mode, you can replay 44 minutes of the current SiriusXM chan-
nel (when the channel is changed, this
audio buffer is erased). Press the REPLAY
button to listen to the stored audio.
• You can touch the on-screen controls to pause and rewind audio playback, touch
the SCAN button to preview each of the
tracks stored in the buffer, or select a
track from the list.
• The time displayed below the bar indi- cates how much time is present between
the current buffer play position and the
live broadcast.
Replay Option Option Description
Play/Pause Touch to pause content playback. Touch Pause/Play again to resume playback.
Rewind/RW Rewinds the channel content in steps of five seconds. Touch and hold to rewind continuously, then release to begin playing content at that point.
Fast Forward/FW Forwards the content, and works similarly to Rewind/RW. However, Fast Forward/FW can only be used when content has been previously rewound.
ELECTRONICS
61
Page 64 of 132
Replay Option Option Description
Replay Time Displays the amount of time in the upper center of the screen by which yourcontent lags the live channel.
Live Resumes playback of live content at any time while replaying rewound content.
SiriusXM Travel Link (Uconnect® 730N & Uconnect® 430N Only)
NOTE:
• SiriusXM Travel Link requires a subscription, sold separately after the 1 year trial sub-
scription included with your vehicle purchase.
• SiriusXM Travel Link is only available in the United States.
• SiriusXM Travel Link brings a wealth of useful information into your vehicle and right to your fingertips.
• To access Travel Link, press the MENU hard-key, then the Travel Link soft-key.
1 – Favorites View and store your favorite location, theater and sport teams for
quick access.
2 – Forecast View detailed weather conditions, forecasts and ski/snowboarding
conditions at resorts.
3 – Ski Info View ski and snowboarding conditions at ski resorts.
4 – Fuel Prices View detailed price information for fuel stations.
5 – Movies View information on movies that are playing at theaters.
6 – Sports View sports scores and upcoming events for all major sports.
ELECTRONICS
62
Page 65 of 132
STEERING WHEEL AUDIO CONTROLS
• The steering wheel audio controls are lo-cated on the rear surface of the steering
wheel.
Right Switch
• Press the switch up or down to increase or decrease the volume.
• Press the button in the center to change modes AM/FM/CD/SAT.
Left Switch
• Press the switch up or down to search for the next listenable station or select the
next or previous CD track.
• Press the button in the center to select the next preset station (radio) or to change CDs if equipped with a CD Changer.
iPod®/USB/MP3 CONTROL
•There are many ways to play music from
iPod®/MP3 players or USB devices through
your vehicle's sound system.
• The remote USB port, located within the upper glove box, allows you to plug an
iPod® into the vehicle's sound system.
NOTE:
If equipped with the Uconnect® 730N, the
USB port on the faceplate allows the same
functions as the remote USB port.
• Non-Touch-Screen Radios: To hear audio from devices connected to the USB port,
press the “AUX” button on the radio faceplate.
• Touch-Screen Radios: To hear audio from devices connected to the USB port, press the “MEDIA” hard-key, then touch the “AUX” or “iPod®” soft-key.
• When connected to this feature: • The iPod® can be controlled using theradio buttons to Play, Browse, and List
the iPod® or external devices contents.
•
The iPod® battery charges when plugged
into the USB port (if supported by the
specific audio device).
• Compatible iPod® devices may also be
controllable using voice commands.
Refer to the Owner's Manual on the DVD for details.
ELECTRONICS
63
Page 66 of 132
NOTE:
The USB port supports certain Mini, Classic, Nano, Touch, and iPhone® devices. The USB
port also supports playing music from compatible external USB Mass Storage Class
memory devices. For supported audio file formats, refer to the USB Port section in the
Owner's Manual on the DVD. Refer to www.UconnectPhone.com for a list of tested iPod®s.
Some iPod® software versions may not fully support the USB port features. Please visit
Apple’s website for iPod® software updates.
WARNING!
Do not plug in or remove the iPod® or external device while driving. Failure to follow this
warning could result in a collision.
Uconnect® Phone
• To determine if your vehicle is equipped with Uconnect® Phone, press the “Uconnect®Phone” button
located on the radio faceplate. If your vehicle has this feature, you
will hear a voice prompt. If not, you will see a message on the radio “Uconnect phone not
available”.
• The Uconnect® Phone is a voice-activated, hands-free, in-vehicle communications system with Voice Command Capability (see Voice Command section).
NOTE:
To access the tutorial, press the “Uconnect® Phone” button
. After the BEEP, say
“tutorial.” Press any hard-key/button or touch the display (Touch-Screen radio) to cancel
the “tutorial”.
• The Uconnect® Phone allows you to dial a phone number with your mobile phone using simple voice commands.
• Refer to your vehicle Owner's Manual on the DVD for further details.
NOTE:
The Uconnect® Phone requires a mobile phone equipped with the Bluetooth® Hands-Free
Profile, Version 1.0 or higher. For Uconnect® Customer Support: U.S. residents - visit
www.UconnectPhone.com or call 1–877–855–8400. Canadian Residents - call, 1-800-465–
2001 (English) or 1-800-387-9983 (French). This site will provide specific instructions based
on the type of mobile phone being paired.
Phone Pairing
NOTE:
• Pairing is a one - time initial setup before using the phone.
• Prior to starting the pairing procedure ensure all additional phones within the vehicle have their Bluetooth® disabled.
• Press the “Phone”
button to begin.
ELECTRONICS
64
Page 70 of 132
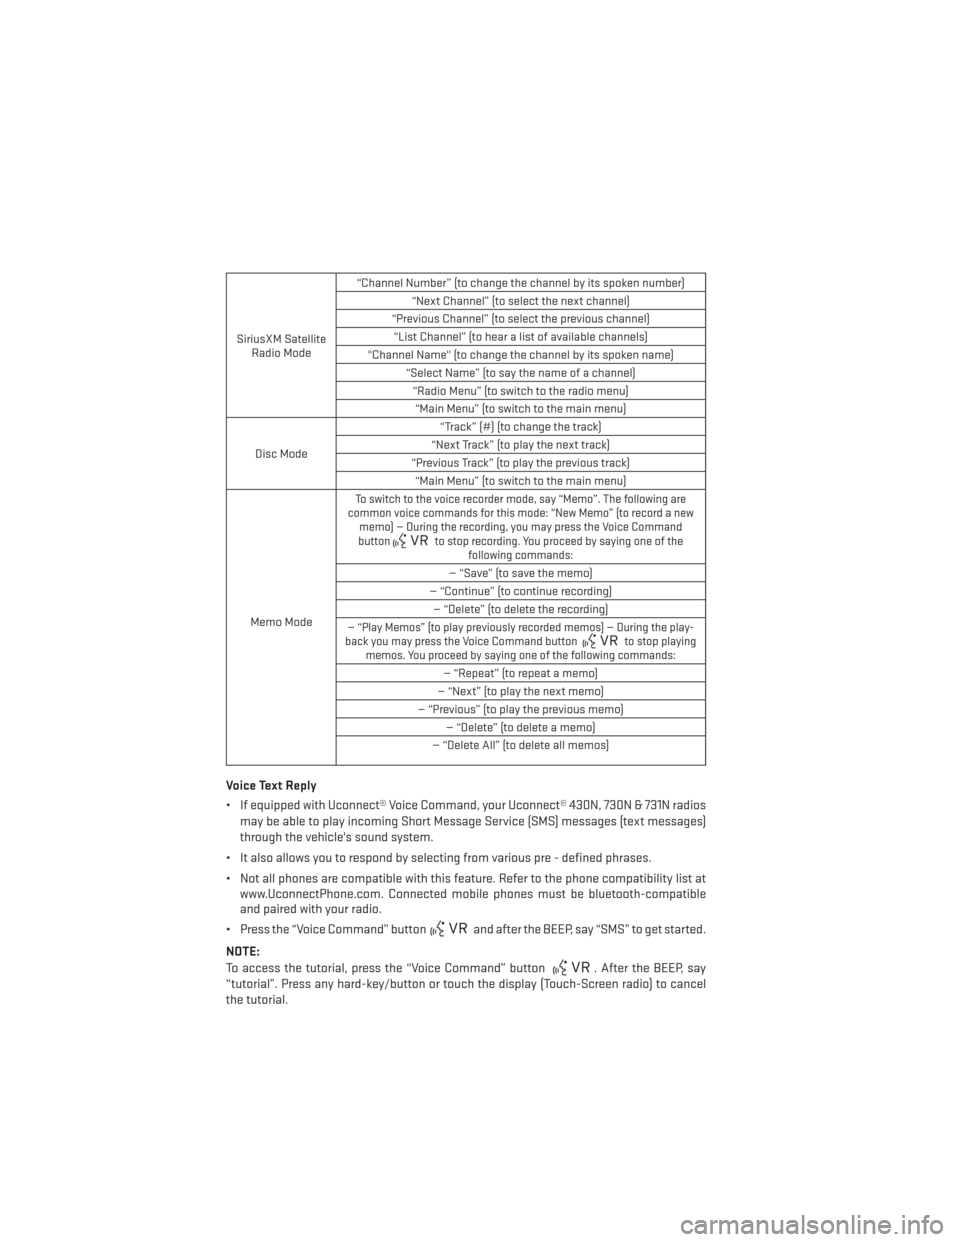
SiriusXM SatelliteRadio Mode “Channel Number” (to change the channel by its spoken number)
“Next Channel” (to select the next channel)
“Previous Channel” (to select the previous channel) “List Channel” (to hear a list of available channels)
"Channel Name" (to change the channel by its spoken name) “Select Name” (to say the name of a channel)“Radio Menu” (to switch to the radio menu)“Main Menu” (to switch to the main menu)
Disc Mode “Track” (#) (to change the track)
“Next Track” (to play the next track)
“Previous Track” (to play the previous track) “Main Menu” (to switch to the main menu)
Memo Mode
To switch to the voice recorder mode, say “Memo”. The following are
common voice commands for this mode: “New Memo” (to record a new memo) — During the recording, you may press the Voice Command
button
to stop recording. You proceed by saying one of the following commands:
— “Save” (to save the memo)
— “Continue” (to continue recording) — “Delete” (to delete the recording)
— “Play Memos” (to play previously recorded memos) — During the play-
back you may press the Voice Command buttonto stop playing
memos. You proceed by saying one of the following commands:
— “Repeat” (to repeat a memo)
— “Next” (to play the next memo)
— “Previous” (to play the previous memo) — “Delete” (to delete a memo)
— “Delete All” (to delete all memos)
Voice Text Reply
• If equipped with Uconnect® Voice Command, your Uconnect® 430N, 730N & 731N radios may be able to play incoming Short Message Service (SMS) messages (text messages)
through the vehicle's sound system.
• It also allows you to respond by selecting from various pre - defined phrases.
• Not all phones are compatible with this feature. Refer to the phone compatibility list at www.UconnectPhone.com. Connected mobile phones must be bluetooth-compatible
and paired with your radio.
• Press the “Voice Command” button
and after the BEEP, say “SMS” to get started.
NOTE:
To access the tutorial, press the “Voice Command” button
. After the BEEP, say
“tutorial”. Press any hard-key/button or touch the display (Touch-Screen radio) to cancel
the tutorial.
ELECTRONICS
68
Page 71 of 132
WARNING!
Any voice commanded system should be used only in safe driving conditions following
applicable laws regarding phone use. Your attention should be focused on safely oper-
ating the vehicle. Failure to do so may result in a collision causing you and others to be
severely injured or killed.
Bluetooth® STREAMING AUDIO
• If equipped with Uconnect® Voice Com-mand, your Bluetooth-equipped iPod®
devices, cell phones or other media play-
ers, may also be able to stream music to
your vehicles speakers. Your connected
device must be Bluetooth-compatible,
and paired with your radio (see Uconnect®
Phone for pairing instructions).
•
Non-Touch-Screen Radios: Press the “AUX”
button on the radio faceplate until "BT" or “Audio Streaming” is displayed on the radio
screen.
• Touch-Screen-Radios: Press the “RADIO/MEDIA” or “MEDIA” hard-key and then touch the “AUX” soft-key tab.
VIDEO ENTERTAINMENT SYSTEM (VES™)
System Operation
•
The screen is located in the overhead com-
partment console. To lower the screen,
press the release button located in the
center of the console rear of the screen.
• The system may be controlled by the front seat occupants using either the radio or
DVD player controls, or by the rear seat
occupants using the remote control.
• The video screen displays information in a split screen format. The left side of the
screen is referred to as Channel 1 and the right side of the screen is referred to as Channel
2. All modes except video modes are displayed in a split screen format.
• To use the headphones, press the power button located on the right ear cup. Select the channel on the headphones (1 or 2) which corresponds to the channel selected on the
desired video screen.
• To receive VES™ audio through the vehicle's sound system, press the VES™ soft-key on the radio's touch-screen.
ELECTRONICS
69
Page 72 of 132
Operation Of The Touch-Screen Radio/DVD Player/Blu-Ray Player
• To view a DVD press the OPEN/CLOSE or LOAD hard-key on the touch-screen radio andinsert the disc or insert the disc into the optional DVD player. Playback will begin
automatically after the DVD is recognized by the disc drive. If playback does not begin
automatically when the disc is inserted into the DVD player press the PLAY button. If
playback does not begin automatically after the disc is inserted into the touch-screen
radio follow these steps:• Press the MENU hard-key, then touch the Rear VES™ soft-key. If a chapter list appears
on the right side of the screen, touch the HIDE LIST soft-key to display the Rear VES™
control screen.
• Touch the 1 soft key to select an audio channel, then touch the DISC soft-key in the MEDIA column.
Operation Of The Remote Control
• The remote control operates similarly to any DVD remote you may have used before and allows the rear seat passengers to change stations, tracks, discs and audio/video
modes.
• The remote control is designed to control either channel by using the selector switch located on the right side of the remote.
• Connect the video game or other external media devices to the AUX jacks following the color coding for the VES™ jacks.
• Pressing the power button will turn the VES™ system ON/OFF.
• Pressing the mode button causes the MODE SELECTION menu to appear on the VES™ screen. Use the remote control arrow buttons to scroll through the available modes, and
then press ENTER to select the desired mode.
Auxiliary Audio/Video Input Jacks
• The AUX jacks are located on the drivers side rear trim panel behind the sliding door.
• Connect the video game or other external media devices to the AUX jacks following the color coding for the VES™ jacks.
• Using either the touch-screen radio or remote control, select AUX from the REAR VES™ CONTROL or the MODE SELECTION screen.
• Refer to the Uconnect® Multimedia – Video Entertainment System (VES™) section in the vehicle Owner's Manual on the DVD for further details.
ELECTRONICS
70
Page 74 of 132

PROGRAMMABLE FEATURES
Electronic Vehicle Information Center (EVIC) – If Equipped
• The EVIC can be used to program the following Personal Settings. Press and releasethe MENU button until Personal Settings displays, then press the DOWN button
to
scroll through the settings. Press the SELECT button
to change the setting.
• Language • Intermittent Wiper Option
• Nav-Turn By Turn • Rain Sensing Wipers
•
Enable/Disable the Rear Park Assist System• Key-Off Power Delay
• Auto Unlock Doors • Illuminated Approach
• Remote Unlock Sequence • Flashers with Sliding Door
• RKE Linked To Memory • Hill Start Assist (HSA)
• Remote Start Comfort Sys. • Keyless Enter-N-Go™ (Passive Entry)
• Horn With Remote Lock • Easy Exit Seat
• Horn With Remote Start • Tilt Mirror In Reverse
• Flash Lamps With Lock • Blind Spot Alert
• Automatic High Beams • Calibrate Compass
• Headlamp Off Delay • Compass Variance
• Headlamps with Wipers (Available with Auto Headlights Only) • Turn Menu Off
Key Fob Programmable Features
• The following features may also be programmed by using the Key Fob transmitter or the
ignition switch and driver's door lock switch.
NOTE:
Pressing the LOCK button while you are inside the vehicle will activate the Vehicle Security
Alarm. Opening a door with the Vehicle Security Alarm activated will cause the alarm to
sound. Press the UNLOCK button to deactivate the Vehicle Security Alarm.
Unlock On First Press
• To unlock either the driver's side, or all doors, on the first press of the UNLOCK button: •
Press and hold the LOCK button for at least four seconds, but no longer than 10 seconds.
Then, press and hold the UNLOCK button while still holding the LOCK button.
• Release both buttons at the same time.
Auto Unlock Doors On Exit
• To have all of the vehicle doors unlock when any door is opened:• Enter your vehicle and close all the doors, and fasten your seat belt.
• Cycle the ignition switch between the LOCK and ON position four times, ending in the
LOCK position (do not start the engine).
• Press the power door UNLOCK switch to unlock the doors. A single chime will indicate that programming is complete.
ELECTRONICS
72