2013 DODGE CHARGER clock
[x] Cancel search: clockPage 43 of 132

Uconnect® 4.3 & 4.3S AT A GLANCE
Displaying the Time
• If the time is not currently displayed at the top of the screen when in Radio mode, pressthe Settings button, then touch clock. Select Show Time, then touch On.
Setting the Time
• Press the Settings hard-key, then touch the Clock soft-key.
• Touch the Time soft-key.
• Touch the up or down soft-keys to adjust the hours, minutes or AM/PM.
NOTE:
12hr format and 24hr format can also be set.
• Once the time is set press the "Done" soft-key to exit the time screen.
Audio Settings
• Press the SETTINGS hard-key on the right side of the unit.
• Then scroll down and press the Audio soft-key to get to the Audio menu.
• The Audio Menu shows the following options for you to customize your audio settings. • Equalizer
• Balance/Fade
• Speed Adjust Volume
• Touch the Exit soft-key to exit from the Audio Menu.
ELECTRONICS
41
Page 44 of 132

Equalizer
• Touch the Equalizer soft-key to adjust the Bass, Mid and Treble. Use the + or - soft-key toadjust the equalizer to your desired settings. Press the Done soft-key when done.
Balance/Fade
• Touch the Balance/Fade soft-key to adjust the sound from the speakers. Use the arrow soft-key to adjust the sound level from the front and rear or right and left side speakers.
Touch the center "C" soft-key to reset the balance and fade to the factory setting. Press
the Done soft-key when done.
Speed Adjust Volume
• Touch the Speed Adjust Volume soft-key to select between OFF, 1, 2 or 3. This will decrease the radio volume relative to a decrease in vehicle speed. Press the Done
soft-key when done.
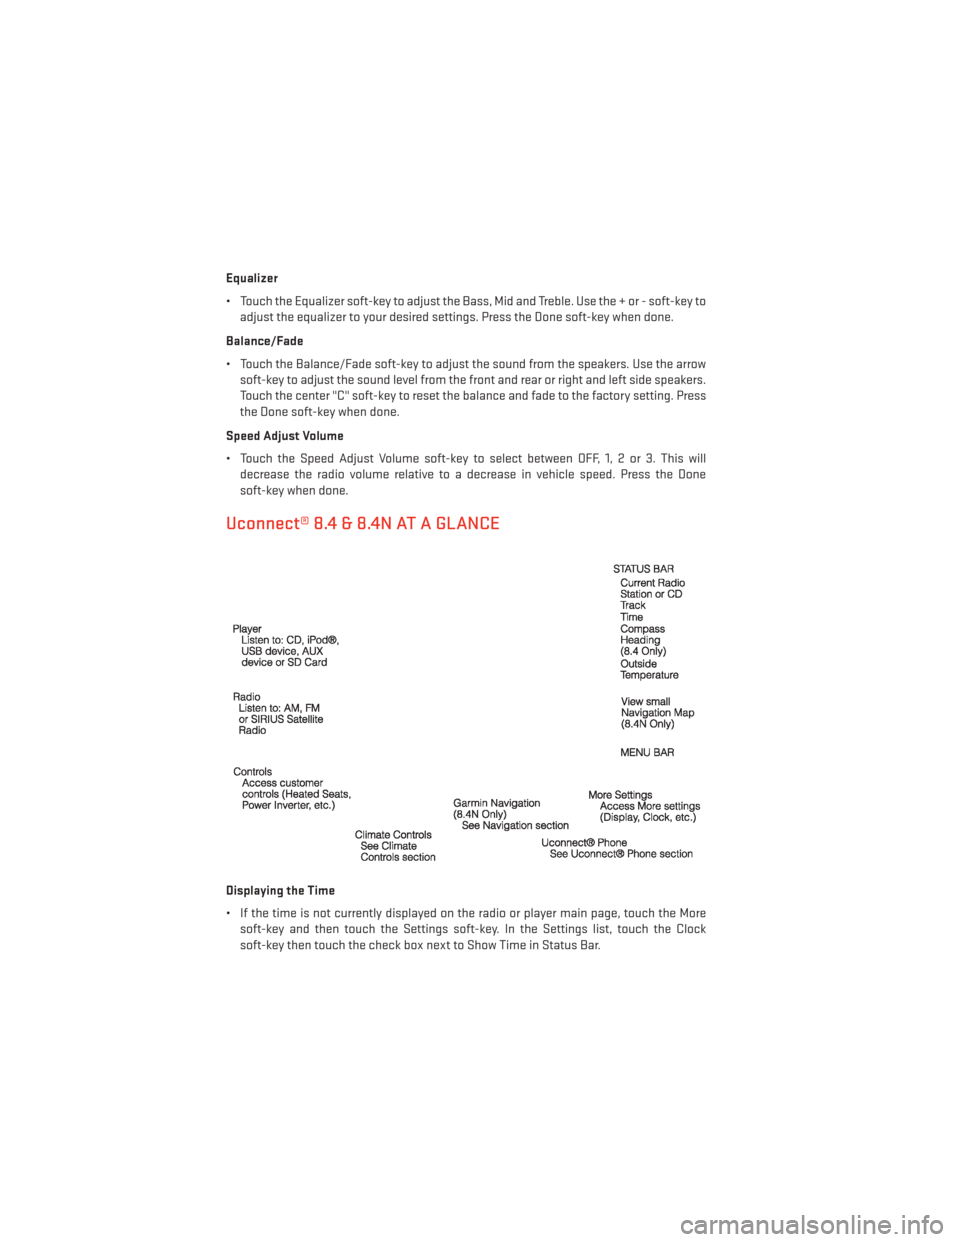
Uconnect® 8.4 & 8.4N AT A GLANCE
Displaying the Time
• If the time is not currently displayed on the radio or player main page, touch the Moresoft-key and then touch the Settings soft-key. In the Settings list, touch the Clock
soft-key then touch the check box next to Show Time in Status Bar.
ELECTRONICS
42
Page 45 of 132

Setting the Time
• Model 8.4N synchronizes time automatically via GPS, so should not require any timeadjustment. If you do need to set the time manually, follow the instructions below for
Model 8.4.
• For Model 8.4, turn the unit on, then touch the time display at the top of the screen. Touch Yes.
• If the time is not displayed at the top of the screen, touch More soft-key and then Settings soft-key. In the Settings screen, touch the Clock soft-key, then check or uncheck this
option.
• Touch + or – next to Set Time Hours and Set Time Minutes to adjust the time.
• If these features are not available, uncheck the Sync with GPS box.
• Touch X to save your settings and exit out of the Clock Setting screen.
Audio Settings
• Touch the Audio soft-key to activate the Audio settings screen to adjust Balance\Fade, Equalizer, and Speed Adjusted Volume.
• You can return to the Radio screen by touching the X located at the top right.
Balance/Fade
• Touch the Balance/Fade soft-key to Balance audio between the front speakers or fade the audio between the rear and front speakers.
• Touching the Front, Rear, Left, or Right soft-keys or touch and drag the red Speaker Icon to adjust the Balance/Fade.
Equalizer
• Touch the Equalizer soft-key to activate the Equalizer screen.
• Touch the + or - soft-keys, or by touching and dragging over the level bar for each of the equalizer bands. The level value, which spans between ±9, is displayed at the bottom of
each of the Bands.
Speed Adjusted Volume
• Touch the Speed Adjusted Volume soft-key to activate the Speed Adjusted Volume screen. The Speed Adjusted Volume is adjusted by touching the + and - buttons or by
touching and dragging over the level bar. This alters the automatic adjustment of the
audio volume with variation to vehicle speed.
ELECTRONICS
43
Page 67 of 132

Uconnect® 4.3 Customer Programmable Features
•
The Uconnect® 4.3 system allows you to access Customer Programmable feature settings
such as Display, Clock, Safety/Assistance, Lights, Doors & Locks, Heated Seats, Engine
Off Operation, Compass Settings, Audio, Phone/Bluetooth and SiriusXM Setup through
hard-keys and soft-keys.
• Press the Settings hard-key to on the right side of the unit to access the Settings screen, use the Page Up/Down soft-keys to scroll through the following settings. The following
feature settings are available:
• Display • Clock
• Safety / Assistance • Doors & Locks
• Heated Seats • Engine Off Options
• Compass Settings • Audio
• Phone / Bluetooth • SiriusXM Setup
• Auto-On Comfort & Remote Start • Lights
Uconnect® 8.4 Customer Programmable Features
• The Uconnect® 8.4 system allows you to access Customer Programmable feature set- tings such as Display, Clock, Safety/Assistance, Lights, Doors & Locks, Heated Seats,
Engine Off Operation, Compass Settings, Audio, Phone/Bluetooth and SiriusXM Setup
through soft-keys.
• Touch the More soft-key on the bottom of the screen, then touch the Settings soft-key to access the Settings screen. When making a selection, scroll up or down until the
preferred setting is highlighted, then press and release the preferred setting until a
check-mark appears next to the setting, showing that setting has been selected. The
following feature settings are available:
• Display • Clock
• Safety / Assistance • Doors & Locks
• Auto-On Comfort & Remote Start • Engine Off Options
• Compass Settings • Audio
• Phone / Bluetooth • SiriusXM Setup
ELECTRONICS
65
Page 85 of 132

Jacking And Changing A Tire
1.
Remove the spare tire, jack, and lug wrench.
2. If equipped with aluminum wheels wherethe center cap covers the lug nuts, use
the lug wrench to pry the center cap off
carefully before raising the vehicle.
3. Before raising the vehicle, use the lug wrench to loosen, but not remove, the lug
nuts on the wheel with the flat tire. Turn
the lug nuts counterclockwise one turn
while the wheel is still on the ground.
4. Place the jack underneath the lift area that is closest to the flat tire. Turn the jack screw clockwise to firmly engage the jack
saddle with the lift area of the sill flange.
NOTE:
If the vehicle is too low for jack placement, slide the jack on its side and rotate it up into
position.
5. Raise the vehicle just enough to remove the flat tire and install the spare tire.
6. Remove the lug nuts and tire.
WHAT TO DO IN EMERGENCIES
83
Page 86 of 132

7. Mount the spare tire.
NOTE:• For vehicles so equipped, do not at-tempt to install a center cap or wheel
cover on the compact spare.
• Refer to “Compact Spare Tire” and to “Limited-Use Spare” under “Tires—
General Information” in “Starting and
Operating” in the Owner's Manual on
the DVD for additional warnings, cau-
tions, and information about the spare
tire, its use, and operation.
8. Install the lug nuts with the cone shaped end of the lug nut toward the wheel. Lightly tighten the lug nuts.
9. Lower the vehicle to the ground by turning the jack handle counterclockwise.
10. Finish tightening the lug nuts. Push down on the wrench while at the end of the handle for increased leverage. Tighten the lug nuts in a star pattern until each nut has been
tightened twice. The correct tightness of each lug nut is 110 ft-lb. (150 N·m). If in doubt
about the correct tightness, have them checked with a torque wrench by your autho-
rized dealer or at a service station.
11. Stow the jack, tools and flat tire. Make sure the base of the jack faces the front of the vehicle before tightening down the fastener.
Road Tire Installation
1. Mount the road tire on the axle.
2. Install the remaining lug nuts with the cone shaped end of the nut toward the wheel. Lightly tighten the lug nuts.
3. Lower the vehicle to the ground by turning the jack handle counterclockwise.
4. Finish tightening the lug nuts. Push down on the wrench while at the end of the handle for increased leverage. Tighten the lug nuts in a star pattern until each nut has been
tightened twice. The correct tightness of each lug nut is 110 ft-lbs (150 N·m). If in doubt
about the correct tightness, have them checked with a torque wrench by your authorized
dealer or service station.
5. After 25 miles (40 km) check the lug nut torque with a torque wrench to ensure that all lug nuts are properly seated against the wheel.
CAUTION!
Do not attempt to raise the vehicle by jacking on locations other than those indicated in
the Jacking Instructions for this vehicle.
WHAT TO DO IN EMERGENCIES
84
Page 118 of 132

Cavity Cartridge Fuse Mini-FuseDescription
21 30 Amp Pink Headlamp Washers
28 25 Amp Neutral Fuel Pump
29 15 Amp Blue Transmission Shifter
31 25 Amp Neutral Engine Module
34 25 Amp Neutral Powertrain #1
35 20 Amp Yellow Powertrain #2
36 10 Amp RedAnti-Lock Brake Module
37 10 Amp RedEngine Controller/Rad Fan Relays
38 10 Amp RedAirbag Module
39 10 Amp RedPower Steering Module/AC Clutch
Relay
48 10 Amp RedAWD Module/Front Axle
Disconnect
51 20 Amp Yellow Vacuum Pump
Rear Power Distribution Center
• There is also a power distribution center located in the trunk under the spare tire access
panel. This center contains fuses and relays.
Cavity Cartridge Fuse Mini-Fuse Description
2 60 Amp Yellow Front PDC Feed #1
4 60 Amp Yellow Front PDC Feed #2
5 30 Amp Pink Sunroof
6 40 Amp Green Exterior Lighting #1
7 40 Amp Green Exterior Lighting #2
8 30 Amp Pink Interior Lighting/Washer Pump
9 30 Amp Pink Power Locks
10 30 Amp Pink Driver Door
11 30 Amp Pink Passenger Door
12 20 Amp Yellow Cigar Lighters, Instrument Panel &
Power Outlet Console Rear
15 40 Amp Green HVAC Blower
23 10 Amp RedFuel Door/Diagnostic Port
24 15 Amp Blue Radio Screen
25 10 Amp RedTire Pressure Monitor
27 25 Amp Neutral Amplifier
31 25 Amp Neutral Power Seats
32 15 Amp Blue HVAC Module/Cluster
33 15 Amp Blue Ignition Switch/Wireless Module
34 10 Amp RedSteering Column Module/Clock
MAINTAINING YOUR VEHICLE
116
Page 129 of 132

FREQUENTLY ASKED QUESTIONS
GETTING STARTED
• How do I install my LATCH Equipped Child Seat? pg. 15
• How do I program my Front Seat Memory? pg. 17
ELECTRONICS
• How do I know which radio I have?• Uconnect® 4.3, 4.3S pg. 41
• Uconnect® 8.4, 8.4N pg. 42
• How do I select the AUX music source? pg. 48
• How do I set the clock on my radio?
• Uconnect® 4.3, 4.3S pg. 41
• Uconnect® 8.4, 8.4N pg. 42
• How do I use the Navigation feature? pg. 50
• How do I pair my cell phone via Bluetooth® with the Uconnect® Hands-Free Voice Activation System? pg. 56
• How do I hear the audio from my iPod® through the USB port using the radio?
• Uconnect® 4.3, 4.3S pg. 48
• Uconnect® 8.4, 8.4N pg. 48
• How do I configure my Universal Garage Door Opener (HomeLink)? pg. 66
UTILITY
• How do I know how much I can tow with my Dodge Charger? pg. 70
WHAT TO DO IN EMERGENCIES
• What do I do if my TPMS warning light is blinking? pg. 76
• How do I change a flat tire? pg. 81
• How do I Jump-Start my vehicle? pg. 92
MAINTAINING YOUR VEHICLE
• Where is my Fuse Block located? pg. 115
• What type of oil do I use? pg. 105
• How often should I change my engine’s oil? pg. 108
• What should my tire pressure be set at? pg. 119
FAQ (How To?)
127