Page 168 of 260
9.6
02
For a detailed global view of the menus available, refer to the
"Screen menu map" section.
For cleaning the screen, the use of a soft, non-abrasive cloth (spectacles cloth) is recommended, with no additional product. "RADIO
"
"
TELEPHONE"
(If conversation in progress)
SETUP
: PARAMETERS
date and time, display con
fi guration, sound.
Changing the audio source:
RADIO:
RADIO broadcasts.
MUSIC: playing MUSIC. Pr
ess the MODE button several times in succession for access to the following displays:
GENERAL OPERATION
"FULL SCREEN MAP"
"MAP IN WINDOW"
(If navigation guidance in progress)
Page 169 of 260
9.7
02
A press on the dial gives access to short-cut menus according to thedisplay in the screen.
GENERAL OPERATION
DISPLAY ACCORDING TO CONTEXT
RADIO:
Activate / Deactivate TA
Activate / Deactivate RDS
MUSIC MEDIA PLAYERS,
CD or USB
(according to
media):
Play modes:
Normal
Random
Random on all media
Repetition
TELEPHONE (call in
pro
gress):
Private mode
FULL SCREEN MAP OR
IN A NEW WINDOW:
Stop / Restore guidance Select destination
Enter an address
Directory
GPS coordinates
Divert route
Move the map
Info. on location
Select as destination
Select as sta
ge
Save this place (contacts)
Quit map mode
Guidance criteria
Put call on hold
DTMF ring tones
Hang up
1
1
1
1
1
1
1
1
2
2
2
2
2
1
2
2
2
1
1
1
1
1
1
Change waveband
F
M
AM
2
2
1
TA 1
Page 219 of 260

9.57
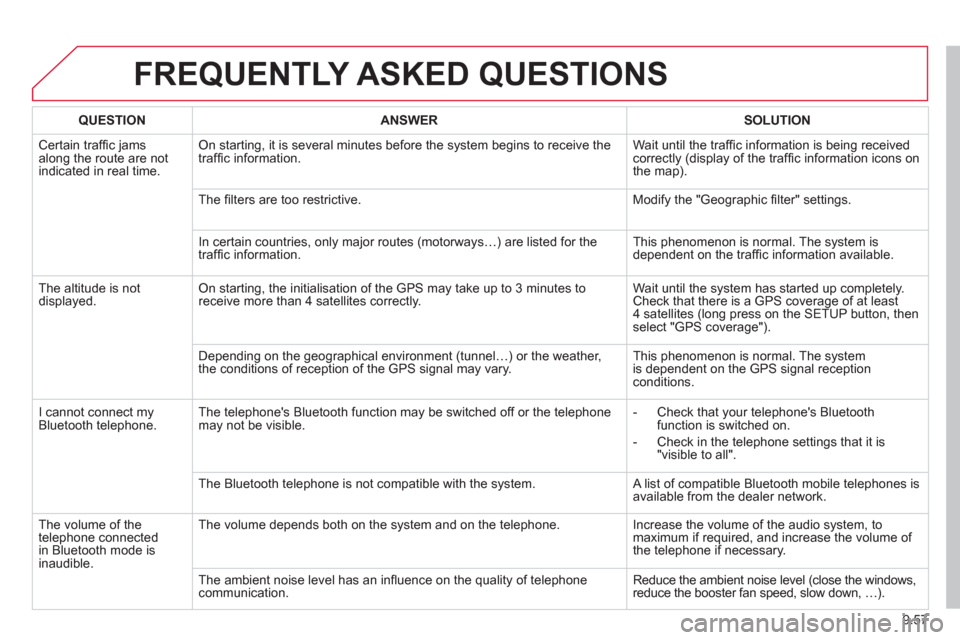
FREQUENTLY ASKED QUESTIONS
QUESTIONANSWER SOLUTION
Certain traffi c jams
along the route are notindicated in real time.
On starting, it is several minutes before the system begins to receive the
traffi c information. Wait until the traffi c information is being received correctly (display of the traffi c information icons on
the map).
Th
e fi lters are too restrictive. Modify the "Geographic fi lter" settings.
In certain countries, onl
y major routes (motorwaysÖ) are listed for the
traffi c information. This phenomenon is normal. The system is
dependent on the traffi c information available.
Th
e altitude is not
displayed. On starting, the initialisation of the GPS may take up to 3 minutes toreceive more than 4 satellites correctly. Wait until the system has started up completely.
Check that there is a GPS coverage of at least
4 satellites (long press on the SETUP button, then select "GPS coverage").
Dependin
g on the geographical environment (tunnel…) or the weather,
the conditions of reception of the GPS signal may vary. This phenomenon is normal. The system
is dependent on the GPS signal receptionconditions.
I cannot connect m
yBluetooth telephone.The telephone's Bluetooth function may be switched off or the telephone
may not be visible.
- Check that your telephone's Bluetoothfunction is switched on.
- Check in the telephone settin
gs that it is "visible to all".
The Bluetooth telephone is not compatible with the system. A list of compatible Bluetooth mobile telephones is available from the dealer network.
Th
e volume of thetelephone connected
in Bluetooth mode isinaudible. The volume depends both on the s
ystem and on the telephone. Increase the volume of the audio system, tomaximum if required, and increase the volume of
the telephone if necessary.
The ambient noise level has an in
fl uence on the quality of telephone communication. Reduce the ambient noise level (close the windows,reduce the booster fan speed, slow down, Ö).
Page 235 of 260

9.73
06BLUETOOTH FUNCTIONS
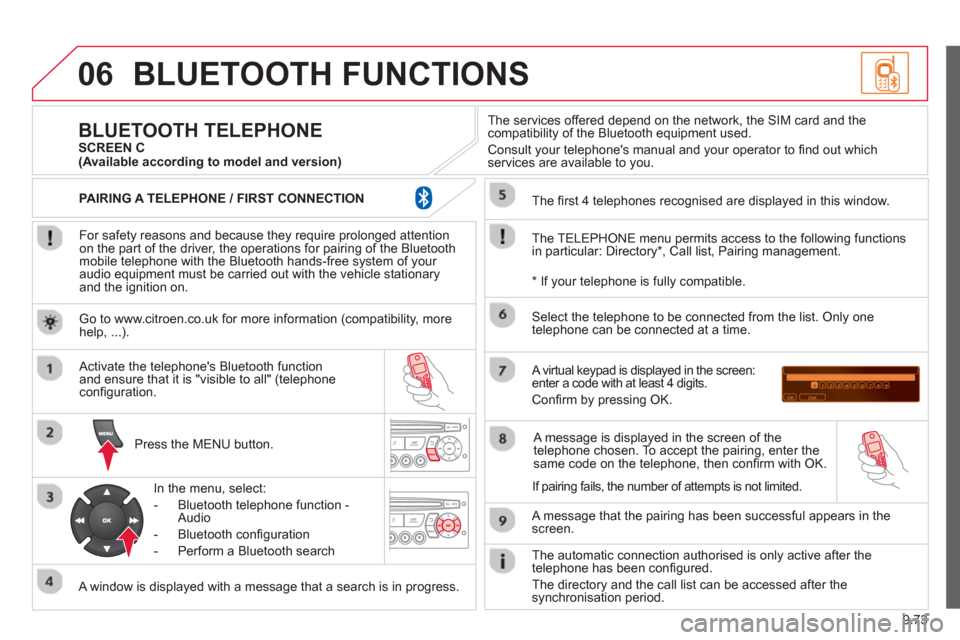
For safety reasons and because they require prolonged attentionon the part of the driver, the operations for pairing of the Bluetooth mobile telephone with the Bluetooth hands-free system of your
audio equipment must be carried out with the vehicle stationary
and the ignition on.
Pr
ess the MENU button.
A window is displayed with a message that a search is in progress.
Activate the telephone's Bluetooth
function
and ensure that it is "visible to all" (telephone confi guration.
In the menu, select:
- Bluetooth telephone
function -
Audio
- Bluetooth confi
guration
- P
erform a Bluetooth search
The services o
ffered depend on the network, the SIM card and thecompatibility of the Bluetooth equipment used.
Consult your telephone's manual and your operator to fi nd out which
services are available to you.
BLUETOOTH TELEPHONE SCREEN C
The TELEPH
ONE menu permits access to the following functions
in particular: Directory * , Call list, Pairing management.
The
fi rst 4 telephones recognised are displayed in this window.
A virtual ke
ypad is displayed in the screen: enter a code with at least 4 digits.
Confi rm by pressing OK.
A messa
ge that the pairing has been successful appears in thescreen.
Select the telephone to be connected from the list.
Only one
telephone can be connected at a time.
A messa
ge is displayed in the screen of the
telephone chosen. To accept the pairing, enter the same code on the telephone, then confi rm with OK.
The automatic connection authorised is onl
y active after the
telephone has been confi gured.
The directory and the call list can be accessed a
fter thesynchronisation period.
(Available according to model and version)
*
If your telephone is fully compatible.
I
f pairing fails, the number of attempts is not limited. Go to www.citroen.co.uk for more information
(compatibility, more help, ...).
PAIRING A TELEPHONE / FIR
ST CONNECTION
Page 248 of 260
162
Instruments and controls
Headlamp beam height adjustment 48
Starter, ignition switch 45
Wiper controls 49-50
Automatic wiping 49
Windscreen / headlamp wash 49
Trip computer Section 9
Cruise control 51-53
Fixed speed limiter 53
Speed limiter 54-56
Steering mounted controls:
- eMyWay Section 9
- Audio system Section 9
Lighting controls 46-47
Automatic illumination of headlamps 48
Foglamps 47
Daytime running lamps 47
Opening the bonnet 120
Parking brake 94
Electric windows,
electric mirrors 91-93
Instrument panels, screens,
speedometers 28-29
Warning lamps, indicator lamps 30-35
Indicators, gauge 36-39
Setting the time
in the instrument panel 29
Dashboard lighting dimmer 39
Gear shift indicator 41
Mat 85
Steering wheel adjustment 45
Horn 96
Page 250 of 260
164
Interior
Seating area fittings 85-87
- stowing rings,
- load space cover,
- coat hook and net fixing,
- bench net,
- grab handle,
- cup holder,
- 12 volt socket,
- storage compartment.
Temporary puncture repair kit 133
Spare wheel, jack,
changing a wheel, tools 135-139
Rear suspension 88-90
Front, side, curtain airbags 103-106
Passenger's airbag deactivation 106
Parking brake, handbrake 94
Opening the bonnet 120
Battery, charging, starting 131
Passenger compartment fuses 148
Front seats, adjustments,
head restraint 69-70
2-seat front bench 71-72
Seat belts 100-101
Rear ventilation 65
Child seats 107-116
ISOFIXmountings 111-113
Rear side windows 92
INTERIOR
Rear seats, rear benches 73-79
Configuration of seats and
benches 80
Rear courtesy lamp 84
Changing courtesy lamp bulbs 143
Accessories 119
Rear view mirror 92
Toll cards, car park tickets 85
Front courtesy lamp 84
Changing courtesy lamp bulbs 143
Page:
< prev 1-8 9-16 17-24