Page 32 of 260

Instruments and controls
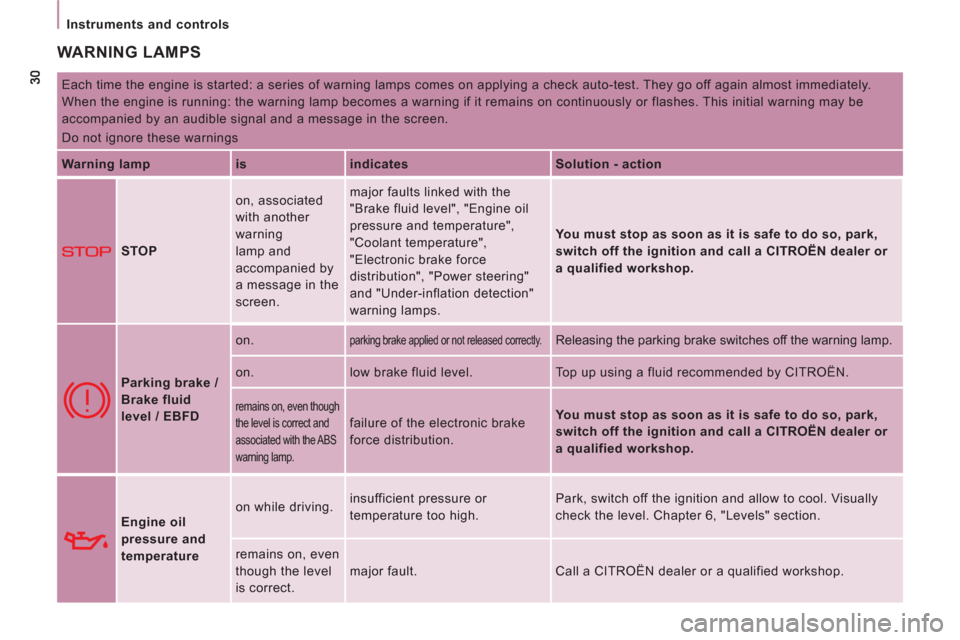
WARNING LAMPS
Each time the engine is started: a series of warning lamps comes on applying a check auto-test. They go off again almost immediately.
When the engine is running: the warning lamp becomes a warning if it remains on continuously or flashes. This initial warning may be
accompanied by an audible signal and a message in the screen.
Do not ignore these warnings
Warning lamp
is
indicates
Solution - action
STOP on, associated
with another
warning
lamp and
accompanied by
a message in the
screen. major faults linked with the
"Brake fluid level", "Engine oil
pressure and temperature",
"Coolant temperature",
"Electronic brake force
distribution", "Power steering"
and "Under-inflation detection"
warning lamps.
You must stop as soon as it is safe to do so, park,
switch off the ignition and call a CITROËN dealer or
a qualified workshop.
Parking brake /
Brake fluid
level / EBFD on.
parking brake applied or not released correctly.
Releasing the parking brake switches off the warning lamp.
on. low brake fluid level. Top up using a fluid recommended by CITROËN.
remains on, even though
the level is correct and
associated with the ABS
warning lamp.
failure of the electronic brake
force distribution.
You must stop as soon as it is safe to do so, park,
switch off the ignition and call a CITROËN dealer or
a qualified workshop.
Engine oil
pressure and
temperature on while driving. insufficient pressure or
temperature too high. Park, switch off the ignition and allow to cool. Visually
check the level. Chapter 6, "Levels" section.
remains on, even
though the level
is correct. major fault. Call a CITROËN dealer or a qualified workshop.
Page 123 of 260
121
Under the bonnet
CHECK
S
6
DIESEL ENGINES
8 -
Power steering reservoir.
9 -
Removable towing eye.
10 -
Priming pump ( a
: 1.6 litre HDi;
b
: 2 litre HDi).
11 -
Engine oil filling funnel
(2 litre HDi).
1 -
Screen/headlamp wash
reservoir.
2 -
Fusebox.
3 -
Coolant header tank.
4 -
Brake and clutch fluid
reservoir.
5 -
Air filter.
6 -
Engine oil dipstick.
7 -
Engine oil filler cap.
7.1 -
Engine oil filler cap.
If your vehicle is fitted with this oil filler tube,
proceed as follows:
A -
Remove the oil filler cap.
B -
Remove the filler tube from its location.
C -
Place the filler tube in the filler opening
as shown on the illustration.
D -
Turn it a 1/4 of a turn to the left to lock it
then top up the oil.
To refit, proceed in the reverse order without
forgetting to retighten the cap A
correctly.
Page 124 of 260
122
Under the bonnet
PETROL ENGINE
4.
Brake and clutch fluid reservoir.
5.
Air filter.
6.
Engine oil dipstick.
1.
Screen/headlamp wash reservoir.
2.
Fusebox.
3.
Coolant header tank.
7.
Engine oil filler cap.
8.
Power steering reservoir.
9.
Removable towing eye.
Page 251 of 260
165
Technical data - Maintenance
VISUAL SEARCH
10
TECHNICAL DATA - MAINTENANCE
Identification markings, serial number,
paint code, tyres 160
Snow chains 140
Engine fuses 149
Windscreen / headlamp wash, levels 1 2 4
Bulbs, lighting, changing bulbs 141-145
Checks 125-126
- battery,
- gearbox,
-
carbon fi lter, passenger compartment fi lter,
- oil filter,
- particle emission filter,
- parking brake,
- brake pads,
- brake drums, discs.
Emissions controls (EOBD) 37
Water bleeding, Diesel filter 126
Under the bonnet
- Diesel 121
- petrol 122
Fuel cut-off, Diesel priming 129-130
Dimensions 154-157
Weights 158
Opening the bonnet, stay 120
Levels 123-124
- Diesel additive,
- dipstick,
- power steering fluid,
- brake fluid,
- coolant,
- screen and headlamp wash fluid.
Towing, lifting 151-152
Towed loads 158
Warning lamps 30-35
Changing a wiper blade 150