Page 101 of 340

5
VISIBILITY
99
Model without AUTO lighting
Model with AUTO lighting
A.
Main lighting mode selection ring:
turn it to position the symbol re-
quired facing the mark.
Manual controls
The lighting is controlled directly by the
driver by means of the ring A
and the
stalk B
.
Lighting off / daytime running lamps.
Automatic illumination of head-
lamps.
B.
Stalk for switching headlamps: pull
the stalk towards you to switch the
lighting between dipped and main
beam headlamps.
In the lamps off and sidelamps modes,
the driver can switch on the main beam
headlamps temporarily ("headlamp
fl ash") by maintaining a pull on the stalk. Sidelamps.
Dipped headlamps or main
beam headlamps.
Displays
Illumination of the corresponding indica-
tor lamp in the instrument panel confi rms
that the lighting selected is on.
Daytime running lamps
Daytime lighting, compulsory in certain
countries, which comes on automati-
cally when the engine is started making
the vehicle more visible to other users.
This function is assured:
- in countries where it is imposed by
regulations,
by illumination of the dipped beam
headlamps with the sidelamps and
number plate lamps; this function
cannot be deactivated.
- for other countries where it is pro-
vided,
by the use of dedicated lamps; this
function can be activated or deac-
tivated via the vehicle confi guration
menu.
The instruments and controls (instru-
ment panel, multifunction screen, air
conditioning control panel, ...) are not
illuminated, except in night mode with
manual or automatic illumination of
headlamps.
Page 109 of 340
5
VISIBILITY
107
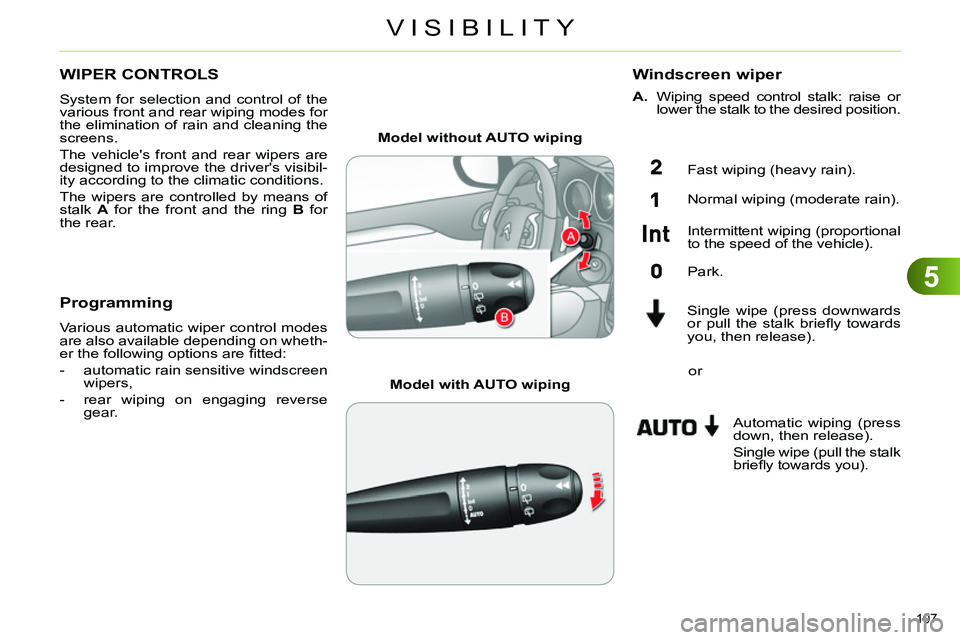
WIPER CONTROLS
System for selection and control of the
various front and rear wiping modes for
the elimination of rain and cleaning the
screens.
The vehicle's front and rear wipers are
designed to improve the driver's visibil-
ity according to the climatic conditions.
The wipers are controlled by means of
stalk A
for the front and the ring B
for
the rear.
Programming
Various automatic wiper control modes
are also available depending on wheth-
er the following options are fi tted:
- automatic rain sensitive windscreen
wipers,
- rear wiping on engaging reverse
gear.
Model without AUTO wiping
Model with AUTO wiping
Windscreen wiper
A.
Wiping speed control stalk: raise or
lower the stalk to the desired position.
Fast wiping (heavy rain).
Normal wiping (moderate rain).
Intermittent wiping (proportional
to the speed of the vehicle).
Park.
Single wipe (press downwards
or pull the stalk briefl y towards
you, then release).
Automatic wiping (press
down, then release).
Single wipe (pull the stalk
briefl y towards you).
or
Page 119 of 340
6
FITTINGS
117
FRONT ARMREST
Comfort and storage device for the driver
and front passenger.
The length of the armrest cover can be
adjusted.
Longitudinal adjustment
To move forwards, raise the lever.
The armrest slides forwards to its
stop.
To stow it, slide it fully back and
press down to lock it.
Storage
The armrest's compartment can hold
up to 6 CDs.
Raise the cover fully.
Page 126 of 340
6
FITTINGS
124
LUGGAGE COVER
(ENTERPRISE VERSION)
Insert the fi xings A
on the frame B
while unrolling the luggage cover.
Stowage
Removal
Unhook all of the fi xings.
Lift the luggage cover on each side.
This conceals the interior of the vehicle
in combination with your rear parcel
shelf.
Installation
Roll up the luggage cover near the
rear seats.
Do not place hard or heavy ob-
jects on the luggage cover.
They could become dangerous
projectiles in the event of sud-
den braking or a collision.
Page 135 of 340

7
CHILD SAFETY
133
(a) Universal child seat: child seat
which can be installed in all vehicles
using the seat belt.
(b) Group 0: from birth to 10 kg. Infant
car seats and "car cots" cannot be
installed on the front passenger
seat.
(c) Consult the legislation in force in
your country before installing your
child on this seat.
(d) To install a child seat at the rear,
backward or forward facing, move
the front seat forward, then straighten
the backrest to allow enough room
for the child seat and the child's
legs.
Remove and stow the head re-
straint before installing a child
seat with backrest on a passen-
ger seat. Refi t the head restraint
once the child seat has been re-
moved.
U
: seating position suitable for the in-
stallation of a child seat secured
using the seat belt and universally
approved "rearward facing" and/or
"forward facing".
U(R1)
: identical to U
, with the vehicle's
seat backrest inclined fully for-
wards.
U(R2)
: identical to U
, with the vehicle's
seat adjusted to the highest po-
sition.
X
: seating position not suitable for in-
stalling a child seat for the weight
group indicated.
Page 136 of 340
7
CHILD SAFETY
134
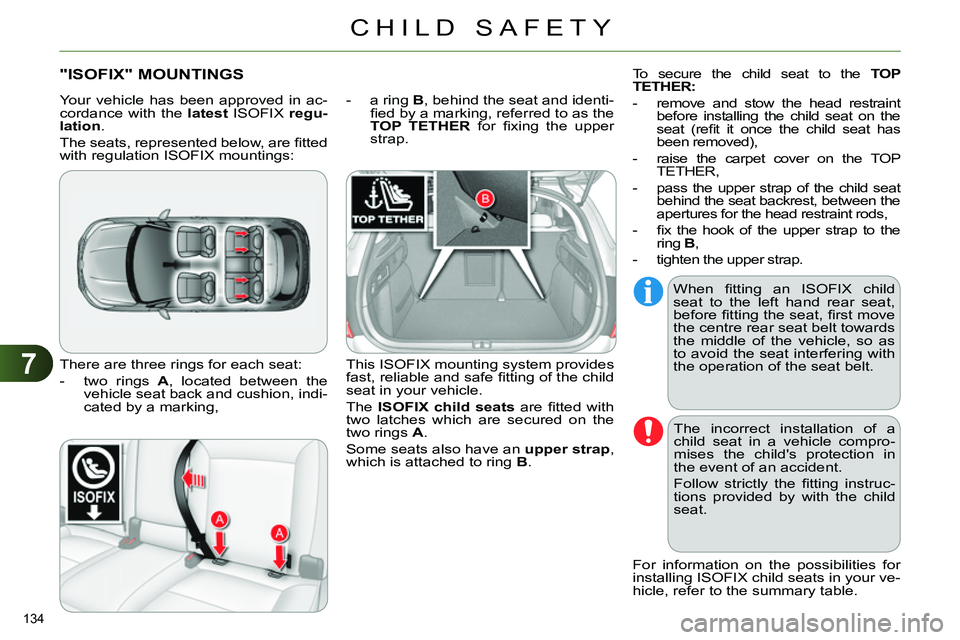
"ISOFIX" MOUNTINGS
There are three rings for each seat:
- two rings A
, located between the
vehicle seat back and cushion, indi-
cated by a marking,
- a ring B
, behind the seat and identi-
fi ed by a marking, referred to as the
TOP TETHER
for fi xing the upper
strap.
This ISOFIX mounting system provides
fast, reliable and safe fi tting of the child
seat in your vehicle.
The ISOFIX child seats
are fi tted with
two latches which are secured on the
two rings A
.
Some seats also have an upper strap
,
which is attached to ring B
.
The incorrect installation of a
child seat in a vehicle compro-
mises the child's protection in
the event of an accident.
Follow strictly the fi tting instruc-
tions provided by with the child
seat.
For information on the possibilities for
installing ISOFIX child seats in your ve-
hicle, refer to the summary table.
When fi tting an ISOFIX child
seat to the left hand rear seat,
before fi tting the seat, fi rst move
the centre rear seat belt towards
the middle of the vehicle, so as
to avoid the seat interfering with
the operation of the seat belt.
Your vehicle has been approved in ac-
cordance with the latest
ISOFIX regu-
lation
.
The seats, represented below, are fi tted
with regulation ISOFIX mountings: To secure the child seat to the TOP
TETHER:
- remove and stow the head restraint
before installing the child seat on the
seat (refi t it once the child seat has
been removed),
- raise the carpet cover on the TOP
TETHER,
- pass the upper strap of the child seat
behind the seat backrest, between the
apertures for the head restraint rods,
- fi x the hook of the upper strap to the
ring B
,
- tighten the upper strap.
Page 138 of 340
7
CHILD SAFETY
136
*
Infant car seats and "car cots" cannot be installed on the front passenger seat.
**
The ISOFIX infant car seat, secured on the lower rings of a vehicle ISOFIX seat, occupies two rear seats.
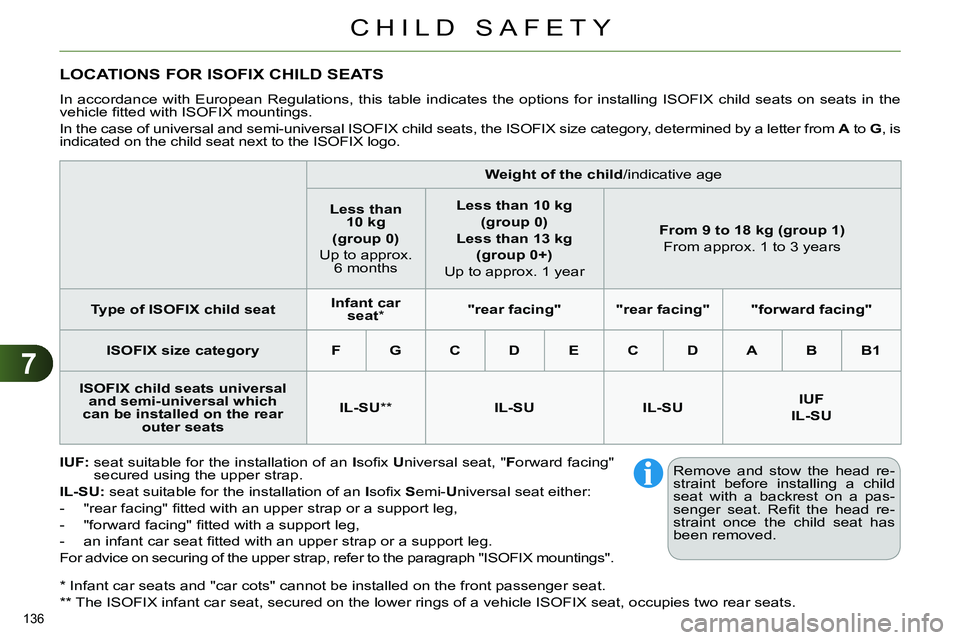
LOCATIONS FOR ISOFIX CHILD SEATS
In accordance with European Regulations, this table indicates the options for installing ISOFIX child seats on seats in the
vehicle fi tted with ISOFIX mountings.
In the case of universal and semi-universal ISOFIX child seats, the ISOFIX size category, determined by a letter from A
to G
, is
indicated on the child seat next to the ISOFIX logo.
IUF:
seat suitable for the installation of an I
sofi x U
niversal seat, " F
orward facing"
secured using the upper strap.
IL-SU:
seat suitable for the installation of an I
sofi x S
emi- U
niversal seat either:
- "rear facing" fi tted with an upper strap or a support leg,
- "forward facing" fi tted with a support leg,
- an infant car seat fi tted with an upper strap or a support leg.
For advice on securing of the upper strap, refer to the paragraph "ISOFIX mountings".
Weight of the child
/indicative age
Less than
10 kg
(group 0)
Up to approx.
6 months
Less than 10 kg
(group 0)
Less than 13 kg
(group 0+)
Up to approx. 1 year
From 9 to 18 kg (group 1)
From approx. 1 to 3 years
Type of ISOFIX child seat
Infant car
seat
*
"rear facing"
"rear facing"
"forward facing"
ISOFIX size category
F
G
C
D
E
C
D
A
B
B1
ISOFIX child seats universal
and semi-universal which
can be installed on the rear
outer seats
IL-SU
**
IL-SU
IL-SU
IUF
IL-SU
Remove and stow the head re-
straint before installing a child
seat with a backrest on a pas-
senger seat. Refi t the head re-
straint once the child seat has
been removed.
Page 141 of 340
8
SAFETY
139
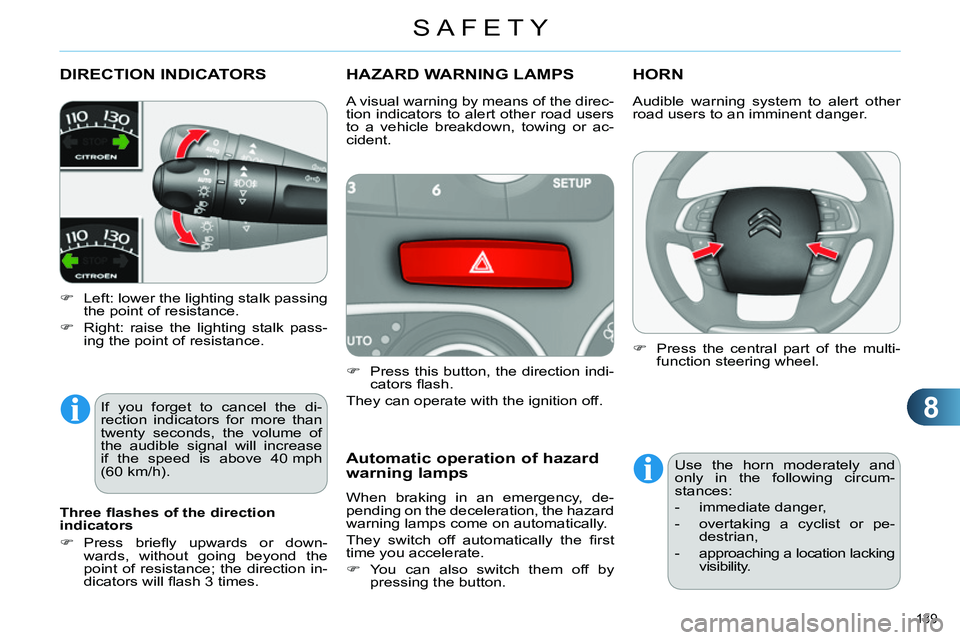
DIRECTION INDICATORS
Left: lower the lighting stalk passing
the point of resistance.
Right: raise the lighting stalk pass-
ing the point of resistance.
HAZARD WARNING LAMPS
Press this button, the direction indi-
cators fl ash.
They can operate with the ignition off.
Automatic operation of hazard
warning lamps
When braking in an emergency, de-
pending on the deceleration, the hazard
warning lamps come on automatically.
They switch off automatically the fi rst
time you accelerate.
You can also switch them off by
pressing the button.
HORN
A visual warning by means of the direc-
tion indicators to alert other road users
to a vehicle breakdown, towing or ac-
cident.
Three fl ashes of the direction
indicators
Press briefl y upwards or down-
wards, without going beyond the
point of resistance; the direction in-
dicators will fl ash 3 times.
If you forget to cancel the di-
rection indicators for more than
twenty seconds, the volume of
the audible signal will increase
if the speed is above 40 mph
(60 km/h). Audible warning system to alert other
road users to an imminent danger.
Press the central part of the multi-
function steering wheel.
Use the horn moderately and
only in the following circum-
stances:
- immediate danger,
- overtaking a cyclist or pe-
destrian,
- approaching a location lacking
visibility.