2013 CITROEN C4 DAG tow
[x] Cancel search: towPage 71 of 340

3
COMFORT
69
FRONT DEMIST - DEFROST
These markings on the control
panel indicate the control po-
sitions for rapid demisting or
defrosting of the windscreen
and side windows.
With manual air conditioning
Put the temperature, air fl ow and
distribution controls to the dedicated
marked position.
Put the air intake control to the
"Exterior air intake" position
(indicator lamp on the control off).
Switch on the air conditioning by
pressing the "A/C"
button; the warn-
ing lamp in the button comes on.
REAR SCREEN DEMIST -
DEFROST
The control button is located
on the air conditioning system
control panel.
Switching on
The rear screen demisting/defrosting
can only operate when the engine is
running.
Press this button to demist/defrost
the rear screen and (depending on
version) the door mirrors. The indi-
cator lamp associated with the but-
ton comes on.
Switching off
The demisting/defrosting switches off
automatically to prevent an excessive
consumption of current.
It is possible to stop the demisting/de-
frosting operation before it is switched
off automatically by pressing the button
again. The indicator lamp associated
with the button goes off.
Switch off the demisting/de-
frosting of the rear screen
and door mirrors as soon as
appropriate, as lower current
consumption results in re-
duced fuel consumption.
With digital dual-zone air
conditioning
Automatic visibility programme
Select this programme to demist
or defrost the windscreen and side
windows as quickly as possible.
The system automatically manages
the air conditioning, air fl ow and air
intake, and provides optimum distribu-
tion towards the windscreen and side
windows.
To stop the programme, press either the
"visibility"
button again or "AUTO"
,
the warning lamp on the button goes
off and the warning lamp on the
"AUTO"
button comes on.
The system starts again with the values
in use before it was overridden by the
visibility programme.
With Stop & Start, when dem-
isting has been activated, the
STOP mode is not available.
With Stop & Start, when the
demisting, air conditioning and
air fl ow functions are activated,
STOP mode is not available.
Page 77 of 340

3
COMFORT
75
REAR SEATS
Bench seat with fi xed one-piece cush-
ion and split backrest (left hand 2/3, right
hand 1/3) which can be folded individually
to adapt the load space in the boot.
Rear head restraints
These have one position for use (up)
and a stowed position (down).
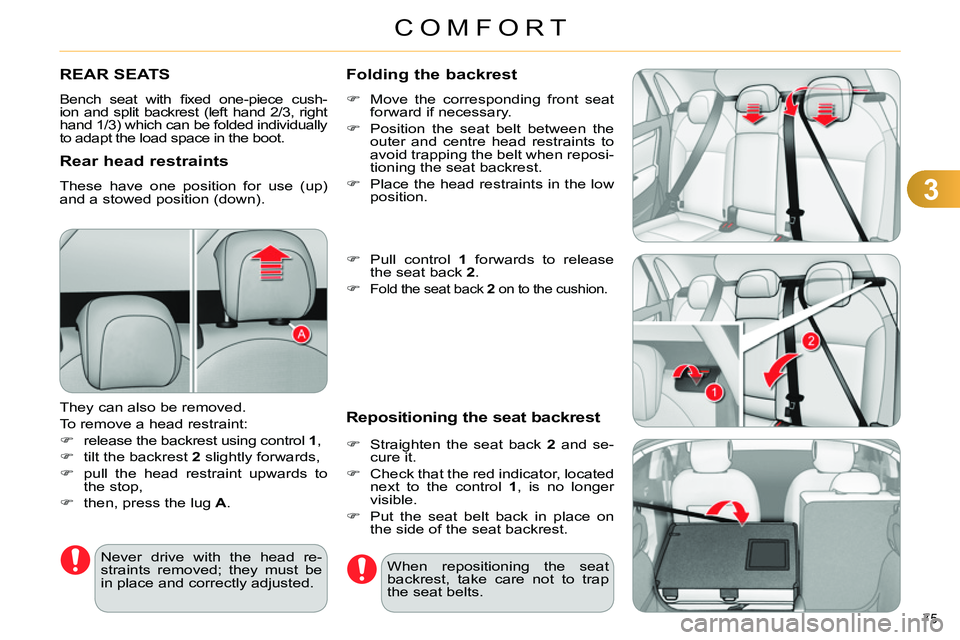
They can also be removed.
To remove a head restraint:
release the backrest using control 1
,
tilt the backrest 2
slightly forwards,
pull the head restraint upwards to
the stop,
then, press the lug A
.
Never drive with the head re-
straints removed; they must be
in place and correctly adjusted. When repositioning the seat
backrest, take care not to trap
the seat belts.
Folding the backrest
Move the corresponding front seat
forward if necessary.
Position the seat belt between the
outer and centre head restraints to
avoid trapping the belt when reposi-
tioning the seat backrest.
Place the head restraints in the low
position.
Pull control 1
forwards to release
the seat back 2
.
Fold the seat back 2
on to the cushion.
Repositioning the seat backrest
Straighten the seat back 2
and se-
cure it.
Check that the red indicator, located
next to the control 1
, is no longer
visible.
Put the seat belt back in place on
the side of the seat backrest.
Page 81 of 340

4
ACCESS
79
REMOTE CONTROL KEY
System which permits central unlocking
or locking of the vehicle using the door
lock or from a distance. It is also used
to locate and start the vehicle, as well
as providing protection against theft.
Press the open padlock
once to unlock the driver's
door only.
Selective unlocking using the
remote control
Turn the key towards the front in
the driver's door lock to unlock the
vehicle completely.
Complete unlocking using the
remote control
Press the open padlock
to unlock the vehicle com-
pletely.
Opening the vehicle using the
2-button remote control
Unfolding the key
Press this button to unfold the key.
Unlocking using the key
Programming unlocking
Setting the total or selective un-
locking is done via the vehicle
confi guration menu.
Complete unlocking is activated by de-
fault.
Press the open padlock again to un-
lock the other doors and the boot.
The direction indicators fl ash for
a few seconds.
The spotlamps in the door mir-
rors come on.
Depending on version, the door
mirrors unfold, the welcome
lighting comes on, the alarm is
deactivated.
Page 83 of 340

4
ACCESS
81
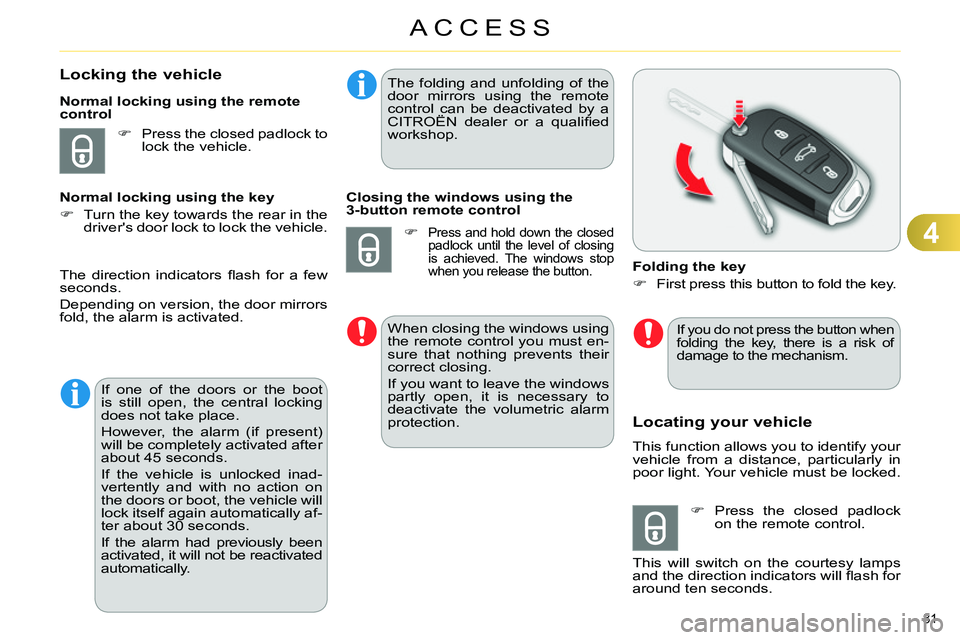
Locking the vehicle
Press the closed padlock to
lock the vehicle.
Normal locking using the remote
control
Normal locking using the key
Turn the key towards the rear in the
driver's door lock to lock the vehicle.
Locating your vehicle
This function allows you to identify your
vehicle from a distance, particularly in
poor light. Your vehicle must be locked.
Folding the key
First press this button to fold the key.
Press the closed padlock
on the remote control.
This will switch on the courtesy lamps
and the direction indicators will fl ash for
around ten seconds.
The direction indicators fl ash for a few
seconds.
Depending on version, the door mirrors
fold, the alarm is activated.
If one of the doors or the boot
is still open, the central locking
does not take place.
However, the alarm (if present)
will be completely activated after
about 45 seconds.
If the vehicle is unlocked inad-
vertently and with no action on
the doors or boot, the vehicle will
lock itself again automatically af-
ter about 30 seconds.
If the alarm had previously been
activated, it will not be reactivated
automatically.
The folding and unfolding of the
door mirrors using the remote
control can be deactivated by a
CITROËN dealer or a qualifi ed
workshop.
Closing the windows using the
3-button remote control
Press and hold down the closed
padlock until the level of closing
is achieved. The windows stop
when you release the button.
When closing the windows using
the remote control you must en-
sure that nothing prevents their
correct closing.
If you want to leave the windows
partly open, it is necessary to
deactivate the volumetric alarm
protection.
If you do not press the button when
folding the key, there is a risk of
damage to the mechanism.
Page 84 of 340

4
ACCESS
82
Anti-theft protection
Electronic engine immobiliser
The key contains an electronic chip
which has a special code. When the
ignition is switched on, this code must
be recognised in order for starting to be
possible.
This electronic engine immobiliser locks
the engine management system a few
minutes after the ignition is switched off
and prevents starting of the engine by
anyone who does not have the key.
In the event of a fault, you
are informed by illumina-
tion of this warning lamp,
an audible signal and a message in the
screen.
In this case, your vehicle will not start;
contact a CITROËN dealer as soon as
possible.
Starting the vehicle
Insert the key in the ignition switch.
The system recognises the starting
code.
Turn the key fully towards the dash-
board to position 3 (Starting)
.
When the engine starts, release
the key.
A heavy object (key fob...), attached to the key and weighing down on
its shaft in the ignition switch, could
cause a malfunction.
Switching the vehicle off
Immobilise the vehicle.
Turn the key fully towards you to
position 1 (Stop)
.
Remove the key from the ignition
switch.
Key left in the "Ignition on"
position
On opening the driver's door, an alert
message is displayed, accompa-
nied by an audible signal, to remind
you that the key is still in the ignition
switch at position 1 (Stop)
.
If the key has been left in the ignition
switch at position 2 (Ignition on)
, the
ignition will be switched off automati-
cally after one hour.
To switch the ignition back on, turn
the key to position 1 (Stop)
, then
back to position 2 (Ignition on)
.
Keep safely, away from your
vehicle, the label attached to the
keys given to you on acquisition
of the vehicle.
Page 89 of 340

4
ACCESS
87
Emergency control
System allowing the doors to be locked
and unlocked manually in the event of
a malfunction of the central locking sys-
tem or battery failure.
Locking the driver's door
Insert the key in the door lock, then
turn it to the rear.
You can also apply the procedure de-
scribed for the passenger doors.
Unlocking the driver's door
Insert the key in the door lock, then
turn it to the front.
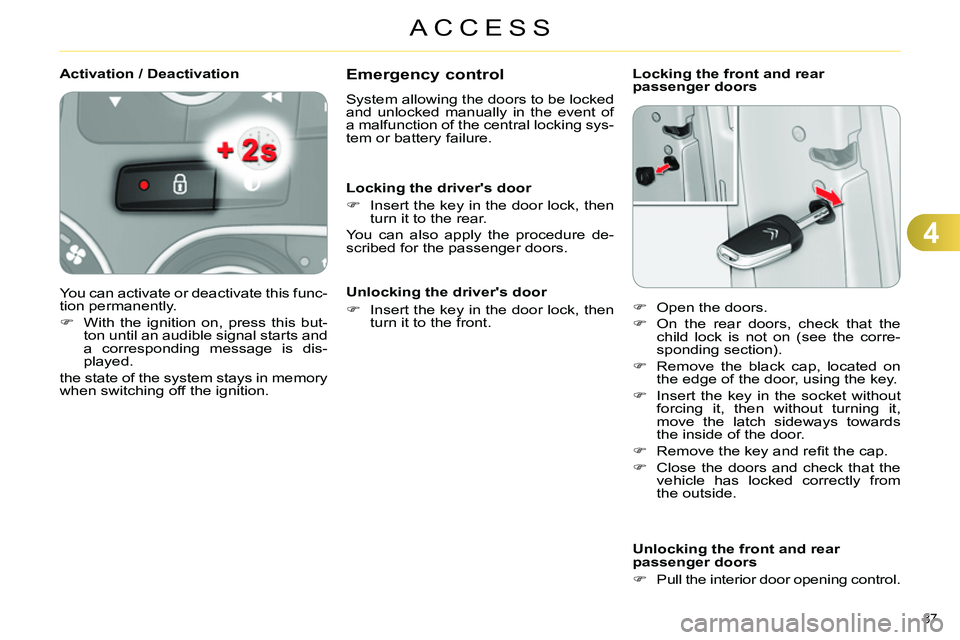
Locking the front and rear
passenger doors
Unlocking the front and rear
passenger doors
Pull the interior door opening control.
Open the doors.
On the rear doors, check that the
child lock is not on (see the corre-
sponding section).
Remove the black cap, located on
the edge of the door, using the key.
Insert the key in the socket without
forcing it, then without turning it,
move the latch sideways towards
the inside of the door.
Remove the key and refi t the cap.
Close the doors and check that the
vehicle has locked correctly from
the outside.
Activation / Deactivation
You can activate or deactivate this func-
tion permanently.
With the ignition on, press this but-
ton until an audible signal starts and
a corresponding message is dis-
played.
the state of the system stays in memory
when switching off the ignition.
Page 91 of 340

4
ACCESS
89
Operating fault
When the ignition is switched on, fi xed
illumination of the indicator lamp in the
button indicates a fault with the system.
Have it checked by a CITROËN dealer
or a qualifi ed workshop.
Locking the vehicle with exterior
perimeter monitoring only
Deactivate the interior volumetric and
anti-tilt monitoring to avoid unwanted
triggering of the alarm in certain cases
such as:
- leaving a pet in the vehicle,
- leaving a window partially open,
- washing your vehicle,
- changing a wheel,
- having your vehicle towed,
- transport by sea.
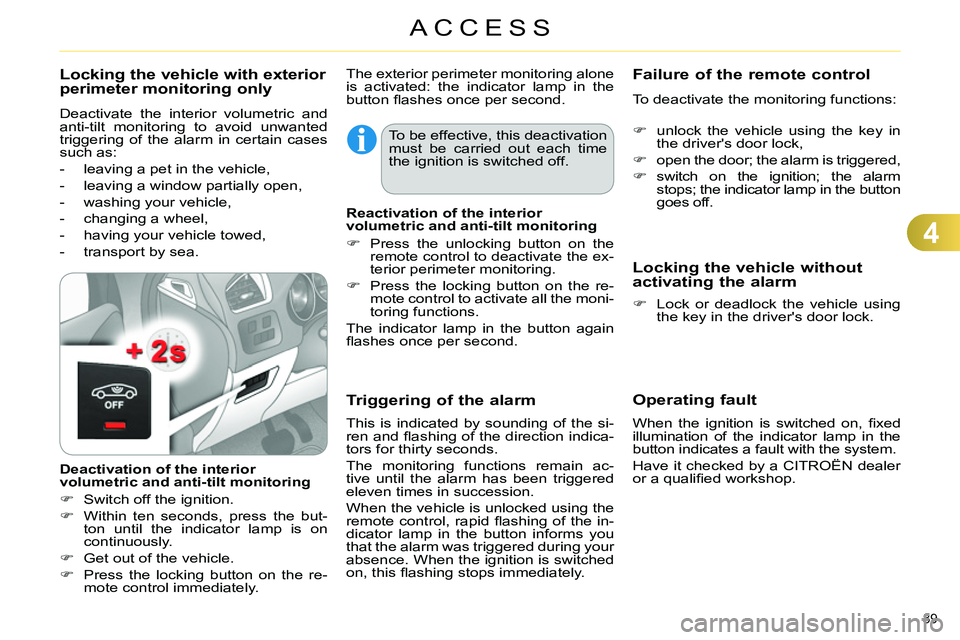
Deactivation of the interior
volumetric and anti-tilt monitoring
Switch off the ignition.
Within ten seconds, press the but-
ton until the indicator lamp is on
continuously.
Get out of the vehicle.
Press the locking button on the re-
mote control immediately. The exterior perimeter monitoring alone
is activated: the indicator lamp in the
button fl ashes once per second.
To be effective, this deactivation
must be carried out each time
the ignition is switched off.
Reactivation of the interior
volumetric and anti-tilt monitoring
Press the unlocking button on the
remote control to deactivate the ex-
terior perimeter monitoring.
Press the locking button on the re-
mote control to activate all the moni-
toring functions.
The indicator lamp in the button again
fl ashes once per second.
Triggering of the alarm
This is indicated by sounding of the si-
ren and fl ashing of the direction indica-
tors for thirty seconds.
The monitoring functions remain ac-
tive until the alarm has been triggered
eleven times in succession.
When the vehicle is unlocked using the
remote control, rapid fl ashing of the in-
dicator lamp in the button informs you
that the alarm was triggered during your
absence. When the ignition is switched
on, this fl ashing stops immediately.
Failure of the remote control
To deactivate the monitoring functions:
unlock the vehicle using the key in
the driver's door lock,
open the door; the alarm is triggered,
switch on the ignition; the alarm
stops; the indicator lamp in the button
goes off.
Locking the vehicle without
activating the alarm
Lock or deadlock the vehicle using
the key in the driver's door lock.
Page 97 of 340

4
ACCESS
95
FUEL TANK
Capacity of the tank: approximately
60 litres.
When the low fuel level in the
tank is reached, this warning
lamp comes on in the instru-
ment panel, accompanied by an
audible warning and the display
of an alert message. When it
fi rst comes on, around 6 litres
of fuel remain in the tank.
Until suffi cient fuel has been added,
every time the ignition is switched on,
this warning lamp appears, accompa-
nied by an audible signal and an alert
message. When driving, this audible
signal and the display of this alert mes-
sage are repeated with increasing fre-
quency, as the level drops towards 0
.
You must refuel as soon as possible to
avoid running out.
If you run out of fuel (Diesel), refer also
to "Checks".
Low fuel level
Refuelling
Additions of fuel must be of at least
5 litres to be registered by the fuel
gauge.
Opening the fi ller cap may result in an
inrush of air. This vacuum is entirely
normal and results from the sealing of
the fuel system.
If you have put in the wrong
fuel for your vehicle, you must
have
the tank drained and re-
fi lled with the correct fuel be-
fore you start the engine.
Press control A
until the automatic
opening of the fuel fl ap is heard.
This control remains active for a few
minutes after switching off the igni-
tion. If necessary, switch the ignition
on again to reactivate it.
If you are fi lling your tank to the top,
do not persist after the third cut-off;
this could cause your vehicle to mal-
function.
Take care to select the pump that
delivers the correct fuel for your
vehicle.
With Stop & Start, never refuel
with the system in STOP mode;
you must switch off the ignition
with the key.
Introduce the nozzle so as to push
in the metal non-return fl ap B.
Make sure that the nozzle is pushed
in as far as possible before starting
to refuel (risk of blowback).
Maintain this position while refuelling.
Push the fuel fl ap to close it.