Page 11 of 284
.Familiarisation
9
1. Steering lock and ignition. 2.Audio equipment steering mounted control stalk.3.Wiper / screenwash / trip computer controlstalk.4.
Central adjustable air vents.
5. Storage tray.
Scented air freshener.
6
.Sunshine sensor.
7. Passenger's air bag. 8.Side adjustable air vent.9.
Passenger's airbag deactivation switch.10.Glove box.11.
Dynamic stability control (ESP/ASR) switch
Parking sensors switch.
Central locking switch.
Hazard warning lamps switch.
Stop & Star t switch. 12. Heating / air conditioning controls.13.Audio equipment. 14.Emergency or assistance call. 15.12 V socket (100 W max).16.
USB por t / auxiliary socket.17.Cup holder. 18.Heated seat controls.19.
Parking brake.
Instruments and controls
Page 45 of 284

2
Multifunction screens
43
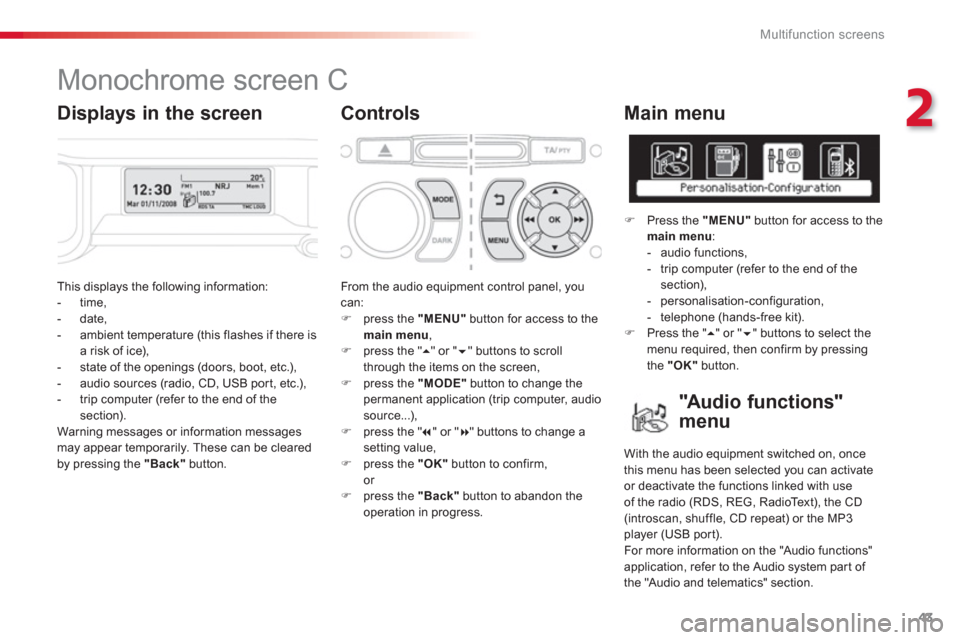
This displays the following information:
- time,
- date,
- ambient temperature (this flashes if there isa risk of ice),
- state of the openings (doors, boot, etc.),
- audio sources (radio, CD, USB port, etc.),
- trip computer (refer to the end of the section).
Warnin
g messages or information messagesmay appear temporarily. These can be clearedby pressing the "Back"button.
From the audio equipment control panel, youcan: �)
press the "MENU"
button for access to themain menu
, �)
press the " ��
" or " ��" buttons to scroll
through the items on the screen, �) press the "MODE"
button to change the
permanent application (trip computer, audiosource...),
�) press the " �� " or "�� " buttons to change asetting value,�)
press the "OK"button to confirm,
or �) press the "Back"button to abandon the
operation in progress.
Main menu
�)
Press the "MENU"
button for access to themain menu
:
- audio functions,
- trip computer
(refer to the end of the section),
- personalisation-configuration,
- telephone (hands-free kit). �)
Press the " �� " or " �� " buttons to select themenu required, then confirm by pressing
the "OK"
button.
Monochrome screen C
Controls
"Au d i o f u n c t i o n s"
menu
With the audio equipment switched on, once
this menu has been selected you can activate or deactivate the functions linked with useof the radio (RDS, REG, RadioText), the CD (introscan, shuffle, CD repeat) or the MP3
player (USB por t).
For more information on the "Audio functions"
application, refer to the Audio system part of
the "Audio and telematics" section.
Displays in the screen
Page 95 of 284
6
Fittings
93
Front interior fi ttings
1.
Sun visor. 2.Child surveillance mirror.3.Grab handle with coat hook. 4.
Upper storage box.
Scented air freshener adjustment.
5. Storage compar tments.
6.Illuminated glove box.
7. Storage pockets. 8.Open storage compar tment at side of passenger seat. 9.
Ticket holder. 10.12 volt socket (100 W max).11.
USB por t / auxiliary socket.12 .
Cup holder.
Page 166 of 284

Practical information
164
Changing a bulb Procedure for replacing a faulty bulb with a new bulb.
1.Direction indicators (H21W amber).2.Dipped beam headlamps (H7-55W).3. Main beam headlamps (H1- 55W).4.Sidelamps (W5W).5.Foglamps (PSX24W).6.LED daytime running lamps.
Front lamps
The headlamps are fitted withpolycarbonate glass with a protectivecoating:�)do not clean them using a dryor abrasive cloth, nor with adetergent or solvent product,�)use a sponge and soapy water or apH neutral product,�)when using a high pressure washer on persistent marks, do not keepthe lance directed towards thelamps or their edges for too long,so as not to damage their protectivecoating and seals,�)do not touch the bulb directly withyour fingers, use lint-free cloths.
Changing a bulb should only be doneafter the headlamp has been switched off for a few minutes (risk of seriousburns).It is imperative to use only anti-ultraviolet (UV) type bulbs in order not to damage the headlamp.
Always replace a failed bulb with anew bulb with the same type and specification.
Page 177 of 284
11
Practical information
175
Fuse N°RatingFunctions
F
820 A Multifunction screen, audio system, navigation radio.
F
930 A Audio system (aftermarket), 12 V socket.
F1
015 A Steering wheel controls.
F1115 A
Ignition, diagnostic socket.
F12 15 A
Rain / sunshine sensor, trailer rela
y unit.
F1
35 A Main stop switch, engine relay unit.
F1415 A Parking assistance control unit, seat belt unfastened warninglamp, airbag control unit, instrument panel, air conditioning,USB Box.
F1
530 A Locking.
F1
6- Not used.
F1740 A
Rear screen and door mirrors demist/defrost.
S
H- PA RC shunt.
Page 191 of 284

11
Practical information
189
"Multimedia":
semi-integral navigation systems, Bluetooth®
hands free kit, audio systems interfaced to steering mounted controls, speakers, DVD player, USB box, por table navigation systems,mapping update CD, Hi-Fi module, drivingaid assistant, Wi-Fi on board, rear multimediasupport, telephone and smartphone carriers, iPhone ®
charger, head-up display...®
or accessories which are not recommended by CITROËN may resultin a failure of your vehicle's electronicsystem and excessive electrical consumption. Please note this precaution. Youare advised to contact a CITROËNrepresentative to be shown the range of recommended equipment and
accessories.
Installation of radio communication transmitters
Before installing any after-market radio communication transmitter, you can
contact a CITROËN dealer for the specification of transmitters which canbe fitted (frequency, maximum power, aerial position, specific installationrequirements), in line with the VehicleElectromagnetic Compatibility Directive(2004/10 4/EC).
By visiting a CITROËN dealer, you canalso obtain cleaning and maintenance products (interior and exterior), including the ecological products inthe "TECHNATURE" range, productsfor topping up (screenwash fluid...), touch-up pens and paint aerosols theexact colour of your vehicle, recharges (cartridge for the temporary puncturerepair kit...), ....
Depending on the legislation in force in the country, it may be compulsoryto have a high visibility safety vest, warning triangle and spare bulbs and fuses available in the vehicle. The fitting of electrical equipment
Page 204 of 284

202
01 FIRST STEPS
Access to the" Navigation - guidance"
menu and display the
recent destinations. Short
press without the engine running: on / off.
Short press with the enginerunning: audio source off / restore.
Short press: select pre-set radio station.
Lon
g press: pre-set thecurrent station.
MODE
button: Selection of the
type of permanent display.
Lon
g press: black screen(DARK).
A
ccess to the " MUSIC
" menu, and display of the CD/MP3/Apple®
tracks and folders. ®
Long press: display the audio settings screen for the"MEDIA
(CD/USB/iPod/Streaming/AUX)" sources.
Long press: open the "Audio settings" menu: music ambience, bass, treble, loudness, left/right
balance, front/rear fader, automatic volume adjustment.
A
ccess to the "RADIO
" menu anddisplay the list of stations received.
Lon
g press: display the audio settingsscreen for the radio tuner source.
Selection and confi rmation OK dial:
Selection of an item on the screen or in a list or a
menu, then confi rmation with a short press.
Other than for menus and lists, a short press
displays a contextual menu depending on the current screen.
Rotation with map displa
yed: zoom the map scalein and out.
Volume ad
justment (each
source is independent,
includin
g TA messages and
navigation instructions).
Page 208 of 284
206
03
A press on the dial gives access to short-cut menus according to thedisplay in the screen.
GENERAL OPERATION
DISPLAY ACCORDING TO CONTEXT
RADIO:
Activate / Deactivate TA
Activate / Deactivate RDS
MUSIC MEDIA PLAYERS,
CD or USB
(according to
media):
Play modes:
Normal
Random
Random on all media
Repetition
TELEPHONE (call in
pro
gress):
Private mode
FULL SCREEN MAP OR IN
A NEW WINDOW:
Stop / Restore guidance Select destination
Enter an address
Directory
GPS coordinates
Divert route
Move the map
Info. on location
Select as destination
Select as sta
ge
Save this place (contacts)
Quit map mode
Guidance criteria
Put call on hold
DTMF ring tones
Hang up
1
1
1
1
1
1
1
1
2
2
2
2
2
1
2
2
2
1
1
1
1
1
1
Change waveband
F
M
AM
2
2
1
TA 1