2013 CHEVROLET ORLANDO exhaust
[x] Cancel search: exhaustPage 201 of 372
Black plate (21,1)Chevrolet Orlando Owner Manual - 2013 - CRC - 6/5/12
Driving and Operating 9-21
Running the Vehicle
While Parked
It is better not to park with the
engine running.
If the vehicle is left with the engine
running, follow the proper steps to
be sure the vehicle will not move.
SeeShifting Into Park on page 9‑18
and Engine Exhaust on page 9‑20.
If the vehicle has a manual
transmission, see Parking on
page 9‑20.
If parking on a hill and pulling a
trailer, see Driving Characteristics
and Towing Tips on page 9‑42.
Automatic
Transmission
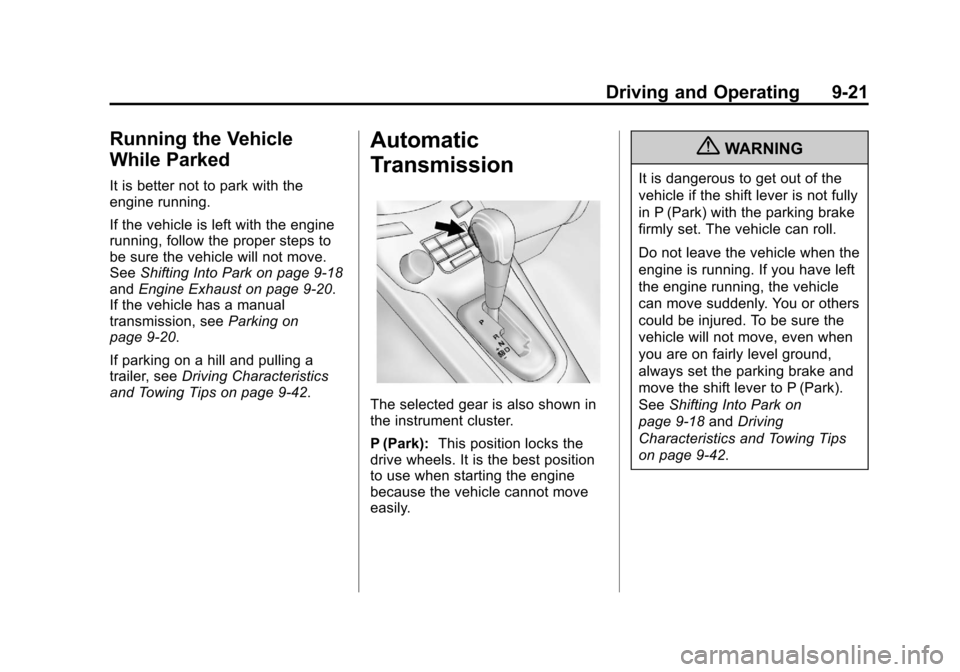
The selected gear is also shown in
the instrument cluster.
P (Park): This position locks the
drive wheels. It is the best position
to use when starting the engine
because the vehicle cannot move
easily.
{WARNING
It is dangerous to get out of the
vehicle if the shift lever is not fully
in P (Park) with the parking brake
firmly set. The vehicle can roll.
Do not leave the vehicle when the
engine is running. If you have left
the engine running, the vehicle
can move suddenly. You or others
could be injured. To be sure the
vehicle will not move, even when
you are on fairly level ground,
always set the parking brake and
move the shift lever to P (Park).
See Shifting Into Park on
page 9‑18 andDriving
Characteristics and Towing Tips
on page 9‑42.
Page 222 of 372
Black plate (42,1)Chevrolet Orlando Owner Manual - 2013 - CRC - 6/5/12
9-42 Driving and Operating
Towing
General Towing
Information
Only use towing equipment that has
been designed for the vehicle.
Contact your dealer or trailering
dealer for assistance with preparing
the vehicle for towing a trailer. Read
the entire section before towing a
trailer.
For towing a disabled vehicle, see
Towing the Vehicle on page 10‑75.
For towing the vehicle behind
another vehicle such as a motor
home, seeRecreational Vehicle
Towing on page 10‑76.
Driving Characteristics
and Towing Tips
Driving with a Trailer
When towing a trailer:
.Become familiar with the state
and local laws that apply
specifically to trailer towing.
.Do not tow a trailer during the
first 800 km (500 mi), to prevent
damage to the engine, axle or
other parts.
.Then, during the first 800 km
(500 mi) trailer towing, do not
drive over 80 km/h (50 mph) and
do not make starts at full throttle.
.Vehicles with automatic
transmissions can tow in D
(Drive) but M (Manual Mode) is
recommended. See Manual
Mode on page 9‑23. Use a lower
gear if the transmission shifts
too often. For vehicles with a
manual transmission, it is better
not to use the highest gear.
{WARNING
When towing a trailer, exhaust
gases may collect at the rear of
the vehicle and enter if the
liftgate, trunk/hatch, or rear-most
window is open.
(Continued)
WARNING (Continued)
When towing a trailer:
.Do not drive with the liftgate,
trunk/hatch, or rear-most
window open.
.Fully open the air outlets on
or under the instrument
panel.
.Also adjust the Climate
Control system to a setting
that brings in only outside air.
See“Climate Control
Systems” in the Index.
For more information about
Carbon Monoxide, see Engine
Exhaust on page 9‑20.
Towing a trailer requires a certain
amount of experience. The
combination you are driving is
longer and not as responsive as the
vehicle itself. Get acquainted with
the handling and braking of the rig
before setting out for the open road.
Page 226 of 372
Black plate (46,1)Chevrolet Orlando Owner Manual - 2013 - CRC - 6/5/12
9-46 Driving and Operating
If there are a lot of options,
equipment, passengers, or cargo in
the vehicle, it will reduce the tongue
weight the vehicle can carry, which
will also reduce the trailer weight the
vehicle can tow. If towing a trailer,
the tongue load must be added to
the GVW because the vehicle will
be carrying that weight, too. See
Vehicle Load Limits on page 9‑9.
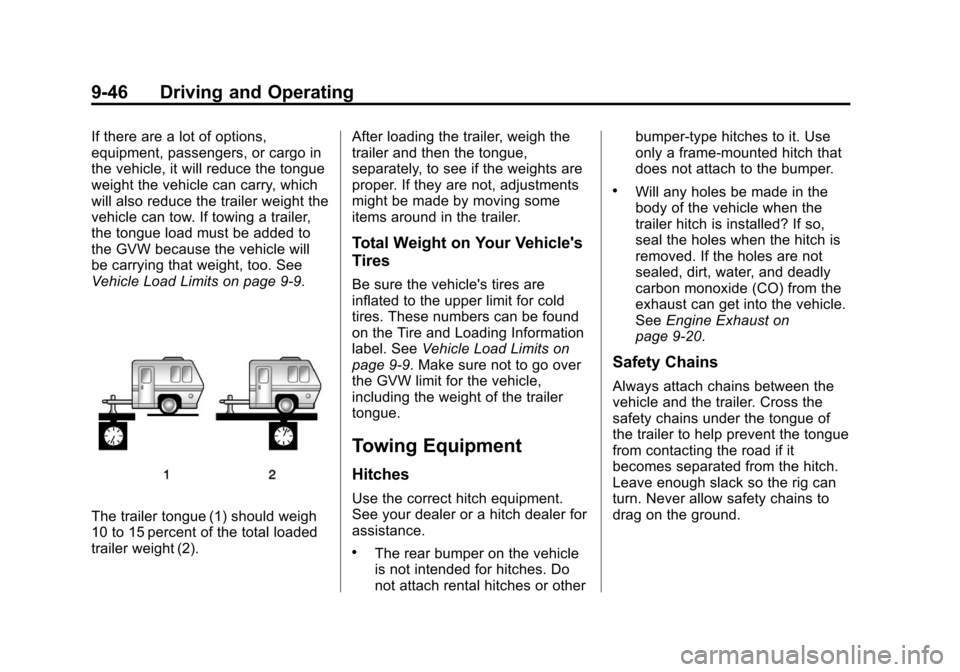
The trailer tongue (1) should weigh
10 to 15 percent of the total loaded
trailer weight (2).After loading the trailer, weigh the
trailer and then the tongue,
separately, to see if the weights are
proper. If they are not, adjustments
might be made by moving some
items around in the trailer.
Total Weight on Your Vehicle's
Tires
Be sure the vehicle's tires are
inflated to the upper limit for cold
tires. These numbers can be found
on the Tire and Loading Information
label. See
Vehicle Load Limits on
page 9‑9. Make sure not to go over
the GVW limit for the vehicle,
including the weight of the trailer
tongue.
Towing Equipment
Hitches
Use the correct hitch equipment.
See your dealer or a hitch dealer for
assistance.
.The rear bumper on the vehicle
is not intended for hitches. Do
not attach rental hitches or other bumper-type hitches to it. Use
only a frame-mounted hitch that
does not attach to the bumper.
.Will any holes be made in the
body of the vehicle when the
trailer hitch is installed? If so,
seal the holes when the hitch is
removed. If the holes are not
sealed, dirt, water, and deadly
carbon monoxide (CO) from the
exhaust can get into the vehicle.
See
Engine Exhaust on
page 9‑20.
Safety Chains
Always attach chains between the
vehicle and the trailer. Cross the
safety chains under the tongue of
the trailer to help prevent the tongue
from contacting the road if it
becomes separated from the hitch.
Leave enough slack so the rig can
turn. Never allow safety chains to
drag on the ground.
Page 231 of 372
Black plate (3,1)Chevrolet Orlando Owner Manual - 2013 - CRC - 6/5/12
Vehicle Care 10-3
California Proposition
65 Warning
Most motor vehicles, including this
one, contain and/or emit chemicals
known to the State of California to
cause cancer and birth defects or
other reproductive harm. Engine
exhaust, many parts and systems,
many fluids, and some component
wear by-products contain and/or
emit these chemicals.
California Perchlorate
Materials Requirements
Certain types of automotive
applications, such as airbag
initiators, safety belt pretensioners,
and lithium batteries contained in
Remote Keyless Entry transmitters,
may contain perchlorate materials.
Special handling may be necessary.
For additional information, see
www.dtsc.ca.gov/hazardouswaste/
perchlorate.
Accessories and
Modifications
Adding non‐dealer accessories or
making modifications to the vehicle
can affect vehicle performance and
safety, including such things as
airbags, braking, stability, ride and
handling, emissions systems,
aerodynamics, durability, and
electronic systems like antilock
brakes, traction control, and stability
control. These accessories or
modifications could even cause
malfunction or damage not covered
by the vehicle warranty.Damage to vehicle components
resulting from modifications or the
installation or use of non‐GM
certified parts, including control
module or software modifications, is
not covered under the terms of the
vehicle warranty and may affect
remaining warranty coverage for
affected parts.
GM Accessories are designed to
complement and function with other
systems on the vehicle. See your
dealer to accessorize the vehicle
using genuine GM Accessories
installed by a dealer technician.
Also, see
Adding Equipment to the
Airbag-Equipped Vehicle on
page 3‑30.
Page 286 of 372
Black plate (58,1)Chevrolet Orlando Owner Manual - 2013 - CRC - 6/5/12
10-58 Vehicle Care
The following information explains
how to repair or change a tire.
Tire Sealant and
Compressor Kit
{WARNING
Idling a vehicle in an enclosed
area with poor ventilation is
dangerous. Engine exhaust may
enter the vehicle. Engine exhaust
contains carbon monoxide (CO)
which cannot be seen or smelled.
It can cause unconsciousness
and even death. Never run the
engine in an enclosed area that
has no fresh air ventilation. For
more information, seeEngine
Exhaust on page 9‑20.
{WARNING
Overinflating a tire could cause
the tire to rupture and you or
others could be injured. Be sure
to read and follow the tire sealant
and compressor kit instructions
and inflate the tire to its
recommended pressure. Do not
exceed the recommended
pressure.
{WARNING
Storing the tire sealant and
compressor kit or other
equipment in the passenger
compartment of the vehicle could
cause injury. In a sudden stop or
collision, loose equipment could
strike someone. Store the tire
sealant and compressor kit in its
original location. If this vehicle has a tire sealant
and compressor kit, there may not
be a spare tire or tire changing
equipment, and on some vehicles
there may not be a place to store
a tire.
The tire sealant and compressor
can be used to temporarily seal
punctures up to 6 mm (0.25 in)
in the tread area of the tire.
It can also be used to inflate an
underinflated tire.
If the tire has been separated from
the wheel, has damaged sidewalls,
or has a large puncture, the tire is
too severely damaged for the tire
sealant and compressor kit to be
effective. See
Roadside Assistance
Program on page 13‑5.
Read and follow all of the tire
sealant and compressor kit
instructions.
Page 317 of 372
Black plate (3,1)Chevrolet Orlando Owner Manual - 2013 - CRC - 6/5/12
Service and Maintenance 11-3
indicate the need for vehicle service
for more than a year. The engine oil
and filter must be changed at least
once a year and the oil life system
must be reset. Your trained dealer
technician can perform this work.
If the engine oil life system is reset
accidentally, service the vehicle
within 5 000 km/3,000 mi since the
last service. Reset the oil life
system when the oil is changed.
SeeEngine Oil Life System on
page 10‑9.
Tire Rotation and Required
Services Every 12 000 km/
7,500 mi
Rotate the tires, if recommended for
the vehicle, and perform the
following services. See Tire
Rotation on page 10‑49.
.Check engine oil level and oil
life percentage. If needed,
change engine oil and filter, and
reset oil life system. See Engine
Oil on page 10‑7 andEngine Oil
Life System on page 10‑9.
.Check engine coolant level. See
Engine Coolant on page 10‑13.
.Check windshield washer fluid
level. See Washer Fluid on
page 10‑18.
.Visually inspect windshield wiper
blades for wear, cracking,
or contamination. See Exterior
Care on page 10‑78. Replace
worn or damaged wiper blades.
See Wiper Blade Replacement
on page 10‑23.
.Check tire inflation pressures.
See Tire Pressure on
page 10‑43.
.Inspect tire wear. See Tire
Inspection on page 10‑48.
.Visually check for fluid leaks.
.Inspect engine air cleaner filter.
See Engine Air Cleaner/Filter on
page 10‑11.
.Inspect brake system.
.Visually inspect steering,
suspension, and chassis
components for damaged, loose,
or missing parts or signs of
wear. See Exterior Care on
page 10‑78.
.Check restraint system
components. See Safety System
Check on page 3‑23.
.Visually inspect fuel system for
damage or leaks.
.Visually inspect exhaust system
and nearby heat shields for
loose or damaged parts.
.Lubricate body components. See
Exterior Care on page 10‑78.
.Check starter switch. See Starter
Switch Check on page 10‑22.
.Check automatic transmission
shift lock control function. See
Automatic Transmission Shift
Lock Control Function Check on
page 10‑22.
Page 362 of 372

Black plate (2,1)Chevrolet Orlando Owner Manual - 2013 - CRC - 6/5/12
i-2 INDEX
Brakes . . . . . . . . . . . . . . . . . . . . . . . . 10-19Antilock . . . . . . . . . . . . . . . . . . . . . . . 9-26
Assist . . . . . . . . . . . . . . . . . . . . . . . . . 9-27
Fluid . . . . . . . . . . . . . . . . . . . . . . . . 10-20
Parking . . . . . . . . . . . . . . . . . . . . . . . 9-27
System Messages . . . . . . . . . . . . 5-25
Braking . . . . . . . . . . . . . . . . . . . . . . . . . 9-3
Break-In, New Vehicle . . . . . . . . . 9-13
Bulb Replacement . . . . . . . . . . . . 10-30
Back-up Lamps . . . . . . . . . . . . . 10-29
Fog Lamps . . . . . . . . . . . . . . . . . 10-27
Halogen Bulbs . . . . . . . . . . . . . . 10-25
Headlamp Aiming . . . . . . . . . . . 10-25
Headlamps . . . . . . . . . . . . . . . . . 10-25
Headlamps, Front TurnSignal, Sidemarker, and
Parking Lamps . . . . . . . . . . . . 10-25
License Plate Lamps . . . . . . . 10-29
Taillamps, Turn Signal, Sidemarker, and
Stoplamps . . . . . . . . . . . . . . . . 10-27
Buying New Tires . . . . . . . . . . . . . 10-51C
Calibration . . . . . . . . . . . . . . . . . . . . . . 5-5
California Fuel Requirements . . . . . . . . . . . 9-38
Perchlorate MaterialsRequirements . . . . . . . . . . . . . . . 10-3
Warning . . . . . . . . . . . . . . . . . . . . . . 10-3
Camera, Rear Vision . . . . . . . . . . 9-35
Capacities and Specifications . . . . . . . . . . . . . . . . 12-2
Carbon Monoxide
Engine Exhaust . . . . . . . . . . . . . . . 9-20
Liftgate . . . . . . . . . . . . . . . . . . . . . . . . 2-8
Winter Driving . . . . . . . . . . . . . . . . . 9-7
Cargo Cover . . . . . . . . . . . . . . . . . . . . . . . . . . 4-2
Management System . . . . . . . . . . 4-4
Cautions, Danger, and Warnings . . . . . . . . . . . . . . . . . . . . . . . . iv
CD Player . . . . . . . . . . . . . . . . . . . . . 7-13
Center Console Storage . . . . . . . . 4-2
Chains, Tire . . . . . . . . . . . . . . . . . . 10-56
Charging System Light . . . . . . . . 5-11 Check
Engine Light . . . . . . . . . . . . . . . . . . 5-12
Ignition
Transmission Lock . . . . . . . . 10-23
Child Restraints Infants and YoungChildren . . . . . . . . . . . . . . . . . . . . . 3-34
Lower Anchors and Tethers for Children . . . . . . . . . 3-39
Older Children . . . . . . . . . . . . . . . . 3-32
Securing . . . . . . . . . . . . . . . . 3-44, 3-46
Systems . . . . . . . . . . . . . . . . . . . . . . 3-36
Child-View Mirror . . . . . . . . . . . . . . 2-13
Cigarette Lighter . . . . . . . . . . . . . . . . 5-6
Circuit Breakers . . . . . . . . . . . . . . 10-31
Cleaning Exterior Care . . . . . . . . . . . . . . . 10-78
Interior Care . . . . . . . . . . . . . . . . 10-82
Climate Control Systems . . . . . . . 8-1 Air Conditioning . . . . . . . . . . . . . . . 8-1
Automatic . . . . . . . . . . . . . . . . . . . . . . 8-3
Heating . . . . . . . . . . . . . . . . . . . . . . . . 8-1
Clock . . . . . . . . . . . . . . . . . . . . . . . . . . . 5-5
Cluster, Instrument . . . . . . . . . . . . . 5-8
Clutch, Hydraulic . . . . . . . . . . . . . 10-11
Collision Damage Repair . . . . . . 13-9
Page 364 of 372

Black plate (4,1)Chevrolet Orlando Owner Manual - 2013 - CRC - 6/5/12
i-4 INDEX
E
Electrical Equipment,Add-On . . . . . . . . . . . . . . . . . . . . . . 9-47
Electrical System Engine CompartmentFuse Block . . . . . . . . . . . . . . . . 10-31
Fuses and Circuit
Breakers . . . . . . . . . . . . . . . . . . 10-31
Instrument Panel Fuse Block . . . . . . . . . . . . . . . . . . . . . . 10-34
Overload . . . . . . . . . . . . . . . . . . . 10-30
Emergency OnStar
®. . . . . . . . . . . . . . . . . . . . . . 14-2
Engine Air Cleaner/Filter . . . . . . . . . . . .10-11
Check and Service EngineSoon Light . . . . . . . . . . . . . . . . . . 5-12
Compartment Overview . . . . . . . 10-6
Coolant . . . . . . . . . . . . . . . . . . . . . 10-13
Coolant Temperature Gauge . . . . . . . . . . . . . . . . . . . . . . 5-10
Cooling System . . . . . . . . . . . . . 10-13
Cooling System Messages . . . 5-26
Drive Belt Routing . . . . . . . . . . . . 12-3
Exhaust . . . . . . . . . . . . . . . . . . . . . . 9-20
Heater . . . . . . . . . . . . . . . . . . . . . . . . 9-17 Engine (cont'd)
Oil Life System . . . . . . . . . . . . . . . 10-9
Oil Messages . . . . . . . . . . . . . . . . . 5-26
Overheating . . . . . . . . . . . . . . . . 10-17
Power Messages . . . . . . . . . . . . . 5-27
Pressure Light . . . . . . . . . . . . . . . . 5-18
Reduced Power Light . . . . . . . . . 5-19
Running While Parked . . . . . . . . 9-21
Starting . . . . . . . . . . . . . . . . . . . . . . . 9-16
Entry Lighting . . . . . . . . . . . . . . . . . . . 6-7
Equipment, Towing . . . . . . . . . . . . 9-46
Event Data Recorders . . . . . . . . 13-14
Exit Lighting . . . . . . . . . . . . . . . . . . . . 6-7
Extender, Safety Belt . . . . . . . . . . 3-22
Exterior Lamp Controls . . . . . . . . . 6-1
F
Filter, Engine Air Cleaner . . . . . . . . . .10-11
Flash-to-Pass . . . . . . . . . . . . . . . . . . . 6-2
Flashers, Hazard Warning . . . . . . 6-4
Flat Tire . . . . . . . . . . . . . . . . . . . . . . 10-56
Changing . . . . . . . . . . . . . . . . . . . 10-65
Floor Mats . . . . . . . . . . . . . . . . . . . . 10-85 Fluid
Automatic Transmission . . . . 10-10
Brakes . . . . . . . . . . . . . . . . . . . . . . 10-20
Washer . . . . . . . . . . . . . . . . . . . . . 10-18
Fog Lamps Bulb Replacement . . . . . . . . . . 10-27
Front . . . . . . . . . . . . . . . . . . . . . . . . . . 6-5
Folding Mirrors . . . . . . . . . . . . . . . . 2-12
Folding Seatback . . . . . . . . . . . . . . . 3-7
Front Fog Lamp Light . . . . . . . . . . . . . . . . . . . . . . . . . . 5-20
Front Seat Armrest . . . . . . . . . . . . . 3-6
Front Seats Adjustment . . . . . . . . . . . . . . . . . . . . 3-3
Heated . . . . . . . . . . . . . . . . . . . . . . . . 3-6
Front Storage . . . . . . . . . . . . . . . . . . . 4-1
Fuel . . . . . . . . . . . . . . . . . . . . . . . . . . . 9-38
Additives . . . . . . . . . . . . . . . . . . . . . 9-39
Economy Driving . . . . . . . . . . . . . 1-20
Filling a Portable FuelContainer . . . . . . . . . . . . . . . . . . . 9-41
Filling the Tank . . . . . . . . . . . . . . . 9-40
Foreign Countries . . . . . . . . . . . . 9-39
Gasoline Specifications . . . . . . . 9-38
Gauge . . . . . . . . . . . . . . . . . . . . . . . . . 5-9
Low Fuel Warning Light . . . . . . . 5-18