2013 CHEVROLET ORLANDO rear light
[x] Cancel search: rear lightPage 1 of 372

Black plate (1,1)Chevrolet Orlando Owner Manual - 2013 - CRC - 6/5/12
2013 Chevrolet Orlando Owner ManualM
In Brief. . . . . . . . . . . . . . . . . . . . . . . . 1-1
Instrument Panel . . . . . . . . . . . . . . 1-2
Initial Drive Information . . . . . . . . 1-4
Vehicle Features . . . . . . . . . . . . . 1-14
Performance and Maintenance . . . . . . . . . . . . . . . . 1-18
Keys, Doors, and Windows . . . . . . . . . . . . . . . . . . . . 2-1
Keys and Locks . . . . . . . . . . . . . . . 2-1
Doors . . . . . . . . . . . . . . . . . . . . . . . . . . 2-8
Vehicle Security . . . . . . . . . . . . . . . . 2-9
Exterior Mirrors . . . . . . . . . . . . . . . 2-11
Interior Mirrors . . . . . . . . . . . . . . . . 2-12
Windows . . . . . . . . . . . . . . . . . . . . . 2-14
Roof . . . . . . . . . . . . . . . . . . . . . . . . . . 2-16
Seats and Restraints . . . . . . . . . 3-1
Head Restraints . . . . . . . . . . . . . . . 3-2
Front Seats . . . . . . . . . . . . . . . . . . . . 3-3
Rear Seats . . . . . . . . . . . . . . . . . . . . 3-8
Safety Belts . . . . . . . . . . . . . . . . . . 3-15
Airbag System . . . . . . . . . . . . . . . . 3-24
Child Restraints . . . . . . . . . . . . . . 3-32 Storage
. . . . . . . . . . . . . . . . . . . . . . . 4-1
Storage Compartments . . . . . . . . 4-1
Additional Storage Features . . . 4-2
Roof Rack System . . . . . . . . . . . . . 4-5
Instruments and Controls . . . . 5-1
Controls . . . . . . . . . . . . . . . . . . . . . . . 5-2
Warning Lights, Gauges, and
Indicators . . . . . . . . . . . . . . . . . . . . 5-7
Information Displays . . . . . . . . . . 5-21
Vehicle Messages . . . . . . . . . . . . 5-24
Vehicle Personalization . . . . . . . 5-30
Lighting . . . . . . . . . . . . . . . . . . . . . . . 6-1
Exterior Lighting . . . . . . . . . . . . . . . 6-1
Interior Lighting . . . . . . . . . . . . . . . . 6-6
Lighting Features . . . . . . . . . . . . . . 6-7
Infotainment System . . . . . . . . . 7-1
Introduction . . . . . . . . . . . . . . . . . . . . 7-1
Radio . . . . . . . . . . . . . . . . . . . . . . . . . . 7-7
Audio Players . . . . . . . . . . . . . . . . 7-13
Phone . . . . . . . . . . . . . . . . . . . . . . . . 7-18
Trademarks and License Agreements . . . . . . . . . . . . . . . . . 7-29 Climate Controls
. . . . . . . . . . . . . 8-1
Climate Control Systems . . . . . . 8-1
Air Vents . . . . . . . . . . . . . . . . . . . . . . . 8-6
Driving and Operating . . . . . . . . 9-1
Driving Information . . . . . . . . . . . . . 9-2
Starting and Operating . . . . . . . 9-13
Engine Exhaust . . . . . . . . . . . . . . 9-20
Automatic Transmission . . . . . . 9-21
Manual Transmission . . . . . . . . . 9-24
Brakes . . . . . . . . . . . . . . . . . . . . . . . 9-26
Ride Control Systems . . . . . . . . 9-28
Cruise Control . . . . . . . . . . . . . . . . 9-31
Object Detection Systems . . . . 9-33
Fuel . . . . . . . . . . . . . . . . . . . . . . . . . . 9-38
Towing . . . . . . . . . . . . . . . . . . . . . . . 9-42
Conversions and Add-Ons . . . 9-47
Vehicle Care . . . . . . . . . . . . . . . . . 10-1
General Information . . . . . . . . . . 10-2
Vehicle Checks . . . . . . . . . . . . . . . 10-4
Headlamp Aiming . . . . . . . . . . . 10-25
Bulb Replacement . . . . . . . . . . 10-25
Electrical System . . . . . . . . . . . . 10-30
Wheels and Tires . . . . . . . . . . . 10-37
Page 9 of 372

Black plate (3,1)Chevrolet Orlando Owner Manual - 2013 - CRC - 6/5/12
In Brief 1-3
1.Air Vents on page 8‑6.
2. Turn and Lane-Change Lever. See Turn and Lane-Change
Signals on page 6‑4.
Headlamp High/Low-Beam
Changer on page 6‑2.
3. Instrument Cluster on page 5‑8.
4. Windshield Wiper/Washer on
page 5‑3.
Rear Window Wiper/Washer on
page 5‑4.
5. Infotainment on page 7‑1.
6. Infotainment Display.
7. Light Sensor. See Automatic
Headlamp System on page 6‑3.
8. Instrument Panel Storage on
page 4‑1.
USB Port and Auxiliary Input
Jack (Inside Instrument Panel
Storage). See Auxiliary Devices
on page 7‑15
9. CD Player on page 7‑13. 10. TCS/StabiliTrak Button. See
StabiliTrak®System on
page 9‑29.
11. Exterior Lamp Controls on
page 6‑1.
Instrument Panel Illumination
Control on page 6‑6.
Front Fog Lamps on page 6‑5.
12. Hood Release. See Hood on
page 10‑4.
13. Front Storage on page 4‑1.
14. Data Link Connector (DLC) (Out of View). See Malfunction
Indicator Lamp on page 5‑12.
15. Cruise Control on page 9‑31.
16. Steering Wheel Adjustment on
page 5‑2.
17. Horn on page 5‑3.
18. Steering Wheel Controls on
page 5‑3.
19. Power Door Locks on
page 2‑7. 20.
Heated Front Seats on
page 3‑6 (If Equipped).
21. Climate Control Systems on
page 8‑1.
Automatic Climate Control
System on page 8‑3.
22. Shift Lever. See Automatic
Transmission on page 9‑21 or
Manual Transmission on
page 9‑24.
23. Parking Brake on page 9‑27.
24. Power Outlets on page 5‑6.
25. Hazard Warning Flashers on
page 6‑4.
26. Passenger Safety Belt Reminder Light. See Safety
Belt Reminders on page 5‑10.
Page 11 of 372
Black plate (5,1)Chevrolet Orlando Owner Manual - 2013 - CRC - 6/5/12
In Brief 1-5
When the engine starts, the parking
lamps will turn on and remain on as
long as the engine is running. The
doors will be locked and the climate
control system may come on.
The engine will continue to run for
10 minutes. Repeat the steps for a
10-minute time extension. Remote
start can be extended only once.
Canceling a Remote Start
To cancel a remote start, do one of
the following:
.Aim the RKE transmitter at the
vehicle and press and hold
/
until the parking lamps turn off.
.Turn on the hazard warning
flashers.
.Turn the vehicle on and then off.
See Remote Vehicle Start on
page 2‑5.
Door Locks
To lock or unlock the vehicle from
outside, use the Remote Keyless
Entry (RKE) transmitter or the key.
From inside the vehicle, use the
power door lock switch.
See Door Locks on page 2‑6.
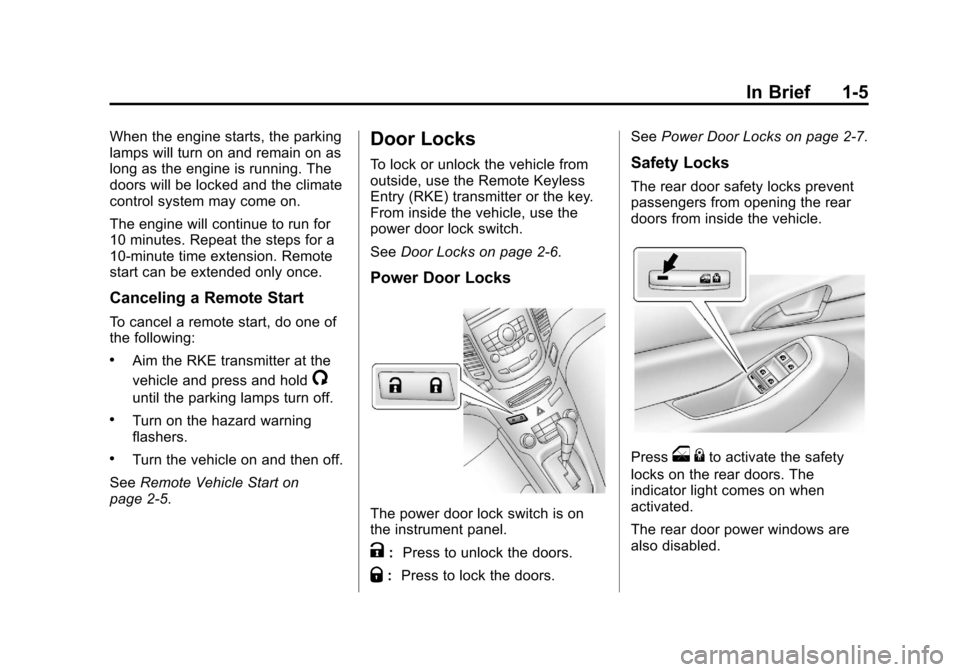
Power Door Locks
The power door lock switch is on
the instrument panel.
K:Press to unlock the doors.
Q:Press to lock the doors. See
Power Door Locks on page 2‑7.
Safety Locks
The rear door safety locks prevent
passengers from opening the rear
doors from inside the vehicle.
Presso{to activate the safety
locks on the rear doors. The
indicator light comes on when
activated.
The rear door power windows are
also disabled.
Page 16 of 372
Black plate (10,1)Chevrolet Orlando Owner Manual - 2013 - CRC - 6/5/12
1-10 In Brief
Interior Mirror
Hold the inside rearview mirror in
the center to move it for a clearer
view of behind your vehicle. Adjust
the inside rearview mirror by moving
it up and down or side to side.
Adjust the mirror to avoid glare from
the headlamps behind you. Push
the tab forward for daytime use and
pull it for nighttime use. SeeManual
Rearview Mirror on page 2‑12.
On vehicles with an automatic
dimming inside rearview mirror, the
mirror reduces glare from the
headlamps of the vehicle behind
you. The dimming feature and
indicator light come on each time
the vehicle is started. See
Automatic Dimming Rearview Mirror
on page 2‑13.
Steering Wheel
Adjustment
The vehicle may have a tilt or tilt
and telescoping steering wheel.
Tilt Steering Wheel
To adjust the steering wheel:
1. Pull the lever down.
2. Move the steering wheel up
or down.
3. Push the lever up to lock the steering wheel in place.
Tilt and Telescoping Steering
Wheel
To adjust the steering wheel:
1. Pull the lever down.
2. Move the steering wheel up or down. 3. Pull or push the steering wheel
closer or away from you.
4. Push the lever up to lock the steering wheel in place.
Do not adjust the steering wheel
while driving.
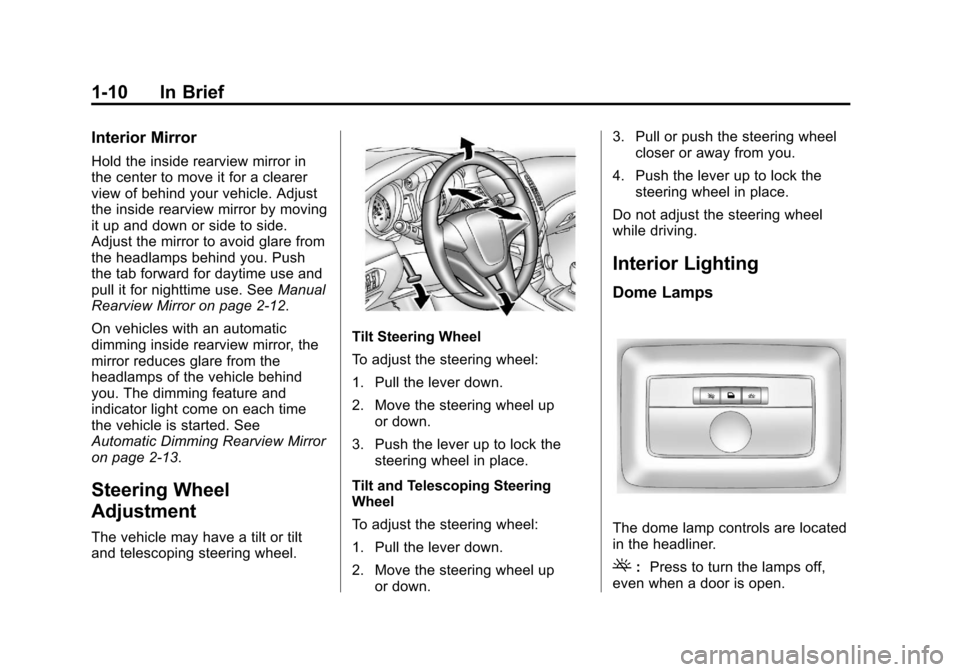
Interior Lighting
Dome Lamps
The dome lamp controls are located
in the headliner.
(: Press to turn the lamps off,
even when a door is open.
Page 20 of 372
Black plate (14,1)Chevrolet Orlando Owner Manual - 2013 - CRC - 6/5/12
1-14 In Brief
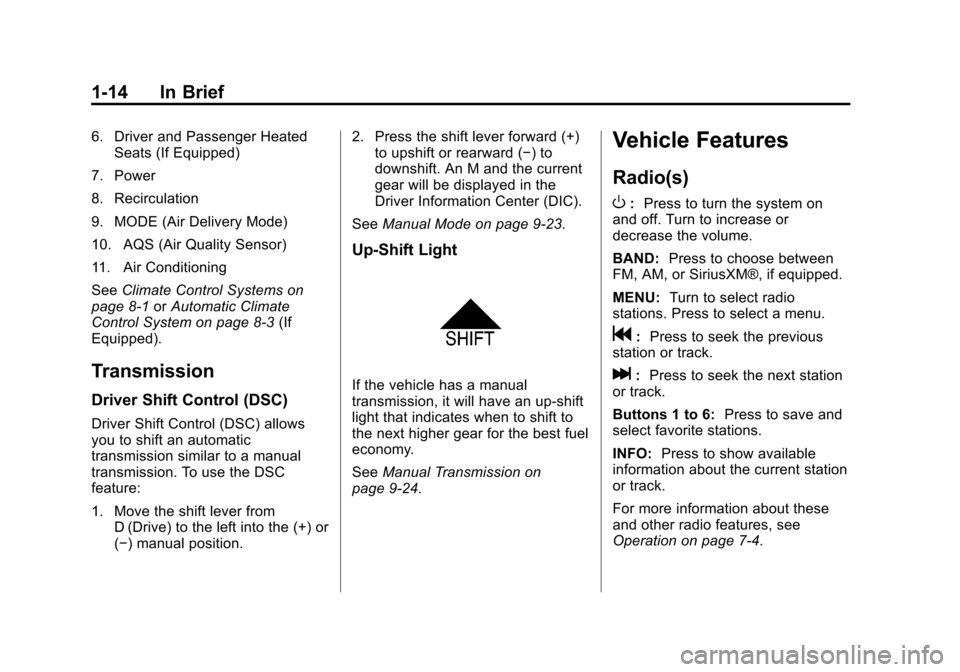
6. Driver and Passenger HeatedSeats (If Equipped)
7. Power
8. Recirculation
9. MODE (Air Delivery Mode)
10. AQS (Air Quality Sensor)
11. Air Conditioning
See Climate Control Systems on
page 8‑1 orAutomatic Climate
Control System on page 8‑3 (If
Equipped).
Transmission
Driver Shift Control (DSC)
Driver Shift Control (DSC) allows
you to shift an automatic
transmission similar to a manual
transmission. To use the DSC
feature:
1. Move the shift lever from D (Drive) to the left into the (+) or
(−) manual position. 2. Press the shift lever forward (+)
to upshift or rearward (−) to
downshift. An M and the current
gear will be displayed in the
Driver Information Center (DIC).
See Manual Mode on page 9‑23.
Up‐Shift Light
If the vehicle has a manual
transmission, it will have an up-shift
light that indicates when to shift to
the next higher gear for the best fuel
economy.
SeeManual Transmission on
page 9‑24.
Vehicle Features
Radio(s)
O
: Press to turn the system on
and off. Turn to increase or
decrease the volume.
BAND: Press to choose between
FM, AM, or SiriusXM®, if equipped.
MENU: Turn to select radio
stations. Press to select a menu.
g: Press to seek the previous
station or track.
l: Press to seek the next station
or track.
Buttons 1 to 6: Press to save and
select favorite stations.
INFO: Press to show available
information about the current station
or track.
For more information about these
and other radio features, see
Operation on page 7‑4.
Page 33 of 372
Black plate (5,1)Chevrolet Orlando Owner Manual - 2013 - CRC - 6/5/12
Keys, Doors, and Windows 2-5
3. Insert the new battery, positiveside facing up. Push the battery
down until it is held in place.
Replace with a CR2032 or
equivalent battery.
4. Snap the battery cover back on to the transmitter.
Remote Vehicle Start
The vehicle may have this feature
that allows you to start the engine
from outside the vehicle.
/(Remote Vehicle Start): This
button will be on the RKE
transmitter if the vehicle has remote
start.
The climate control system will use
the previous settings during a
remote start. The rear defog may
come on during remote start based
on cold ambient conditions. The
rear fog indicator light does not
come on during remote start. If the
vehicle has heated seats, they may
come on during a remote start. See
Heated Front Seats on page 3‑6. Laws in some local communities
may restrict the use of remote
starters. For example, some laws
require a person using remote start
to have the vehicle in view. Check
local regulations for any
requirements.
Other conditions can affect the
performance of the transmitter. See
Remote Keyless Entry (RKE)
System on page 2‑2.
Starting the Vehicle
To start the engine using the remote
start feature:
1. Aim the RKE transmitter at the
vehicle.
2. Press and release
Q.
3. Immediately after completing Step 2, press and hold
/for at
least two seconds or until the
turn signal lamps flash. The turn
signal lamps flashing confirms
the request to remote start the
vehicle has been received. When the engine starts, the parking
lamps will turn on and remain on as
long as the engine is running. The
doors will be locked and the climate
control system may come on.
The engine will continue to run for
10 minutes. Repeat the steps for a
10-minute time extension. Remote
start can be extended only once.
Start the vehicle before driving.
Extending Engine Run Time
For a 10-minute extension, repeat
Steps 1–3 while the engine is still
running. The remote start can be
extended once.
When the remote start is extended,
the second 10 minutes will start
immediately.
For example, if the engine has
been running for five minutes, and
10 minutes are added, the engine
will run for a total of 15 minutes.
Page 35 of 372
Black plate (7,1)Chevrolet Orlando Owner Manual - 2013 - CRC - 6/5/12
Keys, Doors, and Windows 2-7
To lock or unlock a door from
outside the vehicle, use the Remote
Keyless Entry (RKE) transmitter.
From inside the vehicle, use the
power door lock switch.
The doors can also be unlocked
from the inside by pulling the door
handle. Pulling the door handle
again unlatches the door.
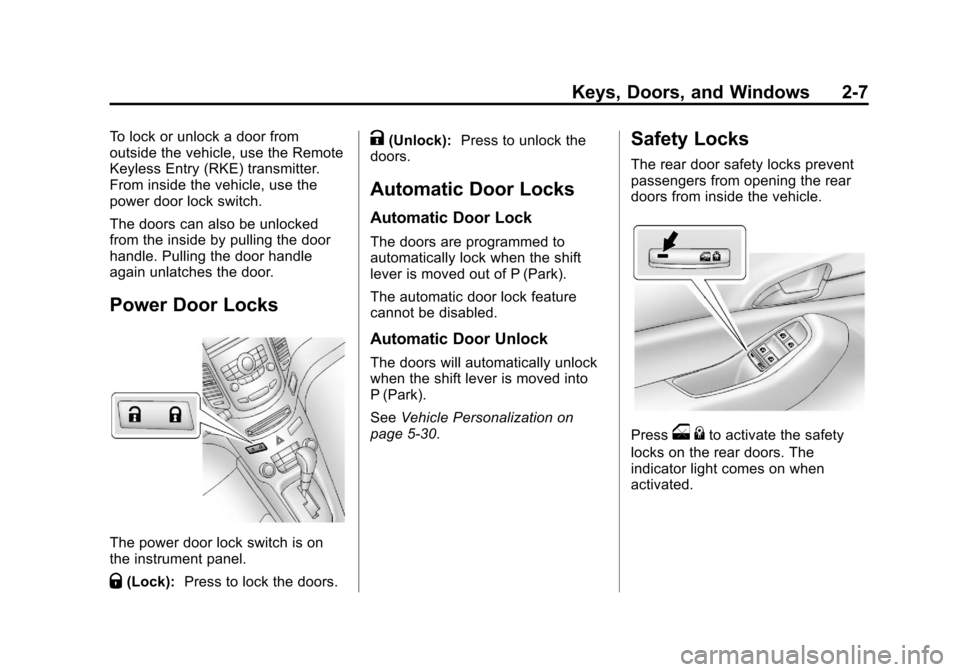
Power Door Locks
The power door lock switch is on
the instrument panel.
Q(Lock):Press to lock the doors.
K(Unlock): Press to unlock the
doors.
Automatic Door Locks
Automatic Door Lock
The doors are programmed to
automatically lock when the shift
lever is moved out of P (Park).
The automatic door lock feature
cannot be disabled.
Automatic Door Unlock
The doors will automatically unlock
when the shift lever is moved into
P (Park).
See Vehicle Personalization on
page 5‑30.
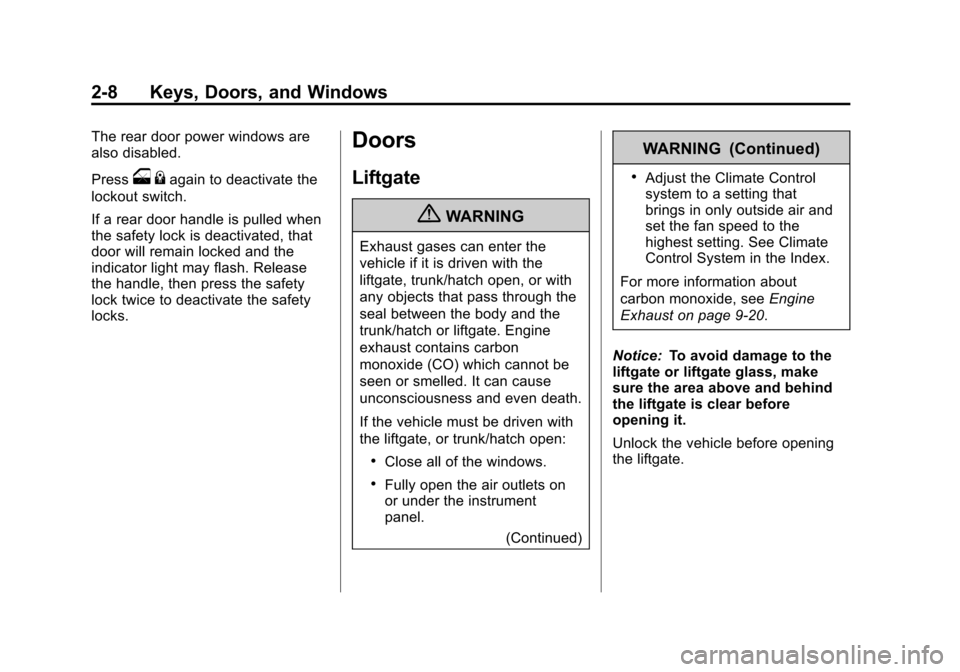
Safety Locks
The rear door safety locks prevent
passengers from opening the rear
doors from inside the vehicle.
Presso {to activate the safety
locks on the rear doors. The
indicator light comes on when
activated.
Page 36 of 372
Black plate (8,1)Chevrolet Orlando Owner Manual - 2013 - CRC - 6/5/12
2-8 Keys, Doors, and Windows
The rear door power windows are
also disabled.
Press
o{again to deactivate the
lockout switch.
If a rear door handle is pulled when
the safety lock is deactivated, that
door will remain locked and the
indicator light may flash. Release
the handle, then press the safety
lock twice to deactivate the safety
locks.
Doors
Liftgate
{WARNING
Exhaust gases can enter the
vehicle if it is driven with the
liftgate, trunk/hatch open, or with
any objects that pass through the
seal between the body and the
trunk/hatch or liftgate. Engine
exhaust contains carbon
monoxide (CO) which cannot be
seen or smelled. It can cause
unconsciousness and even death.
If the vehicle must be driven with
the liftgate, or trunk/hatch open:
.Close all of the windows.
.Fully open the air outlets on
or under the instrument
panel.
(Continued)
WARNING (Continued)
.Adjust the Climate Control
system to a setting that
brings in only outside air and
set the fan speed to the
highest setting. See Climate
Control System in the Index.
For more information about
carbon monoxide, see Engine
Exhaust on page 9‑20.
Notice: To avoid damage to the
liftgate or liftgate glass, make
sure the area above and behind
the liftgate is clear before
opening it.
Unlock the vehicle before opening
the liftgate.