2013 CHEVROLET ORLANDO rear light
[x] Cancel search: rear lightPage 41 of 372
Black plate (13,1)Chevrolet Orlando Owner Manual - 2013 - CRC - 6/5/12
Keys, Doors, and Windows 2-13
Automatic Dimming
Rearview Mirror
The vehicle may have an automatic
dimming inside rearview mirror.
Automatic dimming reduces the
glare from the headlamps of the
vehicle behind you. The dimming
feature and indicator light come on
each time the vehicle is started.
Vehicles with OnStar have three
control buttons at the bottom of the
mirror. See your dealer for more
information about OnStar and how
to subscribe to it. SeeOnStar
Overview on page 14‑1.
Cleaning the Mirror
Do not spray glass cleaner directly
on the mirror. Use a soft towel
dampened with water.
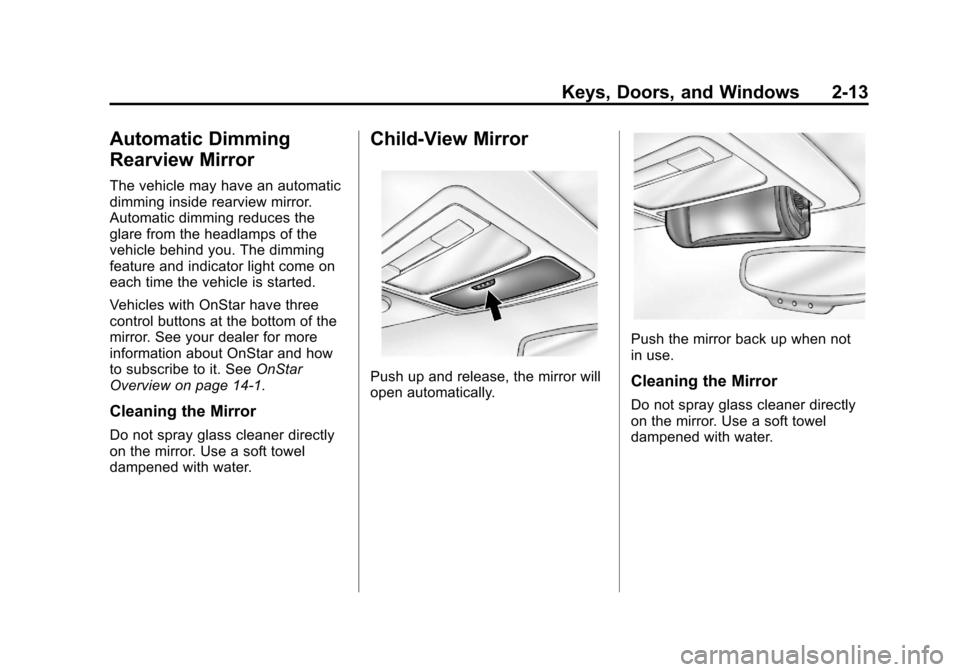
Child-View Mirror
Push up and release, the mirror will
open automatically.
Push the mirror back up when not
in use.
Cleaning the Mirror
Do not spray glass cleaner directly
on the mirror. Use a soft towel
dampened with water.
Page 44 of 372
Black plate (16,1)Chevrolet Orlando Owner Manual - 2013 - CRC - 6/5/12
2-16 Keys, Doors, and Windows
Presso{to activate the rear
window lockout switch. The
indicator light comes on when
activated.
The rear door locks are also
disabled.
Press
o {again to deactivate the
lockout switch.
If the indicator light flashes, the
feature may not be working properly.
Overload Feature
If the windows are operated
repeatedly in short intervals, the
window operation is disabled for a
short time.
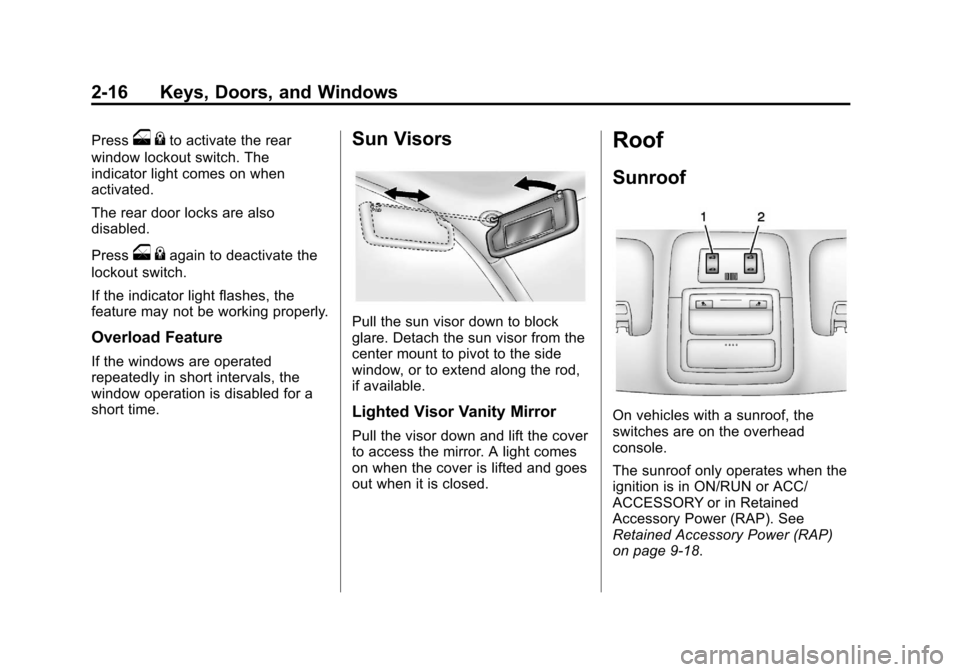
Sun Visors
Pull the sun visor down to block
glare. Detach the sun visor from the
center mount to pivot to the side
window, or to extend along the rod,
if available.
Lighted Visor Vanity Mirror
Pull the visor down and lift the cover
to access the mirror. A light comes
on when the cover is lifted and goes
out when it is closed.
Roof
Sunroof
On vehicles with a sunroof, the
switches are on the overhead
console.
The sunroof only operates when the
ignition is in ON/RUN or ACC/
ACCESSORY or in Retained
Accessory Power (RAP). See
Retained Accessory Power (RAP)
on page 9‑18.
Page 101 of 372
Black plate (1,1)Chevrolet Orlando Owner Manual - 2013 - CRC - 6/5/12
Instruments and Controls 5-1
Instruments and
Controls
Controls
Steering Wheel Adjustment . . . 5-2
Steering Wheel Controls . . . . . . 5-3
Horn . . . . . . . . . . . . . . . . . . . . . . . . . . 5-3
Windshield Wiper/Washer . . . . . 5-3
Rear Window Wiper/Washer . . . . . . . . . . . . . . . . . . . . . . 5-4
Compass . . . . . . . . . . . . . . . . . . . . . 5-5
Clock . . . . . . . . . . . . . . . . . . . . . . . . . 5-5
Power Outlets . . . . . . . . . . . . . . . . . 5-6
Cigarette Lighter . . . . . . . . . . . . . . 5-6
Ashtrays . . . . . . . . . . . . . . . . . . . . . . 5-7
Warning Lights, Gauges, and
Indicators
Warning Lights, Gauges, and Indicators . . . . . . . . . . . . . . . . . . . . 5-7
Instrument Cluster . . . . . . . . . . . . 5-8
Speedometer . . . . . . . . . . . . . . . . . 5-9
Odometer . . . . . . . . . . . . . . . . . . . . . 5-9
Tachometer . . . . . . . . . . . . . . . . . . . 5-9
Fuel Gauge . . . . . . . . . . . . . . . . . . . 5-9
Engine Coolant Temperature
Gauge . . . . . . . . . . . . . . . . . . . . . . 5-10 Safety Belt Reminders . . . . . . . 5-10
Airbag Readiness Light . . . . . . 5-11
Charging System Light . . . . . . . 5-11
Malfunction
Indicator Lamp . . . . . . . . . . . . . 5-12
Service Vehicle Soon Light . . . . . . . . . . . . . . . . . . . . . . . 5-14
Brake System Warning Light . . . . . . . . . . . . . . . . . . . . . . . 5-14
Antilock Brake System (ABS) Warning Light . . . . . . . . . . . . . . 5-15
Up-Shift Light . . . . . . . . . . . . . . . . 5-16
Power Steering Warning Light . . . . . . . . . . . . . . . . . . . . . . . 5-16
Traction Off Light . . . . . . . . . . . . 5-16
StabiliTrak
®OFF Light . . . . . . . 5-17
Traction Control System (TCS)/StabiliTrak
®Light . . . . 5-17
Tire Pressure Light . . . . . . . . . . 5-17
Engine Oil Pressure Light . . . . 5-18
Low Fuel Warning Light . . . . . . 5-18
Security Light . . . . . . . . . . . . . . . . 5-19
Reduced Engine Power Light . . . . . . . . . . . . . . . . . . . . . . . 5-19
High-Beam On Light . . . . . . . . . 5-19
Daytime Running Lamps (DRL) Indicator Light . . . . . . . 5-20
Front Fog Lamp Light . . . . . . . . 5-20 Lamps On Reminder . . . . . . . . . 5-20
Cruise Control Light . . . . . . . . . 5-20
Door Ajar Light . . . . . . . . . . . . . . 5-21
Information Displays
Driver Information
Center (DIC) . . . . . . . . . . . . . . . 5-21
Vehicle Messages
Vehicle Messages . . . . . . . . . . . 5-24
Battery Voltage and ChargingMessages . . . . . . . . . . . . . . . . . . 5-25
Brake System Messages . . . . 5-25
Compass Messages . . . . . . . . . 5-25
Cruise Control Messages . . . . 5-25
Door Ajar Messages . . . . . . . . . 5-25
Engine Cooling System Messages . . . . . . . . . . . . . . . . . . 5-26
Engine Oil Messages . . . . . . . . 5-26
Engine Power Messages . . . . 5-27
Fuel System Messages . . . . . . 5-27
Key and Lock Messages . . . . . 5-27
Lamp Messages . . . . . . . . . . . . . 5-27
Object Detection System Messages . . . . . . . . . . . . . . . . . . 5-28
Ride Control System Messages . . . . . . . . . . . . . . . . . . 5-28
Airbag System Messages . . . . 5-28
Security Messages . . . . . . . . . . 5-28
Page 105 of 372
Black plate (5,1)Chevrolet Orlando Owner Manual - 2013 - CRC - 6/5/12
Instruments and Controls 5-5
ON:Press the upper portion of the
button for continuous rear window
wipes.
OFF: The rear wiper turns off when
the button is returned to the middle
position.
INT (Intermittent Rear Wipes):
Press the lower portion of the button
to set a delay between wipes.
a(Rear Washer): Push the
windshield wiper lever forward to
spray washer fluid on the rear
window. The lever automatically
returns to its original position when
released.
The windshield washer reservoir is
used for the windshield and the rear
window. Check the fluid level in the
reservoir if either washer is not
working. See Washer Fluid on
page 10‑18.
Compass
The vehicle may have a compass
display in the Driver Information
Center (DIC). The compass receives its heading and other information
from the Global Positioning
System (GPS) antenna, StabiliTrak,
and vehicle speed information.
Avoid covering the GPS antenna,
located on the roof, for long periods
of time with objects that may
interfere with the antenna's ability to
receive a satellite signal. The
compass system is designed to
operate for a certain number of
miles or degrees of turn before
needing a signal from the GPS
satellites. When the compass
display shows CAL, drive the
vehicle for a short distance in an
open area where it can receive a
GPS signal. The compass system
will automatically determine when
the GPS signal is restored and
provide a heading again. See
Compass Messages on page 5‑25
for more information on the
messages that may be displayed for
the compass.
Clock
The infotainment system controls
are used to access the time and
date settings through the menu
system. See
Operation on page 7‑4
for information about how to use the
menu system.
Setting the Time
1. Press the CONFIG button and select Time Settings.
2. Select Set Time.
3. Turn the MENU knob to adjust the highlighted number.
4. Press the MENU knob to select the next number.
5. To save the time and return to the Time Settings menu, press
the BACK button at any time or
press the MENU knob after
adjusting the minutes.
Page 106 of 372
Black plate (6,1)Chevrolet Orlando Owner Manual - 2013 - CRC - 6/5/12
5-6 Instruments and Controls
Setting the 12/24 Hour Format
1. Press the CONFIG button andselect Time Settings.
2. Highlight 12/24 Hour Format.
3. Press the MENU knob to select the 12 hour or 24 hour display
format.
Power Outlets
The accessory power outlets can be
used to plug in electrical equipment,
such as a cell phone or MP3 player.
The vehicle has three accessory
power outlets: in front of the
cupholders, at the rear of the center
floor console and in the rear
cargo area.
Remove the cover to access, and
replace when not in use.
{WARNING
Power is always supplied to the
outlets. Do not leave electrical
equipment plugged in when the
vehicle is not in use because the
vehicle could catch fire and cause
injury or death.
Notice: Leaving electrical
equipment plugged in for an
extended period of time while the
vehicle is off will drain the
battery. Always unplug electrical
equipment when not in use and
do not plug in equipment that
exceeds the maximum 20 ampere
rating.
Certain accessory power plugs may
not be compatible with the
accessory power outlet and could
overload vehicle or adapter fuses.
If a problem is experienced, see
your dealer. When adding electrical equipment,
be sure to follow the proper
installation instructions included with
the equipment. See
Add-On
Electrical Equipment on page 9‑47.
Notice: Hanging heavy
equipment from the power outlet
can cause damage not covered
by the vehicle warranty. The
power outlets are designed for
accessory power plugs only, such
as cell phone charge cords.
Cigarette Lighter
For vehicles with a cigarette lighter,
it is located in the center floor
console.
The ignition must be turned to ACC/
ACCESSORY or ON/RUN.
To activate the cigarette lighter,
push it into the heating element and
let go. When the lighter is ready it
will pop back out.
Notice: Holding a cigarette lighter
in while it is heating does not let
the lighter back away from the
Page 131 of 372
Black plate (31,1)Chevrolet Orlando Owner Manual - 2013 - CRC - 6/5/12
Instruments and Controls 5-31
Climate and Air Quality
If equipped, select the Climate and
Air Quality menu and the following
will be displayed:
.Auto Fan Speed
.Air Quality Sensor
.Remote Start Auto Heat Seats
.Auto Defog
.Auto Rear Defog
Auto Fan Speed
This will allow you to select the
automatic fan speed. This feature
sets the climate control fan speed to
maintain the interior temperature.
Press the MENU knob when Auto
Fan Speed is highlighted to open
the menu. Turn the knob to highlight
High, Medium, or Low. Press the
BACK button to confirm the
selection and move back to the
last menu. Air Quality Sensor
This will allow you to select whether
the system will operate at high or
low sensitivity. Only vehicles with
the automatic climate control will
have this option.
Press the MENU knob when Air
Quality Sensor is highlighted to
open the menu. Turn the knob to
highlight High Sensitivity or Low
Sensitivity. Press the BACK button
to confirm the selection and move
back to the last menu.
Remote Start Auto Heat Seats
On vehicles with remote start and
heated seats, the heated seats can
be set to on or off.
Press the MENU knob when
Remote Start Auto Heat Seats is
highlighted to open the menu. Turn
the knob to highlight On or Off.
Press the BACK button to confirm
the selection and move back to the
last menu.Auto Defog
When turned on and high humidity
is detected, the climate control
system may adjust to outside air
supply and turn on the air
conditioner or the heater. The fan
speed may slightly increase to help
prevent fogging. When high
humidity is no longer detected, the
system will return to its prior
operation.
Press the MENU knob when Auto
Defog is highlighted to open the
menu. Turn the knob to highlight On
or Off. Press the BACK button to
confirm the selection and move
back to the last menu.
Auto Rear Defog
When on, this feature turns on the
rear defogger at vehicle start when
the interior temperature is cold and
fog is likely. The Auto Rear Defog
function can be disabled by
pressing
1. When off, the feature
can be turned on by pressing
1.
Page 132 of 372
Black plate (32,1)Chevrolet Orlando Owner Manual - 2013 - CRC - 6/5/12
5-32 Instruments and Controls
See“Rear Window Defogger” under
Climate Control Systems on
page 8‑1 for more information.
Press the MENU knob when Auto
Rear Defog is highlighted to open
the menu. Turn the knob to highlight
On or Off. Press the knob to confirm
the selection and move back to the
last menu.
Comfort and Convenience
Select the Comfort and
Convenience menu and Chime
Volume will be displayed.
Chime Volume
This allows selection of the chime
volume level.
Press the MENU knob when Chime
Volume is highlighted. Turn the knob
to select Normal or High. Press the
BACK button to confirm and go
back to the last menu.
Collision/Detection Systems
If equipped, select the Collision/
Detection Systems menu and Park
Assist will be displayed. Park Assist
This allows the Ultrasonic Parking
Assist feature, audible only, to be
turned on or off.
Press the MENU knob when Park
Assist is highlighted. Turn the knob
to select On or Off. Press the knob
to confirm and go back to the
last menu.
Languages
Select the Language menu and the
following will be displayed:
.English
.Francais
.Espanol
Turn the MENU knob to select the
language. Press BACK to return to
the last menu.
Lighting
Select the Lighting menu and the
following will be displayed:
.Exit Lighting
.Vehicle Locator Lights Exit Lighting
This allows the selection of how
long the exterior lamps stay on
when leaving the vehicle when it is
dark outside.
Press the MENU knob when Exit
Lighting is highlighted. Turn the
knob to select Off, 30 Seconds,
1 Minute, or 2 Minutes. Press the
BACK button to confirm and go
back to the last menu.
Vehicle Locator Lights
This allows the vehicle locator lights
to be turned on or off. When on, the
headlamps and back‐up lamps will
flash when
Kon the Remote
Keyless Entry (RKE) transmitter is
pressed.
Press the MENU knob when Vehicle
Locator Lights is highlighted to open
the menu. Turn the MENU knob to
highlight On or Off. Press MENU to
select On or Off. Press the BACK
button to confirm the selection and
move back to the last menu.
Page 138 of 372
Black plate (4,1)Chevrolet Orlando Owner Manual - 2013 - CRC - 6/5/12
6-4 Lighting
Lights On with Wipers
If the windshield wipers are
activated in daylight with the
engine on, and the exterior lamp
control is in AUTO, the headlamps,
parking lamps, and other exterior
lamps come on. The transition time
for the lamps coming on varies
based on wiper speed. When the
wipers are not operating, these
lamps turn off. Move the exterior
lamp control to
Por;to disable
this feature.
Hazard Warning Flashers
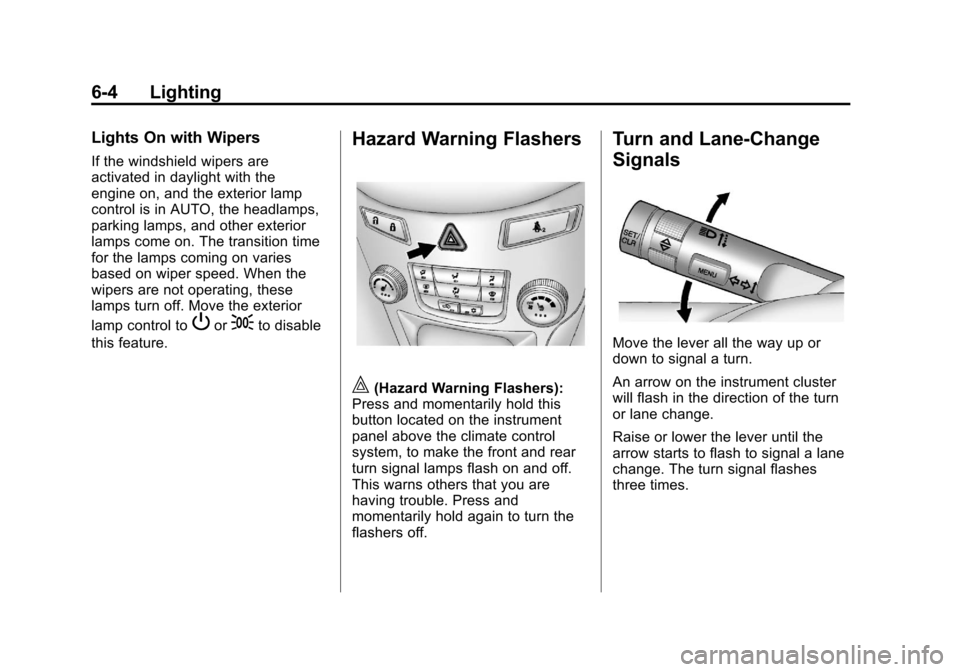
|(Hazard Warning Flashers):
Press and momentarily hold this
button located on the instrument
panel above the climate control
system, to make the front and rear
turn signal lamps flash on and off.
This warns others that you are
having trouble. Press and
momentarily hold again to turn the
flashers off.
Turn and Lane-Change
Signals
Move the lever all the way up or
down to signal a turn.
An arrow on the instrument cluster
will flash in the direction of the turn
or lane change.
Raise or lower the lever until the
arrow starts to flash to signal a lane
change. The turn signal flashes
three times.