2013 CHEVROLET EXPRESS PASSANGER spare tire
[x] Cancel search: spare tirePage 308 of 402
Black plate (60,1)Chevrolet Express Owner Manual - 2013 - 1stPrintReady - 6/19/12
10-60 Vehicle Care
Tire Inspection on page 11‑3and
Tire Rotation on page 10‑58. Also
see Maintenance Schedule on
page 11‑3.
{WARNING
If the vehicle is operated with a
tire that is underinflated, the tire
can overheat. An overheated tire
can lose air suddenly or catch
fire. You or others could be
injured. Properly inflate all tires,
including the spare.
See Tires on page 10‑44 andTire
Pressure on page 10‑53 for more
information on proper tire inflation.
When It Is Time for New
Tires
Factors such as maintenance,
temperatures, driving speeds,
vehicle loading, and road conditions
affect the wear rate of the tires.
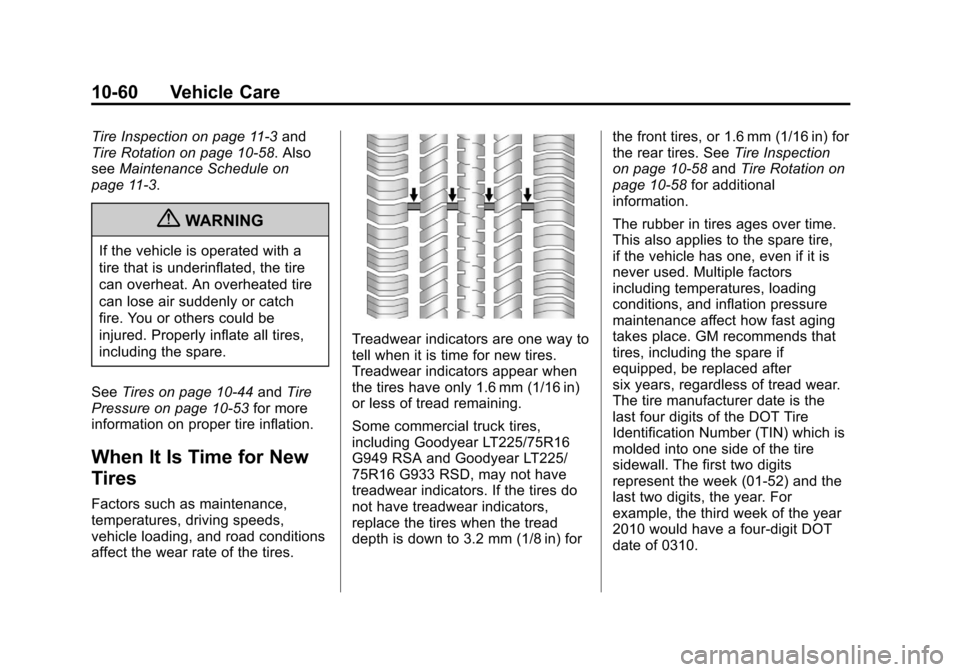
Treadwear indicators are one way to
tell when it is time for new tires.
Treadwear indicators appear when
the tires have only 1.6 mm (1/16 in)
or less of tread remaining.
Some commercial truck tires,
including Goodyear LT225/75R16
G949 RSA and Goodyear LT225/
75R16 G933 RSD, may not have
treadwear indicators. If the tires do
not have treadwear indicators,
replace the tires when the tread
depth is down to 3.2 mm (1/8 in) for the front tires, or 1.6 mm (1/16 in) for
the rear tires. See
Tire Inspection
on page 10‑58 andTire Rotation on
page 10‑58 for additional
information.
The rubber in tires ages over time.
This also applies to the spare tire,
if the vehicle has one, even if it is
never used. Multiple factors
including temperatures, loading
conditions, and inflation pressure
maintenance affect how fast aging
takes place. GM recommends that
tires, including the spare if
equipped, be replaced after
six years, regardless of tread wear.
The tire manufacturer date is the
last four digits of the DOT Tire
Identification Number (TIN) which is
molded into one side of the tire
sidewall. The first two digits
represent the week (01-52) and the
last two digits, the year. For
example, the third week of the year
2010 would have a four-digit DOT
date of 0310.
Page 310 of 402
Black plate (62,1)Chevrolet Express Owner Manual - 2013 - 1stPrintReady - 6/19/12
10-62 Vehicle Care
WARNING (CONTINUED)
Only your dealer or authorized
tire service center should
mount or dismount the tires.
{WARNING
Mixing tires of different sizes,
brands, or types may cause loss
of control of the vehicle, resulting
in a crash or other vehicle
damage. Use the correct size,
brand, and type of tires on all
wheels.
This vehicle may have a different
size spare than the road tires
originally installed on the vehicle.
When new, the vehicle included a
spare tire and wheel assembly
with a similar overall diameter as
the road tires and wheels, so it is
all right to drive on it. The spare (Continued)
WARNING (CONTINUED)
tire was developed for use on this
vehicle and will not affect vehicle
handling.
{WARNING
Using bias-ply tires on the
vehicle may cause the wheel
rim flanges to develop cracks
after many miles of driving.
A tire and/or wheel could fail
suddenly and cause a crash.
Use only radial-ply tires with
the wheels on the vehicle.
If the vehicle tires must be
replaced with a tire that does not
have a TPC Spec number, make
sure they are the same size,
load range, speed rating, and
construction (radial) as the
original tires. Vehicles that have a tire
pressure monitoring system
could give an inaccurate
low-pressure warning if non-TPC
Spec rated tires are installed.
See
Tire Pressure Monitor
System on page 10‑54.
The Tire and Loading
Information label indicates the
original equipment tires on the
vehicle. See Vehicle Load Limits
on page 9‑10 for the label
location and more information
about the Tire and Loading
Information label.
Different Size Tires and
Wheels
If wheels or tires are installed that
are a different size than the original
equipment wheels and tires, vehicle
performance, including its braking,
ride and handling characteristics,
stability, and resistance to rollover
may be affected. If the vehicle has
electronic systems such as antilock
Page 311 of 402

Black plate (63,1)Chevrolet Express Owner Manual - 2013 - 1stPrintReady - 6/19/12
Vehicle Care 10-63
brakes, rollover airbags, traction
control, and electronic stability
control, the performance of these
systems can also be affected.
{WARNING
If different sized wheels are used,
there may not be an acceptable
level of performance and safety if
tires not recommended for those
wheels are selected. This
increases the chance of a crash
and serious injury. Only use GM
specific wheel and tire systems
developed for the vehicle, and
have them properly installed by a
GM certified technician.
See Buying New Tires on
page 10‑61 andAccessories and
Modifications on page 10‑3.
Uniform Tire Quality
Grading
Quality grades can be found
where applicable on the tire
sidewall between tread shoulder
and maximum section width. For
example:
Treadwear 200 Traction AA
Temperature A
The following information relates
to the system developed by the
United States National Highway
Traffic Safety Administration
(NHTSA), which grades tires
by treadwear, traction, and
temperature performance. This
applies only to vehicles sold in
the United States. The grades
are molded on the sidewalls of
most passenger car tires. The
Uniform Tire Quality Grading
(UTQG) system does not apply
to deep tread, winter tires,
compact spare tires, tires with nominal rim diameters of
10 to 12 inches (25 to 30 cm),
or to some limited-production
tires.
While the tires available on
General Motors passenger cars
and light trucks may vary with
respect to these grades, they
must also conform to federal
safety requirements and
additional General Motors Tire
Performance Criteria (TPC)
standards.
All Passenger Car Tires Must
Conform to Federal Safety
Requirements In Addition To
These Grades.
Treadwear
The treadwear grade is a
comparative rating based on the
wear rate of the tire when tested
under controlled conditions on a
specified government test
course. For example, a tire
Page 316 of 402
Black plate (68,1)Chevrolet Express Owner Manual - 2013 - 1stPrintReady - 6/19/12
10-68 Vehicle Care
Tire Changing
Removing the Spare Tire and
Tools
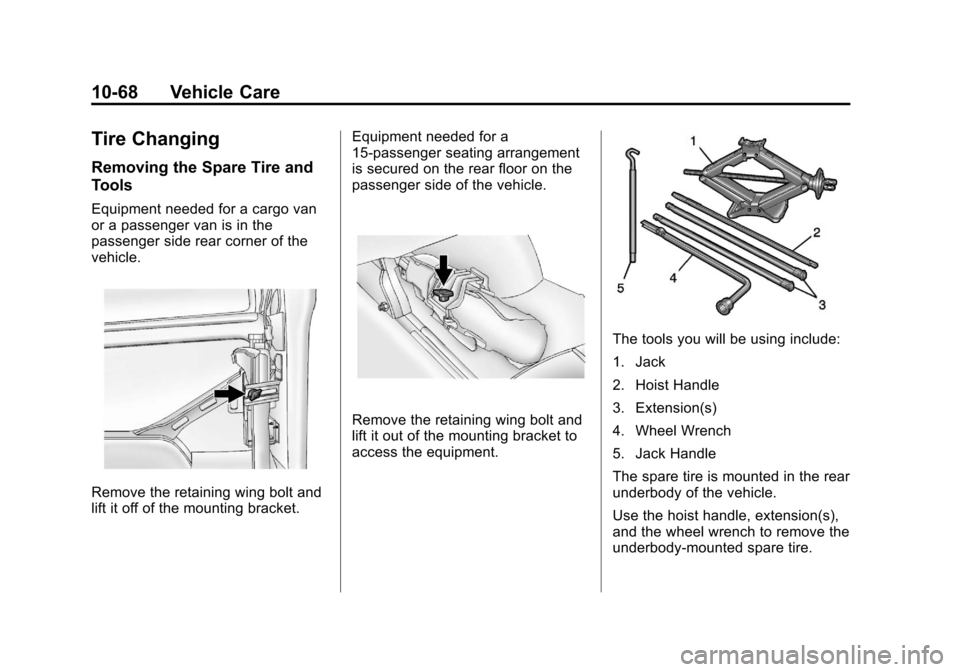
Equipment needed for a cargo van
or a passenger van is in the
passenger side rear corner of the
vehicle.
Remove the retaining wing bolt and
lift it off of the mounting bracket.Equipment needed for a
15-passenger seating arrangement
is secured on the rear floor on the
passenger side of the vehicle.
Remove the retaining wing bolt and
lift it out of the mounting bracket to
access the equipment.
The tools you will be using include:
1. Jack
2. Hoist Handle
3. Extension(s)
4. Wheel Wrench
5. Jack Handle
The spare tire is mounted in the rear
underbody of the vehicle.
Use the hoist handle, extension(s),
and the wheel wrench to remove the
underbody-mounted spare tire.
Page 317 of 402
Black plate (69,1)Chevrolet Express Owner Manual - 2013 - 1stPrintReady - 6/19/12
Vehicle Care 10-69
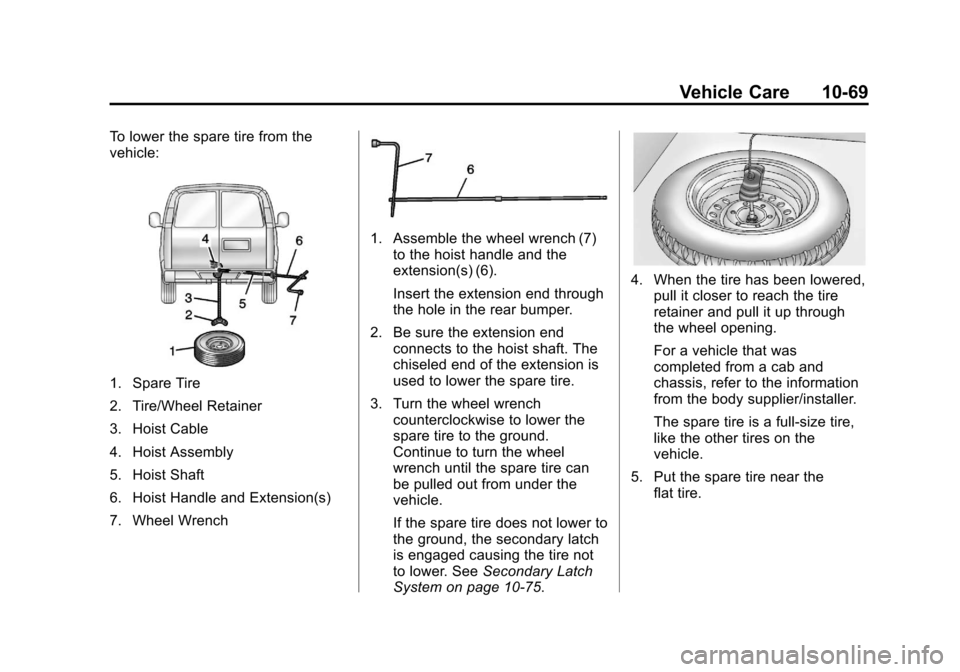
To lower the spare tire from the
vehicle:
1. Spare Tire
2. Tire/Wheel Retainer
3. Hoist Cable
4. Hoist Assembly
5. Hoist Shaft
6. Hoist Handle and Extension(s)
7. Wheel Wrench
1. Assemble the wheel wrench (7)to the hoist handle and the
extension(s) (6).
Insert the extension end through
the hole in the rear bumper.
2. Be sure the extension end connects to the hoist shaft. The
chiseled end of the extension is
used to lower the spare tire.
3. Turn the wheel wrench counterclockwise to lower the
spare tire to the ground.
Continue to turn the wheel
wrench until the spare tire can
be pulled out from under the
vehicle.
If the spare tire does not lower to
the ground, the secondary latch
is engaged causing the tire not
to lower. See Secondary Latch
System on page 10‑75.
4. When the tire has been lowered,
pull it closer to reach the tire
retainer and pull it up through
the wheel opening.
For a vehicle that was
completed from a cab and
chassis, refer to the information
from the body supplier/installer.
The spare tire is a full-size tire,
like the other tires on the
vehicle.
5. Put the spare tire near the flat tire.
Page 318 of 402
Black plate (70,1)Chevrolet Express Owner Manual - 2013 - 1stPrintReady - 6/19/12
10-70 Vehicle Care
Removing the Flat Tire and
Installing the Spare Tire
If the vehicle has plastic wheel nut
caps, loosen them by turning the
wheel wrench counterclockwise.
The wheel nut caps are designed to
remain with the center cap. Remove
the center cap.
If the wheel has a smooth center
piece, place the chisel end of the
wheel wrench in the slot on the
wheel and gently pry it out.
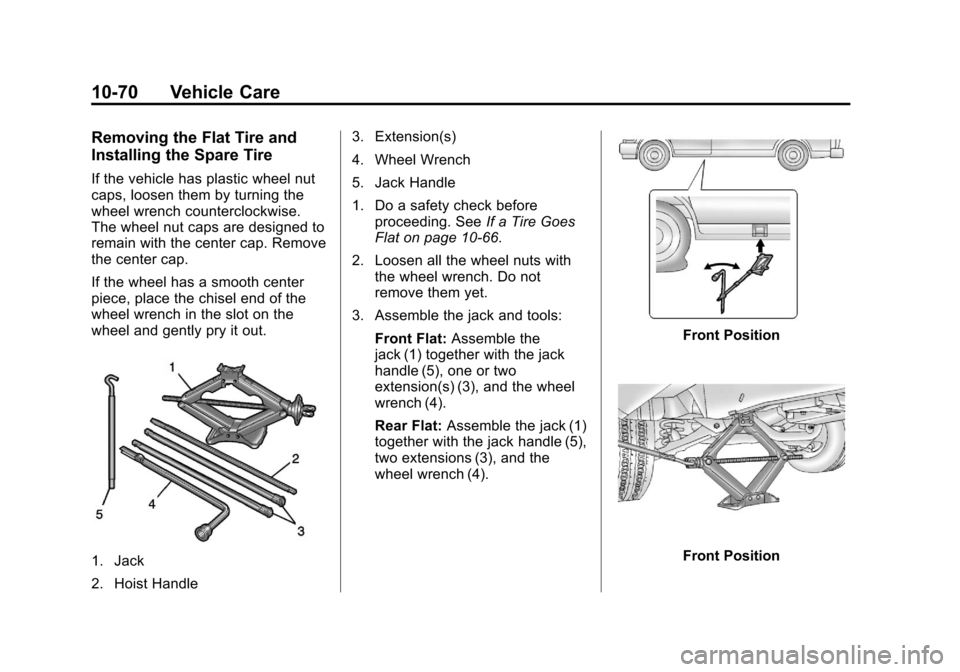
1. Jack
2. Hoist Handle3. Extension(s)
4. Wheel Wrench
5. Jack Handle
1. Do a safety check before
proceeding. See If a Tire Goes
Flat on page 10‑66.
2. Loosen all the wheel nuts with the wheel wrench. Do not
remove them yet.
3. Assemble the jack and tools: Front Flat: Assemble the
jack (1) together with the jack
handle (5), one or two
extension(s) (3), and the wheel
wrench (4).
Rear Flat: Assemble the jack (1)
together with the jack handle (5),
two extensions (3), and the
wheel wrench (4).
Front Position
Front Position
Page 319 of 402
Black plate (71,1)Chevrolet Express Owner Manual - 2013 - 1stPrintReady - 6/19/12
Vehicle Care 10-71
Rear Position
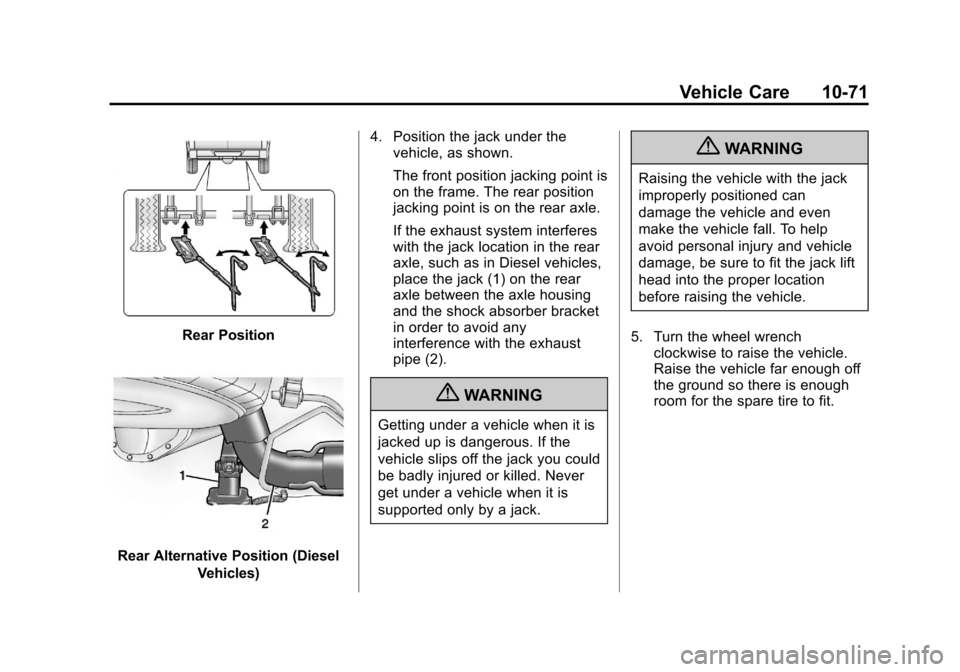
Rear Alternative Position (DieselVehicles) 4. Position the jack under the
vehicle, as shown.
The front position jacking point is
on the frame. The rear position
jacking point is on the rear axle.
If the exhaust system interferes
with the jack location in the rear
axle, such as in Diesel vehicles,
place the jack (1) on the rear
axle between the axle housing
and the shock absorber bracket
in order to avoid any
interference with the exhaust
pipe (2).
{WARNING
Getting under a vehicle when it is
jacked up is dangerous. If the
vehicle slips off the jack you could
be badly injured or killed. Never
get under a vehicle when it is
supported only by a jack.
{WARNING
Raising the vehicle with the jack
improperly positioned can
damage the vehicle and even
make the vehicle fall. To help
avoid personal injury and vehicle
damage, be sure to fit the jack lift
head into the proper location
before raising the vehicle.
5. Turn the wheel wrench clockwise to raise the vehicle.
Raise the vehicle far enough off
the ground so there is enough
room for the spare tire to fit.
Page 320 of 402
Black plate (72,1)Chevrolet Express Owner Manual - 2013 - 1stPrintReady - 6/19/12
10-72 Vehicle Care
6. Remove all the wheel nuts.
7. Take the flat tire off of themounting surface.
{WARNING
Rust or dirt on a wheel, or on the
parts to which it is fastened, can
make wheel nuts become loose
after time. The wheel could come
off and cause an accident. When
changing a wheel, remove any
rust or dirt from places where the
(Continued)
WARNING (CONTINUED)
wheel attaches to the vehicle. In
an emergency, a cloth or a paper
towel can be used; however, use
a scraper or wire brush later to
remove all rust or dirt.
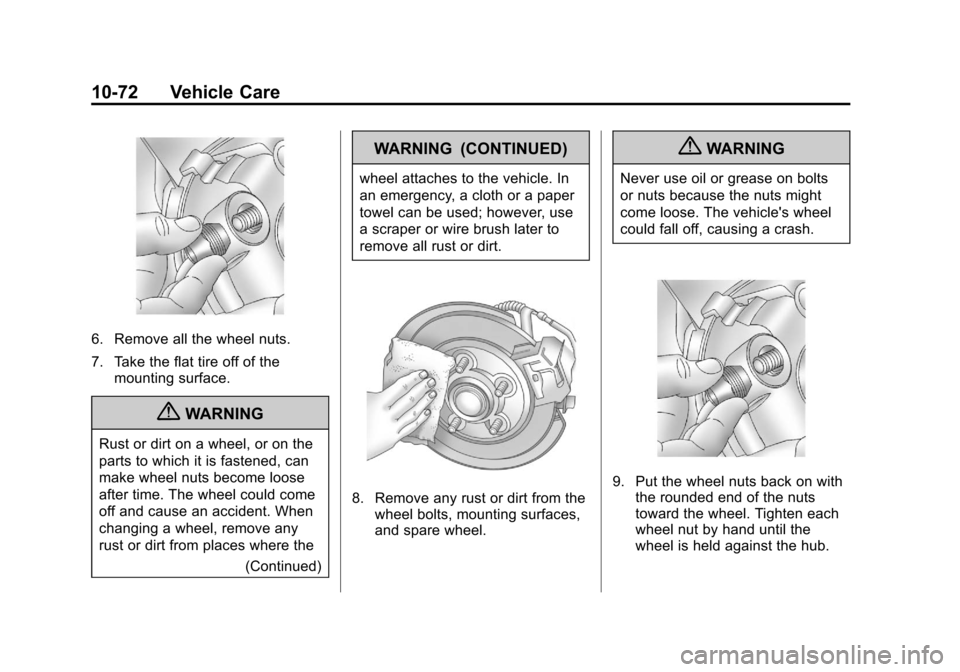
8. Remove any rust or dirt from thewheel bolts, mounting surfaces,
and spare wheel.
{WARNING
Never use oil or grease on bolts
or nuts because the nuts might
come loose. The vehicle's wheel
could fall off, causing a crash.
9. Put the wheel nuts back on withthe rounded end of the nuts
toward the wheel. Tighten each
wheel nut by hand until the
wheel is held against the hub.