2013 CHEVROLET EXPRESS PASSANGER spare tire
[x] Cancel search: spare tirePage 322 of 402

Black plate (74,1)Chevrolet Express Owner Manual - 2013 - 1stPrintReady - 6/19/12
10-74 Vehicle Care
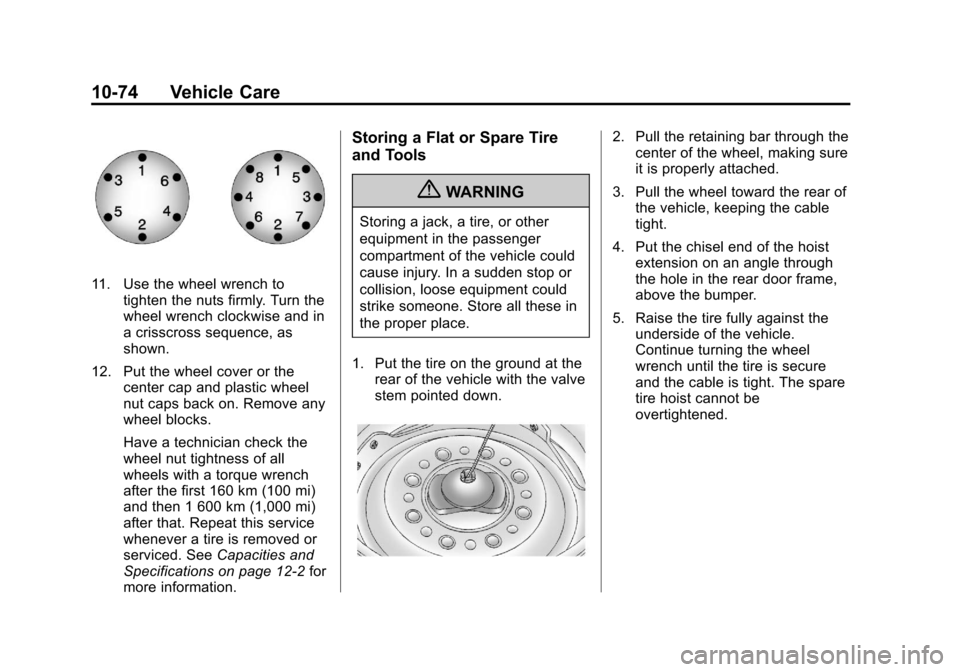
11. Use the wheel wrench totighten the nuts firmly. Turn the
wheel wrench clockwise and in
a crisscross sequence, as
shown.
12. Put the wheel cover or the center cap and plastic wheel
nut caps back on. Remove any
wheel blocks.
Have a technician check the
wheel nut tightness of all
wheels with a torque wrench
after the first 160 km (100 mi)
and then 1 600 km (1,000 mi)
after that. Repeat this service
whenever a tire is removed or
serviced. See Capacities and
Specifications on page 12‑2 for
more information.
Storing a Flat or Spare Tire
and Tools
{WARNING
Storing a jack, a tire, or other
equipment in the passenger
compartment of the vehicle could
cause injury. In a sudden stop or
collision, loose equipment could
strike someone. Store all these in
the proper place.
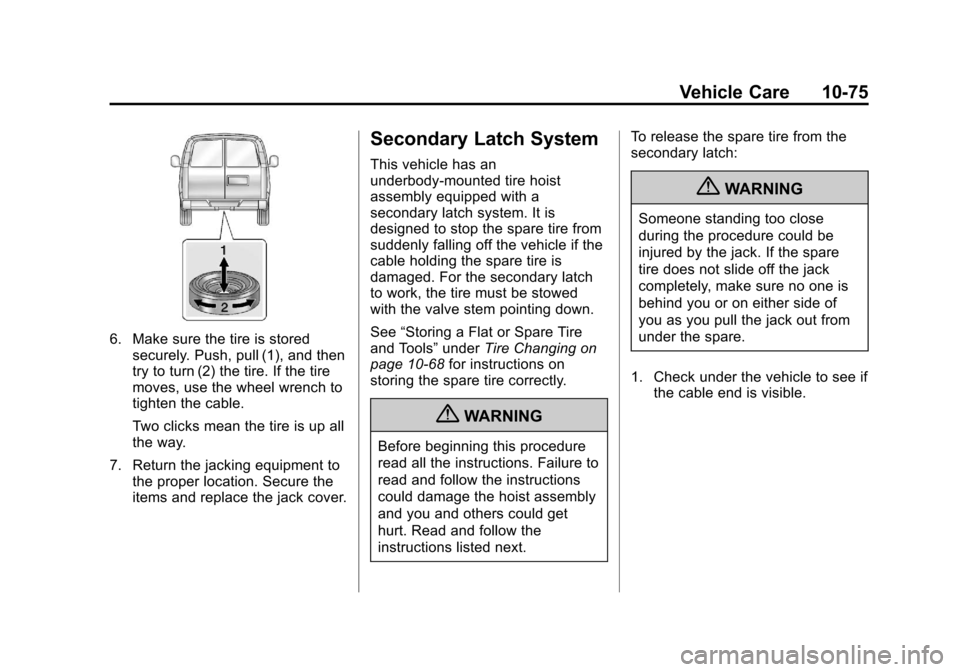
1. Put the tire on the ground at the rear of the vehicle with the valve
stem pointed down.
2. Pull the retaining bar through thecenter of the wheel, making sure
it is properly attached.
3. Pull the wheel toward the rear of the vehicle, keeping the cable
tight.
4. Put the chisel end of the hoist extension on an angle through
the hole in the rear door frame,
above the bumper.
5. Raise the tire fully against the underside of the vehicle.
Continue turning the wheel
wrench until the tire is secure
and the cable is tight. The spare
tire hoist cannot be
overtightened.
Page 323 of 402

Black plate (75,1)Chevrolet Express Owner Manual - 2013 - 1stPrintReady - 6/19/12
Vehicle Care 10-75
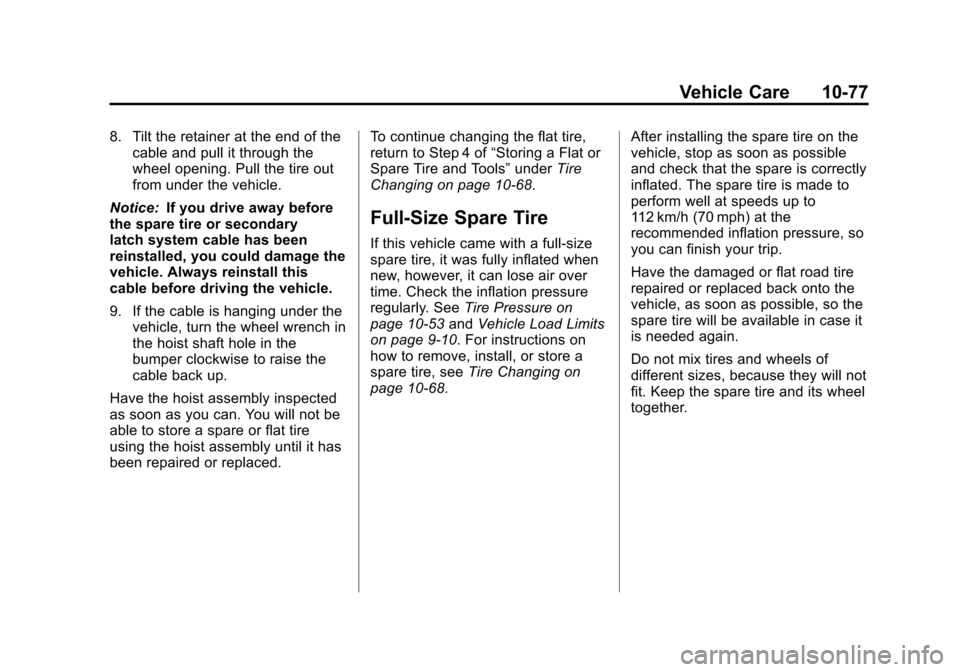
6. Make sure the tire is storedsecurely. Push, pull (1), and then
try to turn (2) the tire. If the tire
moves, use the wheel wrench to
tighten the cable.
Two clicks mean the tire is up all
the way.
7. Return the jacking equipment to the proper location. Secure the
items and replace the jack cover.
Secondary Latch System
This vehicle has an
underbody-mounted tire hoist
assembly equipped with a
secondary latch system. It is
designed to stop the spare tire from
suddenly falling off the vehicle if the
cable holding the spare tire is
damaged. For the secondary latch
to work, the tire must be stowed
with the valve stem pointing down.
See “Storing a Flat or Spare Tire
and Tools” underTire Changing on
page 10‑68 for instructions on
storing the spare tire correctly.
{WARNING
Before beginning this procedure
read all the instructions. Failure to
read and follow the instructions
could damage the hoist assembly
and you and others could get
hurt. Read and follow the
instructions listed next. To release the spare tire from the
secondary latch:
{WARNING
Someone standing too close
during the procedure could be
injured by the jack. If the spare
tire does not slide off the jack
completely, make sure no one is
behind you or on either side of
you as you pull the jack out from
under the spare.
1. Check under the vehicle to see if the cable end is visible.
Page 324 of 402

Black plate (76,1)Chevrolet Express Owner Manual - 2013 - 1stPrintReady - 6/19/12
10-76 Vehicle Care
If the cable is not visible, start
this procedure at Step 6.
2. Turn the hoist extension counterclockwise until
approximately 15 cm (6 in) of
cable is exposed.
3. Attach the jack handle/jackhandle extension and wheel
wrench to the jack.
4. Place the jack under the vehicle,ahead of the rear bumper.
Position the center lift point of
the jack under the center of the
spare tire and turn the handle
clockwise to raise the jack until it
lifts the secondary latch spring. 5. Keep raising the jack until the
spare tire stops moving upward
and is held firmly in place. This
lets you know that the secondary
latch has released. The spare
tire is now balancing on the jack.
6. Lower the jack by turning the wheel wrench counterclockwise.
Keep lowering the jack until the
spare tire slides off the jack or is
hanging by the cable.
7. Disconnect the jack handle from the jack and carefully remove
the jack. Use one hand to push
against the spare while firmly
pulling the jack out from under
the spare tire with the
other hand.
If the spare tire is hanging from
the cable, assembly the wheel
wrench onto the hoist extension
and insert the chisel end of the
hoist extension into the hoist
shaft hole above the bumper.
Turn the wheel wrench
counterclockwise to lower the
spare the rest of the way.
Page 325 of 402

Black plate (77,1)Chevrolet Express Owner Manual - 2013 - 1stPrintReady - 6/19/12
Vehicle Care 10-77
8. Tilt the retainer at the end of thecable and pull it through the
wheel opening. Pull the tire out
from under the vehicle.
Notice: If you drive away before
the spare tire or secondary
latch system cable has been
reinstalled, you could damage the
vehicle. Always reinstall this
cable before driving the vehicle.
9. If the cable is hanging under the
vehicle, turn the wheel wrench in
the hoist shaft hole in the
bumper clockwise to raise the
cable back up.
Have the hoist assembly inspected
as soon as you can. You will not be
able to store a spare or flat tire
using the hoist assembly until it has
been repaired or replaced. To continue changing the flat tire,
return to Step 4 of
“Storing a Flat or
Spare Tire and Tools” underTire
Changing on page 10‑68.
Full-Size Spare Tire
If this vehicle came with a full-size
spare tire, it was fully inflated when
new, however, it can lose air over
time. Check the inflation pressure
regularly. See Tire Pressure on
page 10‑53 andVehicle Load Limits
on page 9‑10. For instructions on
how to remove, install, or store a
spare tire, see Tire Changing on
page 10‑68. After installing the spare tire on the
vehicle, stop as soon as possible
and check that the spare is correctly
inflated. The spare tire is made to
perform well at speeds up to
112 km/h (70 mph) at the
recommended inflation pressure, so
you can finish your trip.
Have the damaged or flat road tire
repaired or replaced back onto the
vehicle, as soon as possible, so the
spare tire will be available in case it
is needed again.
Do not mix tires and wheels of
different sizes, because they will not
fit. Keep the spare tire and its wheel
together.
Page 373 of 402

Black plate (11,1)Chevrolet Express Owner Manual - 2013 - 1stPrintReady - 6/19/12
Customer Information 13-11
Chevrolet reserves the right to make
any changes or discontinue the
Roadside Assistance program at
any time without notification.
Roadside Assistance
Program (U.S. and
Canada)
For U.S.-purchased vehicles, call
1-800-243-8872; (Text Telephone
(TTY): 1-888-889-2438).
For Canadian-purchased vehicles,
call 1-800-268-6800.
Service is available 24 hours a day,
365 days a year.
Calling for Assistance
When calling Roadside Assistance,
have the following information
ready:
.Your name, home address, and
home telephone number.
.Telephone number of your
location.
.Location of the vehicle.
.Model, year, color, and license
plate number of the vehicle.
.Odometer reading, Vehicle
Identification Number (VIN), and
delivery date of the vehicle.
.Description of the problem.
Coverage
Services are provided up to 5 years/
160 000 km (100,000 mi), whichever
comes first.
In the U.S., anyone driving the
vehicle is covered. In Canada, a
person driving the vehicle without
permission from the owner is not
covered.
Roadside Assistance is not a part of
the New Vehicle Limited Warranty.
Chevrolet and General Motors of
Canada Limited reserve the right to
make any changes or discontinue
the Roadside Assistance program at
any time without notification.
Chevrolet and General Motors of
Canada Limited reserve the right to
limit services or payment to an
owner or driver if they decide theclaims are made too often, or the
same type of claim is made many
times.
Services Provided
.Emergency Fuel Delivery:
Delivery of enough fuel for the
vehicle to get to the nearest
service station.
.Lock-Out Service:
Service to
unlock the vehicle if you are
locked out. A remote unlock may
be available if you have OnStar.
For security reasons, the driver
must present identification
before this service is given.
.Emergency Tow from a Public
Road or Highway: Tow to the
nearest Chevrolet dealer for
warranty service, or if the vehicle
was in a crash and cannot be
driven. Assistance is also given
when the vehicle is stuck in the
sand, mud, or snow.
.Flat Tire Change: Service to
change a flat tire with the spare
tire. The spare tire, if equipped,
Page 395 of 402

Black plate (5,1)Chevrolet Express Owner Manual - 2013 - 1stPrintReady - 6/19/12
INDEX i-5
Fuel (cont'd)Recommended . . . . . . . . . . . . . . . 9-42
Requirements, California . . . . . 9-42
System Messages . . . . . . . . . . . . 5-33
Full-Size Spare Tire . . . . . . . . . . 10-77
Fuses Engine CompartmentFuse Block . . . . . . . . . . . . . . . . 10-38
Floor Console Fuse Block . . 10-41
Fuses and Circuit
Breakers . . . . . . . . . . . . . . . . . . 10-38
G
GasolineSpecifications . . . . . . . . . . . . . . . . . 9-42
Gauges
Engine CoolantTemperature . . . . . . . . . . . . . . . . 5-12
Engine Oil Pressure . . . . . . . . . . 5-11
Fuel . . . . . . . . . . . . . . . . . . . . . . . . . . 5-10
Odometer . . . . . . . . . . . . . . . . . . . . . 5-10
Speedometer . . . . . . . . . . . . . . . . . 5-10
Trip Odometer . . . . . . . . . . . . . . . . 5-10
Voltmeter . . . . . . . . . . . . . . . . . . . . . 5-13
Warning Lights and Indicators . . . . . . . . . . . . . . . . . . . . 5-8 General Information
Service and Maintenance . . . . . 11-1
Towing . . . . . . . . . . . . . . . . . . . . . . . . 9-47
Vehicle Care . . . . . . . . . . . . . . . . . . 10-2
Glass, Enhanced Technology . . . . . . . . . . . . . . . . . . . 2-17
GM Mobility Reimbursement
Program . . . . . . . . . . . . . . . . . . . . . . 13-7
H
Halogen Bulbs . . . . . . . . . . . . . . . . 10-32
Hazard Warning Flashers . . . . . . . 6-4
Head Restraints . . . . . . . . . . . . . . . . 3-2
Headlamps . . . . . . . . . . . . . . . . . . . 10-33Aiming . . . . . . . . . . . . . . . . . . . . . . 10-32
Automatic . . . . . . . . . . . . . . . . . . . . . . 6-3
Bulb Replacement . . . . . . . . . . 10-32
Daytime RunningLamps (DRL) . . . . . . . . . . . . . . . . . 6-2
Flash-to-Pass . . . . . . . . . . . . . . . . . . 6-2
High-Beam On Light . . . . . . . . . . 5-24
High/Low Beam Changer . . . . . . 6-2
Heated Mirrors . . . . . . . . . . . . . . . . . 2-14 Heater
Engine . . . . . . . . . . . . . . . . . . . . . . . . 9-18
Heating and Air Conditioning . . . 8-1
High-Beam On Light . . . . . . . . . . . 5-24
Highway Hypnosis . . . . . . . . . . . . . . 9-6
Hill and Mountain Roads . . . . . . . . 9-7
Hood . . . . . . . . . . . . . . . . . . . . . . . . . . 10-4
Horn . . . . . . . . . . . . . . . . . . . . . . . . . . . . 5-3
How to Wear Safety Belts Properly . . . . . . . . . . . . . . . . . . . . . . . 3-9I
Idle SystemFast . . . . . . . . . . . . . . . . . . . . . . . . . . 9-18
Ignition Positions . . . . . . . . . . . . . . 9-15
Ignition Transmission Lock Check . . . . . . . . . . . . . . . . . . . . . . . 10-31
Immobilizer . . . . . . . . . . . . . . . . . . . . 2-11
Infants and Young Children,
Restraints . . . . . . . . . . . . . . . . . . . . 3-35
Infotainment . . . . . . . . . . . . . . . . . . . . 7-1
Instrument Cluster . . . . . . . . . . . . . . 5-9
Introduction . . . . . . . . . . . . . . . . . . . . . . . iii
Page 400 of 402

Black plate (10,1)Chevrolet Express Owner Manual - 2013 - 1stPrintReady - 6/19/12
i-10 INDEX
Service (cont'd)Publications Ordering
Information . . . . . . . . . . . . . . . . 13-16
Scheduling Appointments . . . 13-12
Vehicle Messages . . . . . . . . . . . . 5-36
Servicing the Airbag . . . . . . . . . . . 3-31
Shift Lock Control Function Check, Automatic
Transmission . . . . . . . . . . . . . . . . 10-30
Shifting Into Park . . . . . . . . . . . . . . . . . . . . . . 9-19
Out of Park . . . . . . . . . . . . . . . . . . . 9-20
Side Door . . . . . . . . . . . . . . . . . . . . . . 2-9
Sidemarker Bulb Replacement . . . . . . . . . . 10-34
Signals, Turn and Lane-Change . . . . . . . . . . . . . . . . . 6-4
Sliding Door . . . . . . . . . . . . . . . . . . . 2-10
Specifications and
Capacities . . . . . . . . . . . . . . . . . . . . 12-2
Speedometer . . . . . . . . . . . . . . . . . . 5-10
StabiliTrak OFF Light . . . . . . . . . . . . . . . . . . . . . 5-21
System . . . . . . . . . . . . . . . . . . . . . . . 9-32
Start Vehicle, Remote . . . . . . . . . . 2-4
Starter Switch Check . . . . . . . . . 10-30
Starting the Engine . . . . . . . . . . . . 9-16 Steering . . . . . . . . . . . . . . . . . . . . . . . . 9-4
Fluid, Power . . . . . . . . . . . . . . . . 10-23
Wheel Adjustment . . . . . . . . . . . . . 5-2
Wheel Controls . . . . . . . . . . . . . . . . 5-2
Storage Areas Front . . . . . . . . . . . . . . . . . . . . . . . . . . 4-1
Stuck Vehicle . . . . . . . . . . . . . . . . . . . 9-9
Sun Visors . . . . . . . . . . . . . . . . . . . . . 2-18
Swing-out Windows . . . . . . . . . . . . 2-16
Switches Airbag On-Off . . . . . . . . . . . . . . . . . 3-23
Symbols . . . . . . . . . . . . . . . . . . . . . . . . . . iv
System Infotainment . . . . . . . . . . . . . . . . . . . 7-1
Noise Control . . . . . . . . . . . . . . . 10-29
T
Taillamps . . . . . . . . . . . . . . . . . . . . . 10-35
Text Telephone (TTY) Users . . . 13-6
Theft-Deterrent Systems . . . . . . . 2-11Immobilizer . . . . . . . . . . . . . . . . . . . 2-11
Time . . . . . . . . . . . . . . . . . . . . . . . . . . . . 5-6
Tires Buying New Tires . . . . . . . . . . . 10-61
Chains . . . . . . . . . . . . . . . . . . . . . . 10-65
Changing . . . . . . . . . . . . . . . . . . . 10-68 Tires (cont'd)
Designations . . . . . . . . . . . . . . . 10-48
Different Size . . . . . . . . . . . . . . . 10-62
Dual Rotation . . . . . . . . . . . . . . . 10-59
Full-Size Spare . . . . . . . . . . . . . 10-77
If a Tire Goes Flat . . . . . . . . . . 10-66
Inflation Monitor System . . . . 10-55
Inspection . . . . . . . . . . . . . . . . . . 10-58
Messages . . . . . . . . . . . . . . . . . . . . 5-36
Pressure Light . . . . . . . . . . . . . . . . 5-22
Pressure Monitor System . . . 10-54
Rotation . . . . . . . . . . . . . . . . . . . . 10-58
Secondary Latch System . . . 10-75
Sidewall Labeling . . . . . . . . . . . 10-46
Terminology and
Definitions . . . . . . . . . . . . . . . . . 10-50
Uniform Tire Quality Grading . . . . . . . . . . . . . . . . . . . 10-63
Wheel Alignment and Tire Balance . . . . . . . . . . . . . . . . . . . 10-64
Wheel Replacement . . . . . . . . 10-65
When It Is Time for New Tires . . . . . . . . . . . . . . . . . . . . . . 10-60
Winter . . . . . . . . . . . . . . . . . . . . . . 10-45
Tow/Haul Mode . . . . . . . . . . . . . . . . 9-29
Tow/Haul Mode Light . . . . . . . . . . 5-21