Page 137 of 388

Black plate (31,1)Chevrolet Equinox Owner Manual - 2013 - CRC - 5/21/12
Instruments and Controls 5-31
The low tire pressure warning light
will also come on. SeeTire
Pressure Light on page 5‑19.
If a tire pressure message appears
on the DIC, stop as soon as you
can. Inflate the tires by adding air
until the tire pressure is equal to the
values shown on the Tire and
Loading Information label. See Tires
on page 10‑36, Vehicle Load Limits
on page 9‑14, and Tire Pressure on
page 10‑43.
You can receive more than one tire
pressure message at a time. The
DIC also shows the tire pressure
values. See Driver Information
Center (DIC) on page 5‑22.
Transmission Messages
SERVICE TRANSMISSION
This message displays if there is a
problem with the transmission. See
your dealer.
SHIFT TO PARK
This message displays when the
transmission needs to be shifted to
P (Park). This may appear when
attempting to remove the key from
the ignition or from the vehicle if the
vehicle is not in P (Park).
TRANSMISSION HOT —IDLE
ENGINE
This message displays and a chime
sounds if the transmission fluid in
the vehicle gets hot. Driving with the
transmission fluid temperature high
can cause damage to the vehicle.
Stop the vehicle and let it idle to
allow the transmission to cool. This
message clears when the fluid
temperature reaches a safe level.
Vehicle Reminder
Messages
ICE POSSIBLE DRIVE
WITH CARE
This message is displayed when ice
conditions are possible.
TURN WIPER CONTROL TO
INTERMITTENT FIRST
This message is displayed when
attempting to adjust the intermittent
wiper speed without intermittent
selected on the wiper control. See
Windshield Wiper/Washer on
page 5‑3.
Page 138 of 388

Black plate (32,1)Chevrolet Equinox Owner Manual - 2013 - CRC - 5/21/12
5-32 Instruments and Controls
Vehicle
Personalization
The audio system controls are used
to access the personalization
menus for customizing vehicle
features.
CONFIG (Configuration):Press to
access the Configuration
Settings Menu.
MENU/SEL Knob: Press the
center of this knob to enter the
menus and select menu items. Turn
the knob to scroll through the
menus.
EBACK: Press to exit or move
backwards in a menu. Entering the Personalization
Menus
1. Turn the infotainment system on
and press the CONFIG button to
access the Configuration
Settings menu.
2. Turn the MENU/SEL knob to highlight Vehicle Settings.
3. Press the center of the MENU/ SEL knob to select the Vehicle
Settings menu.
The following list of menu items will
be available:
.Climate and Air Quality
.Comfort and Convenience
.Collision/Detection Systems
.Languages
.Lighting
.Power Door Locks
.Remote Lock/Unlock/Start
.Return to Factory Settings Turn the MENU/SEL knob to
highlight the menu. Press the knob
to select it. Each of the menus is
detailed in the following information.
All of the menus may not be
available. Only those tied to the
features on your vehicle will be
shown.
Climate and Air Quality
Select the Climate and Air Quality
menu and the following will be
displayed:
.Auto Fan Speed
.Air Conditioning Mode
.Remote Start Auto Heat Seats
.Auto Defog
.Auto Rear Defog
Auto Fan Speed
This selection is available on
vehicles with the Automatic Climate
Control System. Choose from the
following blower speed settings:
High: Increased speed.
Page 139 of 388

Black plate (33,1)Chevrolet Equinox Owner Manual - 2013 - CRC - 5/21/12
Instruments and Controls 5-33
Low:Reduced speed.
Normal: Moderate speed.
Press the MENU/SEL knob when
Auto Fan Speed is highlighted. Turn
the knob to highlight “High,”
“Normal,” or“Low.” Press the knob
to confirm the selection and go back
to the last menu.
Air Conditioning Mode
This will allow you to select whether
or not the air conditioning comes on
automatically the next time the
vehicle is started. “On”means that
the air conditioning will be on at
start up, regardless of whether it
was on or off the last time the
vehicle was turned off. “Off”means
the air conditioning will be off at the
next start up, regardless of whether
it was on or off the last time the
vehicle was turned off. “Last
Setting” means that when the
vehicle is started, the air
conditioning will resume whichever
setting it was at the last time the
vehicle was turned off. Press the MENU/SEL knob when
Air Conditioning Mode is
highlighted. Turn the knob to
highlight
“On,” “Off,” or“Last
Setting.” Press the knob to confirm
the selection and go back to the
last menu.
Remote Start Auto Heat Seats
When on, this feature will turn the
heated seats on when using remote
start on cold days.
Press the MENU/SEL knob when
“Remote Start Auto Heat Seats” is
highlighted to toggle between “On”
or “Off.” Press
EBACK to confirm
the selection and go back to the
last menu.
Auto Defog
When turned on and high humidity
is detected, the climate control
system may adjust to outside air
supply and turn on the air
conditioner or the heater. The fan
speed may slightly increase to help
prevent fogging. When high humidity is no longer detected, the
system will return to its prior
operation.
Press the MENU/SEL knob when
“Auto Defog”
is highlighted to toggle
between “On”or“Off.” Press
E
BACK to confirm the selection and
go back to the last menu.
Auto Rear Defog
When on, this feature turns on the
rear defogger at vehicle start when
the interior temperature is cold and
fog is likely. The auto rear defog
function can be disabled by
pressing
1. When off, the feature
can be turned on by pressing
1.
See “Rear Window Defogger” under
Climate Control Systems on
page 8‑1 orAutomatic Climate
Control System on page 8‑3 for
more information.
Press the MENU/SEL knob when
“Auto Rear Defog” is highlighted to
toggle between “On”or“Off.” Press
EBACK to confirm the selection
and go back to the last menu.
Page 140 of 388

Black plate (34,1)Chevrolet Equinox Owner Manual - 2013 - CRC - 5/21/12
5-34 Instruments and Controls
Comfort and Convenience
Select the Comfort and
Convenience menu and the
following will be displayed:
.Easy Exit Driver Seat
.Chime Volume
.Reverse Tilt Mirror
Easy Exit Driver Seat
When on, this feature will move the
driver seat rearward upon turning
the ignition off and the driver door
opening. This may be performed to
make it easier to exit the vehicle.
See the “Easy Exit Driver Seat”
information under Power Seat
Adjustment on page 3‑4 for more
information.
This allows you to turn the easy exit
seat feature on or off.
Press the MENU/SEL knob when
“Easy Exit Driver Seat” is
highlighted. Turn the knob to select
“On” or“Off.” Press the knob to
confirm and go back to the
last menu. Chime Volume
This allows the selection of the
chime volume level.
Press the MENU/SEL knob when
“Chime Volume”
is highlighted. Turn
the knob to select “Normal”or
“High.” Press the knob to confirm
and go back to the last menu.
Reverse Tilt Mirror
When on, both the driver and
passenger mirrors will tilt downward
when vehicle is shifted to
R (Reverse) to improve visibility of
the ground near the rear wheels.
They will return to their previous
driving position when the vehicle is
shifted out of R (Reverse), the
ignition is turned to OFF, or the
vehicle is left in reverse. See Park
Tilt Mirrors on page 2‑16 for more
information.
This allows you to turn the park tilt
mirrors feature on or off. Press the MENU/SEL knob when
“Reverse Tilt Mirror”
is highlighted.
Turn the knob to select “On”or“Off.”
Press the knob to confirm and go
back to the last menu.
Collision/Detection Systems
Select the Collision/Detection
Systems menu and the following will
be displayed:
.Park Assist
Park Assist
This allows the Ultrasonic Parking
Assist feature to be turned on or off.
Press the MENU/SEL knob when
“Park Assist” is highlighted. Turn the
knob to select “On,” “Off,”or“Tow
Bar.” Press the knob to confirm and
go back to the last menu.
See Ultrasonic Parking Assist on
page 9‑40 for more information
Page 141 of 388

Black plate (35,1)Chevrolet Equinox Owner Manual - 2013 - CRC - 5/21/12
Instruments and Controls 5-35
Languages
Select the Languages menu and the
following will be displayed:
.English
.French
.Spanish
Turn the MENU/SEL knob to select
the language. Press the knob to
confirm and go back to the
last menu.
Lighting
Select the Lighting menu and the
following will be displayed:
.Vehicle Locator Lights
.Exit Lighting
Vehicle Locator Lights
This allows the vehicle locator lights
to be turned on or off.
Press the MENU/SEL knob when
“Vehicle Locator Lights” is
highlighted to toggle between “On”or
“Off.” Press
EBACK to confirm
the selection and go back to the
last menu.
Exit Lighting
This allows the selection of how
long the exterior lamps stay on
when leaving the vehicle when it is
dark outside.
Press the MENU/SEL knob when
“Exit Lighting” is highlighted. Turn
the knob to select “Off,”
“30 Seconds,” “1 Minute,” or
“2 Minutes.” Press the knob to
confirm and go back to the
last menu.
Power Door Locks
Select Power Door Locks and the
following will be displayed:
.Unlocked Door Anti Lock Out
.Auto Door Unlock
.Delayed Door Lock Unlocked Door Anti Lock Out
When on, this feature will keep the
driver door from locking when the
door is open. If off is selected, the
Delayed Door Lock menu will be
available.
Press the MENU/SEL knob when
“Unlocked Door Anti Lock Out”
is
highlighted to toggle between “On”
or “Off.” Press
EBACK to confirm
the selection and go back to the
last menu.
Auto Door Unlock
This allows selection of which of the
doors will automatically unlock when
the vehicle is shifted into P (Park).
Press the MENU/SEL knob when
“Auto Door Unlock” is highlighted.
Turn the knob to select “All Doors,”
“Driver Door,” or“Off.” Press the
knob to confirm and go back to the
last menu.
Page 142 of 388

Black plate (36,1)Chevrolet Equinox Owner Manual - 2013 - CRC - 5/21/12
5-36 Instruments and Controls
Delayed Door Lock
When on, this feature will delay the
locking of the doors. If you want to
override the delay you can press the
power door lock on the instrument
panel.
Press the MENU/SEL knob when
“Delayed Door Lock”is highlighted.
Turn the knob to select “On”or“Off.”
Press the knob to confirm and go
back to the last menu.
Remote Lock/Unlock/Start
Select Remote Lock/Unlock/Start
and the following will be displayed:
.Remote Unlock Light Feedback
.Remote Lock Feedback
.Remote Door Unlock
.Memory Remote Recall Remote Unlock Light Feedback
When on, the exterior lamps will
flash when unlocking the vehicle
with the RKE transmitter.
Press the MENU/SEL knob when
“Remote Unlock Light Feedback”
is
highlighted. Turn the knob to select
“Flash Lights” or“Off. ”Press the
knob to confirm and go back to the
last menu.
Remote Lock Feedback
This allows selection of what type of
feedback is given when unlocking
the vehicle with the RKE transmitter.
Press the MENU/SEL knob when
“Remote Lock Feedback” is
highlighted. Turn the knob to select
“Lights and Horn,” “Lights Only,”
“Horn Only,” or“Off. ”Press the knob
to confirm and go back to the
last menu. Remote Door Unlock
This allows selection of which doors
will unlock when pressing the unlock
button on the RKE transmitter.
Press the MENU/SEL knob when
“Remote Door Unlock”
is
highlighted. Turn the knob to select
“All Doors” or“Driver Door.” Press
the knob to confirm and go back to
the last menu.
Memory Remote Recall
This allows the Memory Remote
Recall feature to be turned on or off.
When on, this feature will recall the
current driver's last seat, outside
mirrors upon unlocking the driver
door with the RKE, and opening that
door. The current driver is identified
when the RKE transmitter is used to
unlock the driver door. See “Memory
Remote Recall” underMemory
Seats on page 3‑6 for more
information.
Page 143 of 388

Black plate (37,1)Chevrolet Equinox Owner Manual - 2013 - CRC - 5/21/12
Instruments and Controls 5-37
Memory Remote Recall is when the
memorized settings will be recalled
as you unlock the vehicle.
Press the MENU/SEL knob when
“Memory Remote Recall”is
highlighted to toggle between “On”
or “Off.” Press
EBACK to confirm
the selection and go back to the
last menu.
Return to Factory Settings
Select “Return to Factory Settings”
to return all of the vehicle
personalization to the default
settings. Turn the knob to select
“Yes” or“No.” Press the knob to
confirm and go back to the
last menu.
Universal Remote
System
See Radio Frequency Statement on
page 13‑15 for information
regarding Part 15 of the Federal
Communications Commission (FCC)
rules and Industry Canada
Standards RSS-GEN/210/220/310.
Universal Remote System
Programming
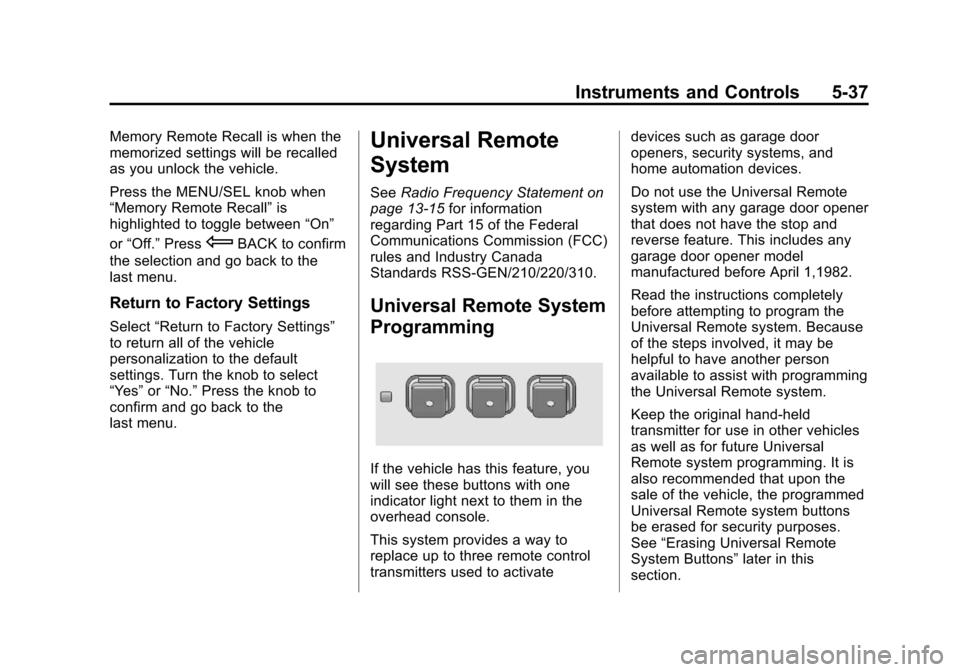
If the vehicle has this feature, you
will see these buttons with one
indicator light next to them in the
overhead console.
This system provides a way to
replace up to three remote control
transmitters used to activate devices such as garage door
openers, security systems, and
home automation devices.
Do not use the Universal Remote
system with any garage door opener
that does not have the stop and
reverse feature. This includes any
garage door opener model
manufactured before April 1,1982.
Read the instructions completely
before attempting to program the
Universal Remote system. Because
of the steps involved, it may be
helpful to have another person
available to assist with programming
the Universal Remote system.
Keep the original hand-held
transmitter for use in other vehicles
as well as for future Universal
Remote system programming. It is
also recommended that upon the
sale of the vehicle, the programmed
Universal Remote system buttons
be erased for security purposes.
See
“Erasing Universal Remote
System Buttons” later in this
section.
Page 144 of 388

Black plate (38,1)Chevrolet Equinox Owner Manual - 2013 - CRC - 5/21/12
5-38 Instruments and Controls
When programming a garage door,
park outside of the garage. Park
directly in line with and facing the
garage door opener motor-head or
gate motor-head. Be sure that
people and objects are clear of the
garage door or gate being
programmed.
It is recommended that a new
battery be installed in the hand-held
transmitter for quicker and more
accurate transmission of the
radio-frequency signal.
Programming the Universal
Remote System
For questions or help programming
the Universal Remote system, call
1-800-355-3515 or go to
www.homelink.com.
Programming a garage door opener
involves time-sensitive actions, so
read the entire procedure before
starting. Otherwise, the device will
time out and the procedure will have
to be repeated.To program up to three devices:
1. Hold the end of the hand-held
transmitter about 3 to 8 cm (1 to
3 in) away from the Universal
Remote system buttons while
keeping the indicator light in
view. The hand-held transmitter
was supplied by the
manufacturer of the garage door
opener receiver
(motor-head unit).
2. At the same time, press and hold both the hand-held
transmitter button and one of the
three Universal Remote system
buttons to be used to operate
the garage door. Do not release
the Universal Remote system
button or the hand-held
transmitter button until the
indicator light changes from a
slowly to a rapidly flashing light.
You now may release both
buttons. Some entry gates and garage
door openers may require
substitution of Step 2 with the
procedure noted in
“Gate
Operator and Canadian
Programming” later in this
section.
3. Press and hold for five seconds the newly trained Universal
Remote system button (the
button selected in Step 2) while
observing the indicator light and
garage door activation.
.If the indicator light stays on
continuously or the garage
door starts to move when
the Universal Remote
system button is pressed
and released, then the
programming is complete.
There is no need to
continue programming
Steps 4–6.