2013 CHEVROLET CRUZE buttons
[x] Cancel search: buttonsPage 9 of 394

Black plate (3,1)Chevrolet Cruze Owner Manual - 2013 - crc - 10/16/12
In Brief 1-3
1.Exterior Lamp Controls on
page 6‑1.
Front Fog Lamps on page 6‑4 (If
Equipped).
Instrument Panel Illumination
Control on page 6‑5.
2. Air Vents on page 8‑6.
3. Headlamp High/Low-Beam
Changer on page 6‑2.
Turn Signal Lever. See Turn and
Lane-Change Signals on
page 6‑4.
Driver Information Center (DIC)
Buttons. See Driver Information
Center (DIC) on page 5‑22.
4. Instrument Cluster on page 5‑8.
5. Driver Information Center (DIC)
on page 5‑22.
6. Steering Wheel Controls on
page 5‑2.
7. Windshield Wiper/Washer on
page 5‑3. 8.
Infotainment on page 7‑1.
Satellite Radio on page 7‑10 (If
Equipped).
9. Infotainment Display Screen.
10. Instrument Panel Storage on
page 4‑1.
11. Light Sensor. See Automatic
Headlamp System on
page 6‑3.
12. Passenger Airbag. See Where
Are the Airbags? on page 3‑19.
13. Hood Release. See Hood on
page 10‑4.
14. Data Link Connector (DLC) (Out of View). See Malfunction
Indicator Lamp on page 5‑13.
15. Instrument Panel Fuse Block
on page 10‑37.
16. Cruise Control on page 9‑36.
17. Steering Wheel Adjustment on
page 5‑2. 18.
Horn on page 5‑3.
Driver Airbag. See Where Are
the Airbags? on page 3‑19.
19. Ignition Switch or Keyless Ignition Button (If Equipped).
SeeIgnition Positions (Key
Access) on page 9‑15 or
Ignition Positions (Keyless
Access) on page 9‑17.
20. Driver Knee Airbag. See Where
Are the Airbags? on page 3‑19.
21. Power Door Locks on
page 2‑11.
22. Hazard Warning Flashers on
page 6‑4.
23. Power Outlets on page 5‑6.
24. Parking Brake on page 9‑33.
25. Shift Lever. See Automatic
Transmission on page 9‑26 or
Manual Transmission on
page 9‑30.
Page 20 of 394

Black plate (14,1)Chevrolet Cruze Owner Manual - 2013 - crc - 10/16/12
1-14 In Brief
6. Driver and Passenger HeatedSeats (If Equipped)
7. Power
8. Recirculation
9. MODE (Air Delivery Mode)
10. AQS (Air Quality Sensor)
11. Air Conditioning
See Climate Control Systems on
page 8‑1 orAutomatic Climate
Control System on page 8‑3 (If
Equipped).
Transmission
Manual Mode
Driver Shift Control (DSC) allows
the automatic transmission to be
shifted similar to a manual
transmission.
Electronic Range Select (ERS)
allows for the selection of a range of
gears.
See Manual Mode on page 9‑28.
Up‐Shift Light
If the vehicle has a manual
transmission, it will have an up-shift
light that indicates when to shift to
the next higher gear for the best fuel
economy.
SeeManual Transmission on
page 9‑30.
Vehicle Features
Radio(s)
O
: Press to turn the system on
and off. Turn to increase or
decrease the volume.
BAND: Press to choose between
FM, AM, or SiriusXM
®, if equipped.
MENU/SEL: Turn to select radio
stations. Press to select a menu.
g: Press to seek the previous
station or track.
l: Press to seek the next station
or track.
Buttons 1 to 6: Press to save and
select favorite stations.
INFO: Press to show available
information about the current station
or track.
For more information about these
and other radio features, see
Operation on page 7‑4.
Page 32 of 394

Black plate (4,1)Chevrolet Cruze Owner Manual - 2013 - crc - 10/16/12
2-4 Keys, Doors, and Windows
PressingQmay also arm the
theft-deterrent system. See Vehicle
Alarm System on page 2‑14.
K(Unlock): Press to unlock the
driver door or all doors. See “Door
Unlock Options” underVehicle
Personalization on page 5‑32.
The turn signal indicators may flash
and/or the horn may sound to
indicate unlocking. See “Unlock
Feedback” underVehicle
Personalization on page 5‑32.
Pressing
Kwill disarm the
theft-deterrent system. See Vehicle
Alarm System on page 2‑14.
V (Remote Trunk Release):
Press and hold to release the trunk.
7(Vehicle Locator/Panic
Alarm): Press and hold briefly to
initiate vehicle locator. The exterior
lamps flash and the horn chirps
three times.
Press and hold
7for at least
three seconds to sound the panic
alarm. The horn sounds and the turn signals flash for 30 seconds,
or until
7is pressed again or the
vehicle is started.
/(Remote Vehicle Start): For
vehicles with this feature, press
Q
and then press and hold/within
five seconds to start the engine from
outside the vehicle using the RKE
transmitter. See Remote Vehicle
Start on page 2‑9.
The buttons on the keys are
disabled when there is a key in the
ignition, if equipped.
Keyless Access Operation
The keyless access system allows
for the doors and trunk to be locked
and unlocked without pressing the
RKE transmitter button. The RKE
transmitter must be within 1 m (3 ft)
of the door being opened. If the
vehicle has this feature, there will be
a button on the outside door
handles. Keyless access can be programmed
to unlock all doors on the first lock/
unlock press from the driver door.
See
Vehicle Personalization on
page 5‑32.
Keyless Unlocking/Locking from
the Driver Door
When the doors are locked and the
RKE transmitter is within range of
the door handle, pressing the lock/
unlock button on the driver door
handle will unlock the driver door.
If the lock/unlock button is pressed
again within five seconds, all
passenger doors will unlock.
Page 45 of 394
Black plate (17,1)Chevrolet Cruze Owner Manual - 2013 - crc - 10/16/12
Keys, Doors, and Windows 2-17
Interior Mirrors
Manual Rearview Mirror
To adjust the inside rearview mirror,
hold the rearview mirror in the
center and move it to view the area
behind the vehicle.
For vehicles with a manual rearview
mirror, push the tab forward for
daytime use and pull it rearward for
nighttime use to avoid glare from
the headlamps from behind.
Vehicles with OnStar
®have three
control buttons at the bottom of the
mirror. See a dealer for more
information about OnStar and how
to subscribe to it. See OnStar
Overview on page 14‑1.
Automatic Dimming
Rearview Mirror
To adjust the inside rearview mirror,
hold the rearview mirror in the
center and move it to view the area
behind the vehicle.
For vehicles with an automatic
dimming rearview mirror, the mirror
will automatically reduce the glare
from the headlamps from behind.
The dimming feature and the
indicator light come on when the
vehicle is started.
Vehicles with OnStar have three
control buttons at the bottom of the
mirror. See your dealer for more
information about OnStar and how
to subscribe to it. See OnStar
Overview on page 14‑1.
Cleaning the Mirror
Do not spray glass cleaner directly
on the mirror. Use a soft towel
dampened with water.
Windows
{WARNING
Never leave a child, a helpless
adult, or a pet alone in a vehicle,
especially with the windows
closed in warm or hot weather.
They can be overcome by the
extreme heat and suffer
permanent injuries or even death
from heat stroke.
Page 94 of 394
Black plate (44,1)Chevrolet Cruze Owner Manual - 2013 - crc - 10/16/12
3-44 Seats and Restraints
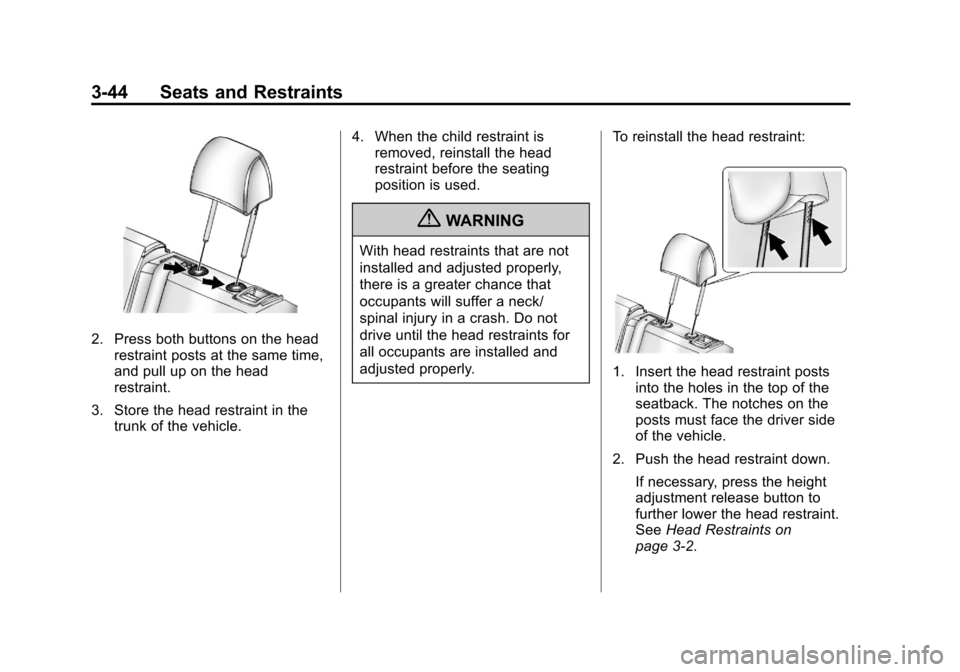
2. Press both buttons on the headrestraint posts at the same time,
and pull up on the head
restraint.
3. Store the head restraint in the trunk of the vehicle. 4. When the child restraint is
removed, reinstall the head
restraint before the seating
position is used.
{WARNING
With head restraints that are not
installed and adjusted properly,
there is a greater chance that
occupants will suffer a neck/
spinal injury in a crash. Do not
drive until the head restraints for
all occupants are installed and
adjusted properly. To reinstall the head restraint:
1. Insert the head restraint posts
into the holes in the top of the
seatback. The notches on the
posts must face the driver side
of the vehicle.
2. Push the head restraint down. If necessary, press the height
adjustment release button to
further lower the head restraint.
See Head Restraints on
page 3‑2.
Page 124 of 394
Black plate (22,1)Chevrolet Cruze Owner Manual - 2013 - crc - 10/16/12
5-22 Instruments and Controls
Information Displays
Driver Information
Center (DIC)
The DIC displays information about
your vehicle. It also displays
warning messages if a system
problem is detected. SeeVehicle
Messages on page 5‑26. All
messages appear in the DIC display
in the center of the instrument
cluster.
DIC Operation and Displays
The DIC has different displays
which can be accessed by using the
DIC buttons on the turn signal lever.
The DIC displays trip, fuel, and
warning messages if a system
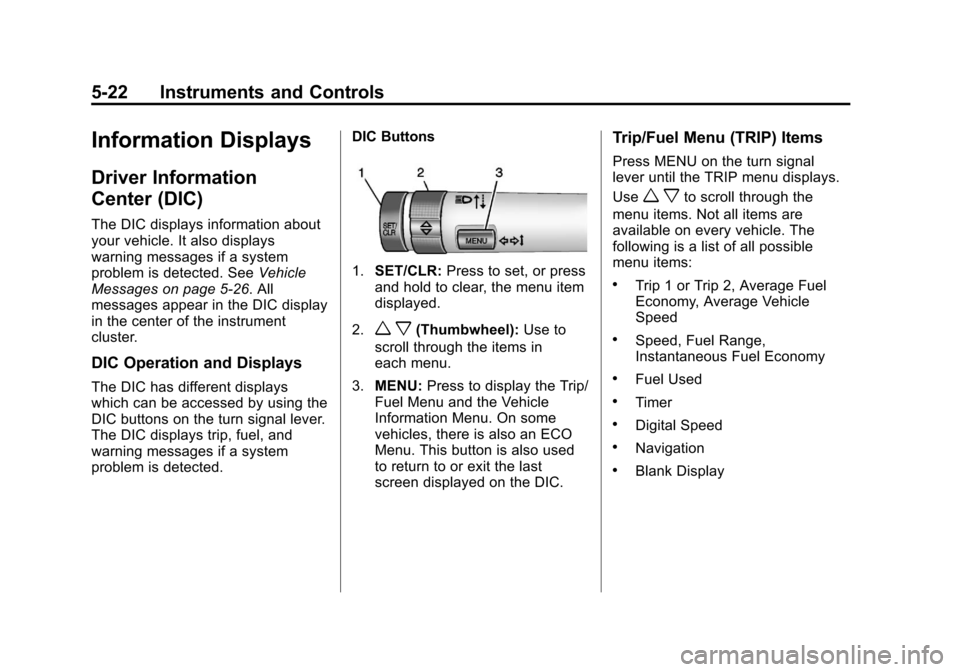
problem is detected. DIC Buttons
1.
SET/CLR: Press to set, or press
and hold to clear, the menu item
displayed.
2.
w x(Thumbwheel): Use to
scroll through the items in
each menu.
3. MENU: Press to display the Trip/
Fuel Menu and the Vehicle
Information Menu. On some
vehicles, there is also an ECO
Menu. This button is also used
to return to or exit the last
screen displayed on the DIC.
Trip/Fuel Menu (TRIP) Items
Press MENU on the turn signal
lever until the TRIP menu displays.
Use
w xto scroll through the
menu items. Not all items are
available on every vehicle. The
following is a list of all possible
menu items:
.Trip 1 or Trip 2, Average Fuel
Economy, Average Vehicle
Speed
.Speed, Fuel Range,
Instantaneous Fuel Economy
.Fuel Used
.Timer
.Digital Speed
.Navigation
.Blank Display
Page 151 of 394
Black plate (3,1)Chevrolet Cruze Owner Manual - 2013 - crc - 10/16/12
Infotainment System 7-3
Overview
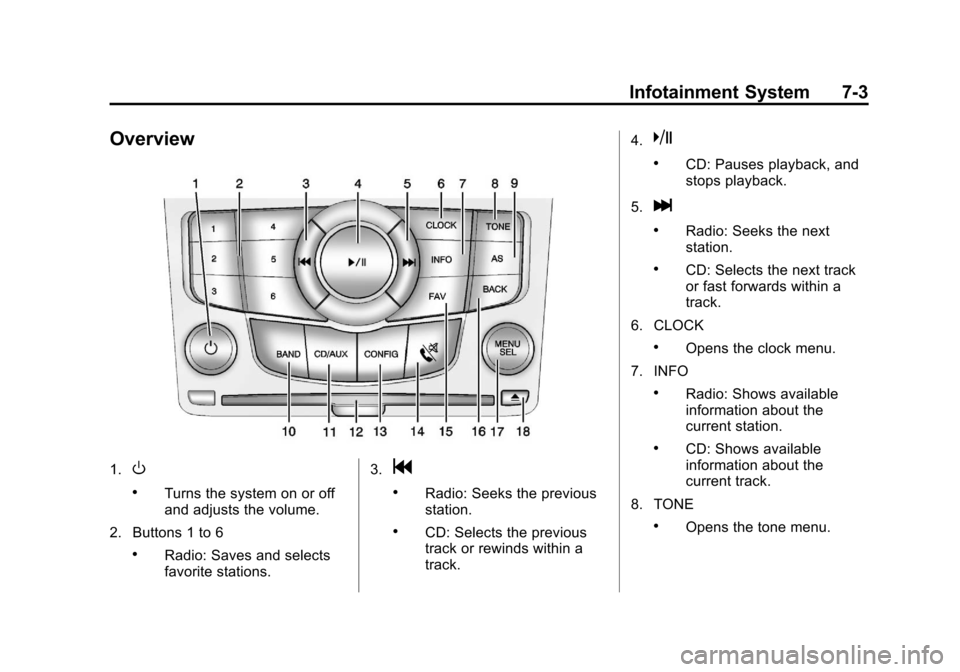
1.O
.Turns the system on or off
and adjusts the volume.
2. Buttons 1 to 6
.Radio: Saves and selects
favorite stations. 3.
g
.Radio: Seeks the previous
station.
.CD: Selects the previous
track or rewinds within a
track.4.
k
.CD: Pauses playback, and
stops playback.
5.
l
.Radio: Seeks the next
station.
.CD: Selects the next track
or fast forwards within a
track.
6. CLOCK
.Opens the clock menu.
7. INFO
.Radio: Shows available
information about the
current station.
.CD: Shows available
information about the
current track.
8. TONE
.Opens the tone menu.
Page 152 of 394
Black plate (4,1)Chevrolet Cruze Owner Manual - 2013 - crc - 10/16/12
7-4 Infotainment System
9. AS
.Radio: Opens the autostore
stations list.
10. BAND
.Changes the band while
listening to the radio.
.Selects the radio when
listening to a different
audio source.
11. CD/AUX
.Selects the CD player or
an external audio source.
12. CD Slot
.Insert a CD.
13. CONFIG
.Opens the settings menu.
14.
5\>
.Opens the phone
main menu.
.Mutes the audio system. 15. FAV
.Radio: Opens the
favorites list.
16. BACK
.Menu: Moves one
level back.
.Character Input: Deletes
the last character.
17. MENU/SEL
.Turn to open menus,
highlight menu items,
or set numeric values
while in a menu.
.Press to select menu
items.
.Radio: Manually selects
radio stations.
.CD: Selects tracks.
18.
Y
.Removes a disc from the
CD slot.
Operation
Controls
The infotainment system is operated
by using the pushbuttons,
multifunction knobs, menus shown
on the display, and steering wheel
controls, if equipped.
Turning the System On or Off
O(Volume/Power): Press to turn
the system on and off.
Automatic Switch-Off
If the infotainment system has been
turned on after the ignition is turned
off, the system will turn off
automatically after 10 minutes.
Volume Control
O(Volume/Power): Turn to adjust
the volume.
5/>(Phone/Mute): Press5/>to mute the infotainment system.
Press
5/>again, or turn theO
knob to cancel mute.