2013 CHEVROLET CRUZE clock
[x] Cancel search: clockPage 21 of 394
Black plate (15,1)Chevrolet Cruze Owner Manual - 2013 - crc - 10/16/12
In Brief 1-15
Storing a Favorite Station
Stations from all bands can be
stored in the favorite lists in any
order. Up to six stations can be
stored in each favorite page and the
number of available favorite pages
can be set.
To store the station to a position in
the list, press the corresponding
numeric button 1 to 6 until a beep is
heard.
For more information, see“Storing a
Station as a Favorite” inAM-FM
Radio on page 7‑7.
Setting the Clock
Adjusting the Time or Date
To set the time and date for the
radio with navigation:
1. Press CLOCK.
2. Select Set Time or Set Date.
3. Turn the MENU/SEL knob to adjust the highlighted number. 4. Press the MENU/SEL knob to
select the next number.
5. To save the settings, press the BACK on the radio faceplate.
Setting the 12/24 Hour Format
To set the 12/24 hour format for the
radio with navigation:
1. Press CLOCK.
2. Highlight 12/24 Hour Format.
3. Press the MENU/SEL knob to select the 12 hour or 24 hour
display format.
4. To save the settings, press the BACK on the radio faceplate.
For detailed instructions on setting
the clock for the vehicle's specific
audio system. See Clock on
page 5‑4.
Satellite Radio
Vehicles with a SiriusXM®satellite
radio tuner and a valid SiriusXM
satellite radio subscription can
receive SiriusXM programming.
SiriusXM Satellite Radio
Service
SiriusXM is a satellite radio service
based in the 48 contiguous United
States and 10 Canadian provinces.
SiriusXM satellite radio has a wide
variety of programming and
commercial-free music, coast to
coast, and in digital-quality sound.
A fee is required to receive the
SiriusXM service.
Refer to:
.www.siriusxm.com or call
1-866-635-2349 (U.S.).
.www.xmradio.ca or call
1-877-209-0079 (Canada).
See Satellite Radio on page 7‑10.
Page 103 of 394
Black plate (1,1)Chevrolet Cruze Owner Manual - 2013 - crc - 10/16/12
Instruments and Controls 5-1
Instruments and
Controls
Controls
Steering Wheel Adjustment . . . 5-2
Steering Wheel Controls . . . . . . 5-2
Horn . . . . . . . . . . . . . . . . . . . . . . . . . . 5-3
Windshield Wiper/Washer . . . . . 5-3
Compass . . . . . . . . . . . . . . . . . . . . . 5-4
Clock . . . . . . . . . . . . . . . . . . . . . . . . . 5-4
Power Outlets . . . . . . . . . . . . . . . . . 5-6
Cigarette Lighter . . . . . . . . . . . . . . 5-6
Ashtrays . . . . . . . . . . . . . . . . . . . . . . 5-6
Warning Lights, Gauges, and
Indicators
Warning Lights, Gauges, andIndicators . . . . . . . . . . . . . . . . . . . . 5-7
Instrument Cluster . . . . . . . . . . . . 5-8
Speedometer . . . . . . . . . . . . . . . . . 5-9
Odometer . . . . . . . . . . . . . . . . . . . . . 5-9
Trip Odometer . . . . . . . . . . . . . . . . . 5-9
Tachometer . . . . . . . . . . . . . . . . . . . 5-9
Fuel Gauge . . . . . . . . . . . . . . . . . . . 5-9
Engine Coolant Temperature Gauge . . . . . . . . . . . . . . . . . . . . . . 5-10
Safety Belt Reminders . . . . . . . 5-10 Airbag Readiness Light . . . . . . 5-11
Passenger Airbag Status
Indicator . . . . . . . . . . . . . . . . . . . . 5-12
Charging System Light . . . . . . 5-13
Malfunction Indicator Lamp . . . . . . . . . . . . . 5-13
Brake System Warning Light . . . . . . . . . . . . . . . . . . . . . . . 5-16
Antilock Brake System (ABS) Warning Light . . . . . . . . . . . . . . 5-16
Up-Shift Light . . . . . . . . . . . . . . . . 5-17
Power Steering Warning Light . . . . . . . . . . . . . . . . . . . . . . . 5-17
Traction Off Light . . . . . . . . . . . . 5-17
StabiliTrak
®OFF Light . . . . . . . 5-18
Traction Control System (TCS)/StabiliTrak
®Light . . . . 5-18
Tire Pressure Light . . . . . . . . . . 5-18
Engine Oil Pressure Light . . . . 5-19
Low Fuel Warning Light . . . . . . 5-19
Security Light . . . . . . . . . . . . . . . . 5-20
Reduced Engine Power Light . . . . . . . . . . . . . . . . . . . . . . . 5-20
High-Beam On Light . . . . . . . . . 5-20
Front Fog Lamp Light . . . . . . . . 5-21
Lamps On Reminder . . . . . . . . . 5-21
Cruise Control Light . . . . . . . . . 5-21
Door Ajar Light . . . . . . . . . . . . . . 5-21
Information Displays
Driver Information Center (DIC) . . . . . . . . . . . . . . . 5-22
Vehicle Messages
Vehicle Messages . . . . . . . . . . . 5-26
Battery Voltage and ChargingMessages . . . . . . . . . . . . . . . . . . 5-27
Brake System Messages . . . . 5-27
Compass Messages . . . . . . . . . 5-27
Cruise Control Messages . . . . 5-27
Door Ajar Messages . . . . . . . . . 5-27
Engine Cooling System Messages . . . . . . . . . . . . . . . . . . 5-28
Engine Oil Messages . . . . . . . . 5-28
Engine Power Messages . . . . 5-29
Fuel System Messages . . . . . . 5-29
Key and Lock Messages . . . . . 5-29
Lamp Messages . . . . . . . . . . . . . 5-29
Object Detection System Messages . . . . . . . . . . . . . . . . . . 5-30
Ride Control System Messages . . . . . . . . . . . . . . . . . . 5-30
Airbag System Messages . . . . 5-30
Security Messages . . . . . . . . . . 5-31
Service Vehicle Messages . . . 5-31
Starting the Vehicle Messages . . . . . . . . . . . . . . . . . . 5-31
Page 106 of 394
Black plate (4,1)Chevrolet Cruze Owner Manual - 2013 - crc - 10/16/12
5-4 Instruments and Controls
been activated. SeeWasher Fluid
on page 10‑20 for information on
filling the windshield washer fluid
reservoir.
{WARNING
In freezing weather, do not use
the washer until the windshield is
warmed. Otherwise the washer
fluid can form ice on the
windshield, blocking your vision.
Clear snow and ice from the wiper
blades and windshield before using
them. If frozen to the windshield,
carefully loosen or thaw them.
Damaged blades should be
replaced. See Wiper Blade
Replacement on page 10‑26.
Heavy snow or ice can overload the
wiper motor.
Wipe Parking
If the ignition is turned to LOCK/
OFF while the wipers are on LO, HI,
or INT, they will immediately stop. If the windshield wiper lever is then
moved to off before the driver door
is opened or within 10 minutes, the
wipers will restart and move to the
base of the windshield.
If the ignition is turned to LOCK/
OFF while the wipers are performing
wipes due to windshield washing,
the wipers continue to run until they
reach the base of the windshield.
Compass
The vehicle may have a compass
display in the Driver Information
Center (DIC). The compass receives
its heading and other information
from the Global Positioning
System (GPS) antenna, StabiliTrak,
and vehicle speed information.
Avoid covering the GPS antenna,
located on the roof, for long periods
of time with objects that may
interfere with the antenna's ability to
receive a satellite signal. The
compass system is designed to
operate for a certain number of
miles or degrees of turn beforeneeding a signal from the GPS
satellites. When the compass
display shows CAL, drive the
vehicle for a short distance in an
open area where it can receive a
GPS signal. The compass system
will automatically determine when
the GPS signal is restored and
provide a heading again. See
Compass Messages on page 5‑27
for more information on the
messages that may be displayed for
the compass.
Clock
The infotainment system controls
are used to access the time and
date settings through the menu
system. See
Operation on page 7‑4
for information about how to use the
menu system. For vehicles with a
connective radio or navigation
system, see the infotainment
manual.
Page 107 of 394
Black plate (5,1)Chevrolet Cruze Owner Manual - 2013 - crc - 10/16/12
Instruments and Controls 5-5
Setting the Time and Date
To set the time and date for the
radio with CD:
1. Press CLOCK.
2. Select Set Time or Set Date.
3. Turn the MENU/SEL knob toadjust the highlighted number.
4. Press the MENU/SEL knob to select the next number.
5. To save the settings, press the MENU/SEL button.
To set the time and date for the
radio without navigation:
1. Press CLOCK.
2. Select Set Time or Set Date.
3. Turn the MENU/SEL knob to adjust the highlighted number.
4. Press the MENU/SEL knob to select the next number.
5. To save the settings, press OK screen button. To set the time and date for the
radio with navigation:
1. Press CLOCK.
2. Select Set Time or Set Date.
3. Turn the MENU/SEL knob to
adjust the highlighted number.
4. Press the MENU/SEL knob to select the next number.
5. To save the settings, press the BACK on the radio faceplate.
Setting the 12/24 Hour Format
To set the 12/24 hour format for the
radio with CD:
1. Press CLOCK.
2. Highlight 12/24 Hour Format.
3. Press the MENU/SEL knob toselect the 12 hour or 24 hour
display format.
4. To save the settings, press the MENU/SEL button. To set the 12/24 hour format for the
radio without navigation:
1. Press CLOCK.
2. Highlight 12/24 Hour Format.
3. Press the MENU/SEL knob to
select the 12 hour or 24 hour
display format.
4. To save the settings, press OK screen button.
To set the 12/24 hour format for the
radio with navigation:
1. Press CLOCK.
2. Highlight 12/24 Hour Format.
3. Press the MENU/SEL knob to select the 12 hour or 24 hour
display format.
4. To save the settings, press the BACK on the radio faceplate.
Page 108 of 394
Black plate (6,1)Chevrolet Cruze Owner Manual - 2013 - crc - 10/16/12
5-6 Instruments and Controls
Power Outlets
The accessory power outlets can be
used to plug in electrical equipment,
such as a cell phone or MP3 player.
There is one accessory power outlet
located on the center floor console
and one on the rear of the center
floor console. These outlets are
powered when the key is in ON/
RUN or ACC/ACCESSORY, or until
the driver door is opened within
10 minutes of turning off the vehicle.
SeeRetained Accessory Power
(RAP) on page 9‑22.
Open the cover to access.
Notice: Leaving electrical
equipment plugged in for an
extended period of time while the
vehicle is off will drain the
battery. Always unplug electrical
equipment when not in use and
do not plug in equipment that
exceeds the maximum 20 ampere
rating. Certain electrical accessories may
not be compatible with the
accessory power outlet and could
overload vehicle or adapter fuses.
If a problem is experienced, see
your dealer.
When adding electrical equipment,
be sure to follow the installation
instructions included with the
equipment. See
Add-On Electrical
Equipment on page 9‑56.
Notice: Hanging heavy
equipment from the power outlet
can cause damage not covered
by the vehicle warranty. The
power outlets are designed for
accessory power plugs only, such
as cell phone charge cords.
Cigarette Lighter
For vehicles with a cigarette lighter,
it is on the center floor console near
the shift lever.
To activate the cigarette lighter,
push it into the heating element and
let go. When the lighter is ready it
will pop back out. Notice:
Holding a cigarette lighter
in while it is heating does not let
the lighter back away from the
heating element when it is hot.
Damage from overheating can
occur to the lighter or heating
element, or a fuse could be
blown. Do not hold a cigarette
lighter in while it is heating.
Ashtrays
For vehicles with a removable
ashtray, the ashtray can be placed
into the front console cupholders.
To open the ashtray, lift the lid of the
ashtray. After using, close the lid.
To empty the ashtray for cleaning,
slightly turn the upper part of the
ashtray counterclockwise and
remove it.
Notice: If papers, pins, or other
flammable items are put in the
ashtray, hot cigarettes or other
smoking materials could ignite
them and possibly damage the
vehicle. Never put flammable
items in the ashtray.
Page 151 of 394
Black plate (3,1)Chevrolet Cruze Owner Manual - 2013 - crc - 10/16/12
Infotainment System 7-3
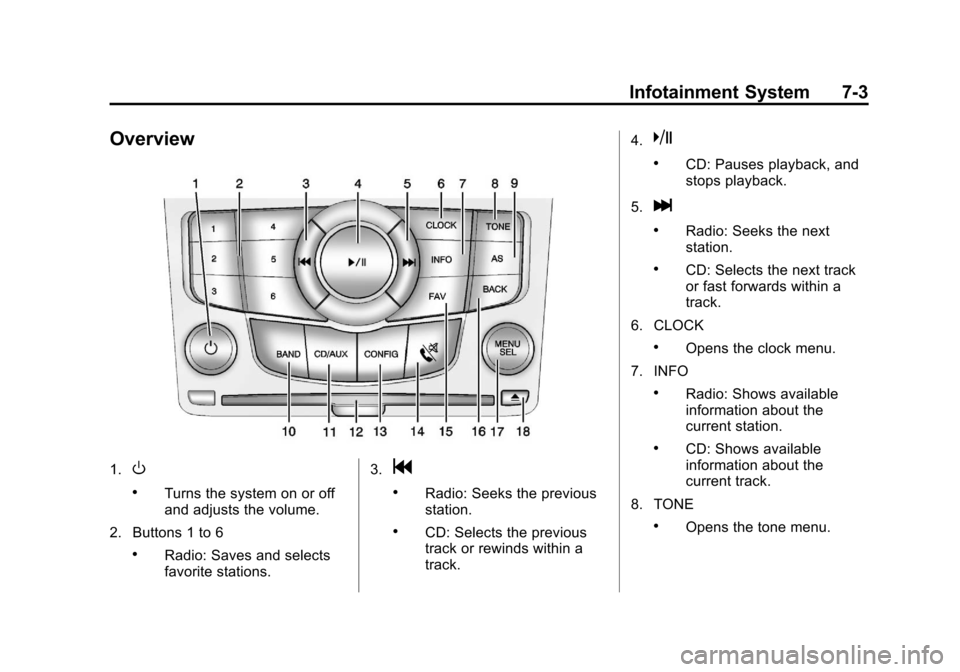
Overview
1.O
.Turns the system on or off
and adjusts the volume.
2. Buttons 1 to 6
.Radio: Saves and selects
favorite stations. 3.
g
.Radio: Seeks the previous
station.
.CD: Selects the previous
track or rewinds within a
track.4.
k
.CD: Pauses playback, and
stops playback.
5.
l
.Radio: Seeks the next
station.
.CD: Selects the next track
or fast forwards within a
track.
6. CLOCK
.Opens the clock menu.
7. INFO
.Radio: Shows available
information about the
current station.
.CD: Shows available
information about the
current track.
8. TONE
.Opens the tone menu.
Page 186 of 394

Black plate (4,1)Chevrolet Cruze Owner Manual - 2013 - crc - 10/16/12
8-4 Climate Controls
To improve fuel efficiency and to
cool the vehicle faster, recirculation
may be automatically selected in
warm weather. The recirculation
light will not come on. Press
hto
select recirculation; press it again to
select outside air.
English units can be changed to
metric units through the Driver
Information Center (DIC). See
Vehicle Personalization on
page 5‑32.
Manual Operation
O(Power): Press to turn the
climate control system on or off.
Fan Control: Turn the knob
clockwise or counterclockwise to
increase or decrease the fan speed.
The selected fan speed is indicated
by a number on the display screen.
Press AUTO to return to automatic
operation.
MODE (Air Delivery Mode): Press
to change the direction of the
airflow. The current mode appears
in the display screen. Automatic operation is canceled and manual
mode is initiated. Press AUTO to
return to automatic operation.
To change the current mode, select
one of the following:
Y(Vent):
Air is directed to the
instrument panel outlets.
\(Bi-level): Air is divided
between the instrument panel
outlets and the floor outlets.
C(Tri-Level): Air is divided
between the windshield, instrument
panel, and floor outlets.
[(Floor): Air is directed to the
floor outlets.
-(Defog): Clears the windows of
fog or moisture. Air is directed to the
windshield and floor outlets.
0(Defrost): Clears the
windshield of fog or frost more
quickly. Air is directed to the
windshield.
#(Air Conditioning): Press to
turn the automatic air conditioning
on or off. If the fan is turned off or the outside temperature falls below
freezing, the air conditioning
compressor will not run.
Press AUTO to return to automatic
operation and the air conditioner
runs as needed. When the indicator
light is on, the air conditioner runs
automatically to cool the air inside
the vehicle or to dry the air needed
to defog the windshield faster.
h(Recirculation):
Press to turn
on recirculation. An indicator light
comes on. Air is recirculated to
quickly cool the inside of the vehicle
or prevent outside air and odors
from entering.
Automatic Air Recirculation:
When the AUTO indicator light is
on, the air is automatically
recirculated as needed to help
quickly cool the inside of the
vehicle.
AQS (Air Quality Sensor): For
vehicles with an air quality sensor,
the climate control system adjusts to
limit some exhaust fumes from
being pulled inside your vehicle.
Page 239 of 394
Black plate (49,1)Chevrolet Cruze Owner Manual - 2013 - crc - 10/16/12
Driving and Operating 9-49
WARNING (Continued)
.Fuel can spray out if the fuel
cap is opened too quickly.
This spray can happen if the
tank is nearly full, and is
more likely in hot weather.
Open the fuel cap slowly and
wait for any hiss noise to stop
then unscrew the cap all
the way
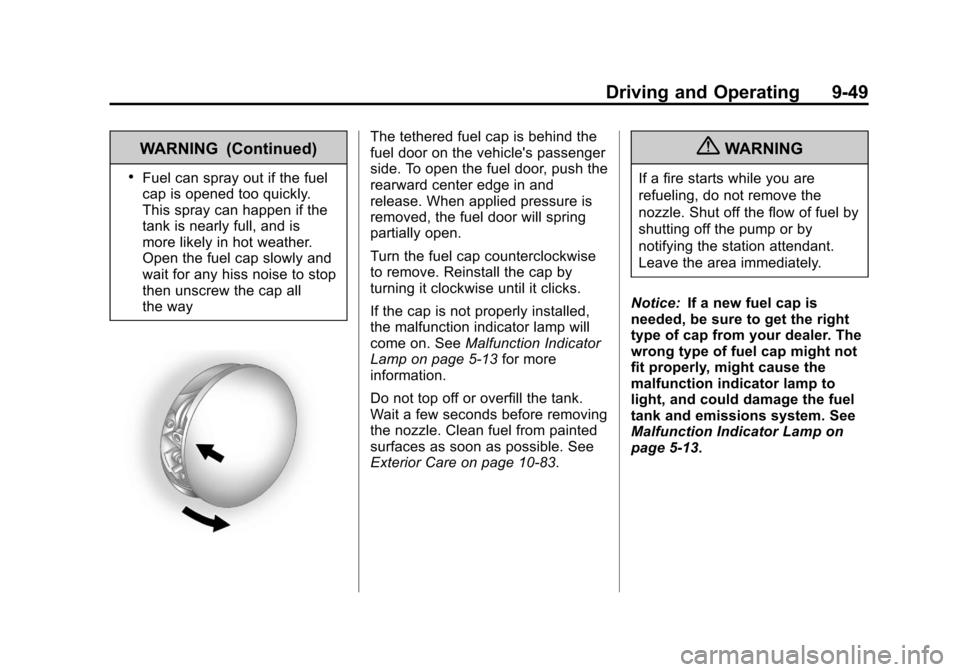
The tethered fuel cap is behind the
fuel door on the vehicle's passenger
side. To open the fuel door, push the
rearward center edge in and
release. When applied pressure is
removed, the fuel door will spring
partially open.
Turn the fuel cap counterclockwise
to remove. Reinstall the cap by
turning it clockwise until it clicks.
If the cap is not properly installed,
the malfunction indicator lamp will
come on. SeeMalfunction Indicator
Lamp on page 5‑13 for more
information.
Do not top off or overfill the tank.
Wait a few seconds before removing
the nozzle. Clean fuel from painted
surfaces as soon as possible. See
Exterior Care on page 10‑83.{WARNING
If a fire starts while you are
refueling, do not remove the
nozzle. Shut off the flow of fuel by
shutting off the pump or by
notifying the station attendant.
Leave the area immediately.
Notice: If a new fuel cap is
needed, be sure to get the right
type of cap from your dealer. The
wrong type of fuel cap might not
fit properly, might cause the
malfunction indicator lamp to
light, and could damage the fuel
tank and emissions system. See
Malfunction Indicator Lamp on
page 5‑13.