2013 CHEVROLET CRUZE clock
[x] Cancel search: clockPage 315 of 394
Black plate (69,1)Chevrolet Cruze Owner Manual - 2013 - crc - 10/16/12
Vehicle Care 10-69
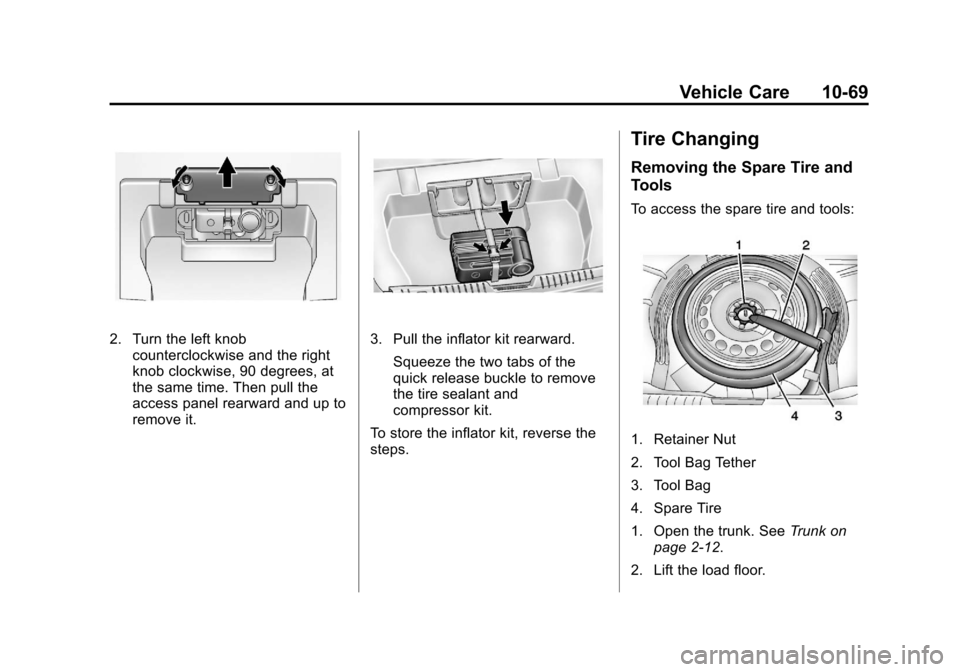
2. Turn the left knobcounterclockwise and the right
knob clockwise, 90 degrees, at
the same time. Then pull the
access panel rearward and up to
remove it.3. Pull the inflator kit rearward.
Squeeze the two tabs of the
quick release buckle to remove
the tire sealant and
compressor kit.
To store the inflator kit, reverse the
steps.
Tire Changing
Removing the Spare Tire and
Tools
To access the spare tire and tools:
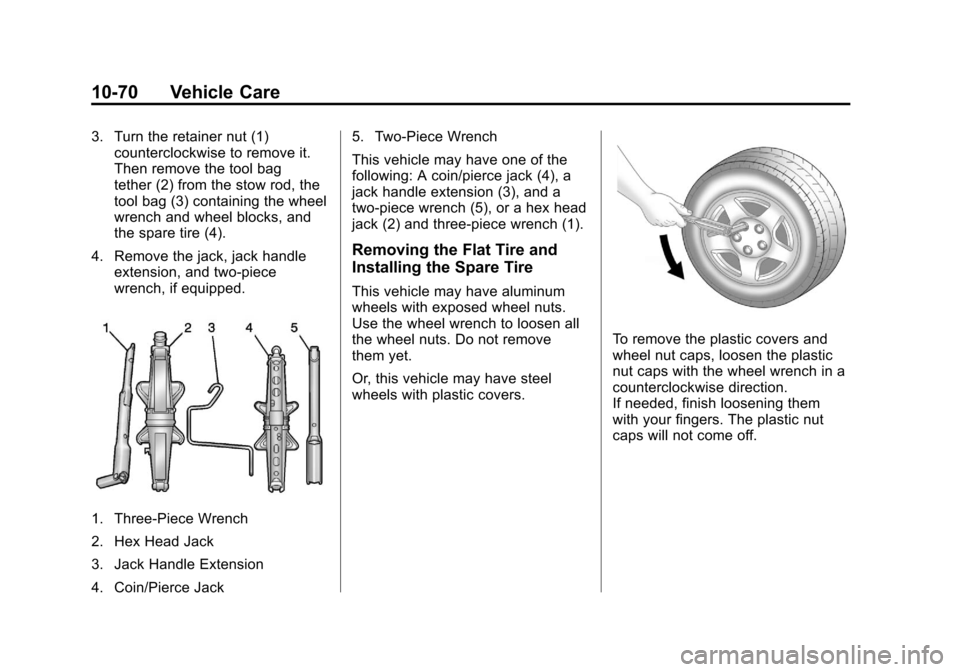
1. Retainer Nut
2. Tool Bag Tether
3. Tool Bag
4. Spare Tire
1. Open the trunk. See Trunk on
page 2‑12.
2. Lift the load floor.
Page 316 of 394
Black plate (70,1)Chevrolet Cruze Owner Manual - 2013 - crc - 10/16/12
10-70 Vehicle Care
3. Turn the retainer nut (1)counterclockwise to remove it.
Then remove the tool bag
tether (2) from the stow rod, the
tool bag (3) containing the wheel
wrench and wheel blocks, and
the spare tire (4).
4. Remove the jack, jack handle extension, and two-piece
wrench, if equipped.
1. Three-Piece Wrench
2. Hex Head Jack
3. Jack Handle Extension
4. Coin/Pierce Jack 5. Two-Piece Wrench
This vehicle may have one of the
following: A coin/pierce jack (4), a
jack handle extension (3), and a
two-piece wrench (5), or a hex head
jack (2) and three-piece wrench (1).
Removing the Flat Tire and
Installing the Spare Tire
This vehicle may have aluminum
wheels with exposed wheel nuts.
Use the wheel wrench to loosen all
the wheel nuts. Do not remove
them yet.
Or, this vehicle may have steel
wheels with plastic covers.
To remove the plastic covers and
wheel nut caps, loosen the plastic
nut caps with the wheel wrench in a
counterclockwise direction.
If needed, finish loosening them
with your fingers. The plastic nut
caps will not come off.
Page 317 of 394
Black plate (71,1)Chevrolet Cruze Owner Manual - 2013 - crc - 10/16/12
Vehicle Care 10-71
If needed, use the flat end of the
wheel wrench and pry along the
edge of the cover until it comes off.
The edge of the wheel cover could
be sharp, so do not try to remove it
with your bare hands. Do not drop
the cover or lay it face down, as it
could become scratched or
damaged. Store the wheel cover in
the trunk until the flat tire is repaired
or replaced.
Once you have removed the wheel
cover, use the following procedure
to remove the flat tire and install the
spare tire.
1. Do a safety check beforeproceeding. See If a Tire Goes
Flat on page 10‑59 for more
information.
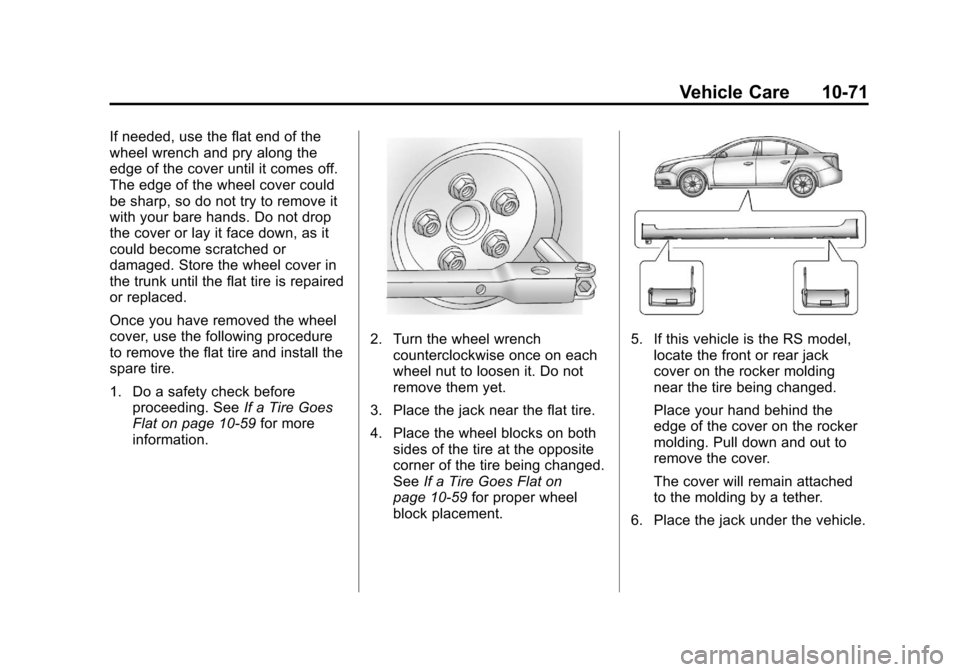
2. Turn the wheel wrench counterclockwise once on each
wheel nut to loosen it. Do not
remove them yet.
3. Place the jack near the flat tire.
4. Place the wheel blocks on both sides of the tire at the opposite
corner of the tire being changed.
See If a Tire Goes Flat on
page 10‑59 for proper wheel
block placement.5. If this vehicle is the RS model, locate the front or rear jack
cover on the rocker molding
near the tire being changed.
Place your hand behind the
edge of the cover on the rocker
molding. Pull down and out to
remove the cover.
The cover will remain attached
to the molding by a tether.
6. Place the jack under the vehicle.
Page 319 of 394
Black plate (73,1)Chevrolet Cruze Owner Manual - 2013 - crc - 10/16/12
Vehicle Care 10-73
{WARNING
Lifting a vehicle and getting under
it to do maintenance or repairs is
dangerous without the
appropriate safety equipment and
training. If a jack is provided with
the vehicle, it is designed only for
changing a flat tire. If it is used for
anything else, you or others could
be badly injured or killed if the
vehicle slips off the jack. If a jack
is provided with the vehicle, only
use it for changing a flat tire.
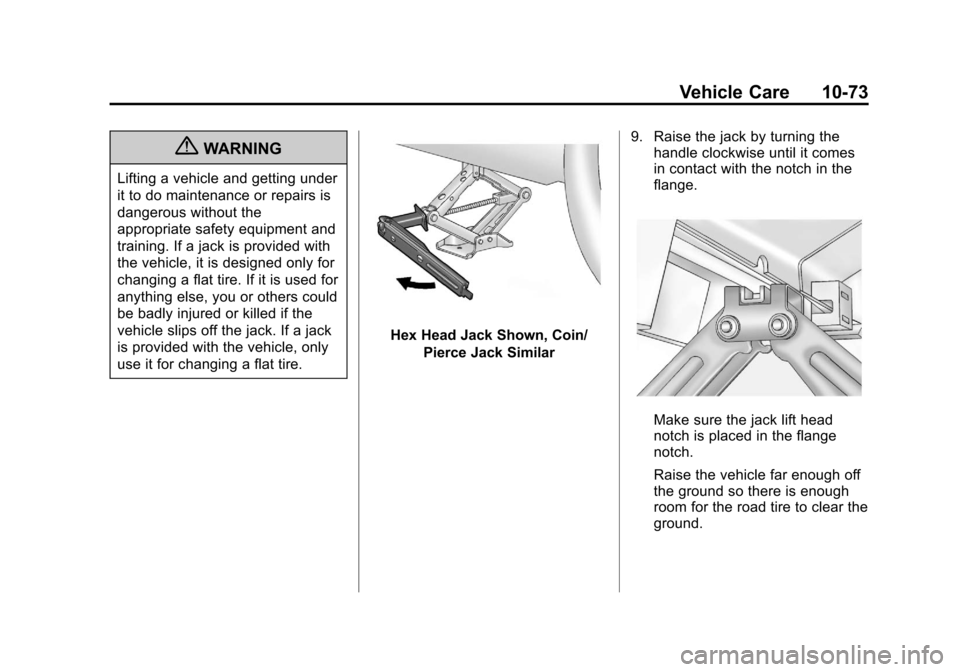
Hex Head Jack Shown, Coin/Pierce Jack Similar 9. Raise the jack by turning the
handle clockwise until it comes
in contact with the notch in the
flange.
Make sure the jack lift head
notch is placed in the flange
notch.
Raise the vehicle far enough off
the ground so there is enough
room for the road tire to clear the
ground.
Page 320 of 394
Black plate (74,1)Chevrolet Cruze Owner Manual - 2013 - crc - 10/16/12
10-74 Vehicle Care
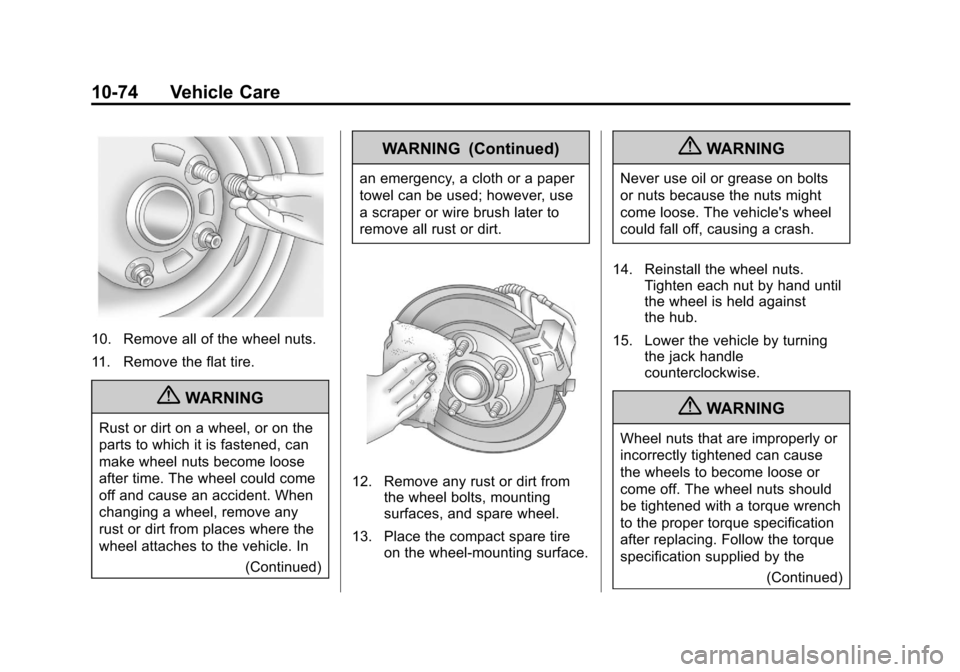
10. Remove all of the wheel nuts.
11. Remove the flat tire.
{WARNING
Rust or dirt on a wheel, or on the
parts to which it is fastened, can
make wheel nuts become loose
after time. The wheel could come
off and cause an accident. When
changing a wheel, remove any
rust or dirt from places where the
wheel attaches to the vehicle. In(Continued)
WARNING (Continued)
an emergency, a cloth or a paper
towel can be used; however, use
a scraper or wire brush later to
remove all rust or dirt.
12. Remove any rust or dirt fromthe wheel bolts, mounting
surfaces, and spare wheel.
13. Place the compact spare tire on the wheel-mounting surface.
{WARNING
Never use oil or grease on bolts
or nuts because the nuts might
come loose. The vehicle's wheel
could fall off, causing a crash.
14. Reinstall the wheel nuts. Tighten each nut by hand until
the wheel is held against
the hub.
15. Lower the vehicle by turning the jack handle
counterclockwise.
{WARNING
Wheel nuts that are improperly or
incorrectly tightened can cause
the wheels to become loose or
come off. The wheel nuts should
be tightened with a torque wrench
to the proper torque specification
after replacing. Follow the torque
specification supplied by the
(Continued)
Page 322 of 394
Black plate (76,1)Chevrolet Cruze Owner Manual - 2013 - crc - 10/16/12
10-76 Vehicle Care
Notice:Wheel covers will not fit
on the vehicle's compact spare.
If you try to put a wheel cover on
the compact spare, the cover or
the spare could be damaged.
Storing a Flat or Spare Tire
and Tools
{WARNING
Storing a jack, a tire, or other
equipment in the passenger
compartment of the vehicle could
cause injury. In a sudden stop or
collision, loose equipment could
strike someone. Store all these in
the proper place.
Storing the Flat Tire and Tools
1. Replace the wheel wrench and wheel blocks in the tool bag.
2. Remove the foam container from the rear storage compartment.
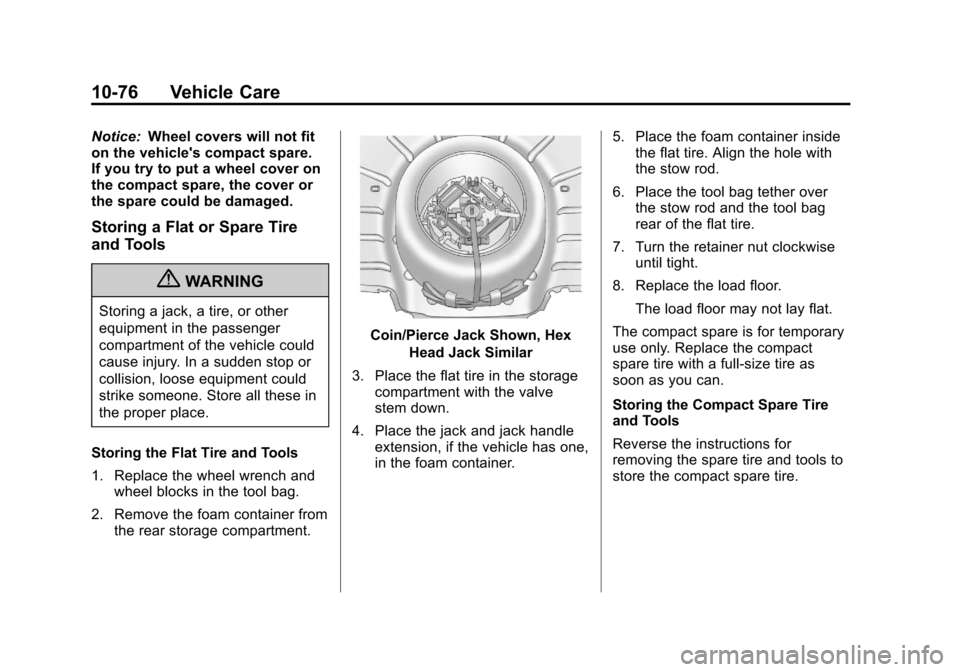
Coin/Pierce Jack Shown, Hex
Head Jack Similar
3. Place the flat tire in the storage compartment with the valve
stem down.
4. Place the jack and jack handle extension, if the vehicle has one,
in the foam container. 5. Place the foam container inside
the flat tire. Align the hole with
the stow rod.
6. Place the tool bag tether over the stow rod and the tool bag
rear of the flat tire.
7. Turn the retainer nut clockwise until tight.
8. Replace the load floor.
The load floor may not lay flat.
The compact spare is for temporary
use only. Replace the compact
spare tire with a full-size tire as
soon as you can.
Storing the Compact Spare Tire
and Tools
Reverse the instructions for
removing the spare tire and tools to
store the compact spare tire.
Page 384 of 394

Black plate (2,1)Chevrolet Cruze Owner Manual - 2013 - crc - 10/16/12
i-2 INDEX
BrakeSystem Warning Light . . . . . . . . 5-16
Brakes . . . . . . . . . . . . . . . . . . . . . . . . 10-21 Antilock . . . . . . . . . . . . . . . . . . . . . . . 9-32
Assist . . . . . . . . . . . . . . . . . . . . . . . . . 9-33
Fluid . . . . . . . . . . . . . . . . . . . . . . . . 10-22
Parking . . . . . . . . . . . . . . . . . . . . . . . 9-33
System Messages . . . . . . . . . . . . 5-27
Braking . . . . . . . . . . . . . . . . . . . . . . . . . 9-4
Break-In, New Vehicle . . . . . . . . . 9-14
Bulb Replacement . . . . . . . . . . . . 10-32 Halogen Headlamps . . . . . . . . 10-27
Headlamp Aiming . . . . . . . . . . . 10-26
Headlamps . . . . . . . . . . . . . . . . . 10-27
Headlamps, Front TurnSignal, and Parking
Lamps . . . . . . . . . . . . . . . . . . . . 10-27
License Plate Lamps . . . . . . . 10-31
Taillamps, Turn Signal, Sidemarker, Stoplamps,
and Backup Lamps . . . . . . . . 10-29
Buying New Tires . . . . . . . . . . . . . 10-54C
Calibration . . . . . . . . . . . . . . . . . . . . . . 5-4
California Fuel Requirements . . . . . . . . . . . 9-47
Perchlorate MaterialsRequirements . . . . . . . . . . . . . . . 10-3
Warning . . . . . . . . . . . . . . . . . . . . . . 10-2
Camera, Rear Vision . . . . . . . . . . 9-42
Canadian Vehicle Owners . . . . . . . . iii
Capacities and Specifications . . . . . . . . . . . . . . . . 12-2
Carbon Monoxide Engine Exhaust . . . . . . . . . . . . . . . 9-25
Trunk . . . . . . . . . . . . . . . . . . . . . . . . . 2-12
Winter Driving . . . . . . . . . . . . . . . . . 9-8
Cargo
Tie-Downs . . . . . . . . . . . . . . . . . . . . . 4-2
Cautions, Danger, and Warnings . . . . . . . . . . . . . . . . . . . . . . . . iv
CD Player . . . . . . . . . . . . . . . . . . . . . 7-14
Center Console Storage . . . . . . . . 4-2
Chains, Tire . . . . . . . . . . . . . . . . . . 10-59
Charging System Light . . . . . . . . 5-13 Check
Engine Light . . . . . . . . . . . . . . . . . . 5-13
Ignition
Transmission Lock . . . . . . . . 10-25
Child Restraints Infants and YoungChildren . . . . . . . . . . . . . . . . . . . . . 3-33
Lower Anchors and Tethers for Children . . . . . . . . . 3-38
Older Children . . . . . . . . . . . . . . . . 3-31
Securing . . . . . . . . . . . . . . . . 3-45, 3-48
Systems . . . . . . . . . . . . . . . . . . . . . . 3-35
Cigarette Lighter . . . . . . . . . . . . . . . . 5-6
Circuit Breakers . . . . . . . . . . . . . . 10-33
Cleaning Exterior Care . . . . . . . . . . . . . . . 10-83
Interior Care . . . . . . . . . . . . . . . . 10-86
Climate Control Systems . . . . . . . 8-1 Air Conditioning . . . . . . . . . . . . . . . 8-1
Automatic . . . . . . . . . . . . . . . . . . . . . . 8-3
Heating . . . . . . . . . . . . . . . . . . . . . . . . 8-1
Clock . . . . . . . . . . . . . . . . . . . . . . . . . . . 5-4
Cluster, Instrument . . . . . . . . . . . . . 5-8
Clutch, Hydraulic . . . . . . . . . . . . . 10-13
Collision Damage Repair . . . . . . 13-9
Compact Spare Tire . . . . . . . . . . 10-77