2013 CHEVROLET CAPTIVA SPORT fuel cap
[x] Cancel search: fuel capPage 242 of 374
Black plate (8,1)Chevrolet Captiva Sport Owner Manual - 2013 - crc - 11/12/12
10-8 Vehicle Care 4. Lift and remove the engine
cover.
5. Reverse Steps 1 – 4 to reinstall
the engine cover.
Engine Oil To ensure proper engine
performance and long life, careful
attention must be paid to engine oil.
Following these simple, but
important steps will help protect
your investment: .
Always use engine oil approved
to the proper specification and of
the proper viscosity grade. See
“ Selecting the Right Engine Oil ”
in this section. .
Check the engine oil level
regularly and maintain the
proper oil level. See “ Checking
Engine Oil ” and “ When to Add
Engine Oil ” in this section..
Change the engine oil at the
appropriate time. See Engine Oil
Life System on page 10 ‑ 10 . .
Always dispose of engine oil
properly. See “ What to Do with
Used Oil ” in this section.
Checking Engine Oil It is a good idea to check the engine
oil level at each fuel fill. In order to
get an accurate reading, the vehicle
must be on level ground. The
engine oil dipstick handle is a loop.
See Engine Compartment Overview
on page 10 ‑ 4 for the location of the
engine oil dipstick.
Obtaining an accurate oil level
reading is essential:
1. If the engine has been running
recently, turn off the engine and
allow several minutesfor the oil
to drain back into the oil pan.
Checking the oil level too soon
after engine shutoff will not
provide an accurate oil level
reading. { WARNINGThe engine oil dipstick handle
may be hot; it could burn you.
Use a towel or glove to touch the
dipstick handle.
2. Pull out the dipstick and clean it
with a paper towel or cloth, then
push it back in all the way.
Remove it again, keeping the tip
down, and check the level.
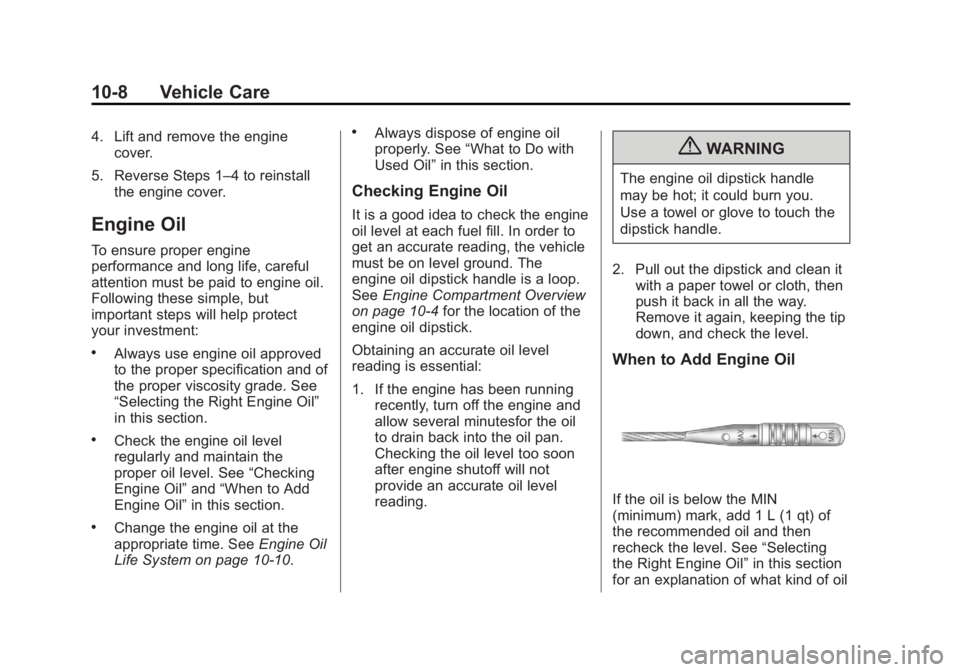
When to Add Engine Oil
If the oil is below the MIN
(minimum) mark, add 1 L (1 qt) of
the recommended oil and then
recheck the level. See “ Selecting
the Right Engine Oil ” in this section
for an explanation of what kind of oil
Page 266 of 374
Black plate (32,1)Chevrolet Captiva Sport Owner Manual - 2013 - crc - 11/12/12
10-32 Vehicle Care Fuses Usage
FUEL/VAC Fuel Pump/
Vacuum Pump
HDLP
WASHER Headlamp Washer
HI
BEAM LH High-Beam
Headlamp (Left)
HI
BEAM RH High-Beam
Headlamp (Right)
HORN Horn
HTD
WASH/MIR Heated Washer
Fluid/Heated Mirrors
IGN COIL A Ignition Coil A
IGN COIL B Ignition Coil B
LO
BEAM LH Low-Beam
Headlamp (Left)
LO
BEAM RH Low-Beam
Headlamp (Right)
PRK LP LH Parking Lamps (Left)
PRK LP RH Parking Lamps
(Right) Fuses Usage
PRK
LP RH* Parking Lamps
(Right) (Europe Park
Lamps)
PWM FAN Pulse Width
Modulation Fan
REAR
DEFOG Rear Window
Defogger
REAR WPR Rear Wiper Motor
SPARE Not Used
STOP
LAMP Stoplamps
STRTR Starter
TCM Transmission
Control Module
TRLR
PRK LP Trailer Parking
Lamps
Relays Usage
FAN1 RLY Cooling Fan 1
FAN2 RLY Cooling Fan 2
FAN3 RLY Cooling Fan 3 Relays Usage
FRT
FOG RLY Front Fog Lamps
FUEL/VAC
PUMP RLY Fuel Pump/Vacuum
Pump Relay
HDLP
WSHR RLY Headlamp Washer
HI
BEAM RLY High-Beam
Headlamps
LO
BEAM RLY Low-Beam
Headlamps
PWR/
TRN RLY Powertrain
REAR
DEFOG
RLY Rear Window
Defogger
STOP
LAMP RLY Stoplamps
STRTR RLY Starter
WPR
CNTRL RLY Wiper Control
WPR
SPD RLY Wiper Speed
Page 268 of 374
Black plate (34,1)Chevrolet Captiva Sport Owner Manual - 2013 - crc - 11/12/12
10-34 Vehicle Care Fuses Usage
APO JACK
(CONSOLE) Auxiliary Power
Outlet Jack
APO JACK
(REAR
CARGO) Auxiliary Power
Outlet Jack Rear
Cargo
AWD/VENT All-Wheel Drive/
Ventilation
BCM (CTSY) Body Control
Module (Courtesy)
BCM
(DIMMER) Body Control
Module (Dimmer)
BCM (INT
LIGHT) Body Control
Module (Interior
Light)
BCM
(PRK/TN) Body Control
Module (Parking/
Turn Signal)
BCM (STOP) Body Control
Module (Stoplamp) Fuses Usage
BCM
(TRN SIG) Body Control
Module (Turn
Signal)
BCM
(VBATT) Body Control
Module (Battery
Voltage)
CIGAR Cigarette Lighter
CIM Communications
Integration Module
CLSTR Instrument Cluster
DRL Daytime Running
Lamps
DR/LCK Driver Door Lock
DRVR
PWR SEAT Driver Power Seat
DRV/
PWR WNDW Driver Power
Window
F/DOOR
LOCK Fuel Door Lock Fuses Usage
FRT WSR Front Washer
FSCM Fuel System
Control Module
FSCM
VENT SOL Fuel System
Control Module
Vent Solenoid
HEATING
MAT SW Heating Mat Switch
HTD
SEAT PWR Heated Seat
Power
HVAC BLWR Heating,
Ventilation, and Air
Conditioning
Blower
IPC Instrument Panel
Cluster
ISRVM/RCM Inside Rearview
Mirror/Remote
Compass Module
Page 275 of 374
Black plate (41,1)Chevrolet Captiva Sport Owner Manual - 2013 - crc - 11/12/12
Vehicle Care 10-41steering, power brakes, power
windows, power seats, and air
conditioning.
Aspect Ratio :
The relationship
of a tire's height to its width.
Belt :
A rubber coated layer of
cords between the plies and the
tread. Cords may be made from
steel or other reinforcing
materials.
Bead :
The tire bead contains
steel wires wrapped by steel
cords that hold the tire onto
the rim.
Bias Ply Tire :
A pneumatic tire
in which the plies are laid at
alternate angles less than
90 degrees to the centerline of
the tread.
Cold Tire Pressure :
The
amount of air pressure in a tire,
measured in kPa (kilopascal)
or psi (pounds per square inch) before a tire has built up heat
from driving. See Tire Pressure
on page 10 ‑ 43 .
Curb Weight :
The weight of a
motor vehicle with standard and
optional equipment including the
maximum capacity of fuel, oil,
and coolant, but without
passengers and cargo.
DOT Markings :
A code molded
into the sidewall of a tire
signifying that the tire is in
compliance with the U.S.
Department of Transportation
(DOT) Motor Vehicle Safety
Standards. The DOT code
includes the Tire Identification
Number (TIN), an alphanumeric
designator which can also
identify the tire manufacturer,
production plant, brand, and
date of production.
GVWR :
Gross Vehicle Weight
Rating. See Vehicle Load Limits
on page 9 ‑ 10 . GAWR FRT :
Gross Axle Weight
Rating for the front axle. See
Vehicle Load Limits on
page 9 ‑ 10 .
GAWR RR :
Gross Axle Weight
Rating for the rear axle. See
Vehicle Load Limits on
page 9 ‑ 10 .
Intended Outboard Sidewall :
The side of an asymmetrical tire,
that must always face outward
when mounted on a vehicle.
Kilopascal (kPa) :
The metric
unit for air pressure.
Light Truck (LT-Metric) Tire :
A
tire used on light duty trucks and
some multipurpose passenger
vehicles.
Load Index :
An assigned
number ranging from 1 to 279
that corresponds to the load
carrying capacity of a tire.
Page 277 of 374
Black plate (43,1)Chevrolet Captiva Sport Owner Manual - 2013 - crc - 11/12/12
Vehicle Care 10-43of a tire when only 1.6 mm
(1/16 in) of tread remains. See
When It Is Time for New Tires
on page 10 ‑ 50 .
UTQGS (Uniform Tire Quality
Grading Standards) :
A tire
information system that provides
consumers with ratings for a
tire's traction, temperature, and
treadwear. Ratings are
determined by tire
manufacturers using
government testing procedures.
The ratings are molded into the
sidewall of the tire. See Uniform
Tire Quality Grading on
page 10 ‑ 53 .
Vehicle Capacity Weight :
The
number of designated seating
positions multiplied by
68 kg (150 lb) plus the rated
cargo load. See Vehicle Load
Limits on page 9 ‑ 10 . Vehicle Maximum Load on the
Tire :
Load on an individual tire
due to curb weight, accessory
weight, occupant weight, and
cargo weight.
Vehicle Placard :
A label
permanently attached to a
vehicle showing the vehicle
capacity weight and the original
equipment tire size and
recommended inflation pressure.
See “ Tire and Loading
Information Label ” under Vehicle
Load Limits on page 9 ‑ 10 .
Tire Pressure Tires need the correct amount of
air pressure to operate
effectively.
Notice: Neither tire
underinflation nor
overinflation is good. Underinflated tires, or tires
that do not have enough air,
can result in: .
Tire overloading and
overheating which could
lead to a blowout. .
Premature or
irregular wear. .
Poor handling. .
Reduced fuel economy.
Overinflated tires, or tires that
have too much air, can
result in: .
Unusual wear. .
Poor handling. .
Rough ride. .
Needless damage from
road hazards.
The Tire and Loading
Information label on the vehicle
indicates the original equipment
tires and the correct cold tire
Page 279 of 374
Black plate (45,1)Chevrolet Captiva Sport Owner Manual - 2013 - crc - 11/12/12
Vehicle Care 10-45WARNING (Continued)and set to the correct cold tire
inflation pressure for the
vehicle load.
Vehicles with P235/55R18 size tires
require inflation pressure adjustment
when driving the vehicle at speeds
of 160 km/h (100 mph) or higher.
Set the cold inflation pressure
to the maximum inflation pressure
shown on the tire sidewall,
or 262 kPa (38 psi), whichever is
lower. See the example following.
Return the tires to the
recommended cold tire inflation
pressure when high-speed driving
has ended. See Vehicle Load Limits
on page 9 ‑ 10 and Tire Pressure on
page 10 ‑ 43 .
Example:
The maximum load and inflation
pressure is molded on the tire
sidewall, in small letters, near
the rim flange. It will read something like this: Maximum load
690 kg (1521 lbs) 300 kPa (44 psi)
Max. Press.
For this example, set the inflation
pressure for high ‐ speed driving at
262 kPa (38 psi).
Tire Pressure Monitor
System Notice: Modifications made to the
Tire Pressure Monitor System
(TPMS) by anyone other than an
authorized service facility may
void authorization to use the
system.
The Tire Pressure Monitor System
(TPMS) uses radio and sensor
technology to check tire pressure
levels. The TPMS sensors monitor
the air pressure in your vehicle's
tires and transmit tire pressure
readings to a receiver located in the
vehicle.
Each tire, including the spare (if
provided), should be checked
monthly when cold and inflated to the inflation pressure recommended
by the vehicle manufacturer on the
vehicle placard or tire inflation
pressure label. (If your vehicle has
tires of a different size than the size
indicated on the vehicle placard or
tire inflation pressure label, you
should determine the proper tire
inflation pressure for those tires.)
As an added safety feature, your
vehicle has been equipped with a
tire pressure monitoring system
(TPMS) that illuminates a low tire
pressure telltale when one or more
of your tires is significantly under ‐
inflated.
Accordingly, when the low tire
pressure telltale illuminates, you
should stop and check your tires as
soon as possible, and inflate them
to the proper pressure. Driving on a
significantly under ‐ inflated tire
causes the tire to overheat and can
lead to tire failure. Under ‐ inflation
also reduces fuel efficiency and tire
tread life, and may affect the
vehicle's handling and stopping
ability.
Page 304 of 374
Black plate (70,1)Chevrolet Captiva Sport Owner Manual - 2013 - crc - 11/12/12
10-70 Vehicle Care Dinghy Towing Front-wheel-drive and
all-wheel-drive vehicles may be
dinghy towed from the front. These
vehicles can also be towed by
placing them on a platform trailer
with all four wheels off of the
ground. For other towing options,
see “ Dolly Towing ” following in this
section.
For vehicles being dinghy towed,
the vehicle should be run at the
beginning of each day and at each
RV fuel stop for about five minutes.
This will ensure proper lubrication of
transmission components. To tow the vehicle from the front
with all four wheels on the ground:
1. Position the vehicle that will be
towed and secure it to the
towing vehicle.
2. Turn the ignition key to ACC/
ACCESSORY.
3. Shift the transmission to
N (Neutral). 4. Turn fog lamps and all
accessories off.
5. To prevent the battery from
draining while the vehicle is
being towed, remove the 2 amp
PWR/MODING fuse from the
instrument panel fuse block and
store it in a safe location. See
Instrument Panel Fuse Block on
page 10 ‑ 33 .
Notice: If 105 km/h (65 mph) is
exceeded while towing the
vehicle, it could be damaged.
Never exceed 105 km/h (65 mph)
while towing the vehicle.
Notice: If the vehicle is towed
without performing each of the
steps listed under “ Dinghy
Towing, ” the automatic
transmission could be damaged.
Be sure to follow all steps of the
dinghy towing procedure prior to
and after towing the vehicle.
Page 309 of 374
Black plate (75,1)Chevrolet Captiva Sport Owner Manual - 2013 - crc - 11/12/12
Vehicle Care 10-75signs of wear. Inspect the power
steering for proper hook-up, binding,
leaks, cracks, chafing, etc. Visually
check constant velocity joints,
rubber boots, and axle seals for
leaks.
Body Component Lubrication Lubricate all key lock cylinders,
hood hinges, liftgate hinges, and the
steel fuel door hinge unless the
components are plastic. Applying
silicone grease on weatherstrips
with a clean cloth will make them
last longer, seal better, and not stick
or squeak.
Underbody Maintenance Use plain water to flush dirt and
debris from the vehicle's underbody.
Your dealer or an underbody car
washing system can do this. If not
removed, rust and corrosion can
develop. Sheet Metal Damage If the vehicle is damaged and
requires sheet metal repair or
replacement, make sure the body
repair shop applies anti-corrosion
material to parts repaired or
replaced to restore corrosion
protection.
Original manufacturer replacement
parts will provide the corrosion
protection while maintaining the
vehicle warranty.
Finish Damage Quickly repair minor chips and
scratches with touch-up materials
available from your dealer to avoid
corrosion. Larger areas of finish
damage can be corrected in your
dealer's body and paint shop.
Chemical Paint Spotting
Airborne pollutants can fall upon
and attack painted vehicle surfaces
causing blotchy, ring-shaped discolorations, and small, irregular
dark spots etched into the paint
surface.
Interior Care To prevent dirt particle abrasions,
regularly clean the vehicle's interior.
Immediately remove any soils. Note
that newspapers or dark garments
that can transfer color to home
furnishings can also permanently
transfer color to the vehicle's
interior.
Use a soft bristle brush to remove
dust from knobs and crevices on the
instrument cluster. Using a mild
soap solution, immediately remove
hand lotions, sunscreen, and insect
repellent from all interior surfaces or
permanent damage may result.
Your dealer may have products for
cleaning the interior. Use cleaners
specifically designed for the
surfaces being cleaned to prevent
permanent damage. Apply all
cleaners directly to the cleaning
cloth. Do not spray cleaners directly