2013 BMW X3 XDRIVE 28I lock
[x] Cancel search: lockPage 167 of 211
CoolantVehicle equipment
All standard, country-specific and optional
equipment that is offered in the model series is
described in this chapter. Therefore, equipment
is also described that is not available in a vehicle,
e. g., because of the selected optional equip‐
ment or country variant. This also applies for
safety-related functions and systems.
General information Danger of burns from hot engine
Do not open the cooling system while the
engine is hot; otherwise, escaping coolant may
cause burns.◀
Suitable additives
Only use suitable additives; otherwise, en‐
gine damage may occur. The additives are
harmful to your health.◀
Coolant consists of water and additives.
Not all commercially available additives are suit‐
able for your vehicle. Ask your service center for
suitable additives.Coolant level
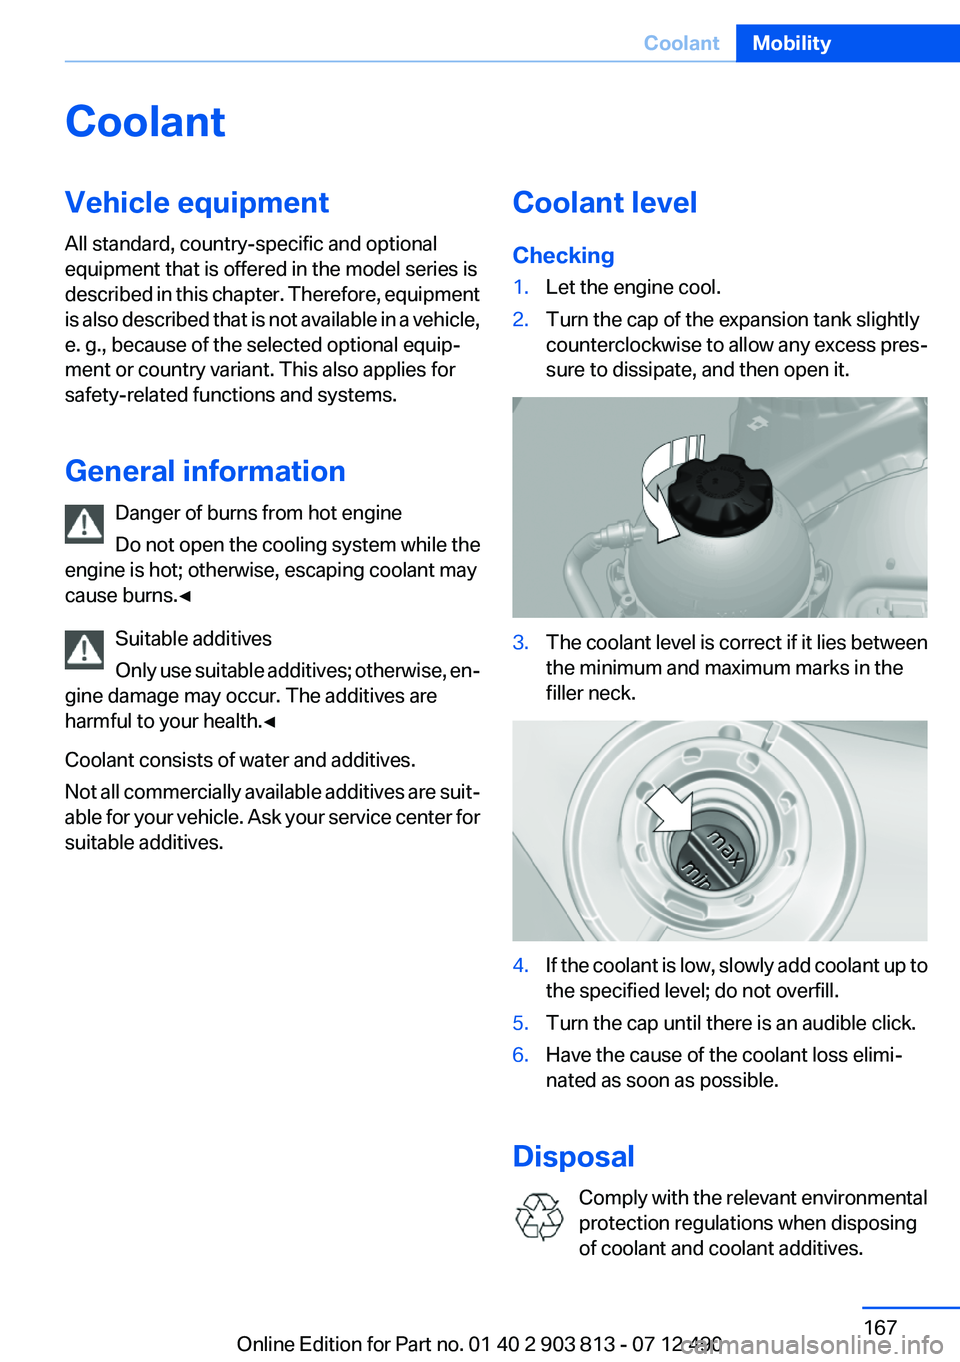
Checking1.Let the engine cool.2.Turn the cap of the expansion tank slightly
counterclockwise to allow any excess pres‐
sure to dissipate, and then open it.3.The coolant level is correct if it lies between
the minimum and maximum marks in the
filler neck.4.If the coolant is low, slowly add coolant up to
the specified level; do not overfill.5.Turn the cap until there is an audible click.6.Have the cause of the coolant loss elimi‐
nated as soon as possible.
Disposal
Comply with the relevant environmental
protection regulations when disposing
of coolant and coolant additives.
Seite 167CoolantMobility167
Online Edition for Part no. 01 40 2 903 813 - 07 12 490
Page 173 of 211
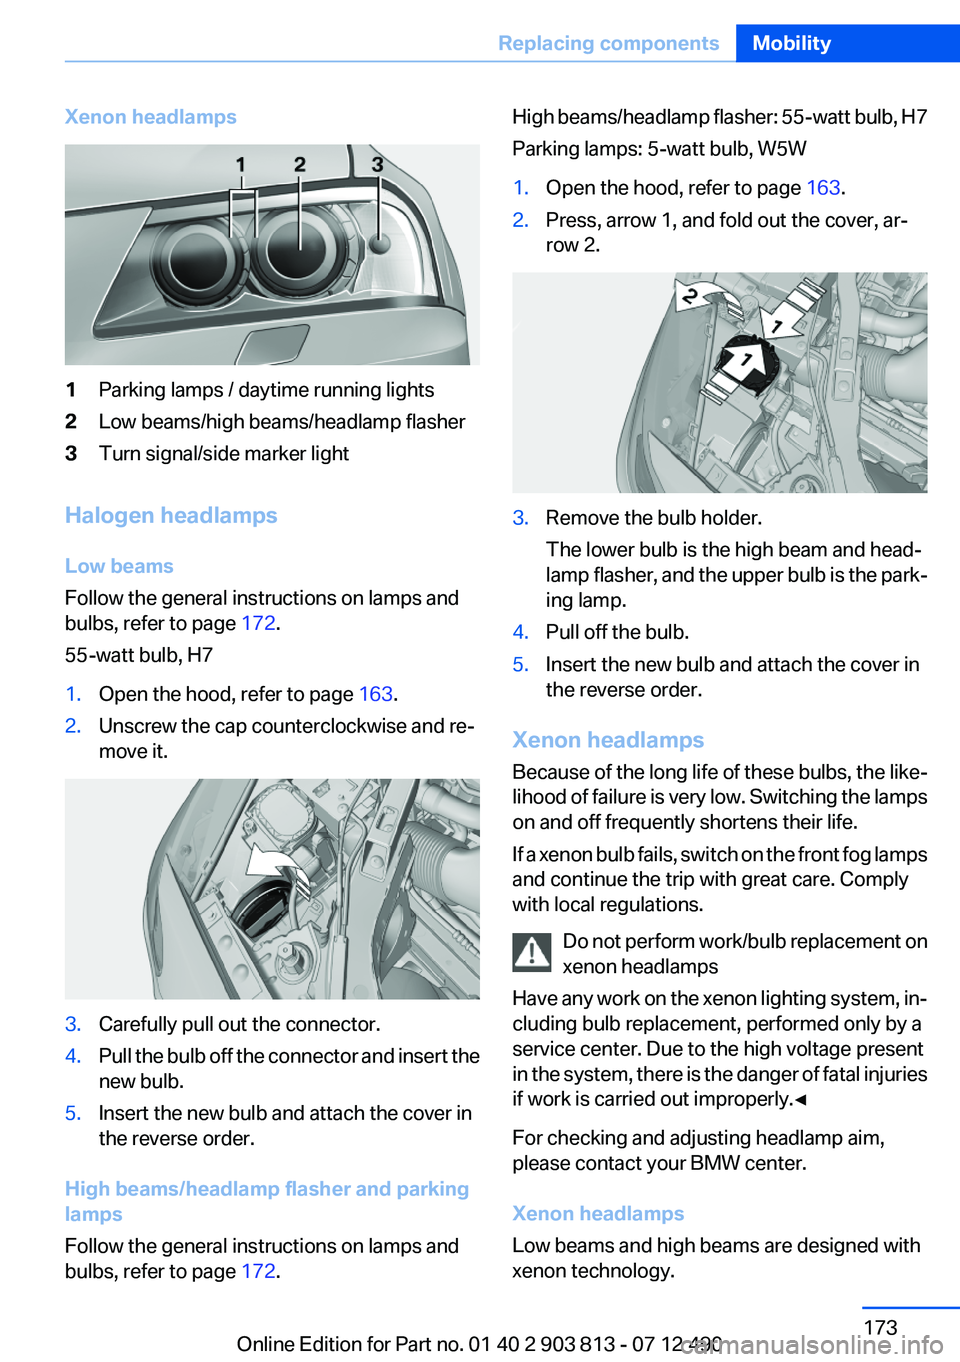
Xenon headlamps1Parking lamps / daytime running lights2Low beams/high beams/headlamp flasher3Turn signal/side marker light
Halogen headlamps
Low beams
Follow the general instructions on lamps and
bulbs, refer to page 172.
55-watt bulb, H7
1.Open the hood, refer to page 163.2.Unscrew the cap counterclockwise and re‐
move it.3.Carefully pull out the connector.4.Pull the bulb off the connector and insert the
new bulb.5.Insert the new bulb and attach the cover in
the reverse order.
High beams/headlamp flasher and parking
lamps
Follow the general instructions on lamps and
bulbs, refer to page 172.
High beams/headlamp flasher: 55-watt bulb, H7
Parking lamps: 5-watt bulb, W5W1.Open the hood, refer to page 163.2.Press, arrow 1, and fold out the cover, ar‐
row 2.3.Remove the bulb holder.
The lower bulb is the high beam and head‐
lamp flasher, and the upper bulb is the park‐
ing lamp.4.Pull off the bulb.5.Insert the new bulb and attach the cover in
the reverse order.
Xenon headlamps
Because of the long life of these bulbs, the like‐
lihood of failure is very low. Switching the lamps
on and off frequently shortens their life.
If a xenon bulb fails, switch on the front fog lamps
and continue the trip with great care. Comply
with local regulations.
Do not perform work/bulb replacement on
xenon headlamps
Have any work on the xenon lighting system, in‐
cluding bulb replacement, performed only by a
service center. Due to the high voltage present
in the system, there is the danger of fatal injuries
if work is carried out improperly.◀
For checking and adjusting headlamp aim,
please contact your BMW center.
Xenon headlamps
Low beams and high beams are designed with
xenon technology.
Seite 173Replacing componentsMobility173
Online Edition for Part no. 01 40 2 903 813 - 07 12 490
Page 174 of 211
The parking lamps and daylight running lights
are made using LED technology.
Contact your service center in the event of a
malfunction.
Front fog lamps
Follow the general instructions on lamps and
bulbs, refer to page 172.
Front fog lamps in vehicles equipped with Adap‐
tive Light Control: 55-watt bulb, H11
Front fog lamps without Adaptive Light Control:
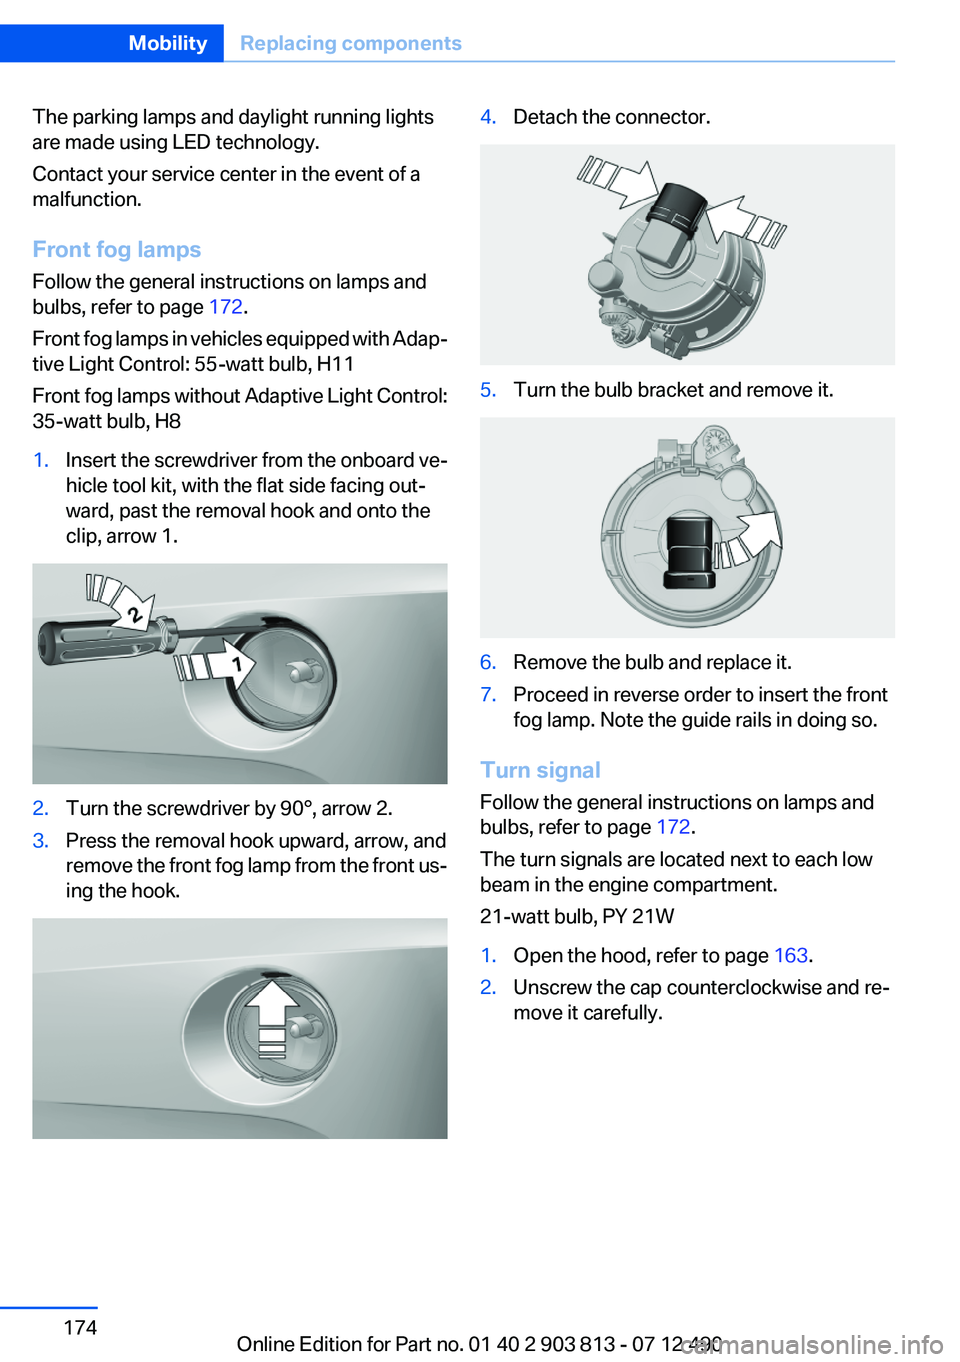
35-watt bulb, H81.Insert the screwdriver from the onboard ve‐
hicle tool kit, with the flat side facing out‐
ward, past the removal hook and onto the
clip, arrow 1.2.Turn the screwdriver by 90°, arrow 2.3.Press the removal hook upward, arrow, and
remove the front fog lamp from the front us‐
ing the hook.4.Detach the connector.5.Turn the bulb bracket and remove it.6.Remove the bulb and replace it.7.Proceed in reverse order to insert the front
fog lamp. Note the guide rails in doing so.
Turn signal
Follow the general instructions on lamps and
bulbs, refer to page 172.
The turn signals are located next to each low
beam in the engine compartment.
21-watt bulb, PY 21W
1.Open the hood, refer to page 163.2.Unscrew the cap counterclockwise and re‐
move it carefully.Seite 174MobilityReplacing components174
Online Edition for Part no. 01 40 2 903 813 - 07 12 490
Page 175 of 211
The bulb is attached to the cap.3.Turn the bulb clockwise to remove it.4.Insert the new bulb and attach the cover in
the reverse order.
Lateral turn signals
Follow the general instructions on lamps and
bulbs, refer to page 172.
These lamps are made using LED technology.
Please contact your service center in the event
of a malfunction.
Tail lamps, bulb replacement
At a glance
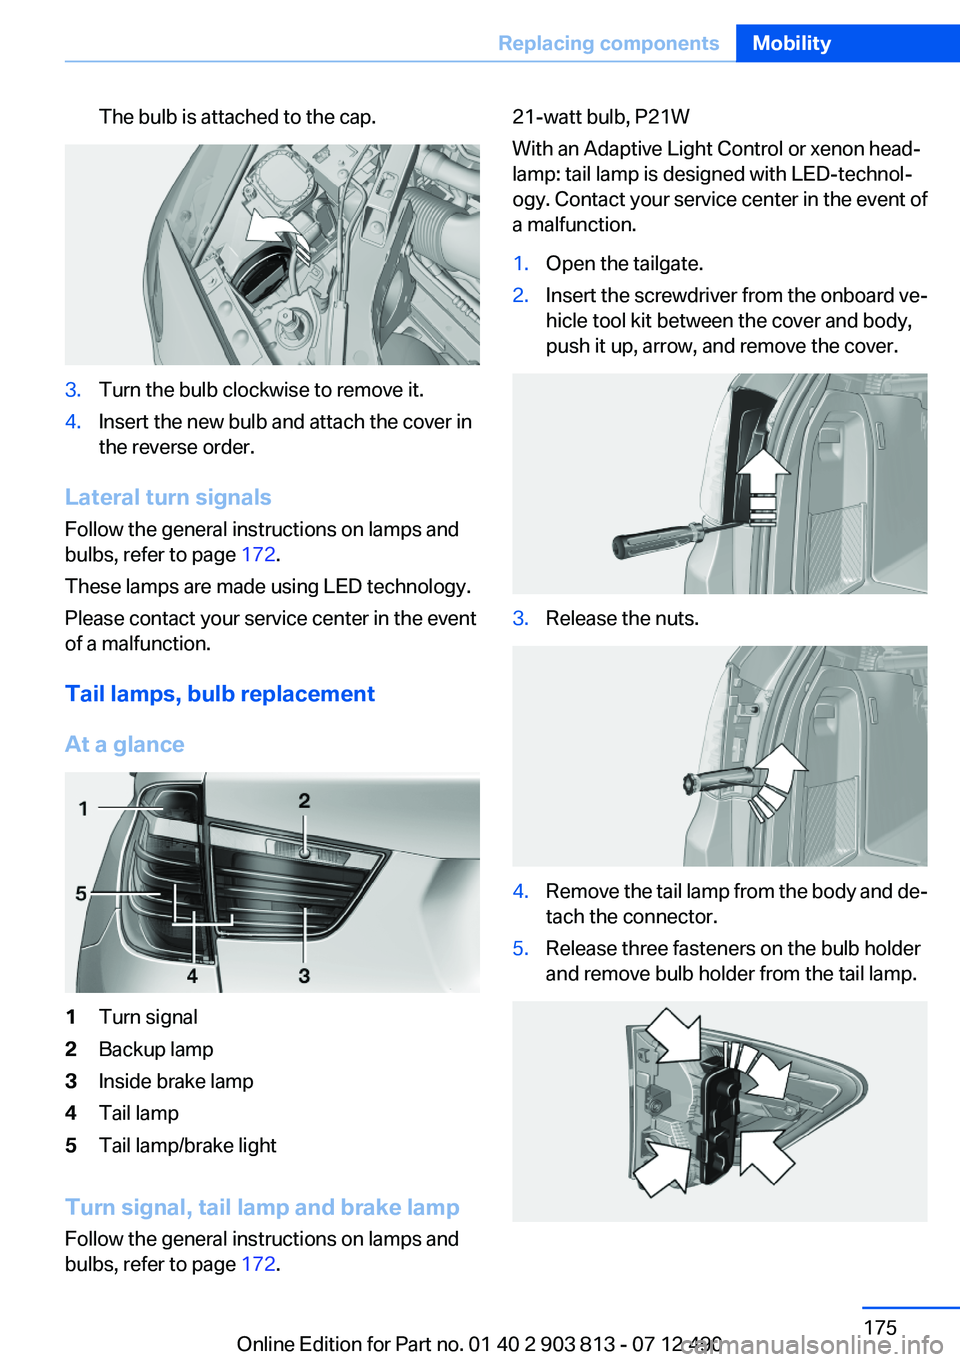
1Turn signal2Backup lamp3Inside brake lamp4Tail lamp5Tail lamp/brake light
Turn signal, tail lamp and brake lamp
Follow the general instructions on lamps and
bulbs, refer to page 172.
21-watt bulb, P21W
With an Adaptive Light Control or xenon head‐
lamp: tail lamp is designed with LED-technol‐
ogy. Contact your service center in the event of
a malfunction.1.Open the tailgate.2.Insert the screwdriver from the onboard ve‐
hicle tool kit between the cover and body,
push it up, arrow, and remove the cover.3.Release the nuts.4.Remove the tail lamp from the body and de‐
tach the connector.5.Release three fasteners on the bulb holder
and remove bulb holder from the tail lamp.Seite 175Replacing componentsMobility175
Online Edition for Part no. 01 40 2 903 813 - 07 12 490
Page 179 of 211
Assist Response Center contacts you and
takes further steps to help you.
Even if you are unable to respond, the BMW
Assist Response Center can take further
steps to help you under certain circumstan‐
ces.
For this purpose, data that are used to de‐
termine the necessary rescue measures,
such as the current position of the vehicle if
it can be established, are transmitted to the
BMW Assist Response Center.▷If the LED is flashing but the BMW Assist
Response Center cannot be heard on the
hands-free system, the hands-free system
may be malfunctioning. However, the BMW
Assist Response Center may still be able to
hear you.
Initiating an Emergency Request
automatically
Under certain conditions, an Emergency Re‐
quest is automatically initiated immediately after
a severe accident. Automatic Collision Notifica‐
tion is not affected by pressing the SOS button.
Warning triangle
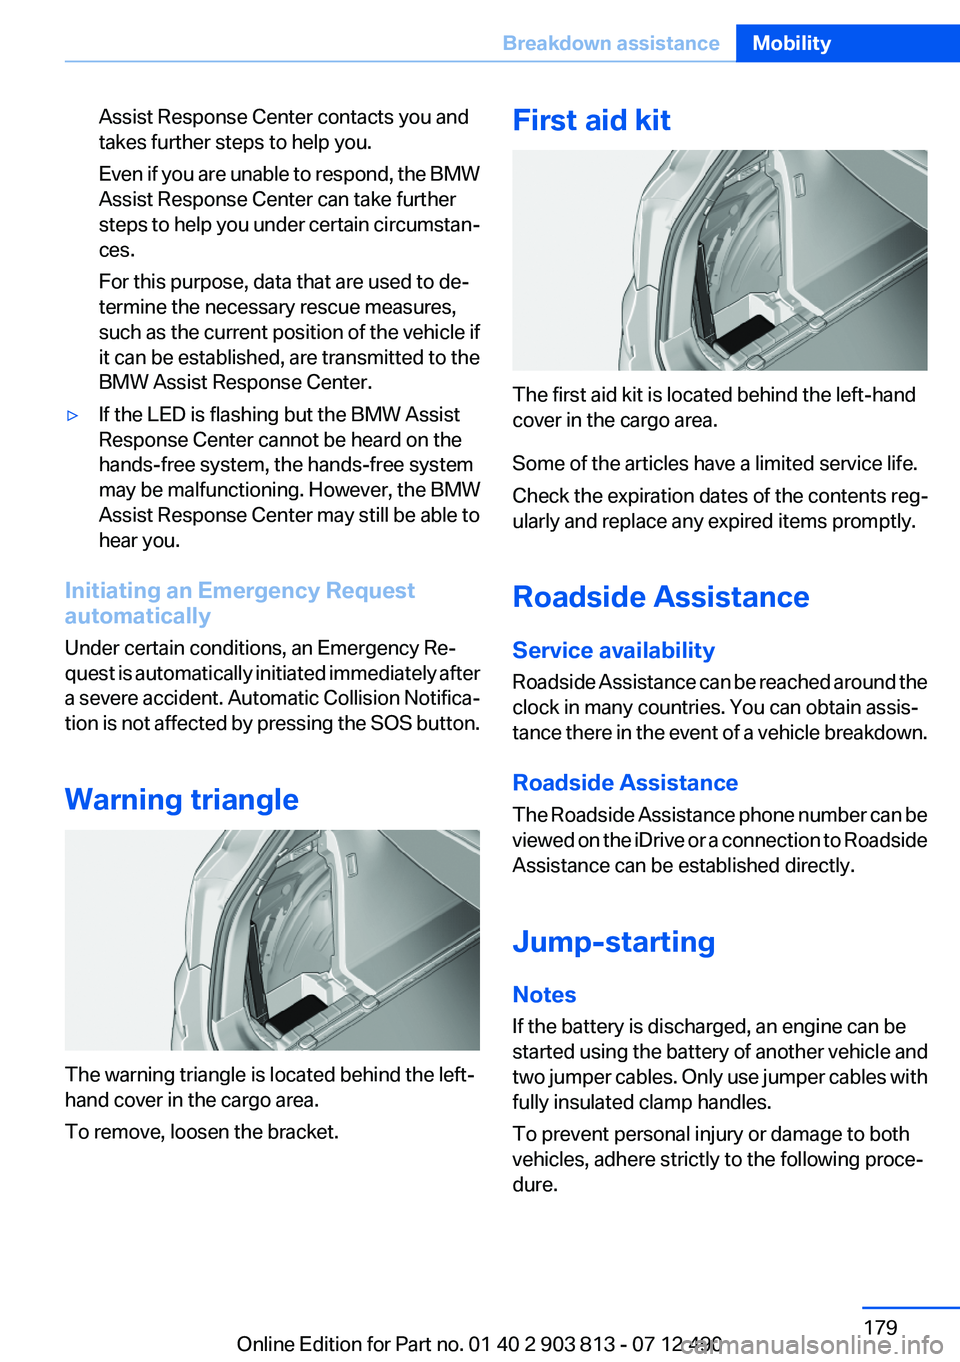
The warning triangle is located behind the left-
hand cover in the cargo area.
To remove, loosen the bracket.
First aid kit
The first aid kit is located behind the left-hand
cover in the cargo area.
Some of the articles have a limited service life.
Check the expiration dates of the contents reg‐
ularly and replace any expired items promptly.
Roadside Assistance
Service availability
Roadside Assistance can be reached around the
clock in many countries. You can obtain assis‐
tance there in the event of a vehicle breakdown.
Roadside Assistance
The Roadside Assistance phone number can be
viewed on the iDrive or a connection to Roadside
Assistance can be established directly.
Jump-starting
Notes
If the battery is discharged, an engine can be
started using the battery of another vehicle and
two jumper cables. Only use jumper cables with
fully insulated clamp handles.
To prevent personal injury or damage to both
vehicles, adhere strictly to the following proce‐
dure.
Seite 179Breakdown assistanceMobility179
Online Edition for Part no. 01 40 2 903 813 - 07 12 490
Page 184 of 211
Transmission position P with the igni‐
tion off
When the ignition is switched off, position P
is engaged automatically. When in an auto‐
matic car wash, for example, ensure that the
ignition is not switched off accidentally.◀
The vehicle cannot be locked from the outside
when in transmission position N.
A signal is sounded when an attempt is made to
lock the vehicle.
Transmission position
Transmission position P is engaged automati‐
cally:
▷When the ignition is switched off.▷After approx. 15 minutes.
Headlamps
▷Do not rub dry and do not use abrasive or
caustic cleansers.▷Soak areas that have been soiled e.g. due to
insects, with shampoo and wash off with
water.▷Thaw ice with deicing spray; do not use an
ice scraper.
After washing the vehicle
After washing the vehicle, apply the brakes
briefly to dry them; otherwise, braking action can
be reduced and corrosion of the brake discs can
occur.
Remove all residue completely from the wind‐
shields, otherwise streaking may cause loss of
visibility and wiper noise when the windshield
wipers are operated.
Vehicle care
Car care products
BMW recommends using cleaning and care
products from BMW, since these have been
tested and approved.
Car care and cleaning products
Follow the instructions on the container.
When cleaning the interior, open the doors or
windows.
Only use products intended for cleaning vehi‐
cles.
Cleansers can contain substances that are dan‐
gerous and harmful to your health.◀
Vehicle paint
Regular care contributes to driving safety and
value retention. Environmental influences in
areas with elevated air pollution or natural con‐
taminants, such as tree resin or pollen can affect
the vehicle's paintwork. Tailor the frequency
and extent of your car care to these influences.
Aggressive substances such as spilled fuel, oil,
grease or bird droppings must be removed im‐
mediately to prevent the finish from being al‐
tered or discolored.
Leather care
Remove dust from the leather often, using a
cloth or vacuum cleaner.
Otherwise, particles of dust and road grime
chafe in pores and folds, and lead to increased
wear and premature degradation of the leather
surface.
To guard against discoloration, such as from
clothing, provide leather care roughly every two
months.
Clean light-colored leather more frequently be‐
cause soiling on such surfaces is substantially
more visible.
Use leather care products; otherwise, dirt and
grease will gradually break down the protective
layer of the leather surface.
Suitable care products are available from the
service center.
Upholstery material care
Vacuum regularly with a vacuum cleaner.Seite 184MobilityCare184
Online Edition for Part no. 01 40 2 903 813 - 07 12 490
Page 193 of 211
Short commands of the voice act. systemVehicle equipment
All standard, country-specific and optional
equipment that is offered in the model series is
described in this chapter. Therefore, equipment
is also described that is not available in a vehicle,
e. g., because of the selected optional equip‐
ment or country variant. This also applies for
safety-related functions and systems.General information
Instructions for voice activation system, refer to
page 23.
To have the available spoken instructions read
out loud: ›Voice commands‹
Adjusting
Vehicle
FunctionCommandOpen the main menu.›Main menu‹Open the options.›Options‹Open the settings.›Settings‹Info display of the instrument cluster.›Info Display‹Settings on the Control Display.›Control display‹Open the time and date.›Time and date‹Open the language and units.›Language and units‹Open the speed limit.›Speed‹Open the light.›Lighting‹Open the door lock.›Door locks‹Open the profiles.›Profiles‹
Equipment
FunctionCommandOpen the air conditioning settings.›Climate‹Open the Head-up Display.›head up display‹Seite 193Short commands of the voice act. systemReference193
Online Edition for Part no. 01 40 2 903 813 - 07 12 490
Page 202 of 211
Everything from A to Z
IndexA
ABS, Antilock Brake Sys‐ tem 102
Activated-charcoal filter 125
Adaptive brake lights, refer to Brake force display 101
Adaptive light control 88
Additives, oil 166
Adjustments, seats/head re‐ straints 46
After washing vehicle 184
Airbags 91
Airbags, indicator/warning light 92
Air circulation, refer to Recir‐ culated-air mode 121, 124
Air, dehumidifying, refer to Cooling function 121, 124
Air distribution, manual 120, 123
Air flow, automatic climate control 124
Air pressure, tires 155
Air vents, refer to Ventila‐ tion 125
Air volume, automatic climate control 121
Alarm system 40
Alarm, unintentional 42
All around the center con‐ sole 14
All around the headliner 15
All around the steering wheel 12
ALL program, automatic cli‐ mate control 124
All-season tires, refer to Win‐ ter tires 161
All-wheel-drive 103 Alternating-code hand-held
transmitter 128
Alternative oil types 166
Ambient light 90
Antifreeze, washer fluid 68
Antilock Brake System, ABS 102
Anti-slip control, refer to DSC 102
Approved axle load 191
Approved engine oils 166
Armrest, refer to Center arm‐ rest 135
Arrival time 82
Assistance, Roadside Assis‐ tance 179
AUTO H button, refer to Auto‐ matic Hold 64
AUTO intensity 123
Automatic car wash 183
Automatic climate con‐ trol 120
Automatic climate control with enhanced features 122
Automatic Curb Monitor 53
Automatic deactivation, front passenger airbags 93
Automatic headlamp con‐ trol 87
Automatic Hold 64
Automatic locking 37
Automatic recirculated-air control 124
Automatic tailgate 38
Automatic transmission with Steptronic 68
AUTO program, automatic cli‐ mate control 123
AUTO program, climate con‐ trol 121
AUTO program, intensity 123 Auto Start/Stop function 61
Average fuel consumption 82
Average speed 82
Axle loads, weights 191
B
Backrest curvature, refer to Lumbar support 48
Backrest, width 48
Backup camera 114
Band-aids, refer to First aid kit 179
Bar for tow-starting/tow‐ ing 181
Battery replacement, vehicle battery 176
Battery replacement, vehicle remote control 30
Battery, vehicle 176
Belts, safety belts 49
Beverage holder, cu‐ pholder 135
Blinds, sun protection 43
BMW Assist, see user's manual for Navigation, Enter‐
tainment and Communica‐
tion
BMW Homepage 6
BMW Internet page 6
BMW Maintenance Sys‐ tem 168
Bottle holder, refer to Cu‐ pholder 135
Brake assistant 102
Brake discs, breaking in 140
Brake force display 101
Brake lamps, brake force dis‐ play 101
Brake lights, adaptive 101
Brake pads, breaking in 140 Seite 202ReferenceEverything from A to Z202
Online Edition for Part no. 01 40 2 903 813 - 07 12 490