2013 BMW X1 XDRIVE 28I tow bar
[x] Cancel search: tow barPage 100 of 291

Park Distance Control PDC
The concept
In addition to the PDC Park Distance Control, the
backup camera, refer to page 102, can be
switched on.
PDC supports you when parking. A slow ap‐
proach to an object in front of or behind your ve‐
hicle is announced by:▷Signal tones.▷Visual display.
Measurement
Measurements are made by ultrasound sensors
in the bumpers.
The range is approx. 6 ft/2 m.
An acoustic warning is first given:
▷By the front sensors and two rear corner
sensors at approx. 24 in/60 cm.▷By the rear middle sensors at approx.
5 ft/1.50 m.
System limits
Check the traffic situation as well
PDC cannot serve as a substitute for the
driver's personal judgment of the traffic situa‐
tion. Check the traffic situation around the vehi‐
cle with your own eyes. Otherwise, an accident
could result from road users or objects located
outside of the PDC detection range.
Loud noises from outside and inside the vehicle
may prevent you from hearing the PDC's signal
tone.◀
Avoid driving quickly with PDC
Avoid approaching an object quickly.
Avoid driving away quickly while PDC is not yet
active.
For technical reasons, the system may other‐
wise be too late in issuing a warning.◀
Limits of ultrasonic measurement
The detection of objects can reach the physical
limits of ultrasonic measurement, for instance:▷With tow bars and trailer hitches.▷With thin or wedge-shaped objects.▷With low objects.▷With objects with corners and sharp edges.
Low objects already displayed, e.g., curbs, can
move into the blind area of the sensors before or
after a continuous tone sounds.
High, protruding objects such as ledges may not
be detected.
False warnings
PDC may issue a warning under the following
conditions even though there is no obstacle
within the detection range:
▷In heavy rain.▷When sensors are very dirty or covered in
ice.▷When sensors are covered in snow.▷On rough road surfaces.▷In large buildings with right angles and
smooth walls, e.g., in underground garages.▷In heavy exhaust.▷Due to other ultrasound sources, e.g.,
sweeping machines, high pressure steam
cleaners or neon lights.
Switching on automatically
With the engine running or the ignition switched
on, shift the selector lever into position R.
Switching off automatically when
driving forward
The system switches off when a certain distance
or speed is exceeded.
Switch on the system again if necessary.
Seite 100ControlsDriving comfort100
Online Edition for Part no. 01 40 2 914 595 - VI/12
Page 246 of 291

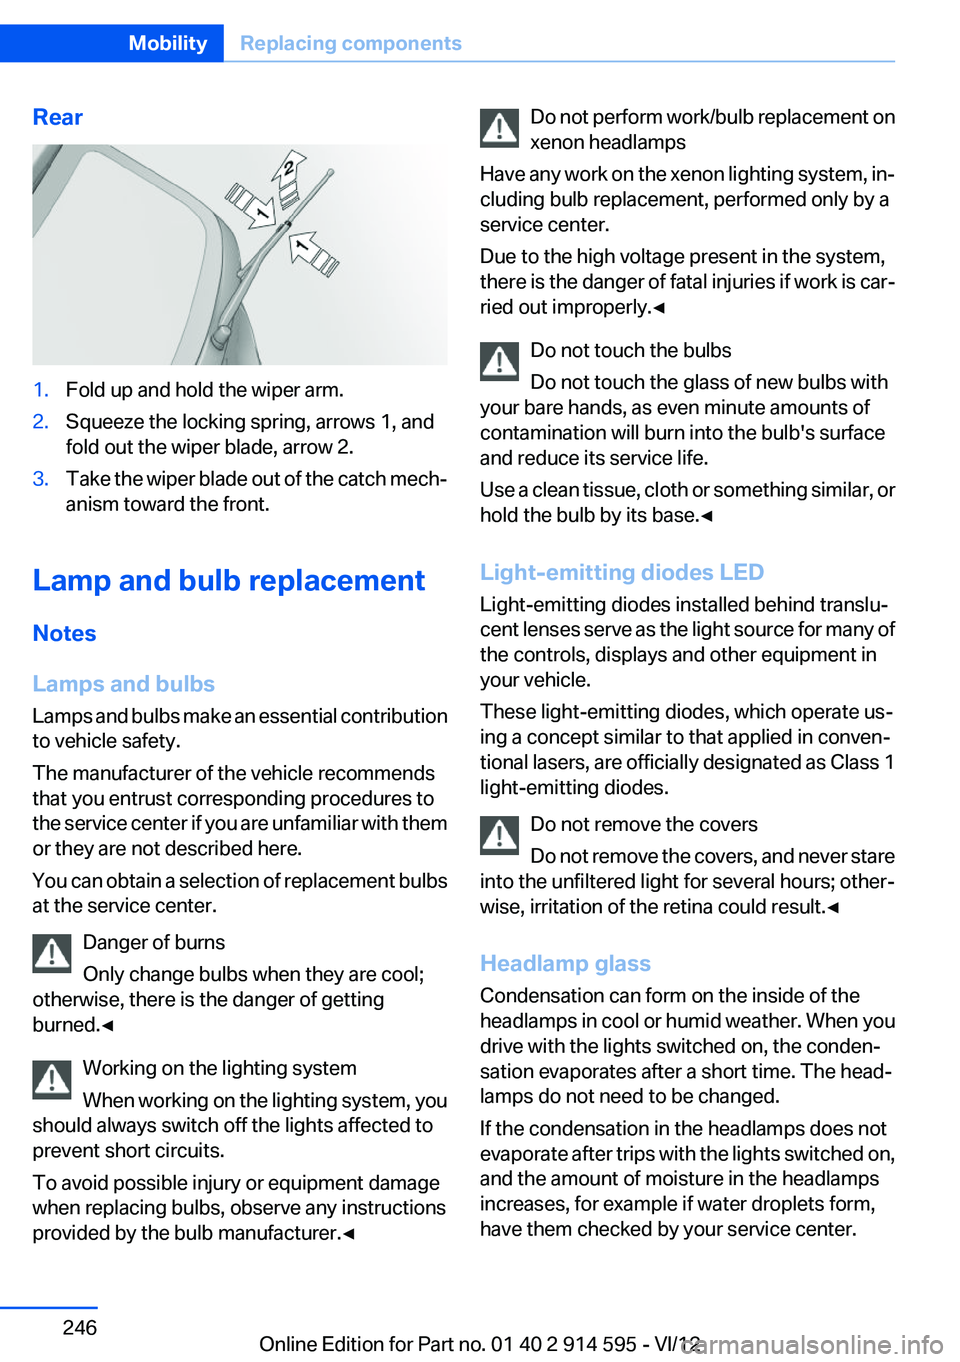
Rear1.Fold up and hold the wiper arm.2.Squeeze the locking spring, arrows 1, and
fold out the wiper blade, arrow 2.3.Take the wiper blade out of the catch mech‐
anism toward the front.
Lamp and bulb replacement
Notes
Lamps and bulbs
Lamps and bulbs make an essential contribution
to vehicle safety.
The manufacturer of the vehicle recommends
that you entrust corresponding procedures to
the service center if you are unfamiliar with them
or they are not described here.
You can obtain a selection of replacement bulbs
at the service center.
Danger of burns
Only change bulbs when they are cool;
otherwise, there is the danger of getting
burned.◀
Working on the lighting system
When working on the lighting system, you
should always switch off the lights affected to
prevent short circuits.
To avoid possible injury or equipment damage
when replacing bulbs, observe any instructions
provided by the bulb manufacturer.◀
Do not perform work/bulb replacement on
xenon headlamps
Have any work on the xenon lighting system, in‐
cluding bulb replacement, performed only by a
service center.
Due to the high voltage present in the system,
there is the danger of fatal injuries if work is car‐
ried out improperly.◀
Do not touch the bulbs
Do not touch the glass of new bulbs with
your bare hands, as even minute amounts of
contamination will burn into the bulb's surface
and reduce its service life.
Use a clean tissue, cloth or something similar, or
hold the bulb by its base.◀
Light-emitting diodes LED
Light-emitting diodes installed behind translu‐
cent lenses serve as the light source for many of
the controls, displays and other equipment in
your vehicle.
These light-emitting diodes, which operate us‐
ing a concept similar to that applied in conven‐
tional lasers, are officially designated as Class 1
light-emitting diodes.
Do not remove the covers
Do not remove the covers, and never stare
into the unfiltered light for several hours; other‐
wise, irritation of the retina could result.◀
Headlamp glass
Condensation can form on the inside of the
headlamps in cool or humid weather. When you
drive with the lights switched on, the conden‐
sation evaporates after a short time. The head‐
lamps do not need to be changed.
If the condensation in the headlamps does not
evaporate after trips with the lights switched on,
and the amount of moisture in the headlamps
increases, for example if water droplets form,
have them checked by your service center.Seite 246MobilityReplacing components246
Online Edition for Part no. 01 40 2 914 595 - VI/12
Page 256 of 291

sponding engine or body ground of the ve‐
hicle to be started.
Starting the engine
Never use spray fluids to start the engine.
1.Start the engine of the assisting vehicle and
let it run for several minutes at an increased
idle speed.
If the vehicle being started has a diesel en‐
gine: let the engine of the assisting vehicle
run for approx. 10 minutes.2.Start the engine of the vehicle being started
in the usual way.
If the first starting attempt is not successful,
wait a few minutes before making another
attempt in order to allow the discharged bat‐
tery to recharge.3.Let both engines run for several minutes.4.Disconnect the jumper cables in the reverse
order.
Check the battery and recharge if necessary.
Tow-starting and towing Observe applicable laws and regulations
Observe applicable laws and regulations
for tow-starting and towing.◀
No additional passengers
Do not transport any passengers other
than the driver in a vehicle that is being towed. ◀
Automatic transmission, 8-gear:
transporting your vehicle
Note
Your vehicle is not permitted to be towed.
Therefore, contact a service center in the event
of a breakdown.
Do not have the vehicle towed
Have your vehicle transported on a loading
platform only; otherwise, damage may occur.◀
Tow truck
Do not lift the vehicle
Do not lift the vehicle by the tow fitting or
body and chassis parts; otherwise, damage may
result.◀
Towing your vehicle
Observe before towing your vehicle Light towing vehicle
The towing vehicle must not be lighter
than your vehicle, or it will not be possible to
control vehicle response.◀
Attaching the tow bar/tow rope correctly
Attach the tow bar or tow rope to the tow
fitting; connecting it to other vehicle parts may
cause damage.◀
Automatic transmission, 6-gear
Selector lever in position N.
Adhere to the towing speed and distance
Do not exceed a towing speed of
40 mph/70 km/h and a towing distance of
90 miles/150 km or damage to the transmission
can occur.◀
Seite 256MobilityBreakdown assistance256
Online Edition for Part no. 01 40 2 914 595 - VI/12
Page 257 of 291

Being towedFollow the towing instructions
Follow all towing instructions, or vehicle
damage or accidents may occur.◀▷Make sure that the ignition is switched on;
otherwise, the low beams, tail lamps, turn
signals, and windshield wipers may be un‐
available.▷Do not tow the vehicle with the rear axle
tilted, as the front wheels could turn.▷When the engine is stopped, there is no
power assist. Consequently, more force
needs to be applied when braking and steer‐
ing.▷Larger steering wheel movements are re‐
quired.▷Switch on the hazard warning system, de‐
pending on local regulations.▷If the electrical system has failed, clearly
identify the vehicle being towed by placing
a sign or a warning triangle in the rear win‐
dow.
Towing other vehicles
General information Light towing vehicle
Your vehicle must not be lighter than the
vehicle being towed; otherwise, it will not be
possible to control vehicle response.◀
Attaching the tow bar/tow rope correctly
Attach the tow bar or tow rope to the tow
fitting; connecting it to other vehicle parts may
cause damage.◀
▷Switch on the hazard warning system, de‐
pending on local regulations.▷If the electrical system has failed, clearly
identify the vehicle being towed by placing
a sign or a warning triangle in the rear win‐
dow.Towing methods
Do not lift the vehicle
Do not lift the vehicle by the tow fitting or
body and chassis parts; otherwise, damage may
result.◀
Tow bar
The tow fittings used should be on the same
side on both vehicles.
Should it prove impossible to avoid mounting
the tow bar at an offset angle, please observe
the following:▷Clearance and maneuvering capability will
be sharply limited during cornering.▷The tow bar will generate lateral forces if it
is attached offset.
Tow rope
When starting to tow the vehicle, make sure that
the tow rope is taut.
To avoid jerking and the associated stresses on
the vehicle components when towing, always
use nylon ropes or nylon straps.
Attaching the tow rope correctly
Only secure the tow rope on the tow fit‐
ting; otherwise, damage can occur when it is se‐
cured on other parts of the vehicle.◀
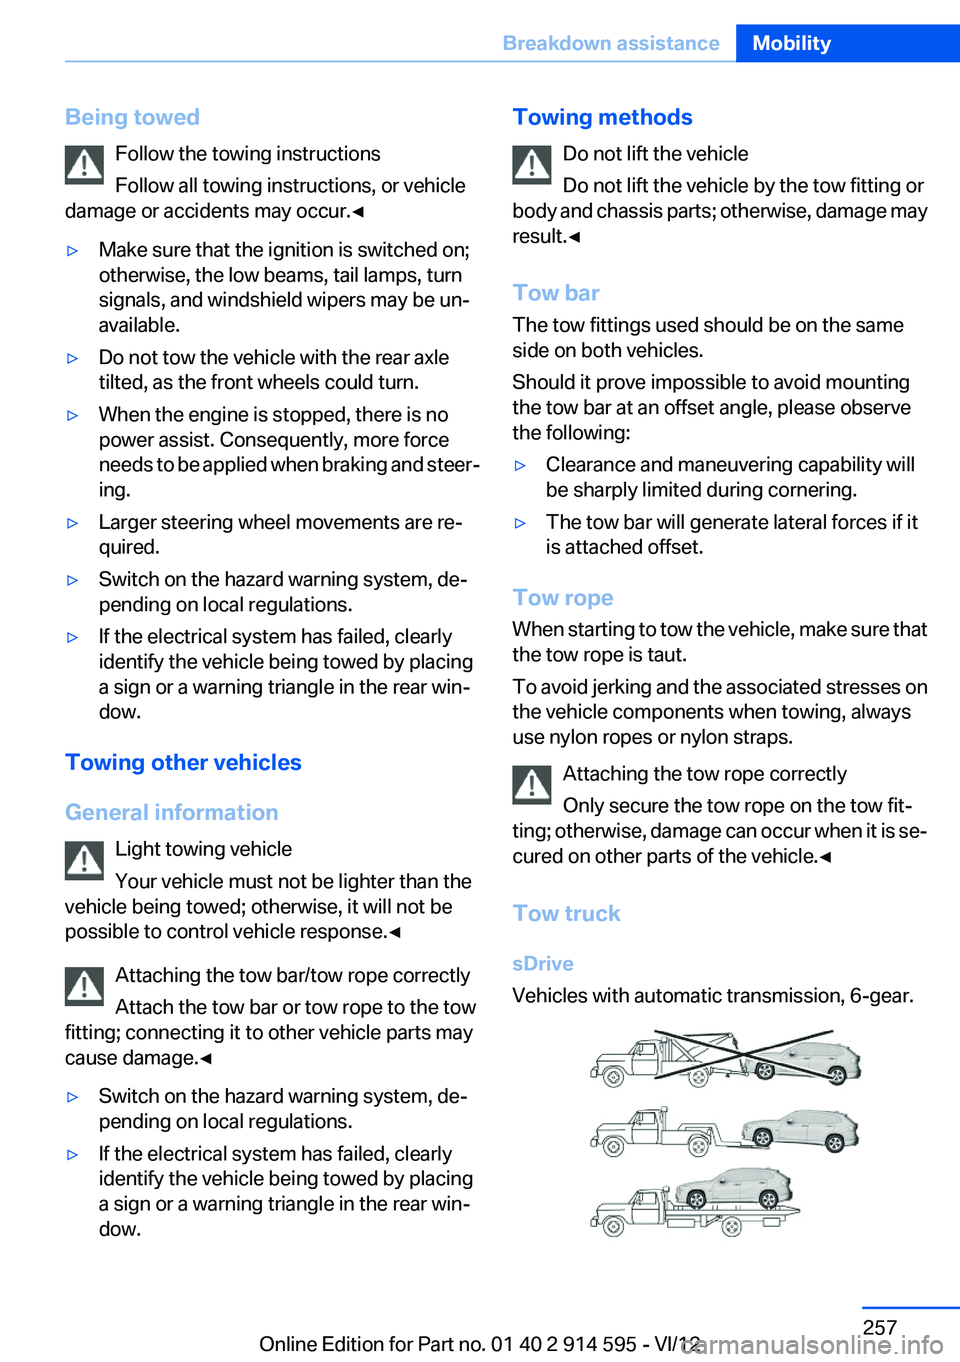
Tow truck
sDrive
Vehicles with automatic transmission, 6-gear.
Seite 257Breakdown assistanceMobility257
Online Edition for Part no. 01 40 2 914 595 - VI/12
Page 258 of 291

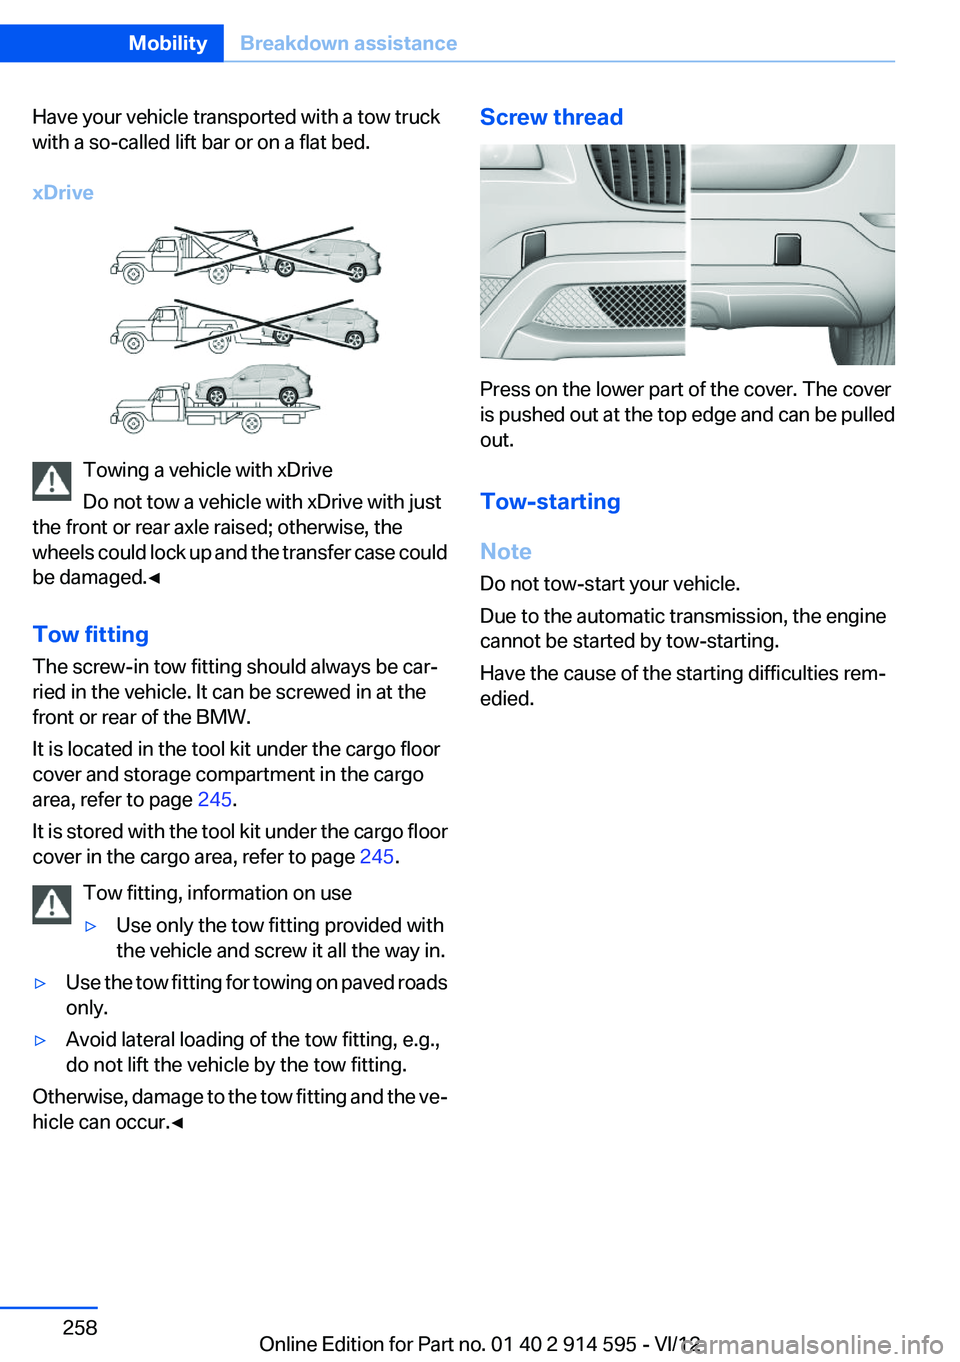
Have your vehicle transported with a tow truck
with a so-called lift bar or on a flat bed.
xDrive
Towing a vehicle with xDrive
Do not tow a vehicle with xDrive with just
the front or rear axle raised; otherwise, the
wheels could lock up and the transfer case could
be damaged.◀
Tow fitting
The screw-in tow fitting should always be car‐
ried in the vehicle. It can be screwed in at the
front or rear of the BMW.
It is located in the tool kit under the cargo floor
cover and storage compartment in the cargo
area, refer to page 245.
It is stored with the tool kit under the cargo floor
cover in the cargo area, refer to page 245.
Tow fitting, information on use
▷Use only the tow fitting provided with
the vehicle and screw it all the way in.▷Use the tow fitting for towing on paved roads
only.▷Avoid lateral loading of the tow fitting, e.g.,
do not lift the vehicle by the tow fitting.
Otherwise, damage to the tow fitting and the ve‐
hicle can occur.◀
Screw thread
Press on the lower part of the cover. The cover
is pushed out at the top edge and can be pulled
out.
Tow-starting
Note
Do not tow-start your vehicle.
Due to the automatic transmission, the engine
cannot be started by tow-starting.
Have the cause of the starting difficulties rem‐
edied.
Seite 258MobilityBreakdown assistance258
Online Edition for Part no. 01 40 2 914 595 - VI/12
Page 277 of 291

Axle loads, refer toWeights 267
B
Backrest curvature, refer to Lumbar support 44
Backrests, refer to Seats 43
Backrest width adjustment 44
Back seats– Adjusting the backrest
tilt 115
Backup camera 102
Backup camera, cleaning 104
Backup camera, obstacle marking 103
Backup camera, pathway lines 103
Backup camera, turning lines 103
Backup lamps, bulb replace‐ ment 249
Balance 160
Band-aids, refer to First aid kit 254
Bass 160
Battery
– Remote control 30
Battery disposal 251
Battery, refer to Vehicle bat‐ tery 251
Battery replacement, remote control for vehicle 38
Before entering the car wash 259
Belts, refer to Safety belts 45
Belt tensioners, refer to Safety belts 45
Beverage holder, refer to Cu‐ pholder 122
Black and white map dis‐ play 154
Blower, refer to Air flow rate 106
Bluetooth audio 185
Bluetooth connection, activat‐ ing/deactivating 193
BMW Apps 219
BMW Apps, video play‐ back 184
BMW Assist 215
BMW Assist, refer to Connec‐ tedDrive 215
BMW EfficientDynamics, refer to Saving fuel 133
BMW Homepage 6
BMW Internet page 6
BMW maintenance sys‐ tem 243
BMW Online 217
Bottle holder, refer to Cu‐ pholder 122
Brake assistant 94
Brake discs, breaking in 126
Brake fluid, refer to Service re‐ quirements 75
Brake force display 93
Brake force distribution, elec‐ tronic 94
Brake lamps– Bulb replacement 249
Brake lamps, brake force dis‐
play 93
Brake lights, adaptive 93
Brake pads, breaking in 126
Brakes
– Handbrake 58
Brakes, BMW maintenance
system 243
Brakes, service require‐ ments 75
Brake system, BMW mainte‐ nance system 243
Braking, notes 127
Breakdown assistance 254
Breakdown, transporting the vehicle 256
Breaking in 126
Brightness on the Control Dis‐ play 75
Bulb replacement, refer to Lamp and bulb replace‐
ment 246
Button for starting the engine,
refer to Start/Stop button 54
C
Calendar 209
California Proposition 65 Warning 7
Camera, care 261
Camera, refer to Backup cam‐ era 102
Can holder, refer to Cu‐ pholder 122
Car battery, refer to Vehicle battery 251
Car care products 260
Care 259
Care, displays 262
Care, vehicle 260
Cargo 130
Cargo area 115
Cargo area– Comfort Access 37– Cover 115– Folding up the cargo floor
panel 118– Multi-function hook 118– Partition net 116
Cargo area, capacities 267
Cargo area, enlarging 115
Cargo area lamp, refer to Inte‐ rior lamps 84
Cargo area lid, refer to Tail‐ gate 35
Cargo area net, refer to Parti‐ tion net 116
Cargo area, opening from the inside 35
Cargo area, opening from the outside 36
Cargo floor panel
– Folding up 118
Cargo floor panel, raising 118
Cargo straps, securing cargo 131
Car key, refer to Integrated key/remote control 30
Seite 277Everything from A to ZReference277
Online Edition for Part no. 01 40 2 914 595 - VI/12
Page 287 of 291

Tasks 210
Technical changes, refer to Safety 6
Technical data 266
Telephone 192
Telephone, adjusting the vol‐ ume 196
Telephone, installation loca‐ tion, refer to Center arm‐
rest 120
TeleService 216
Temperature– Automatic climate con‐
trol 106– Changing the unit of meas‐
ure 72
Temperature, coolant, refer to
Coolant temperature 69
Temperature display
– External temperature 68– External temperature warn‐
ing 68– Setting the unit 72
Temperature, engine oil 69
Temperature warning 68
Text messages 207
Theft alarm system, refer to Alarm system 38
Thigh support adjustment 44
Third brake lamp, refer to Cen‐ ter brake lamp 250
Tilting the passenger side mir‐ ror 48
Time
– Setting the time 72– Setting the time zone 73
Tire age 233
Tire identification marks 233
Tire inflation pressure 228
Tire inflation pressure, check‐ ing 228
Tire pressure monitor, refer to Flat Tire Monitor 88
Tire Pressure Monitor TPM 90
Tire Quality Grading 233
Tires– Inflation pressure 228
Tires, breaking in 126
Tires, changing 235
Tires, condition 234
Tires, damage 235
Tire size 233
Tires, minimum tread 234
Tires, retreaded tires 236
Tires, run-flat tires 236
Tires, storage 236
Tire tread 234
Toll roads, route 149
Tone 160
Tool kit, refer to Onboard ve‐ hicle tool kit 245
Tools, refer to Onboard vehicle tool kit 245
Tow bar 257
Tow fitting 258
Towing 256
Towing another vehicle 256
Towing, being towed 256
Towing with automatic trans‐ mission 256
Town/city, navigation 141
Tow rope 257
Tow-starting 256, 258
TPM Tire Pressure Moni‐ tor 90
Traction control 95
Traffic bulletins, naviga‐ tion 153
Transmission
– Automatic transmission with
Steptronic 62– Overriding selector lever lock
in case of automatic trans‐
mission with Steptronic 64
Transmission, automatic
transmission with Step‐
tronic 64
Transmission lock
– Refer to Changing selector
lever positions 62– Refer to P Park 63Transmission positions, auto‐
matic transmission with
Steptronic 64
Transporting children safely 50
Treble, tone 160
Trip computer, refer to Dis‐ plays on the Control Dis‐
play 70
Trip-distance counter, refer to Trip odometer 68
Triple turn signal activa‐ tion 59
Trip odometer 68
Trips, planning 147
Trunk, refer to Cargo area 115
Turning circle, refer to Dimen‐ sions 266
Turning lamps, refer to Adap‐ tive light control 81
Turn signal– Indicator/warning lamp 14
Turn signals 59
Turn signals
– Bulb replacement 249– Bulb replacement, front 249
Turn signals, triple turn signal
activation 59
U
Uniform Tire Quality Grading/ UTQG 233
Unintentional alarms, avoid‐ ing 39
Units
– Average fuel consump‐
tion 72– Temperature 72
Units of measure, changing on
Control Display 72
Universal Garage Door Opener 110
Universal remote control 110
Seite 287Everything from A to ZReference287
Online Edition for Part no. 01 40 2 914 595 - VI/12