2013 BMW X1 XDRIVE 28I wheel
[x] Cancel search: wheelPage 250 of 291

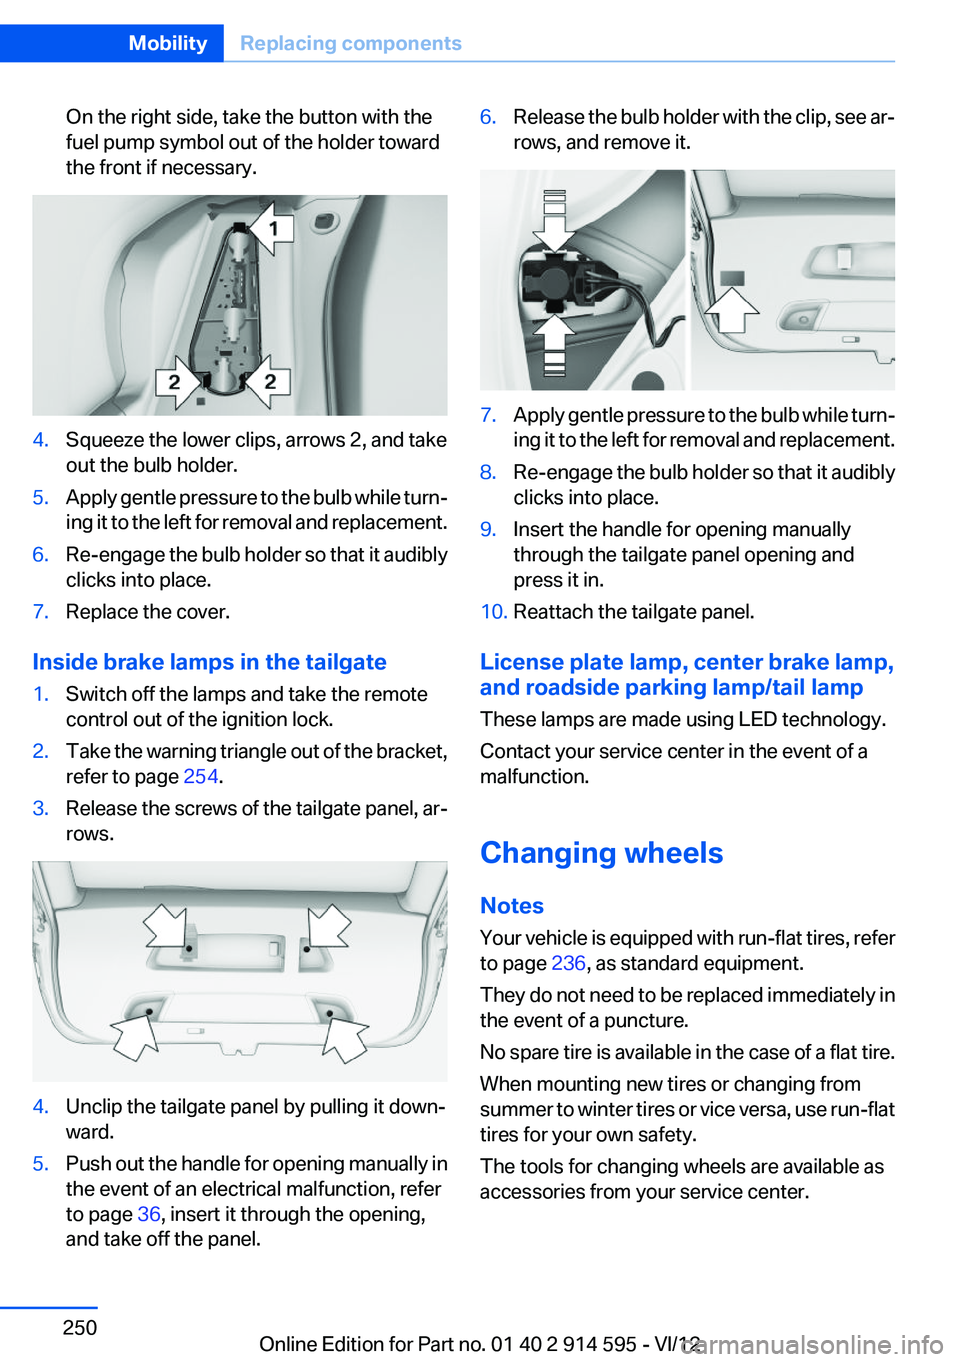
On the right side, take the button with the
fuel pump symbol out of the holder toward
the front if necessary.4.Squeeze the lower clips, arrows 2, and take
out the bulb holder.5.Apply gentle pressure to the bulb while turn‐
ing it to the left for removal and replacement.6.Re-engage the bulb holder so that it audibly
clicks into place.7.Replace the cover.
Inside brake lamps in the tailgate
1.Switch off the lamps and take the remote
control out of the ignition lock.2.Take the warning triangle out of the bracket,
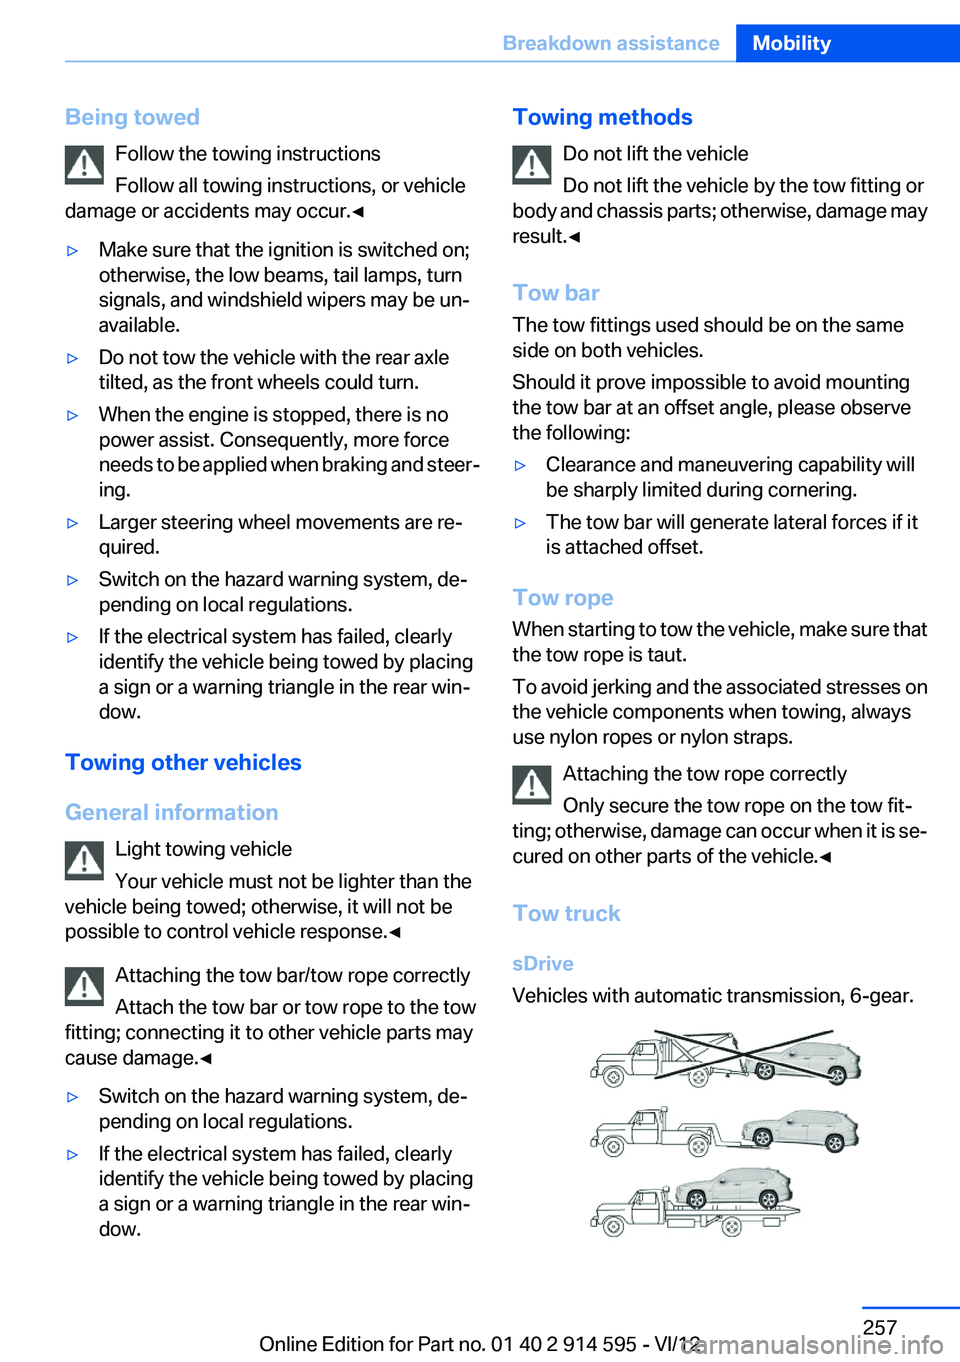
refer to page 254.3.Release the screws of the tailgate panel, ar‐
rows.4.Unclip the tailgate panel by pulling it down‐
ward.5.Push out the handle for opening manually in
the event of an electrical malfunction, refer
to page 36, insert it through the opening,
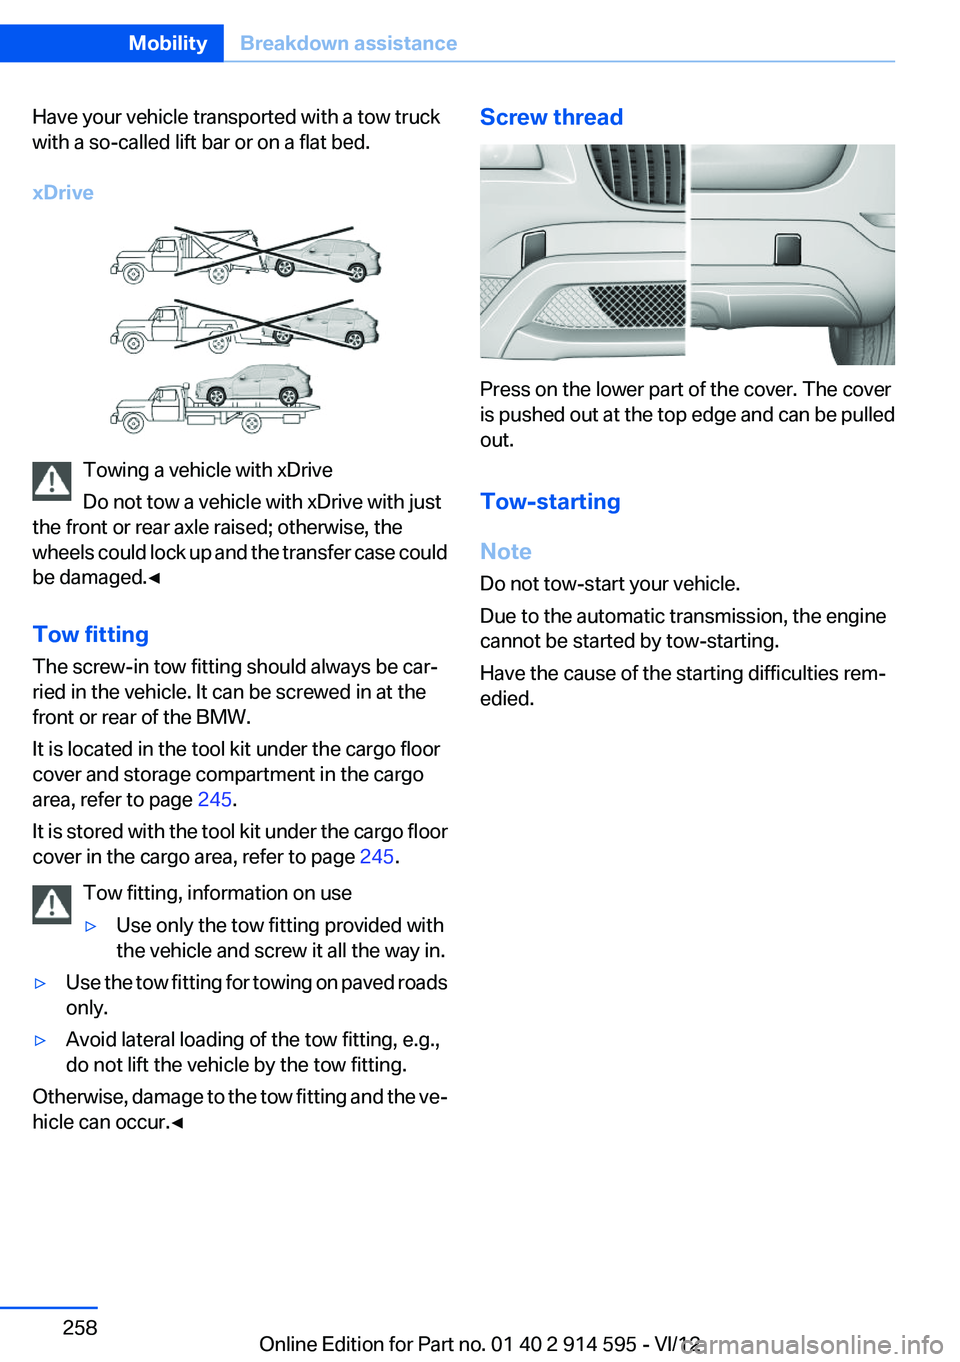
and take off the panel.6.Release the bulb holder with the clip, see ar‐
rows, and remove it.7.Apply gentle pressure to the bulb while turn‐
ing it to the left for removal and replacement.8.Re-engage the bulb holder so that it audibly
clicks into place.9.Insert the handle for opening manually
through the tailgate panel opening and
press it in.10.Reattach the tailgate panel.
License plate lamp, center brake lamp,
and roadside parking lamp/tail lamp
These lamps are made using LED technology.
Contact your service center in the event of a
malfunction.
Changing wheels
Notes
Your vehicle is equipped with run-flat tires, refer
to page 236, as standard equipment.
They do not need to be replaced immediately in
the event of a puncture.
No spare tire is available in the case of a flat tire.
When mounting new tires or changing from
summer to winter tires or vice versa, use run-flat
tires for your own safety.
The tools for changing wheels are available as
accessories from your service center.
Seite 250MobilityReplacing components250
Online Edition for Part no. 01 40 2 914 595 - VI/12
Page 257 of 291

Being towedFollow the towing instructions
Follow all towing instructions, or vehicle
damage or accidents may occur.◀▷Make sure that the ignition is switched on;
otherwise, the low beams, tail lamps, turn
signals, and windshield wipers may be un‐
available.▷Do not tow the vehicle with the rear axle
tilted, as the front wheels could turn.▷When the engine is stopped, there is no
power assist. Consequently, more force
needs to be applied when braking and steer‐
ing.▷Larger steering wheel movements are re‐
quired.▷Switch on the hazard warning system, de‐
pending on local regulations.▷If the electrical system has failed, clearly
identify the vehicle being towed by placing
a sign or a warning triangle in the rear win‐
dow.
Towing other vehicles
General information Light towing vehicle
Your vehicle must not be lighter than the
vehicle being towed; otherwise, it will not be
possible to control vehicle response.◀
Attaching the tow bar/tow rope correctly
Attach the tow bar or tow rope to the tow
fitting; connecting it to other vehicle parts may
cause damage.◀
▷Switch on the hazard warning system, de‐
pending on local regulations.▷If the electrical system has failed, clearly
identify the vehicle being towed by placing
a sign or a warning triangle in the rear win‐
dow.Towing methods
Do not lift the vehicle
Do not lift the vehicle by the tow fitting or
body and chassis parts; otherwise, damage may
result.◀
Tow bar
The tow fittings used should be on the same
side on both vehicles.
Should it prove impossible to avoid mounting
the tow bar at an offset angle, please observe
the following:▷Clearance and maneuvering capability will
be sharply limited during cornering.▷The tow bar will generate lateral forces if it
is attached offset.
Tow rope
When starting to tow the vehicle, make sure that
the tow rope is taut.
To avoid jerking and the associated stresses on
the vehicle components when towing, always
use nylon ropes or nylon straps.
Attaching the tow rope correctly
Only secure the tow rope on the tow fit‐
ting; otherwise, damage can occur when it is se‐
cured on other parts of the vehicle.◀
Tow truck
sDrive
Vehicles with automatic transmission, 6-gear.
Seite 257Breakdown assistanceMobility257
Online Edition for Part no. 01 40 2 914 595 - VI/12
Page 258 of 291

Have your vehicle transported with a tow truck
with a so-called lift bar or on a flat bed.
xDrive
Towing a vehicle with xDrive
Do not tow a vehicle with xDrive with just
the front or rear axle raised; otherwise, the
wheels could lock up and the transfer case could
be damaged.◀
Tow fitting
The screw-in tow fitting should always be car‐
ried in the vehicle. It can be screwed in at the
front or rear of the BMW.
It is located in the tool kit under the cargo floor
cover and storage compartment in the cargo
area, refer to page 245.
It is stored with the tool kit under the cargo floor
cover in the cargo area, refer to page 245.
Tow fitting, information on use
▷Use only the tow fitting provided with
the vehicle and screw it all the way in.▷Use the tow fitting for towing on paved roads
only.▷Avoid lateral loading of the tow fitting, e.g.,
do not lift the vehicle by the tow fitting.
Otherwise, damage to the tow fitting and the ve‐
hicle can occur.◀
Screw thread
Press on the lower part of the cover. The cover
is pushed out at the top edge and can be pulled
out.
Tow-starting
Note
Do not tow-start your vehicle.
Due to the automatic transmission, the engine
cannot be started by tow-starting.
Have the cause of the starting difficulties rem‐
edied.
Seite 258MobilityBreakdown assistance258
Online Edition for Part no. 01 40 2 914 595 - VI/12
Page 259 of 291

CareVehicle equipment
This chapter describes all series equipment as
well as country-specific and special equipment
offered for this model series.Therefore, it also
describes equipment that may not be found in
your vehicle, for instance due to the selected
special equipment or the country version. This
also applies to safety-related functions and sys‐
tems.
Car washes
Notes Steam jets or high-pressure washers
When using steam jets or high-pressure
washers, hold them a sufficient distance away
and use a maximum temperature of
140 ℉/60 ℃.
Holding them too close or using excessively
high pressures or temperatures can cause dam‐
age or preliminary damage that may then lead to
long-term damage.
Follow the operating instructions for the high-
pressure washer.◀
Cleaning sensors/cameras with high-
pressure washers
When using high-pressure washers, do not
spray the exterior sensors and cameras, for Park
Distance Control or the backup camera, for in‐
stance, for extended periods of time and only
from a distance of at least 12 in/30 cm.◀
Wash your vehicle frequently, particularly in win‐
ter.
Intense soiling and road salt can damage the ve‐
hicle.Washing in automatic car washes
Give preference to cloth car washes or those
that use soft brushes in order to avoid paint
damage.
Notes
Note the following:▷Make sure that the wheels and tires are not
damaged by the transport mechanisms.▷Fold in the exterior mirrors; otherwise, they
may be damaged, depending on the width of
the vehicle.▷Deactivate the rain sensor, refer to page 60,
to avoid unintentional wiper activation.▷Move the rear window wiper to its resting
position, deactivate it, and protect it against
damage. Ask the car wash operator about
any necessary protective measures.▷Remove additional attachments, for in‐
stance a spoiler or telephone antenna, if
there is a risk that these may be damaged.
Guide rails in car washes
Avoid car washes with guide rails higher
than 4 in/10 cm; otherwise, the vehicle body
could be damaged.◀
Before driving into a car wash
The vehicle is able to roll if the following steps
are taken.
Automatic transmission
1.Insert the remote control into the ignition
lock, even with Comfort Access.2.Engage the selector lever or transmission
position N.3.Release the handbrake, refer to page 58.4.Switch the engine off.5.Leave the remote control in the ignition lock
so that the vehicle can roll.Seite 259CareMobility259
Online Edition for Part no. 01 40 2 914 595 - VI/12
Page 261 of 291

Caring for special components
Light-alloy wheels
Use wheel cleaner, particularly during the winter
months. Do not use aggressive, acidic, strongly
alkaline or abrasive cleaners, or steam jets
above 140 ℉/60 ℃; follow the manufacturer's
instructions.
Chrome surfaces
Carefully clean components such as the radiator
grille or door handles with an ample supply of
water, possibly with shampoo added, particu‐
larly when they have been exposed to road salt.
Rubber components
Aside from water, treat only with rubber cleans‐
ers.
When cleaning rubber seals, do not use any sil‐
icon-containing car care products in order to
avoid damage or reduced noise damping.
Fine wood parts
Clean fine wood facing and fine wood compo‐
nents only with a moist rag. Then dry with a soft
cloth.
Plastic components
These include:▷Imitation leather surfaces.▷Headliner.▷Lamp lenses.▷Instrument cluster cover.▷Matte black spray-coated components.▷Painted parts in the interior.
Clean with a microfiber cloth.
Moisten the cloth lightly with water if necessary.
Do not soak the headliner.
Do not use cleansers that contain alcohol
or solvents
Do not use cleansers that contain alcohol or sol‐
vents, such as lacquer thinners, heavy-duty
grease removers, fuel, or such; this could lead to
surface damage.◀
Safety belts
Dirty belt straps impede the reeling action and
thus have a negative impact on safety.
No chemical cleaning
Do not clean chemically; this can destroy
the webbing.◀
Use only a mild soapy solution, with the safety
belts clipped into their buckles.
Do not allow the reels to retract the safety belts
until they are dry.
Carpets and floor mats No objects in the area around the pedals
Keep floor mats, carpets, and any other
objects out of the area of motion of the pedals;
otherwise, the function of the pedals could be
impeded while driving
Do not place additional floor mats over existing
mats or other objects.
Only use floor mats that have been approved for
the vehicle and can be properly fixed in place.
Ensure that the floor mats are securely fastened
again when they are returned after being re‐
moved, such as for cleaning.◀
Floor mats can be removed from the passenger
compartment for cleaning.
When returning the floor mats, secure them
again to prevent slipping.
If the floor carpets are very dirty, clean with a
microfiber cloth and water or a textile cleaner. To
prevent matting of the carpet, rub back and forth
in the direction of travel only.
Sensors/cameras
To clean sensors or cameras, use a cloth mois‐
tened with a small amount of glass cleaner.Seite 261CareMobility261
Online Edition for Part no. 01 40 2 914 595 - VI/12
Page 266 of 291

Technical dataVehicle equipment
This chapter describes all series equipment as
well as country-specific and special equipment
offered for this model series.Therefore, it alsodescribes equipment that may not be found in
your vehicle, for instance due to the selected
special equipment or the country version. This
also applies to safety-related functions and sys‐
tems.
Dimensions
1Vehicle width, without exterior mirrors:
70.8 inches/1,798 mm2Vehicle height: 60.8 inches/1,545 mm3Vehicle width, with exterior mirrors: 81 in‐
ches/2,058 mm4Wheelbase: 108.7 inches/2,760 mm5Vehicle length: 176.5 inches/4,484 mmSeite 266ReferenceTechnical data266
Online Edition for Part no. 01 40 2 914 595 - VI/12
Page 276 of 291

Everything from A to Z
IndexA
ABS, Antilock Brake Sys‐ tem 94
Accident, refer to Emergency Request, initiating 253
Acoustic signal, refer to Check Control 77
Activated charcoal filter with automatic climate con‐
trol 108
Adaptive brake lights, refer to Brake force display 93
Adaptive light control 81
Additional telephone 192
Additives, coolant 242
Additives, engine oil 241
After washing vehicle 260
Airbags 85
Airbags, indicator/warning light 88
Air circulation, refer to Recir‐ culated air mode 107
Air conditioning mode– Automatic climate con‐
trol 105– Ventilation 108
Air distribution
– Automatic 106– Manual 106
Air drying, refer to Cooling
function 107
Air flow rate 106
Airing, refer to Ventilation 108
Air pressure, refer to Tire infla‐ tion pressure 228
Air supply
– Automatic climate con‐
trol 105– Ventilation 108
Air vents
– Refer to Ventilation 108Alarm system 38
Alarm system– Avoiding unintentional
alarms 39– Ending an alarm 39– Interior motion sensor 39– Tilt alarm sensor 39
All around the headliner 17
ALL program 107
All-season tires, refer to Win‐ ter tires 236
All-wheel drive, refer to
xDrive 96
Alternating-code hand-held transmitter 111
AM/FM station 162
Announcement, navigation, refer to Spoken instruc‐
tions 151
Antifreeze, coolant 242
Antifreeze, washer fluid 61
Antilock Brake System, ABS 94
Anti-slip control, refer to Dy‐ namic Stability Control
DSC 94
Anti-theft protection 32
Appointments 209
Approved axle loads, refer to Weights 267
Approved engine oils 241
Approved gross vehicle weight, refer to Weights 267
Armrest, refer to Center arm‐ rest 120
Arrival time, refer to Com‐ puter 70
Ashtray 114
Assist 215
Assistance, Roadside Assis‐ tance 254
Assistance with driving off, re‐
fer to Drive-off assistant 97
Assistance with starting en‐ gine, refer to Jump-start‐
ing 255
Audio device, external 121
Audio playback 171
Audio playback, Blue‐ tooth 185
Automatic– Air distribution 106– Air flow rate 106
Automatic car wash 259
Automatic climate control
– Automatic air distribu‐
tion 106
Automatic, cruise control 98
Automatic Curb Monitor 48
Automatic Engine Start/Stop Function 56
Automatic headlamp con‐ trol 80, 81
Automatic recirculated air control 107
Automatic transmission with Steptronic 62, 64
Automatic transmission with
Steptronic
– Interlock 62– Kickdown 63, 64– Overriding selector lever
lock 64
AUTO program with automatic
climate control 106
AUX-IN port 121, 181
Average fuel consumption 70
Average fuel consumption
– Setting the units 72
Average speed 70
Average speed, refer to Com‐ puter 70
Seite 276ReferenceEverything from A to Z276
Online Edition for Part no. 01 40 2 914 595 - VI/12
Page 278 of 291

Carpet, care 261
Car phone, installation loca‐ tion, refer to Center arm‐
rest 120
Car phone, refer to Tele‐ phone 192
Car vacuum cleaner, connect‐ ing, refer to Connecting elec‐
trical devices 114
Car wash 259
Catalytic converter, refer to Hot exhaust system 126
CBS Condition Based Serv‐ ice 243
CD/DVD 170
CD/DVD notes 175
CD changer 174
CDs, storing 176
Cell phone 192
Cell phone, installation loca‐ tion, refer to Center arm‐
rest 120
Center armrest, front 120
Center armrest, rear 121
Center brake lamp, bulb re‐ placement 250
Center console, refer to Around the center con‐
sole 16
Central locking– Comfort Access 36– From the inside 34– Setting the unlocking char‐
acteristics 32
Central locking system
– From the outside 31– Principle 31
Central screen, refer to Control
Display 18
Changes, technical, refer to Safety 6
Changing wheels/tires 235
Check Control 77
Children, transporting 50
Child restraint fixing system LATCH 51
Child restraint fixing sys‐
tems 50
Child restraint fixing systems, mounting 50
Child safety locks 53
Child seat, mounting 50
Child seats, refer to Transport‐ ing children safely 50
Chrome parts, care 261
Cigarette lighter, connecting electrical devices 114
Cigarette lighter, refer to Lighter 114
Cigarette lighter socket 114
Circulation of air, refer to Re‐ circulated air mode 107
Cleaning, displays 262
Cleaning your BMW, refer to Care 259
Clock 68
Clock– 12h/24h format 73– Setting the time and date 73
Closing
– From the inside 34– From the outside 32
Clothes hooks 122
Cockpit 12
Cold start, refer to Starting the engine 55
Combination instrument, refer to Instrument cluster 14
Combination switch, refer to Turn signal/high beams/
headlamp flasher 59
Combination switch, refer to Washer/wiper system 59
Comfort Access
– Battery replacement 38
Comfort area, refer to Around
the center console 16
Compact wheel, inflation pres‐ sure 228
Compartment for remote con‐ trol, refer to Ignition lock 54
Compartment in floor 118
Compartments, refer to Stor‐
age compartments 120, 121
Compass, digital 112
Computer 70
Computer, displaying informa‐ tion 70
Computer, displays on the Control Display 70
Concierge service 216
Condensation under the vehi‐ cle 128
Condition Based Service CBS 243
Confirmation signals for lock‐ ing/unlocking the vehicle 33
ConnectedDrive 215
Connecting, mobile phone, re‐ fer to Pairing the mobile
phone 193
Consumption, refer to Aver‐ age fuel consumption 70
Contacts 205, 213
Control Display 18
Control Display, care 262
Control Display, settings 74
Controller 19
Controls and displays 12
Control systems, driving sta‐ bility 94
Convenient operation– Glass sunroof 32– Window 32
Coolant 242
Coolant, checking the level 242
Coolant temperature 69
Cooling function, switching on and off 107
Cooling, maximum 106
Cooling system, refer to Cool‐ ant 242
Corrosion on brake discs 128
Courtesy lamps, refer to Inte‐ rior lamps 84
Cradle for telephone or mobile phone, refer to Snap-in
adapter 202
Seite 278ReferenceEverything from A to Z278
Online Edition for Part no. 01 40 2 914 595 - VI/12