2013 BMW X1 XDRIVE 28I audio
[x] Cancel search: audioPage 22 of 291
6.Turn the controller to set the hours and
press the controller.7.Turn the controller to set the minutes and
press the controller.
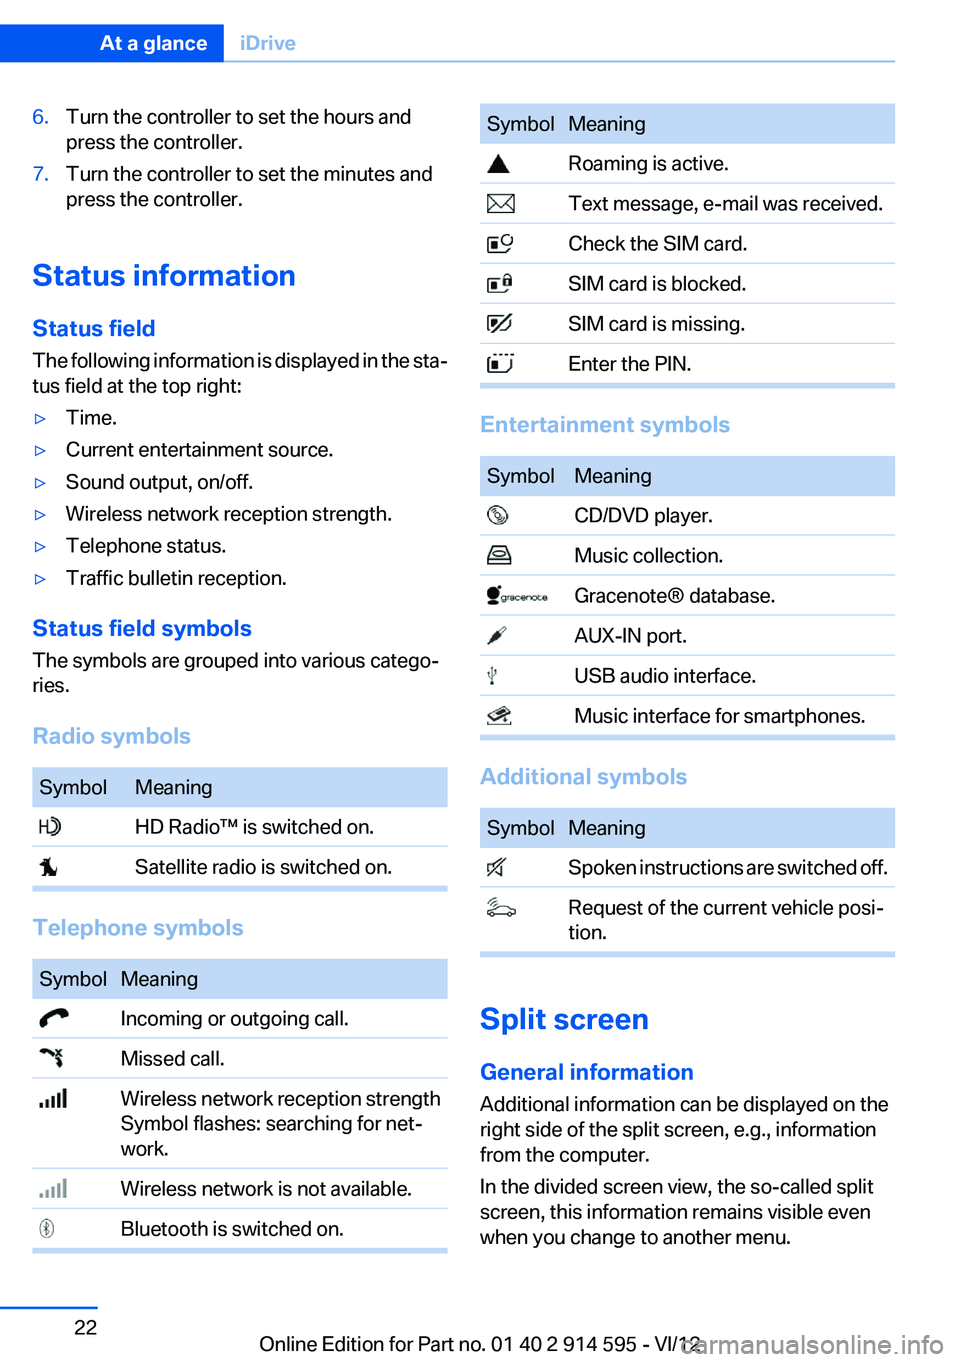
Status information
Status field
The following information is displayed in the sta‐
tus field at the top right:
▷Time.▷Current entertainment source.▷Sound output, on/off.▷Wireless network reception strength.▷Telephone status.▷Traffic bulletin reception.
Status field symbols
The symbols are grouped into various catego‐
ries.
Radio symbols
SymbolMeaning HD Radio™ is switched on. Satellite radio is switched on.
Telephone symbols
SymbolMeaning Incoming or outgoing call. Missed call. Wireless network reception strength
Symbol flashes: searching for net‐
work. Wireless network is not available. Bluetooth is switched on.SymbolMeaning Roaming is active. Text message, e-mail was received. Check the SIM card. SIM card is blocked. SIM card is missing. Enter the PIN.
Entertainment symbols
SymbolMeaning CD/DVD player. Music collection. Gracenote® database. AUX-IN port. USB audio interface. Music interface for smartphones.
Additional symbols
SymbolMeaning Spoken instructions are switched off. Request of the current vehicle posi‐
tion.
Split screen
General information
Additional information can be displayed on the
right side of the split screen, e.g., information
from the computer.
In the divided screen view, the so-called split
screen, this information remains visible even
when you change to another menu.
Seite 22At a glanceiDrive22
Online Edition for Part no. 01 40 2 914 595 - VI/12
Page 26 of 291

For example, if the "Settings" menu is displayed,
the commands for the settings are read out loud.
Executing functions using short
commands
Functions on the main menu can be performed
directly by means of short commands, usually
irrespective of which menu item is currently se‐
lected, for instance ›Vehicle status‹.
List of short commands of the voice activation
system, refer to page 268.
Help dialog for the voice activation
system
Calling up help dialog: ›Help‹
Additional commands for the help dialog:▷›Help with examples‹: information about the
current operating options and the most im‐
portant commands for them are announced.▷›Help with voice activation‹: information
about the principle of operation for the voice
activation system is announced.
Example: playing back a CD
1.Switch on the Entertainment sound output
if necessary.2. Press the button on the steering
wheel.3.›C D and multimedia‹
The medium last played is played back.4.›C D track ...‹ e.g., CD track 4.
Setting the voice dialog
You can set whether the system should use the
standard dialog or a shorter version.
In the shorter variant of the voice dialog, the an‐
nouncements from the system are issued in an
abbreviated form.
On the Control Display:1."Settings"2."Language/Units"3."Speech mode:"4.Select the setting.
Adjusting the volume
Turn the volume knob while giving an instruction
until the desired volume is set.
▷The volume remains constant even if the
volume of other audio sources is changed.▷The volume is stored for the remote control
currently in use.
Notes on Emergency
Requests
Do not use the voice activation system to initiate
an Emergency Request. In stressful situations,
the voice and vocal pitch can change. This can
unnecessarily delay the establishment of a te‐
lephone connection.
Instead, use the SOS button, refer to
page 253, in the vicinity of the interior mirror.
Environmental conditions
▷Say the commands, numbers, and letters
smoothly and with normal volume, empha‐
sis, and speed.Seite 26At a glanceVoice activation system26
Online Edition for Part no. 01 40 2 914 595 - VI/12
Page 31 of 291

▷The remote control used is detected when
the vehicle is unlocked and the stored profile
is called up.▷Your personal settings will be recognized
and called up again even if the vehicle has
been used in the meantime by someone else
with another remote control.
The individual settings are stored for a maximum
of four remote controls. They are stored for two
remote controls if Comfort Access is in use.
Personal Profile settings
The following functions and settings can be
stored in a profile.
More information on the settings can be found
under:
▷Assigning the programmable memory but‐
tons, refer to page 23.▷Response of the central locking system
when the car is being unlocked, refer to
page 32.▷Automatic locking of the vehicle, refer to
page 35.▷Automatic call-up of the driver's seat posi‐
tion after unlocking, refer to page 33.▷Settings for the display on the Control Dis‐
play and in the instrument cluster:▷12h/24h clock format, refer to
page 73.▷Date format, refer to page 74.▷Brightness of the Control Display, refer
to page 75.▷Language on the Control Display, refer
to page 74.▷Units of measure for fuel consumption,
distance covered/remaining distances,
and temperature, refer to page 72.▷Show visual warning for the Park Distance
Control PDC, refer to page 101.▷Backup camera:▷Function selection, refer to page 102.▷Type of display, refer to page 104.▷Light settings:▷Triple turn signal activation, refer to
page 59.▷Welcome lamps, refer to page 80.▷Headlamp courtesy delay feature, refer
to page 81.▷Daytime running lights, refer to
page 81.▷High-beam Assistant, refer to
page 82.▷Automatic climate control: AUTO program,
cooling function and automatic recirculated
air control activated/deactivated, tempera‐
ture, air flow rate and distribution, refer to
page 105.▷Navigation:▷Voice activation, refer to page 151.▷Route criteria, refer to page 149.▷Map view settings, refer to page 152.▷Entertainment:▷Tone control, refer to page 160.▷Radio, stored stations, refer to
page 168.▷CD/multimedia, audio source listened to
last, refer to page 170.▷Telephone: volume, refer to page 196.
Central locking system
The concept
The central locking system becomes active
when the driver's door is closed.
The system simultaneously engages and re‐
leases the locks on the following:
▷Doors.▷Tailgate.▷Fuel filler flap.Seite 31Opening and closingControls31
Online Edition for Part no. 01 40 2 914 595 - VI/12
Page 121 of 291
cover for the snap-in adapter, depending on the
version.
Details on this mobile phone cradle, refer to
page 202.
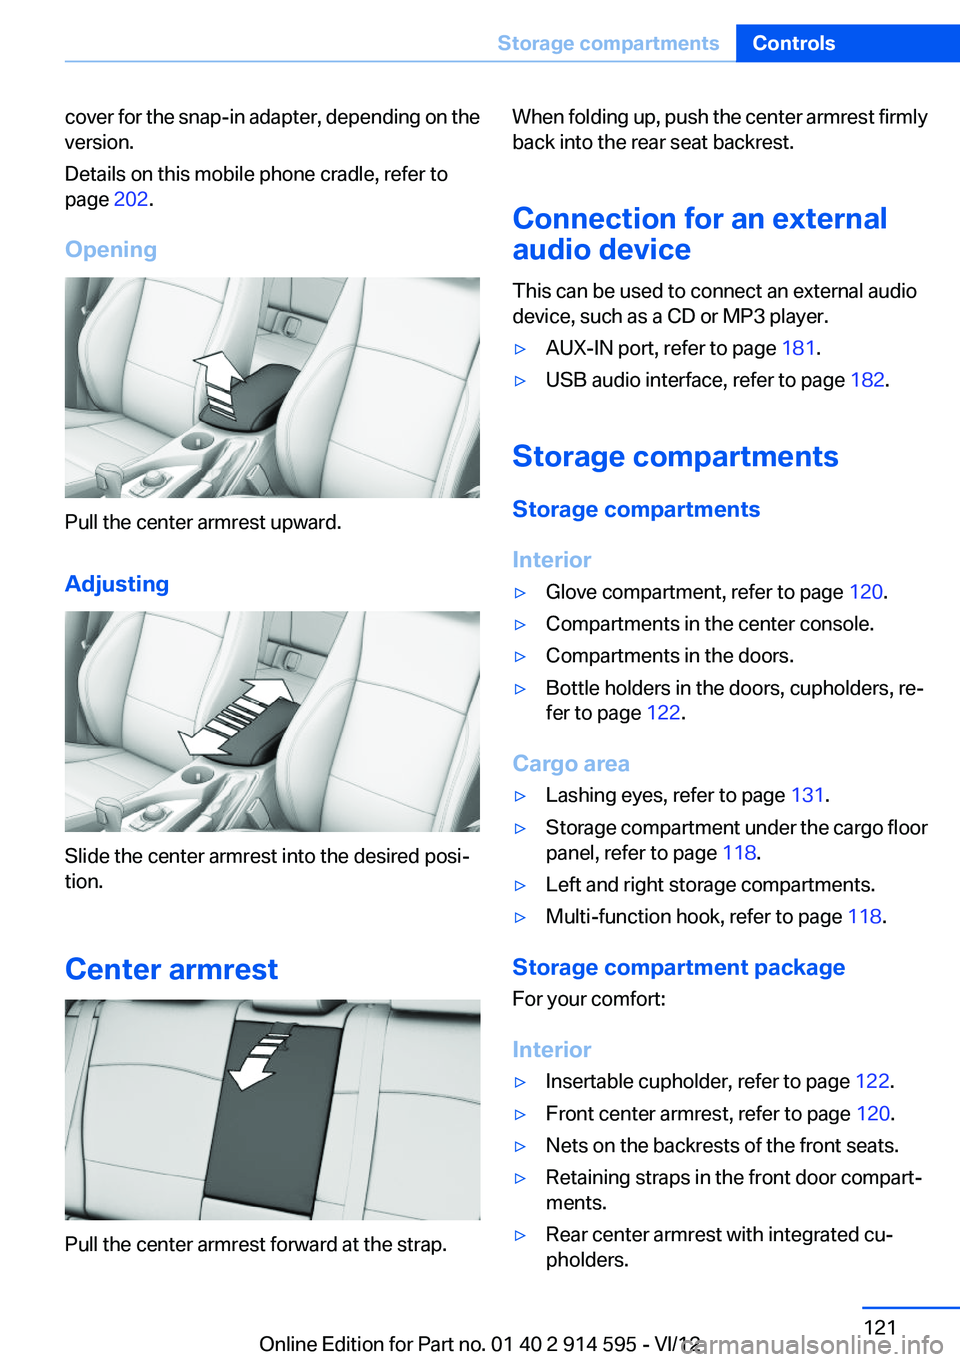
Opening
Pull the center armrest upward.
Adjusting
Slide the center armrest into the desired posi‐
tion.
Center armrest
Pull the center armrest forward at the strap.
When folding up, push the center armrest firmly
back into the rear seat backrest.
Connection for an external
audio device
This can be used to connect an external audio
device, such as a CD or MP3 player.▷AUX-IN port, refer to page 181.▷USB audio interface, refer to page 182.
Storage compartments
Storage compartments
Interior
▷Glove compartment, refer to page 120.▷Compartments in the center console.▷Compartments in the doors.▷Bottle holders in the doors, cupholders, re‐
fer to page 122.
Cargo area
▷Lashing eyes, refer to page 131.▷Storage compartment under the cargo floor
panel, refer to page 118.▷Left and right storage compartments.▷Multi-function hook, refer to page 118.
Storage compartment package
For your comfort:
Interior
▷Insertable cupholder, refer to page 122.▷Front center armrest, refer to page 120.▷Nets on the backrests of the front seats.▷Retaining straps in the front door compart‐
ments.▷Rear center armrest with integrated cu‐
pholders.Seite 121Storage compartmentsControls121
Online Edition for Part no. 01 40 2 914 595 - VI/12
Page 160 of 291

ToneVehicle equipment
This chapter describes all series equipment as
well as country-specific and special equipment
offered for this model series.Therefore, it also
describes equipment that may not be found in
your vehicle, for instance due to the selected
special equipment or the country version. This
also applies to safety-related functions and sys‐
tems.
General information
The sound settings are stored for the remote
control currently in use.
Treble, bass, balance, and
fader▷"Treble": treble adjustment.▷"Bass": depth adjustment.▷"Balance": left/right volume distribution.▷"Fader": front/rear volume distribution.
Setting treble, bass, balance, and fader
1."CD/Multimedia", "Radio" or "Settings"2."Tone"3.Select the desired tone settings.4.To adjust: turn the controller.5.To store: press the controller.
Equalizer
Setting for individual audio frequency ranges.
Adjusting the equalizer
1."CD/Multimedia", "Radio" or "Settings"2."Tone"3."Equalizer"4.Select the desired setting.5.To adjust: turn the controller.6.To store: press the controller.Seite 160EntertainmentTone160
Online Edition for Part no. 01 40 2 914 595 - VI/12
Page 161 of 291
Multi-channel playback,
surround
Choose between stereo and multi-channel play‐
back, surround.
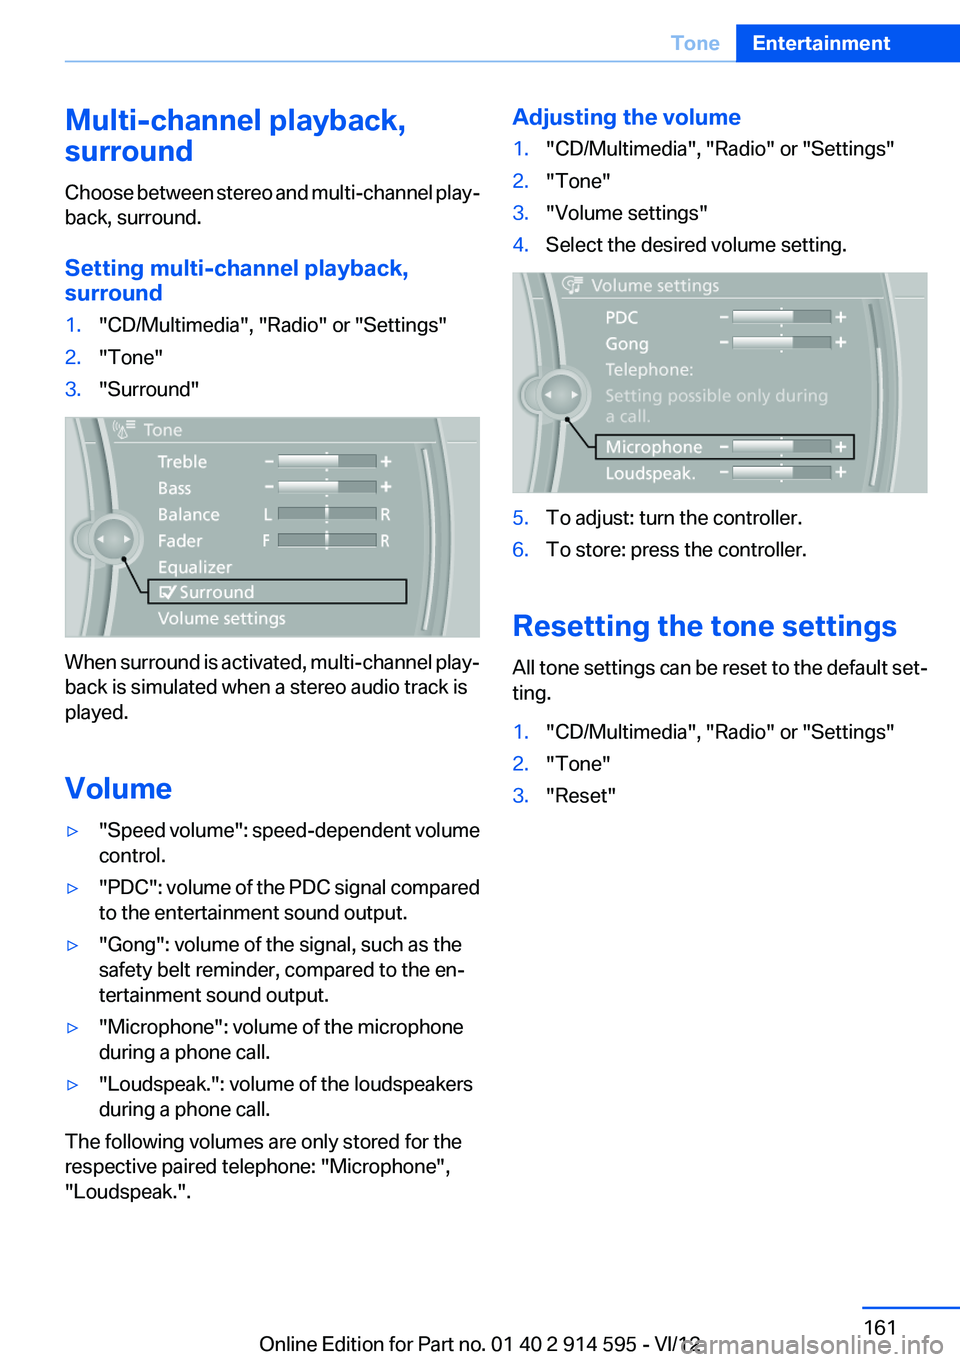
Setting multi-channel playback,
surround1."CD/Multimedia", "Radio" or "Settings"2."Tone"3."Surround"
When surround is activated, multi-channel play‐
back is simulated when a stereo audio track is
played.
Volume
▷" Speed volume": speed-dependent volume
control.▷"PDC" : volume of the PDC signal compared
to the entertainment sound output.▷"Gong": volume of the signal, such as the
safety belt reminder, compared to the en‐
tertainment sound output.▷"Microphone": volume of the microphone
during a phone call.▷"Loudspeak.": volume of the loudspeakers
during a phone call.
The following volumes are only stored for the
respective paired telephone: "Microphone",
"Loudspeak.".
Adjusting the volume1."CD/Multimedia", "Radio" or "Settings"2."Tone"3."Volume settings"4.Select the desired volume setting.5.To adjust: turn the controller.6.To store: press the controller.
Resetting the tone settings
All tone settings can be reset to the default set‐
ting.
1."CD/Multimedia", "Radio" or "Settings"2."Tone"3."Reset"Seite 161ToneEntertainment161
Online Edition for Part no. 01 40 2 914 595 - VI/12
Page 164 of 291
3.Open "Options".4."HD Radio Reception"
The setting is stored for the remote control cur‐
rently in use.
This symbol is displayed in the status line
when the audio signal is digital.
When tuning to a station with a digital signal, it
may take several seconds for the station to be
played back in digital quality.
In areas in which the station is not continuously
received in digital mode, the playback switches
between analog and digital reception. In this
case, switch off digital radio reception.
Displaying additional information
Some stations broadcast additional information
on the current track, such as the name of the ar‐
tist.
1.Select the desired station.2.Open "Options".3."Station info"
Selecting a substation
This symbol indicates that a main station also
broadcasts additional substations. The station
name of the main station ends in HD1. Station
names of the substations end in HD2, HD3, etc.
1.Select the desired station.2.Press the controller.3.Select the substation.
When reception is poor, the substation is muted.
Satellite radio
General information
The channels are offered in predefined pack‐
ages. The packages must be enabled by tele‐
phone.
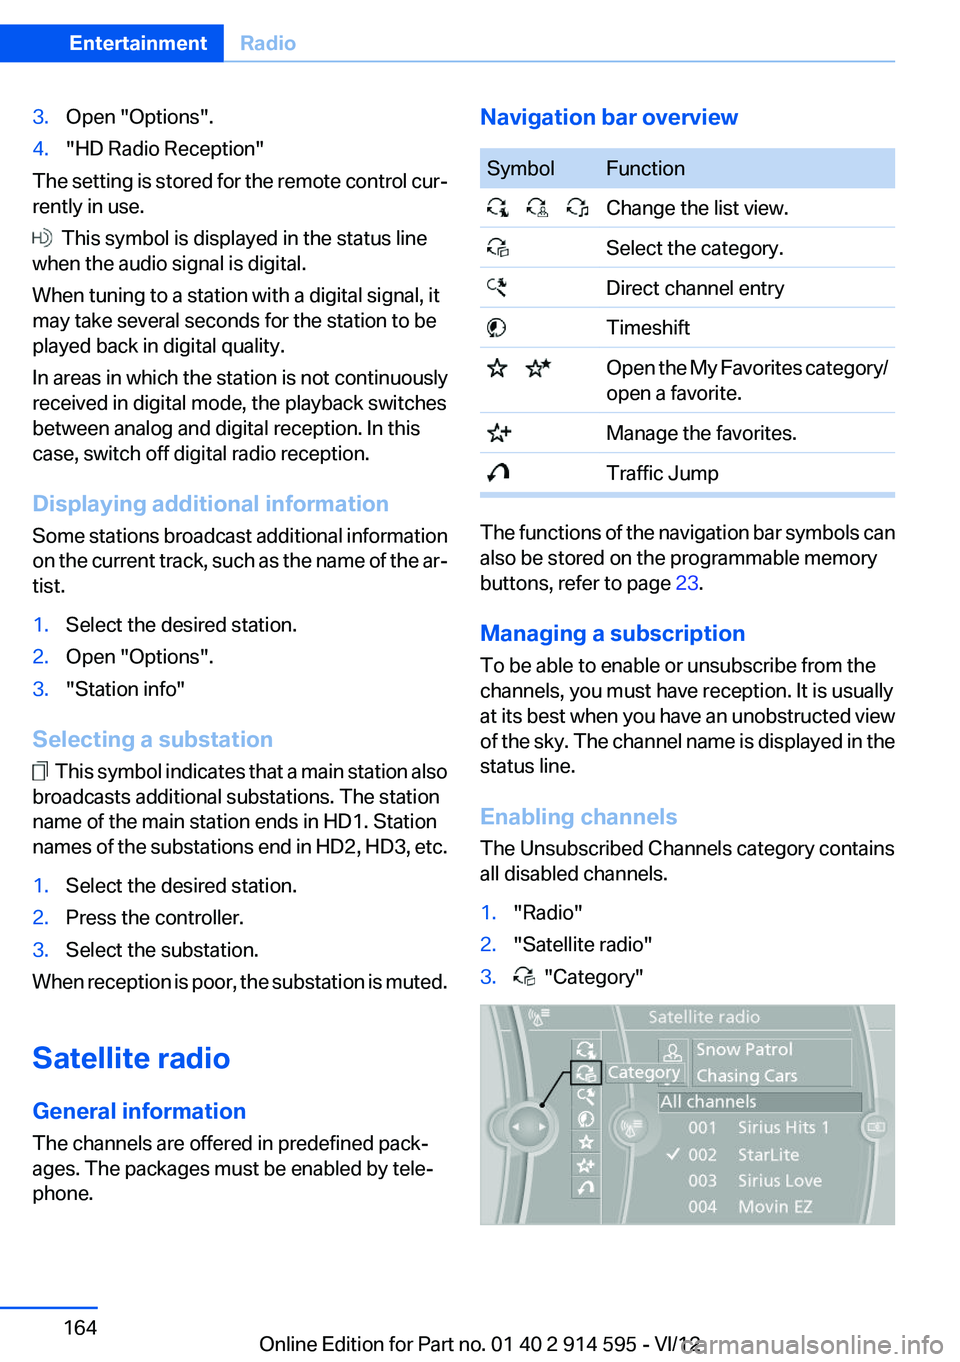
Navigation bar overviewSymbolFunction Change the list view. Select the category. Direct channel entry Timeshift Open the My Favorites category/
open a favorite. Manage the favorites. Traffic Jump
The functions of the navigation bar symbols can
also be stored on the programmable memory
buttons, refer to page 23.
Managing a subscription
To be able to enable or unsubscribe from the
channels, you must have reception. It is usually
at its best when you have an unobstructed view
of the sky. The channel name is displayed in the
status line.
Enabling channels
The Unsubscribed Channels category contains
all disabled channels.
1."Radio"2."Satellite radio"3. "Category"Seite 164EntertainmentRadio164
Online Edition for Part no. 01 40 2 914 595 - VI/12
Page 166 of 291
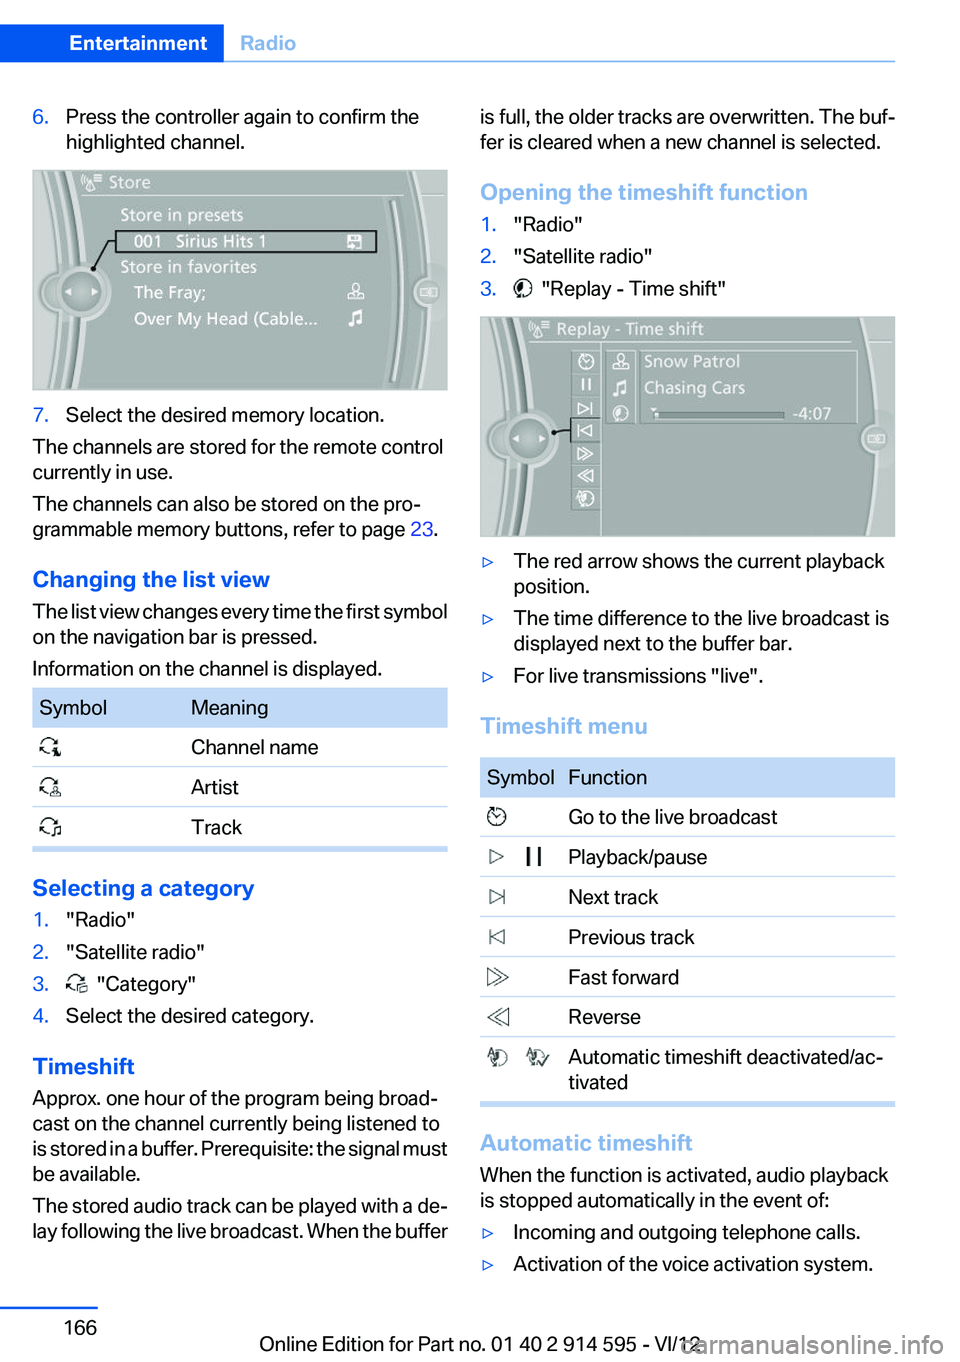
6.Press the controller again to confirm the
highlighted channel.7.Select the desired memory location.
The channels are stored for the remote control
currently in use.
The channels can also be stored on the pro‐
grammable memory buttons, refer to page 23.
Changing the list view
The list view changes every time the first symbol
on the navigation bar is pressed.
Information on the channel is displayed.
SymbolMeaning Channel name Artist Track
Selecting a category
1."Radio"2."Satellite radio"3. "Category"4.Select the desired category.
Timeshift
Approx. one hour of the program being broad‐
cast on the channel currently being listened to
is stored in a buffer. Prerequisite: the signal must
be available.
The stored audio track can be played with a de‐
lay following the live broadcast. When the buffer
is full, the older tracks are overwritten. The buf‐
fer is cleared when a new channel is selected.
Opening the timeshift function1."Radio"2."Satellite radio"3. "Replay - Time shift"▷The red arrow shows the current playback
position.▷The time difference to the live broadcast is
displayed next to the buffer bar.▷For live transmissions "live".
Timeshift menu
SymbolFunction Go to the live broadcast Playback/pause Next track Previous track Fast forward Reverse Automatic timeshift deactivated/ac‐
tivated
Automatic timeshift
When the function is activated, audio playback
is stopped automatically in the event of:
▷Incoming and outgoing telephone calls.▷Activation of the voice activation system.Seite 166EntertainmentRadio166
Online Edition for Part no. 01 40 2 914 595 - VI/12