2013 BMW 328I CONVERTIBLE parking assist
[x] Cancel search: parking assistPage 12 of 308
11
Dashboard
At a glance
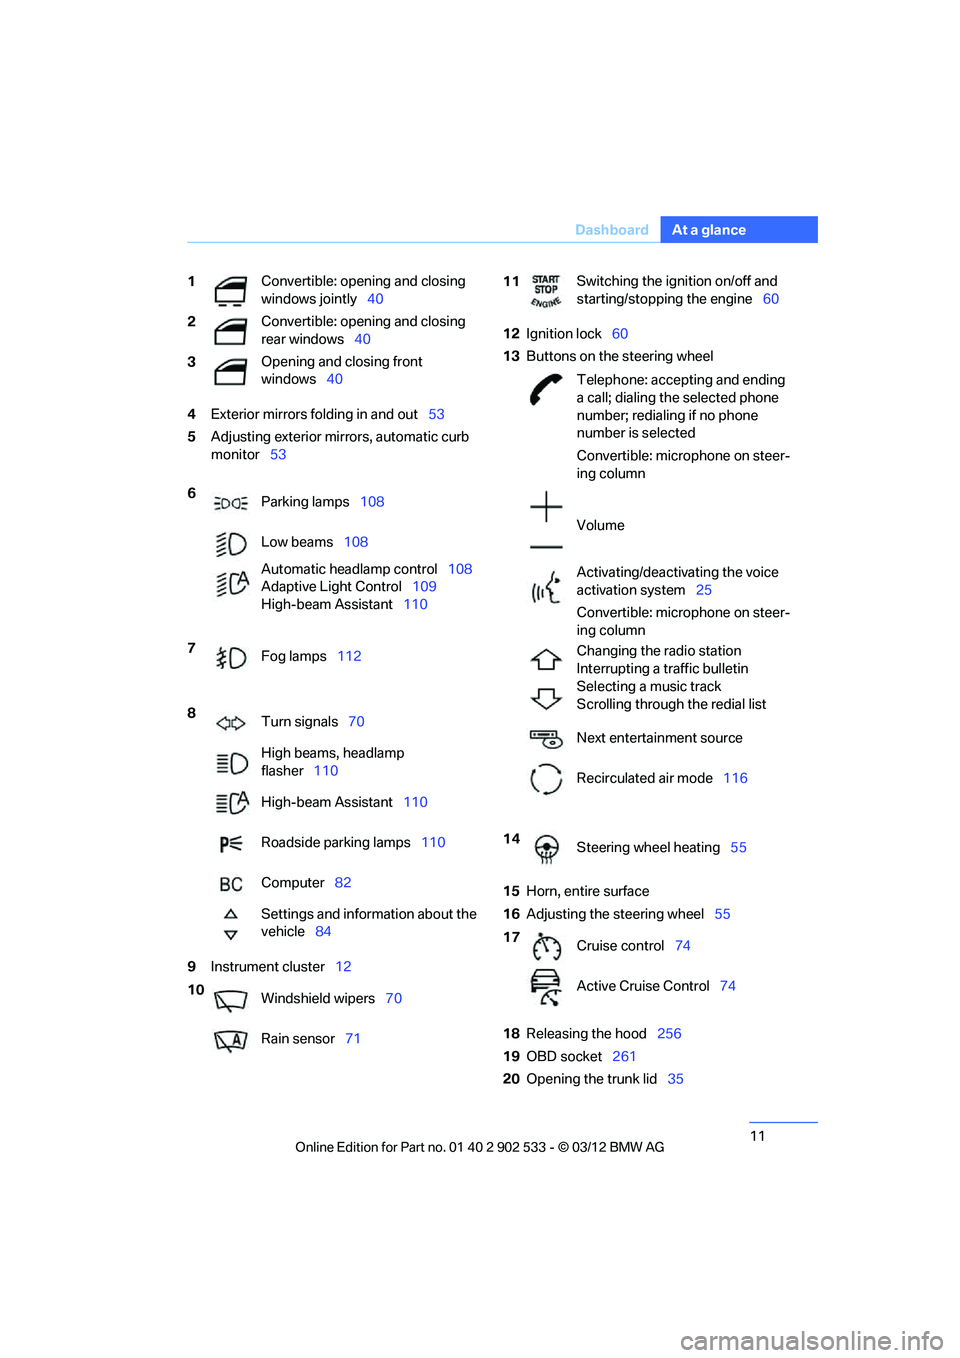
4
Exterior mirrors folding in and out 53
5 Adjusting exterior mirrors, automatic curb
monitor 53
9 Instrument cluster 12 12
Ignition lock 60
13 Buttons on the steering wheel
15 Horn, entire surface
16 Adjusting the steering wheel 55
18 Releasing the hood 256
19 OBD socket 261
20 Opening the trunk lid 35
1
Convertible: opening and closing
windows jointly
40
2 Convertible: opening and closing
rear windows
40
3 Opening and closing front
windows
40
6 Parking lamps 108
Low beams 108
Automatic headlamp control 108
Adaptive Light Control 109
High-beam Assistant 110
7 Fog lamps 112
8 Turn signals 70
High beams, headlamp
flasher 110
High-beam Assistant 110
Roadside parking lamps 110
Computer 82
Settings and information about the
vehicle 84
10 Windshield wipers 70
Rain sensor 71
11Switching the ignition on/off and
starting/stopping the engine
60
Telephone: accepting and ending
a call; dialing the selected phone
number; redialing if no phone
number is selected
Convertible: microphone on steer-
ing column
Volume
Activating/deactivating the voice
activation system 25
Convertible: microphone on steer-
ing column
Changing the radio station
Interrupting a traffic bulletin
Selecting a music track
Scrolling through the redial list
Next entertainment source
Recirculated air mode 116
14 Steering wheel heating 55
17 Cruise control 74
Active Cruise Control 74
00320051004F004C00510048000300280047004C0057004C005200510003
Page 95 of 308
94
ControlsTechnology for driving comfort and safety
Technology for driving comfort and safety
Vehicle equipment
In this chapter, all production, country, and
optional equipment that is offered in the model
range is described. For this reason, descrip-
tions will be given of some equipment that may
not be available in a vehicle, for example due to
the special options or national-market version
selected. This also applies to safety related
functions and systems.
Park Distance Control PDC
The concept
The PDC assists you with maneuvering in tight
parking spaces. Acoustic signals and a visual
indicator warn you of the presence of an object
in front of or behind your vehicle.To measure
the distance, there are four ultrasonic sensors
in either bumper.
These sensors have a range of approx. 6.5 ft/
2 m. However, an acoustic warning does not
sound until an object is approx. 24 in/60 cm
from the front sensors and rear corner sensors,
or approx. 5 ft/1.50 m from the rear center sen-
sors.
PDC is a parking aid that can indicate
objects when they are approached
slowly, as is usually the case when parking.
Avoid approaching an object at high speed; oth-
erwise, physical circumstances may lead to the
system warning being issued too late. <
Switching on automatically
With the engine running or the ignition switched
on, the system is activated after approx. one
second when you shift into reverse or move the
automatic transmission selector lever to
position R. Wait this short period before driving.
Switching off automatically
After approx. 160 ft/50 m of driving or above
approx. 20 mph or 30 km/h km/h, the system
switches off and the LED goes out.
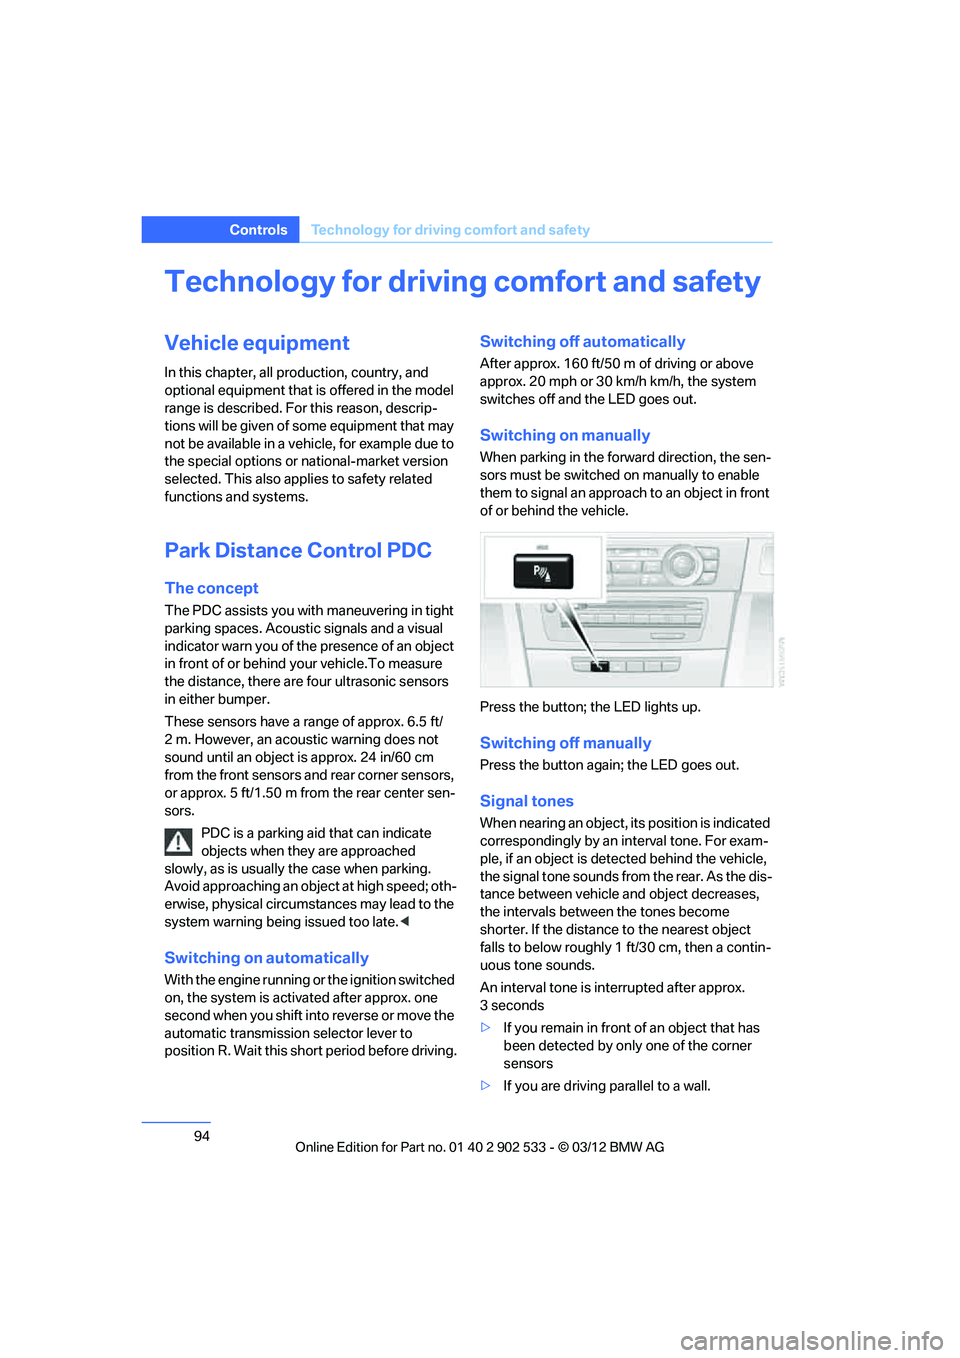
Switching on manually
When parking in the forward direction, the sen-
sors must be switched on manually to enable
them to signal an approach to an object in front
of or behind the vehicle.
Press the button; the LED lights up.
Switching off manually
Press the button again; the LED goes out.
Signal tones
When nearing an object, its position is indicated
correspondingly by an interval tone. For exam-
ple, if an object is detected behind the vehicle,
the signal tone sounds from the rear. As the dis-
tance between vehicle and object decreases,
the intervals between the tones become
shorter. If the distance to the nearest object
falls to below roughly 1 ft/30 cm, then a contin-
uous tone sounds.
An interval tone is interrupted after approx.
3seconds
>If you remain in front of an object that has
been detected by only one of the corner
sensors
> If you are driving parallel to a wall.
00320051004F004C00510048000300280047004C0057004C005200510003
Page 99 of 308
98
ControlsTechnology for driving comfort and safety
Drive-off assistant
The drive-off assistant enables you to drive off
smoothly on uphill gradients. It is not necessary
to use the parking brake for this.
1.Hold the car in place by depressing the
brake.
2. Release the brake and drive off without
delay.
The drive-off assistant holds the car in
place for approx. 2 seconds after the
brake is released. Drive off without delay after
releasing the brake. Otherwise, the drive-off
assistant will no longer hold the car in place
after approx. 2 seconds and the car will start to
roll backwards. <
Flat Tire Monitor FTM
The concept
The system does not measure the actual infla-
tion pressure in the tires.
The system detects a pressure loss in a tire by
comparing the rotational speeds of the individ-
ual wheels while moving.
In the event of a pressure loss, the diameter and
therefore the rotational speed of the corre-
sponding wheel change. This is detected and
reported as a flat tire.
Functional requirement
The system must have been initialized while the
tire inflation pressure was correct; otherwise,
reliable signaling of a flat tire is not ensured.
Each time a tire inflation pressure has been cor-
rected or a wheel or tire has been changed,
reinitialize the system.
System limitations
Sudden serious tire damage caused by
external influences cannot be indicated in
advance. < A natural, steady pressure loss in all four tires is
not detected. Therefore, check the tire inflation
pressure regularly.
In the following situations, the system could be
delayed or malfunction:
>
System has not been initialized
> Driving on snowy or slippery road surface
> Performance-oriented style of driving: slip
in the drive wheels, high lateral acceleration
> Snow chains are attached
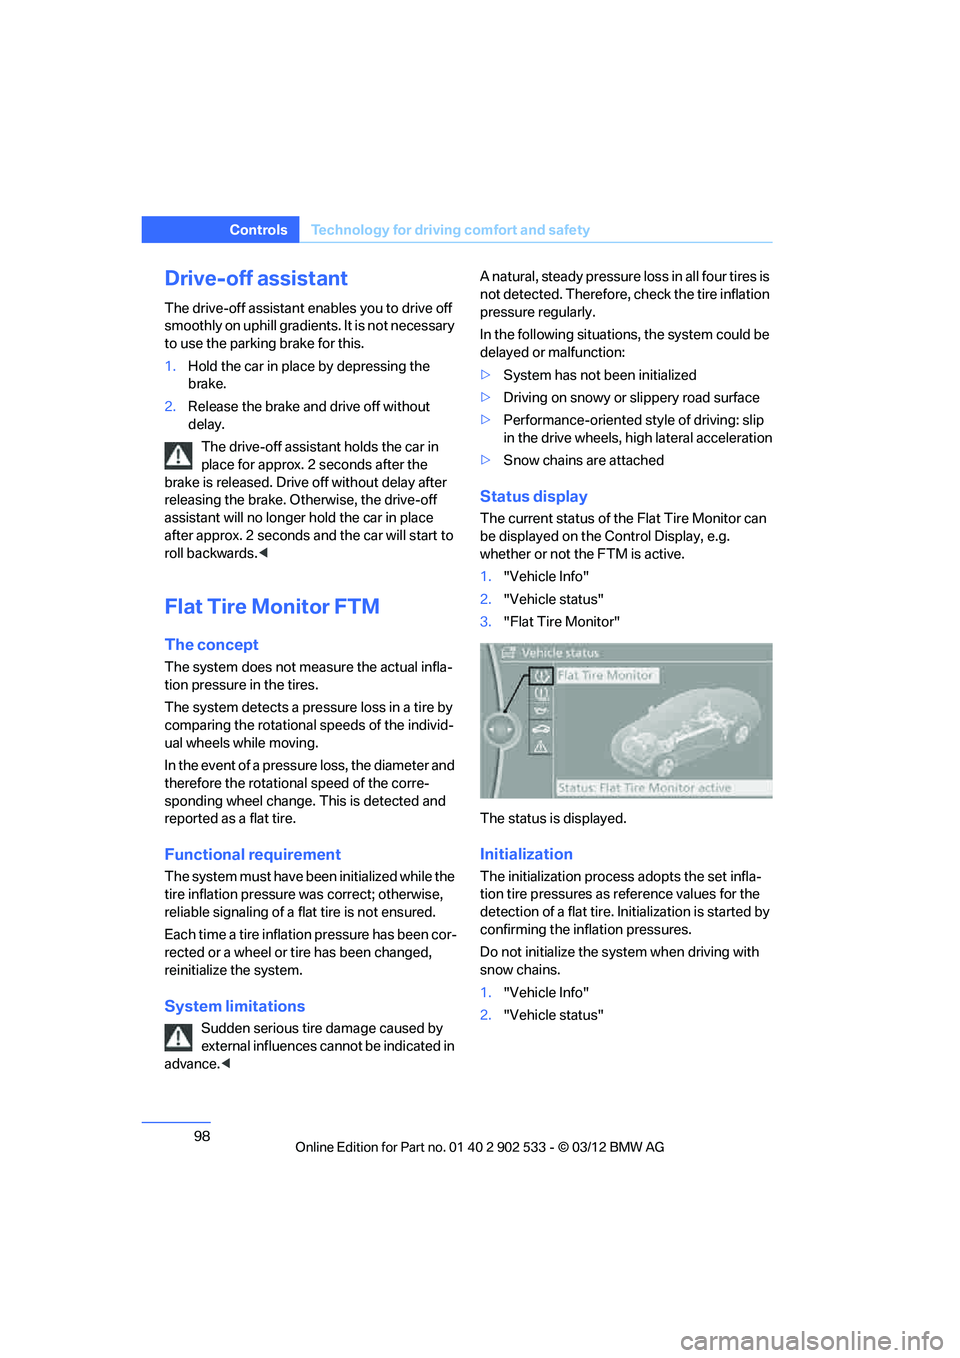
Status display
The current status of the Flat Tire Monitor can
be displayed on the Co ntrol Display, e.g.
whether or not the FTM is active.
1. "Vehicle Info"
2. "Vehicle status"
3. "Flat Tire Monitor"
The status is displayed.
Initialization
The initialization proces s adopts the set infla-
tion tire pressures as reference values for the
detection of a flat tire. Initialization is started by
confirming the inflation pressures.
Do not initialize the system when driving with
snow chains.
1. "Vehicle Info"
2. "Vehicle status"
00320051004F004C00510048000300280047004C0057004C005200510003
Page 104 of 308
103
Technology for driving comfort and safety
Controls
tire to overheat and can lead to tire failure.
Underinflation also reduces fuel efficiency and
tire tread life, and may affect the vehicle’s han-
dling and stopping ability. Please note that the
TPMS is not a substitute for proper tire mainte-
nance, and it is the driver’s responsibility to
maintain correct tire pressure, even if underin-
flation has not reached the level at which the
TPMS low tire pressure telltale illuminates.
The TPMS malfunction indicator is combined
with the low tire pressure telltale. When the sys-
tem detects a malfunction, the telltale will flash
for approximately one minute and then remain
continuously lit. This sequence will continue
upon subsequent vehicle startups as long as
the malfunction exists. When the malfunction
indicator is illuminated, the system may not be
able to detect or signal low tire pressure as
intended. TPMS malfunctions may occur for a
variety of reasons, including the installation of
replacement or alternate tires or wheels on the
vehicle that prevent the TPMS from functioning
properly. Always check the TPMS malfunction
telltale after replacing one or more tires or
wheels on your vehicle to ensure that the
replacement or alternate tires and wheels allow
the TPMS to continue to function properly.
Active steering
The concept
Active steering varies the turning angle of the
front wheels in relation to steering wheel move-
ments. It also varies the steering force required
to turn the wheels depending on the speed at
which you are driving.
When you are driving in the low speed range,
e.g. in a town or when parking, the steering
angle is increased, i.e. steering becomes very
direct and less effort is required to turn the
wheels. In the higher speed range, on the other
hand, the steering angle is reduced as the
speed increases. This improves the handling of
your BMW over the entire speed range.
In critical situations, the system can make tar-
geted corrections to the steering angle pro-
vided by the driver and thus stabilize the vehicle
before the driver intervenes. This stabilizing
intervention is simultaneously deactivated
when DSC is switched off, refer to page
96.
Malfunction
The warning lamps light up and a
message is displayed on the Control
Display. Active steering is malfunc-
tioning or is temporarily deactivated.
At low speeds, greater steering wheel move-
ments are required, whereas at higher speeds
the vehicle reacts more sensitively to steering
wheel movements. The stability-enhancing
feature may also be deactivated. Drive cau-
tiously and think well ahead.
Deactivation
Active steering is deactivated to perform an ini-
tialization. A message indicates that the feature
is deactivated. Initialization may take several
minutes.
If the message does not disappear during the
current trip, have the system checked.
Defect
If there is a defect, a corresponding text mes-
sage appears. Have the system checked.
Servotronic
The concept
The Servotronic varies the steering force
required to turn the wheels relative to the vehi-
cle speed.
At low speeds, the steering force is strongly
assisted, i.e. less force is needed for steering.
As the vehicle speed increases, the steering
assisting power is reduced.
00320051004F004C00510048000300280047004C0057004C005200510003
Page 109 of 308
108
ControlsLamps
Lamps
Vehicle equipment
In this chapter, all production, country, and
optional equipment that is offered in the model
range is described. For this reason, descrip-
tions will be given of some equipment that may
not be available in a vehicle, for example due to
the special options or national-market version
selected. This also applies to safety related
functions and systems.
At a glance
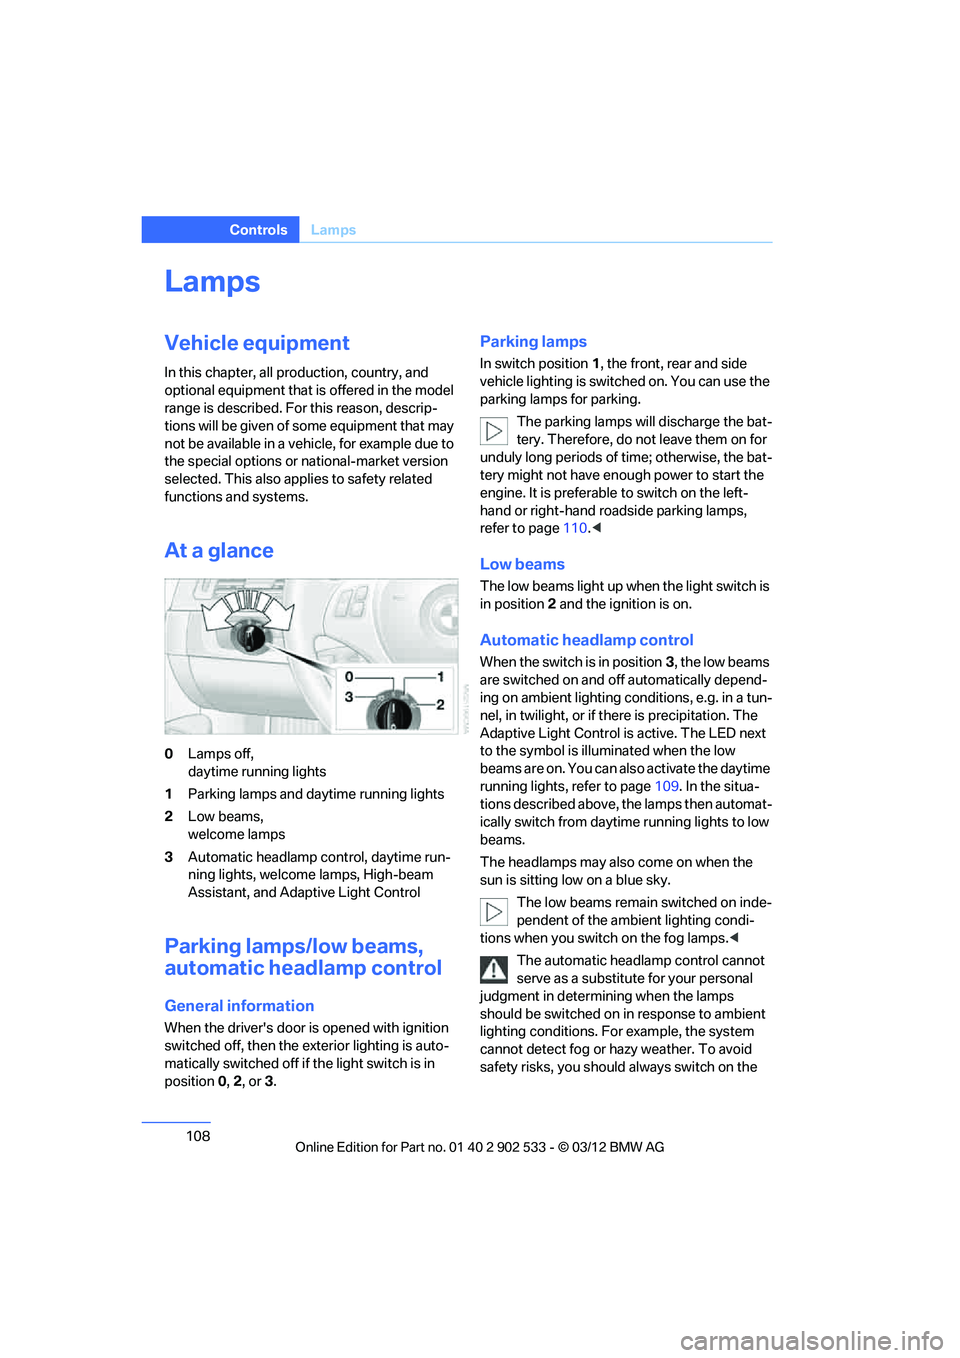
0Lamps off,
daytime running lights
1 Parking lamps and daytime running lights
2 Low beams,
welcome lamps
3 Automatic headlamp control, daytime run-
ning lights, welcome lamps, High-beam
Assistant, and Adaptive Light Control
Parking lamps/low beams,
automatic headlamp control
General information
When the driver's door is opened with ignition
switched off, then the exterior lighting is auto-
matically switched off if the light switch is in
position 0, 2, or3.
Parking lamps
In switch position 1, the front, rear and side
vehicle lighting is switched on. You can use the
parking lamps for parking.
The parking lamps will discharge the bat-
tery. Therefore, do not leave them on for
unduly long periods of time; otherwise, the bat-
tery might not have enough power to start the
engine. It is preferable to switch on the left-
hand or right-hand roadside parking lamps,
refer to page 110.<
Low beams
The low beams light up when the light switch is
in position 2 and the ignition is on.
Automatic headlamp control
When the switch is in position 3, the low beams
are switched on and off automatically depend-
ing on ambient lighting conditions, e.g. in a tun-
nel, in twilight, or if there is precipitation. The
Adaptive Light Control is active. The LED next
to the symbol is illuminated when the low
beams are on. You can also activate the daytime
running lights, refer to page 109. In the situa-
tions described above, the lamps then automat-
ically switch from daytime running lights to low
beams.
The headlamps may also come on when the
sun is sitting low on a blue sky.
The low beams remain switched on inde-
pendent of the ambient lighting condi-
tions when you switch on the fog lamps. <
The automatic headlamp control cannot
serve as a substitute for your personal
judgment in determining when the lamps
should be switched on in response to ambient
lighting conditions. For example, the system
cannot detect fog or hazy weather. To avoid
safety risks, you should always switch on the
00320051004F004C00510048000300280047004C0057004C005200510003
Page 111 of 308
110
ControlsLamps
angle and other parameters, the light from the
headlamp follows the course of the road.
In tight curves at speeds up to 40 mph/70 km/h,
e.g. on mountainous roads or when turning, an
additional, corner-illuminating lamp is switched
on that lights up the inside area of the curve.
Activating Adaptive Light Control
With the ignition switched on, turn the light
switch to position 3, refer to page 108.
The corner-illuminating lamp is switched on
automatically, depending on the steering wheel
angle or turn signal indicator.
Standstill function: to avoid blinding oncoming
traffic, the Adaptive Light Control does not
direct light toward the driver's side when the
vehicle is at a standstill.
When you are reversing, only the corner-illumi-
nating lamps are switched on and active on
both sides.
Malfunction
The warning lamp lights up. A mes-
sage appears on the Control Dis-
play.The Adaptive Light Control is
malfunctioning or failed. Have the system
checked as soon as possible.
High beams/roadside parking
lamps
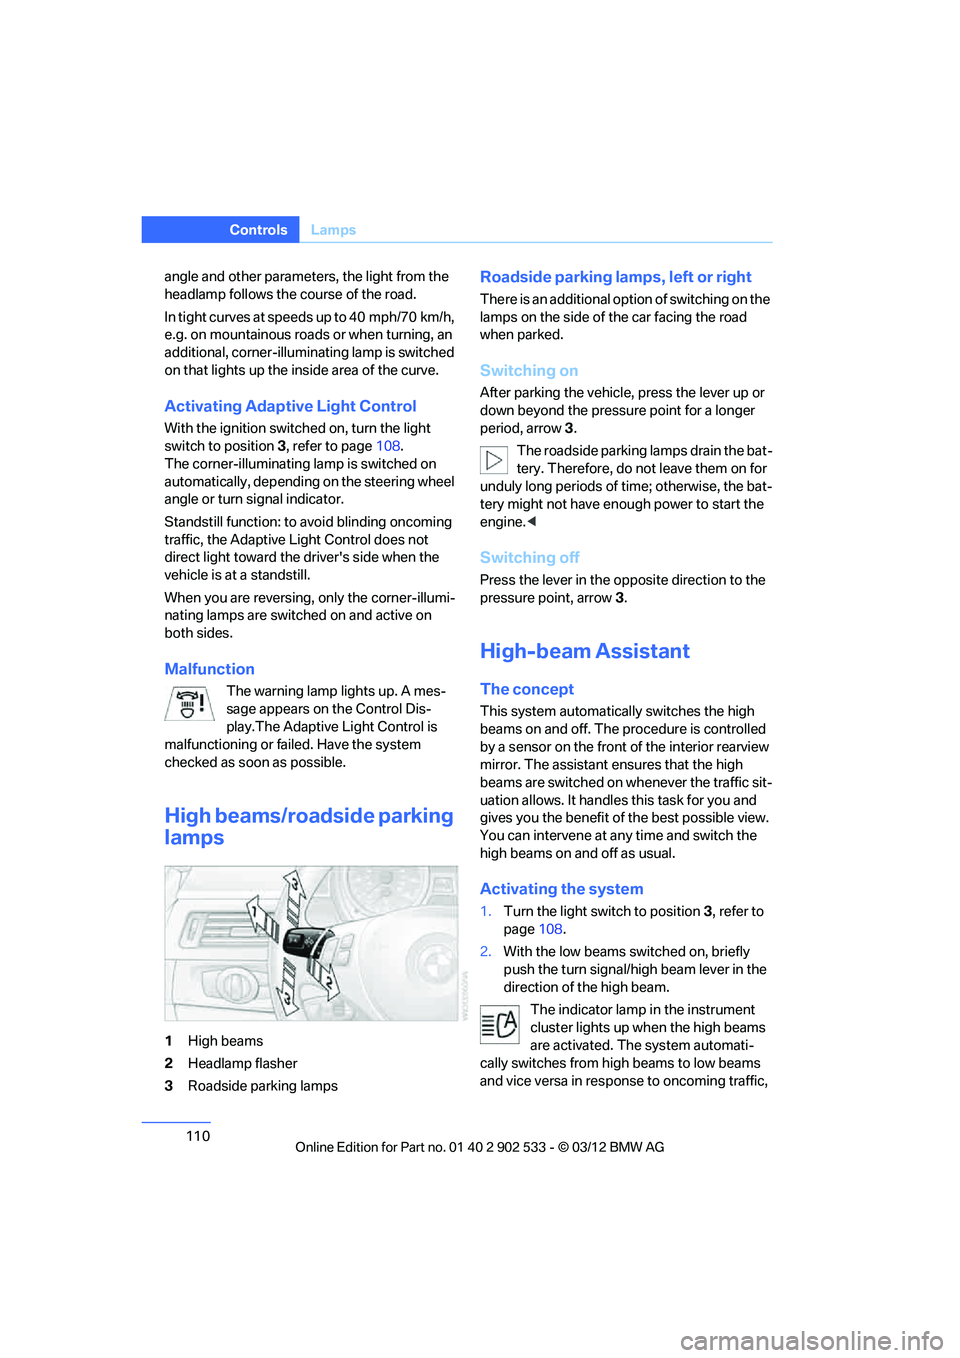
1 High beams
2 Headlamp flasher
3 Roadside parking lamps
Roadside parking lamps, left or right
There is an additional option of switching on the
lamps on the side of the car facing the road
when parked.
Switching on
After parking the vehicle, press the lever up or
down beyond the pressure point for a longer
period, arrow 3 .
The roadside parking lamps drain the bat-
tery. Therefore, do not leave them on for
unduly long periods of time; otherwise, the bat-
tery might not have enough power to start the
engine. <
Switching off
Press the lever in the opposite direction to the
pressure point, arrow 3.
High-beam Assistant
The concept
This system automatically switches the high
beams on and off. The procedure is controlled
by a sensor on the front of the interior rearview
mirror. The assistant ensures that the high
beams are switched on whenever the traffic sit-
uation allows. It handles this task for you and
gives you the benefit of the best possible view.
You can intervene at any time and switch the
high beams on and off as usual.
Activating the system
1. Turn the light switch to position 3, refer to
page 108.
2. With the low beams switched on, briefly
push the turn signal/high beam lever in the
direction of the high beam.
The indicator lamp in the instrument
cluster lights up when the high beams
are activated. The system automati-
cally switches from high beams to low beams
and vice versa in response to oncoming traffic,
00320051004F004C00510048000300280047004C0057004C005200510003
Page 277 of 308
276
MobilityGiving and receiving assistance
Manual transmission
Gearshift lever in neutral position.
Automatic transmission
Selector lever in position N.
Changing selector lever positions, refer to
page63.
Do not exceed a towing speed of
45 mph or 70 km/h and a towing distance
of 90 miles/150 km; otherwise, the automatic
transmission may be damaged.<
Sport automatic transmission with
double clutch
Make sure that the parking lock P is not
engaged; otherwise, the rear wheels are
immobilized.
When using the car wash function, refer to
page 263, note that the parking lock P is
engaged automatically after approx. 30 min-
utes, blocking the rear wheels.
In the event of an electrical malfunction or if the
vehicle must be towed for more than approx.
20 minutes, unlock the parking lock manually,
refer to page 68.<
When towing, do not exceed a maximum
speed of 30 mph or 50 km/h and a maxi-
mum distance traveled of 30 miles/50 km; oth-
erwise, the transmission may be damaged. <
Towing methods
Do not lift the vehicle by a tow fitting or
body and chassis parts; otherwise, dam-
age may result. <
With a tow bar
The towing vehicle must not be lighter
than the towed vehicle; otherwise, it may
be impossible to maintain control. <
The tow fittings used should be on the same
side on both vehicles. Should it prove impossi-
ble to avoid mounting the tow bar at an angle,
please observe the following: >
Clearance and maneuvering capability will
be sharply limited during cornering.
> The tow bar will generate lateral forces if it is
attached offset.
Attach the tow bar to the tow fittings only,
as attaching it to other parts of the vehicle
could result in damage. <
With a tow rope
When starting off in the towing vehicle, make
sure that the tow rope is taut.
To avoid jerking and the associated
stresses on vehicle components when
towing, always use nylon ropes or nylon straps.
Attach the tow rope to the tow fittings only, as
attaching it to other parts of the vehicle could
result in damage. <
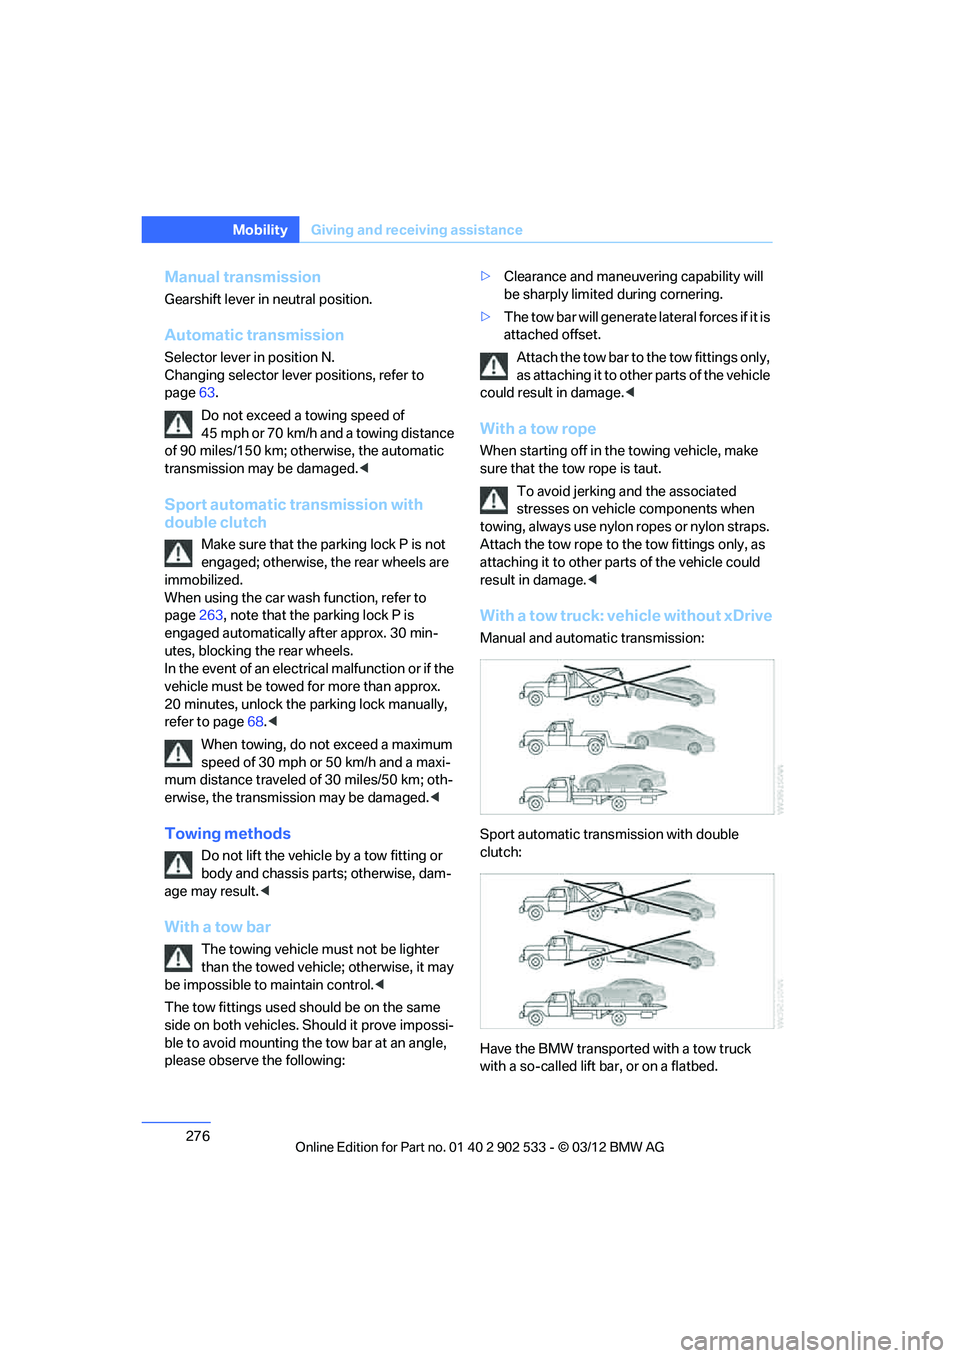
With a tow truck: vehicle without xDrive
Manual and automatic transmission:
Sport automatic transmission with double
clutch:
Have the BMW transported with a tow truck
with a so-called lift bar, or on a flatbed.
00320051004F004C00510048000300280047004C0057004C005200510003
Page 294 of 308
293
Everything from A to Z
Reference
AUX-IN
– port
125
Available services 228
Average fuel consumption 82
– setting the units 85
Average speed 82
Avoid highways in
navigation 155
Avoiding unintentional alarms 38
Axle loads, refer to Weights 283
B
Backrest contour, refer to
Lumbar support 48
Backrests, refer to Seat adjustment 47
Backrest width adjustment 48
Back seats
– refer to Rear seats 50
Bag holder 129
Band-aids, refer to First aid pouch 273
Bar, refer to Towing methods 276
Base plate for telephone or
mobile phone
– refer to Snap-in adapter 211
– refer to Snap-in adapter in
the center armrest storage
compartment 124
Battery 270
– charging 270
– disposal 40,271
– jump-starting 274
– remote control 30
– replacing 270
– temporary power failure 270
Battery renewal
– remote control 40
– remote control for vehicle 39
Being towed 275
Belt hand-over 53
– pinch protection system 53
Belts, refer to Safety belts 52Belt tensioner, refer to Safety
belts 52
Beverage holders, refer to Cupholders 126
Black ice, refer to Outside temperature warning 80
Blinds, refer to Roller
sunblinds 124
Blower, refer to Air volume 116
Bluetooth, activating/ deactivating 201
BMW
– car shampoo 265
BMW Assist 224
– updating 228
BMW Homepage 4
BMW Info 218
BMW Maintenance
System 260
BMW Online 226
BMW webpage 4
Bottle holders, refer to Cupholders 126
Brake Assist, refer to Dynamic
Brake Control DBC 95
Brake fluid, refer to Service requirements 85
Brake Force Display 104
Brake lamps
– B ra
ke Force Display 104
Brake pads 136
– breaking in 136
Brake pedal, refer to Braking
safely 138
Brake rotors 139
– brakes 136
– breaking in 136
Brakes
– ABS 95
– BMW Maintenance System 260
– Brake Force Display 104
– breaking in 136
– parking brake 62
– service requirements 85Brakes, refer to Braking
safely 138
Brake system 136
– BMW Maintenance
System 260
– breaking in 136
– disc brakes 139
Breakdown services, refer to Roadside Assistance 273
Breaking in the clutch 136
Breaking in the differential, refer to Engine and
differential 136
Break-in period 136
Brightness of the Control Display 92
Bulb changing, refer to Lamps and bulbs 266
Button for starting the engine,
refer to Start/Stop button 60
Buttons on the steering wheel 11
C
Calendar 219
– displaying appointment 219
– selecting calendar day 219
California Proposition 65 warning 6
Call
– accepting 205
– ending 205
– muting the microphone 207
– rejecting 205
Calling, refer to Phone numbers, dialing 206
Calling, refer to Telephone owner's manual
Calls
– with multiple parties 206
Can holders, refer to Cupholders 126
Capacities 284
Capacity of the trunk 283
Car battery, refer to Vehicle
battery 270
00320051004F004C00510048000300280047004C0057004C005200510003