2013 BMW 328I CONVERTIBLE lock
[x] Cancel search: lockPage 263 of 308

262
MobilityCare
Care
Vehicle equipment
In this chapter, all production, country, and
optional equipment that is offered in the model
range is described. For this reason, descrip-
tions will be given of some equipment that may
not be available in a vehicle, for example due to
the special options or national-market version
selected. This also applies to safety related
functions and systems.
Care products
Regular cleaning and care contributes signifi-
cantly to the value retention of your BMW.
BMW recommends cleaning and caring for your
vehicle with products that are approved by
BMW for this purpose.
Your BMW center will be happy to advise you on
the products and services available for cleaning
and caring for your BMW.
Original BMW CareProducts have been
material-tested, laboratory-checked and
proven in the field, and offer optimal care and
protection for your vehicle. <
Do not use cleaners that contain alcohol
or solvents as these may result in dam-
age. <
Cleaning agents can contain substances
that are dangerous or hazardous to your
health. Therefore, follow the warning and safety
instructions on the packaging. When cleaning
inside the vehicle, always open the doors or
windows of the vehicle. In enclosed areas, pro-
vide for sufficient ventilation. Only use products
designed for cleaning vehicles. <
Exterior care
Washing the vehicle
Especially during the winter months,
ensure that the vehicle is washed more
frequently. Heavy soiling and road salt can lead
to vehicle damage. <
After washing the vehicle, apply the
brakes briefly to dry them; otherwise,
water can reduce braking efficiency over the
short term and the brake discs can corrode. <
Automatic car washes
Give preference to car washes that use cloth or
soft brushes in order to avoid paint damage.
Do not use high-pressure car washes;
otherwise, water may drip into the vehicle
around the windows. <
Before driving into a car wash, ensure that it is
suitable for your BMW. Check the following:
> Dimensions of your vehicle, refer to
page 281.
> If necessary: fold in the exterior mirrors,
refer to page 54.
> Maximum permissible tire width.
Avoid car washes with guide rail heights
over 4 in/10 cm; otherwise, there is the
danger of damaging chassis parts. <
Preparations before driving into an automatic
car wash:
> Unscrew the rod antenna.
> Deactivate the rain sensor to prevent
undesired wiper operation.
> Remove additional add-on parts, e.g. spoil-
ers or phone antennas, if they could be
damaged.
> Leave the remote control in the ignition
lock.
00320051004F004C00510048000300280047004C0057004C005200510003
Page 264 of 308

263
Care
Mobility
Automatic transmission
Before driving into an automatic car wash, per-
form the following steps to ensure that the vehi-
cle can roll:
1.
Insert the remote control into the ignition
lock, even with Comfort Access.
2. Move the selector lever to position N.
3. Release the parking brake.
4. Switch off the engine.
5. Leave the remote control in the ignition lock
so that the vehicle can roll.
Sport automatic transmission with
double clutch
Before driving into an automatic car wash, per-
form the following steps to ensure that the vehi-
cle can roll:
1.Insert the remote control into the ignition
lock, even with Comfort Access.
2. Engage transmission position N.
3. Release the parking brake.
4. Switch off the engine.
5. Leave the remote control in the ignition lock
so that the vehicle can roll.
The transmission is switched into position P:
> automatically after approx. 30 minutes
> if you remove the infrared remote control
from the ignition lock
Steam jets/high-pressure washers
When using steam jets or high-pressure
washers, make sure to maintain sufficient
distance from the vehicle and do not exceed a
temperature of 140 7/60 6.
Insufficient clearance or excessive pressure or
temperature can lead to component damage or
water penetration. Follow the operating instruc-
tions of the high-pressure washer. <
When using high-pressure washers, do
not spray the sensors, e.g. of the Park
Distance Control, for an extended period and maintain a distance of at least 1 ft/30 cm from
them.
<
Manual car wash
When washing the vehicle by hand, use large
quantities of water and car shampoo if neces-
sary. Clean the vehicle with a sponge or wash-
ing brush, applying light pressure only.
Before cleaning the windshield, deacti-
vate the rain sensor or switch off the igni-
tion to prevent unintentional activation of the
wipers. <
Observe local regulations pertaining to
washing vehicles by hand. <
Headlamps
Do not rub them dry and do not use abrasive or
corrosive cleaning agents.
Loosen dirt, e.g. insects, with shampoo or
insect remover and wash away with copious
quantities of water.
Thaw ice with a windshield deicer and do not
use an ice scraper.
Windows
Clean the inside and outside surfaces of the
windows and the mirrors with window cleaner.
Do not clean the mirrors with cleaners
containing quartz. <
Convertible: retractable hardtop
Proceed as you would in a normal car wash.
When you open a wet hardtop, water
drops may run into the trunk. If necessary,
remove items from the trunk beforehand to
avoid water stains or soiling. <
Paintwork care
Regular care contributes to value retention and
protects the paintwork against the long-term
effects of damaging substances.
Environmental influences in regions with ele-
vated levels of air pollution or natural contami-
00320051004F004C00510048000300280047004C0057004C005200510003
Page 267 of 308
266
MobilityReplacin g compon ents
Replacing components
Vehicle equipment
In this chapter, all production, country, and
optional equipment that is offered in the model
range is described. For this reason, descrip-
tions will be given of some equipment that may
not be available in a vehicle, for example due to
the special options or national-market version
selected. This also applies to safety related
functions and systems.
Onboard vehicle tool kit
Coupe
The onboard vehicle tool kit is stored in a com-
partment on the right-hand side of the trunk.
Remove the cover.
Convertible
The onboard vehicle tool kit is stored in a pouch
under the trunk floor panel.
Wiper blades
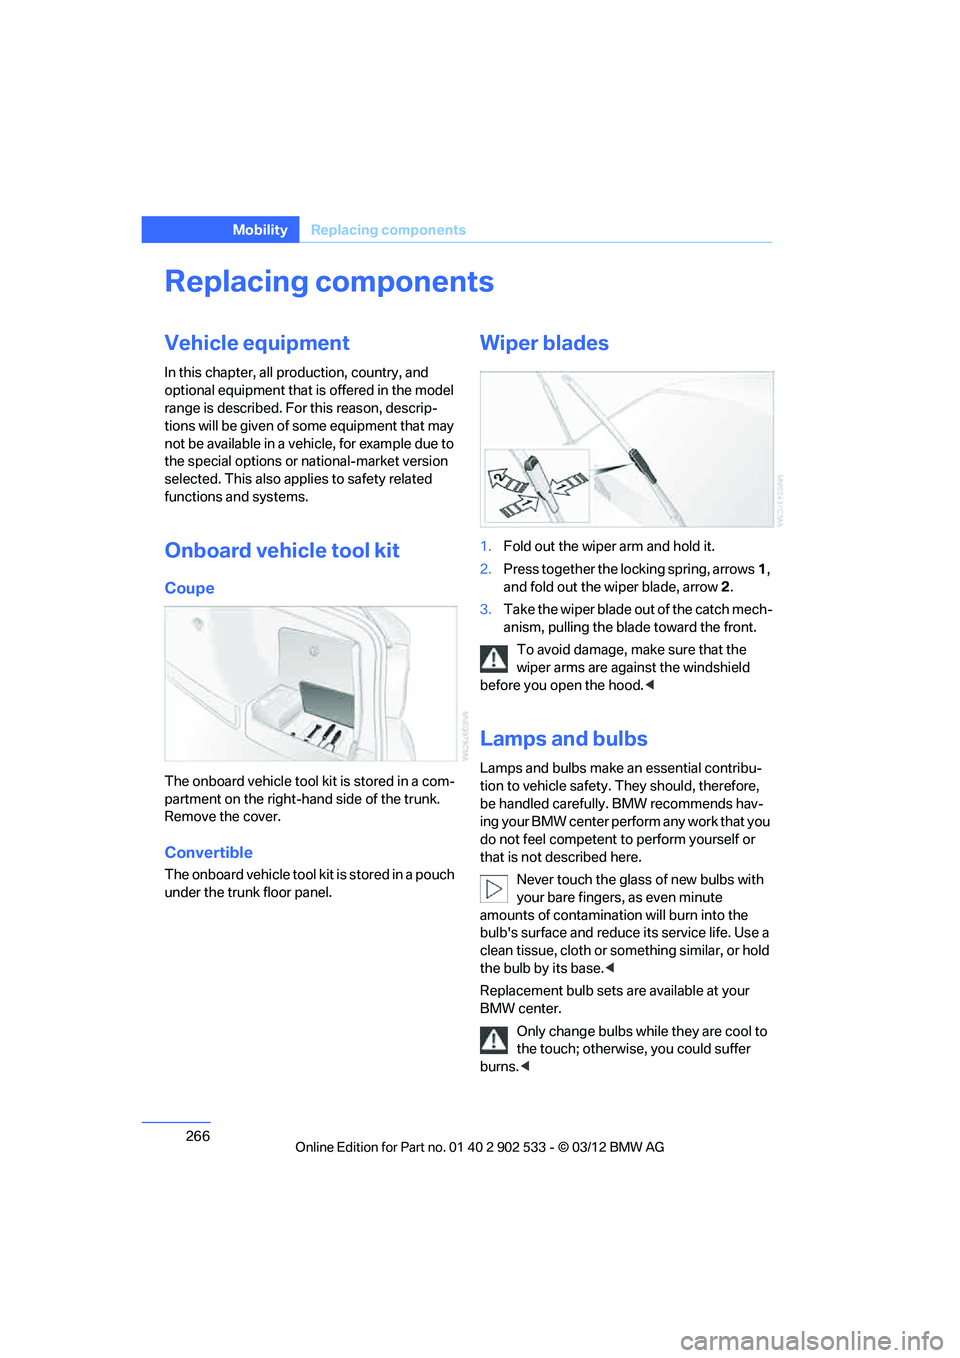
1.Fold out the wiper arm and hold it.
2. Press together the locking spring, arrows 1,
and fold out the wiper blade, arrow 2.
3. Take the wiper blade out of the catch mech-
anism, pulling the blade toward the front.
To avoid damage, make sure that the
wiper arms are against the windshield
before you open the hood. <
Lamps and bulbs
Lamps and bulbs make an essential contribu-
tion to vehicle safety. They should, therefore,
be handled carefully. BMW recommends hav-
ing your BMW center perform any work that you
do not feel competent to perform yourself or
that is not described here.
Never touch the glass of new bulbs with
your bare fingers, as even minute
amounts of contamination will burn into the
bulb's surface and reduce its service life. Use a
clean tissue, cloth or something similar, or hold
the bulb by its base. <
Replacement bulb sets are available at your
BMW center.
Only change bulbs while they are cool to
the touch; otherwise, you could suffer
burns. <
00320051004F004C00510048000300280047004C0057004C005200510003
Page 268 of 308

267
Replacin g components
Mobility
When working on electrical systems,
always begin by switching off the con-
sumer in question; otherwise, short-circuits
could result. To avoid possible injury or equip-
ment damage when replacing bulbs, observe
any instructions provided by the bulb manufac-
turer. <
For care of the headlamps, please follow the
instructions in the chapter entitled 'Care'. To replace lamps not described here,
please contact your BMW center. <
Light-emitting diodes LED
Light-emitting diodes installed behind translu-
cent lenses serve as the light source for many of
the controls, displays, and equipment in your
vehicle. These light-emitting diodes, which
operate using a concept similar to that applied
in conventional lasers, are officially designated
as Class 1 light-emitting diodes.
Do not remove the covers or expose the
eyes directly to the unfiltered light source
for several hours; otherwise, this could cause
irritation of the retina. <
Headlight lenses
In cool or humid weather, condensation may
form on the interior of outside lamps. The con-
densation will disappear after a short time when
driving with the headlamps switched on. The
headlamp glasses do not need to be changed.
If the headlamps do not defrost despite driving
with the headlamps switched on, and additional
moisture builds up, for example water droplets
in the lamps, have them checked by your BMW
center.
Xenon lamps
These bulbs have a very long service life and are
highly unlikely to fail. If a xenon lamp fails never-
theless, switch on the fog lamps and continue
the journey with great care, provided that local
legislation does not prohibit this. Have all work on the xenon lamp system,
including bulb replacements, performed
only by your BMW center. Due to high voltage,
there is a risk of fatal injury if work on the xenon
lamps is carried out improperly. <
Access to the lamps
1.Switch off the lamps and take the remote
control out of the ignition lock.
2. Remove the upper cover from the head-
lamp. To do so, use a screwdriver to press
the catches towards the rear, see arrows,
and pull the cover forward and out.
Follow the same steps in reverse order to reat-
tach the cover. Be careful when installing the cover; oth-
erwise, leaks could occur and cause dam-
age to the headlamp system. <
Parking lamps and roadside parking
lamps, daytime running lights
These lamps use LED technology for operation.
If they malfunction, please contact your BMW
center.
Corner-illuminating lamps
H3 bulb, 55 watts
1.Switch off the lamps and take the remote
control out of the ignition lock.
2. Remove the cover, refer to Access to the
lamps.
00320051004F004C00510048000300280047004C0057004C005200510003
Page 274 of 308
273
Giving and receiving assistance
Mobility
>
If the LED is flashing but the BMW Assist
Response Center cannot be heard over the
hands-free system, it is possible that the
hands-free system is malfunctioning. The
BMW Assist Response Center may still be
able to hear you, however.
Automatically triggering an Emergency
Request
Under certain conditions, an Emergency
Request is sent automatically immediately after
a severe accident. An automatic Emergency
Request is not affected by pressing the SOS
button.
Roadside Assistance
BMW Roadside Assistance is available by
phone around the clock in many countries. You
can obtain support there in the event of a break-
down.
First aid pouch
Some of the articles contained in the first aid
pouch have a limited service life. Therefore,
check the expiration dates of the contents reg-
ularly and replace any items in good time, if nec-
essary.
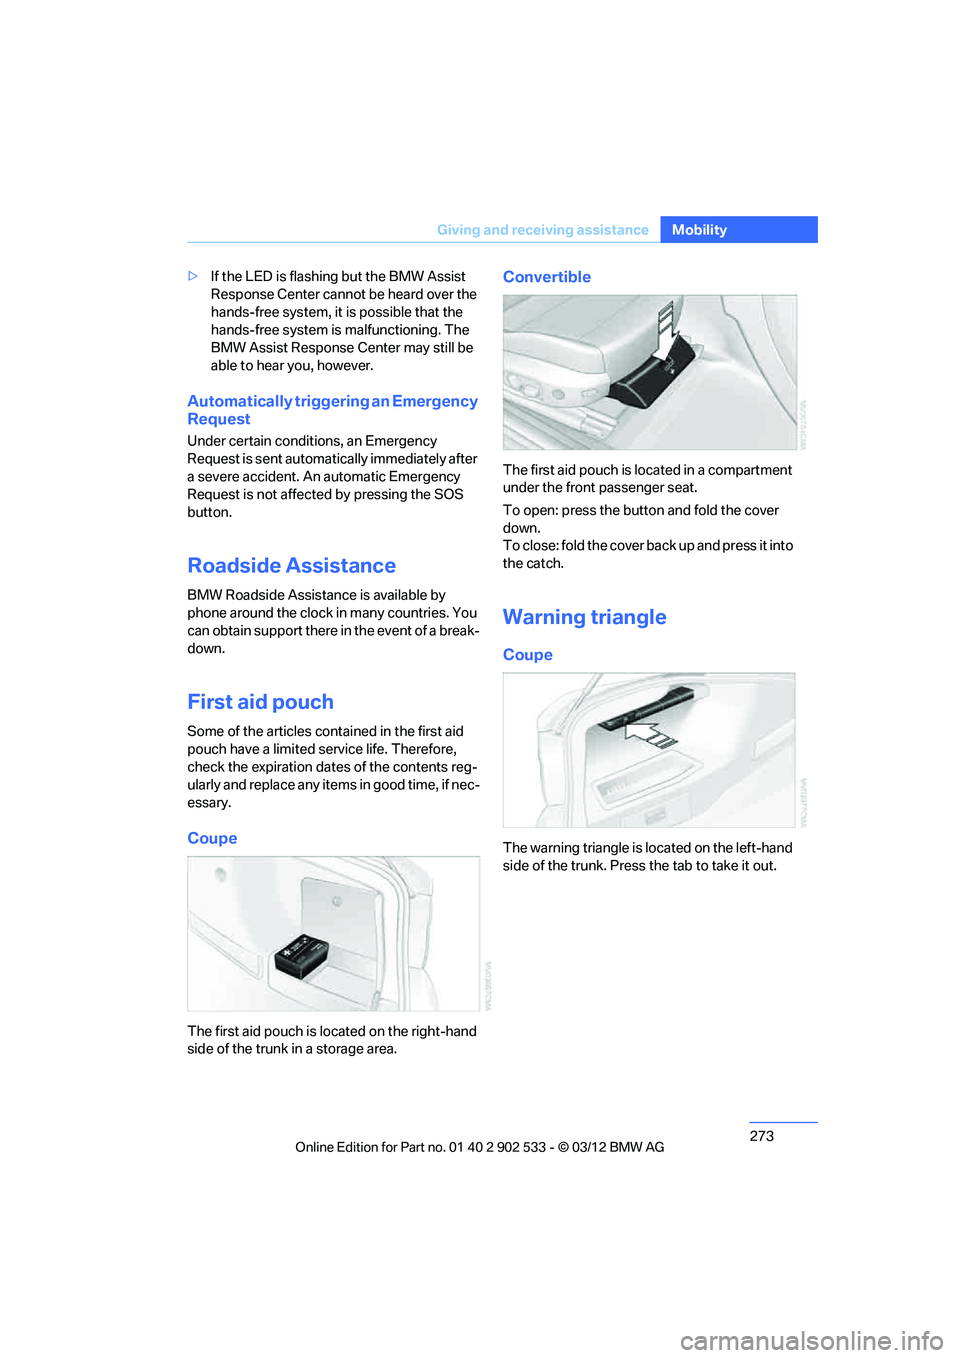
Coupe
The first aid pouch is located on the right-hand
side of the trunk in a storage area.
Convertible
The first aid pouch is located in a compartment
under the front passenger seat.
To open: press the button and fold the cover
down.
To close: fold the cover back up and press it into
the catch.
Warning triangle
Coupe
The warning triangle is located on the left-hand
side of the trunk. Press the tab to take it out.
00320051004F004C00510048000300280047004C0057004C005200510003
Page 277 of 308
276
MobilityGiving and receiving assistance
Manual transmission
Gearshift lever in neutral position.
Automatic transmission
Selector lever in position N.
Changing selector lever positions, refer to
page63.
Do not exceed a towing speed of
45 mph or 70 km/h and a towing distance
of 90 miles/150 km; otherwise, the automatic
transmission may be damaged.<
Sport automatic transmission with
double clutch
Make sure that the parking lock P is not
engaged; otherwise, the rear wheels are
immobilized.
When using the car wash function, refer to
page 263, note that the parking lock P is
engaged automatically after approx. 30 min-
utes, blocking the rear wheels.
In the event of an electrical malfunction or if the
vehicle must be towed for more than approx.
20 minutes, unlock the parking lock manually,
refer to page 68.<
When towing, do not exceed a maximum
speed of 30 mph or 50 km/h and a maxi-
mum distance traveled of 30 miles/50 km; oth-
erwise, the transmission may be damaged. <
Towing methods
Do not lift the vehicle by a tow fitting or
body and chassis parts; otherwise, dam-
age may result. <
With a tow bar
The towing vehicle must not be lighter
than the towed vehicle; otherwise, it may
be impossible to maintain control. <
The tow fittings used should be on the same
side on both vehicles. Should it prove impossi-
ble to avoid mounting the tow bar at an angle,
please observe the following: >
Clearance and maneuvering capability will
be sharply limited during cornering.
> The tow bar will generate lateral forces if it is
attached offset.
Attach the tow bar to the tow fittings only,
as attaching it to other parts of the vehicle
could result in damage. <
With a tow rope
When starting off in the towing vehicle, make
sure that the tow rope is taut.
To avoid jerking and the associated
stresses on vehicle components when
towing, always use nylon ropes or nylon straps.
Attach the tow rope to the tow fittings only, as
attaching it to other parts of the vehicle could
result in damage. <
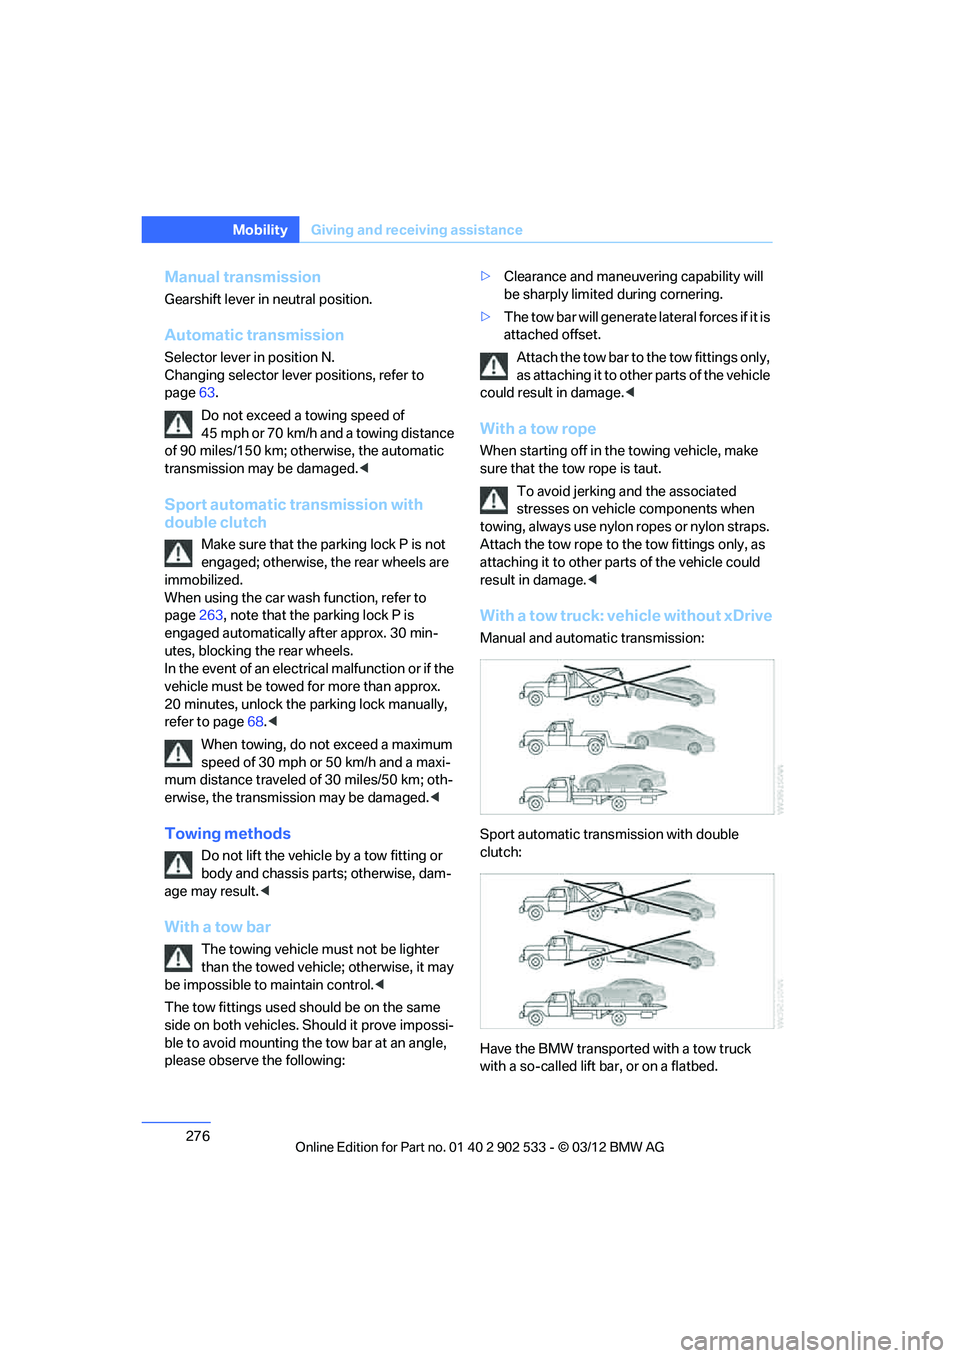
With a tow truck: vehicle without xDrive
Manual and automatic transmission:
Sport automatic transmission with double
clutch:
Have the BMW transported with a tow truck
with a so-called lift bar, or on a flatbed.
00320051004F004C00510048000300280047004C0057004C005200510003
Page 278 of 308
277
Giving and receiving assistance
Mobility
Do not tow the vehicle with just the rear axle
raised as this may cause the steering to turn.
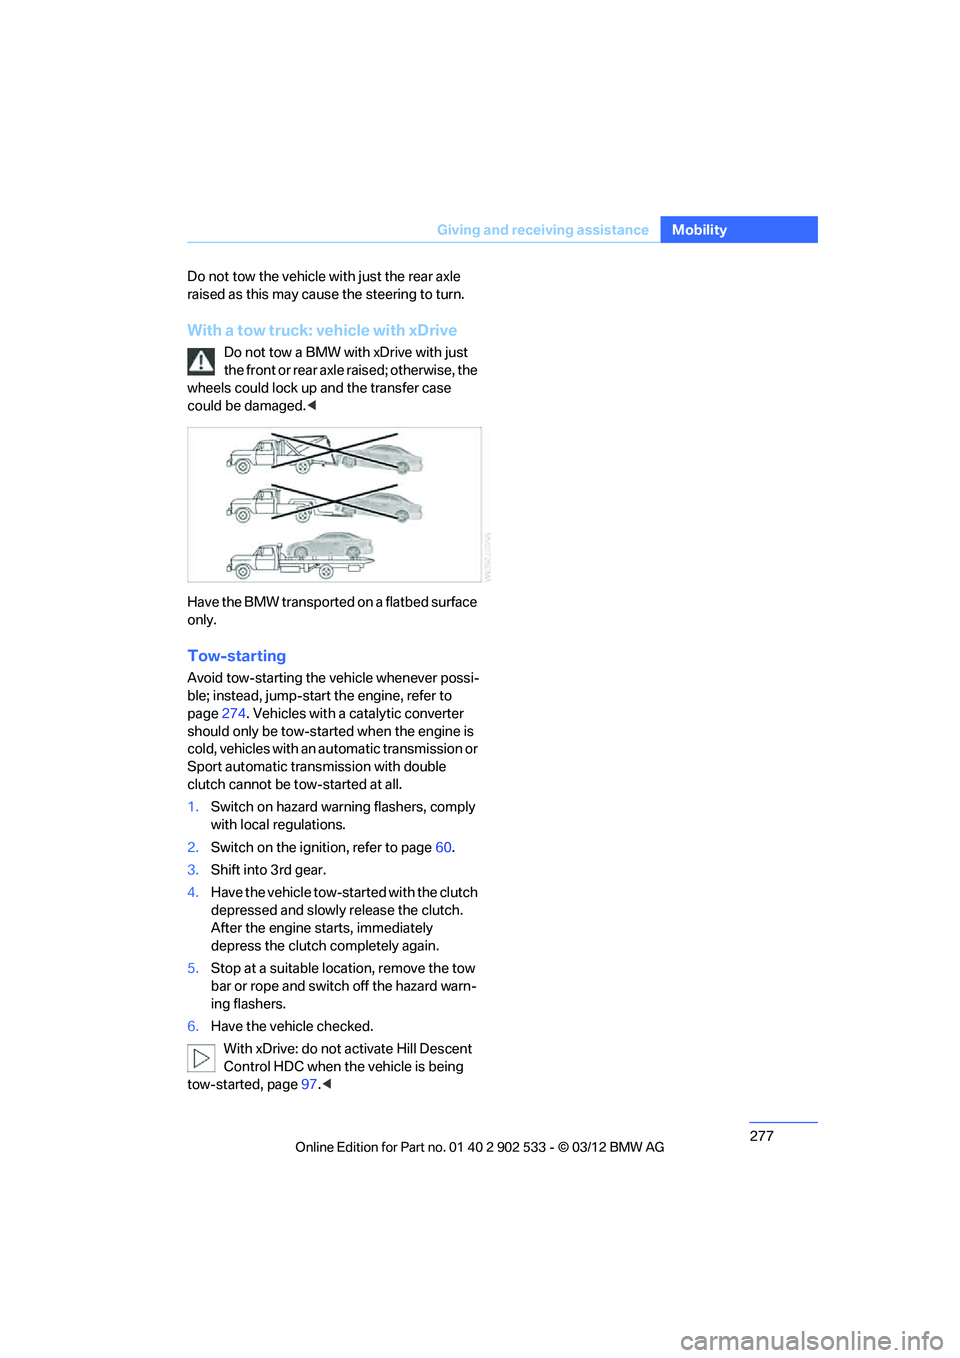
With a tow truck: vehicle with xDrive
Do not tow a BMW with xDrive with just
the front or rear axle raised; otherwise, the
wheels could lock up and the transfer case
could be damaged. <
Have the BMW transported on a flatbed surface
only.
Tow-starting
Avoid tow-starting the vehicle whenever possi-
ble; instead, jump-start the engine, refer to
page 274. Vehicles with a catalytic converter
should only be tow-started when the engine is
cold, vehicles with an automatic transmission or
Sport automatic transmission with double
clutch cannot be tow-started at all.
1. Switch on hazard warning flashers, comply
with local regulations.
2. Switch on the ignition, refer to page 60.
3. Shift into 3rd gear.
4. Have the vehicle tow-started with the clutch
depressed and slowly release the clutch.
After the engine starts, immediately
depress the clutch completely again.
5. Stop at a suitable location, remove the tow
bar or rope and switch off the hazard warn-
ing flashers.
6. Have the vehicle checked.
With xDrive: do not activate Hill Descent
Control HDC when the vehicle is being
tow-started, page 97.<
00320051004F004C00510048000300280047004C0057004C005200510003
Page 292 of 308
291
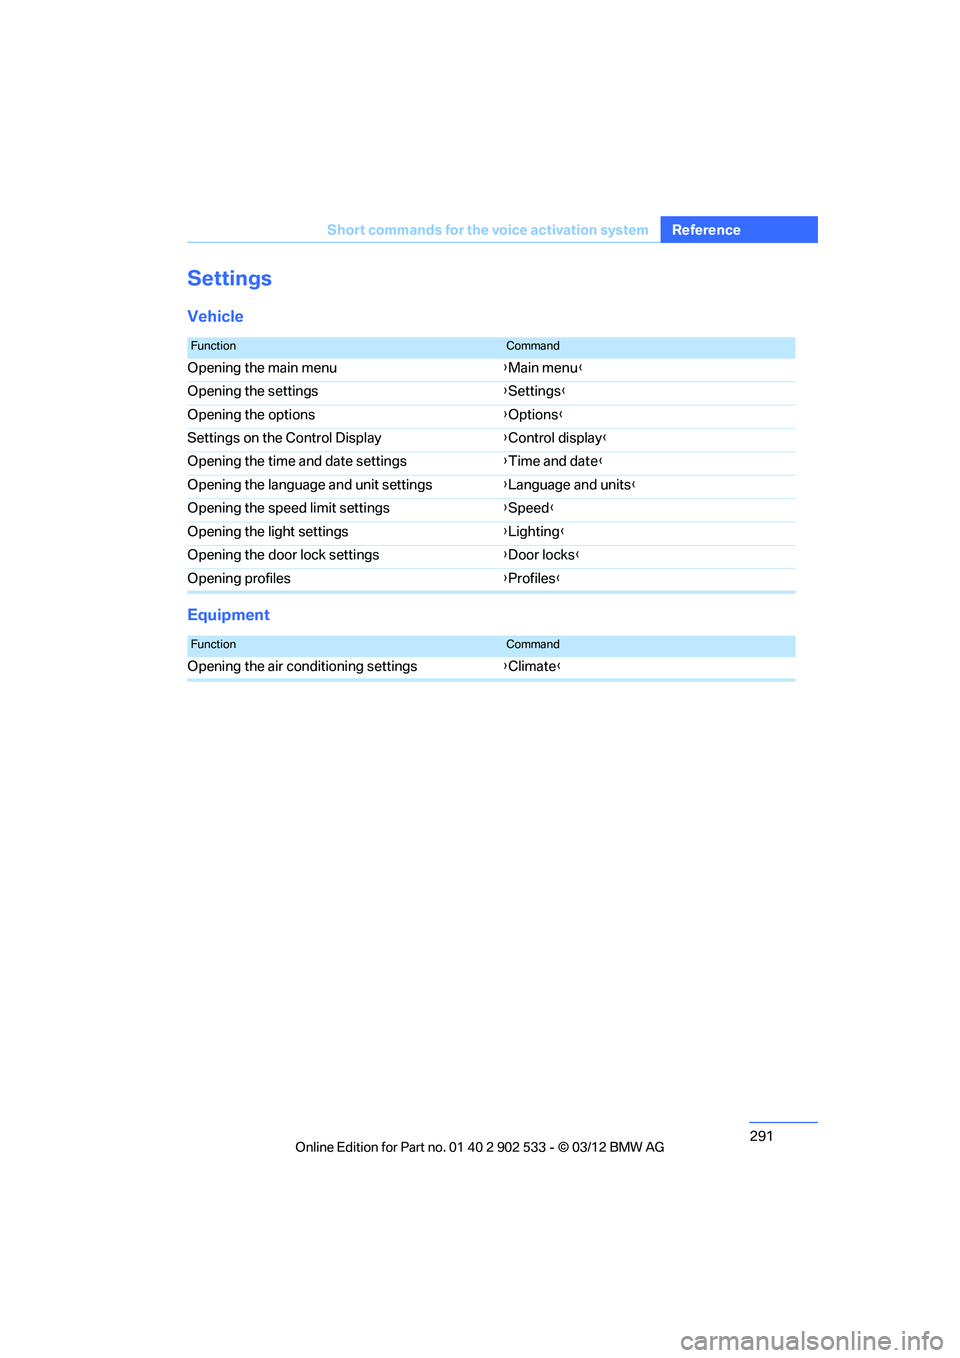
Short commands for the voice activation system
Reference
Settings
Vehicle
Equipment
FunctionCommand
Opening the main menu
{Main menu }
Opening the settings {Settings }
Opening the options {Options }
Settings on the Control Display {Control display }
Opening the time and date settings {Time and date }
Opening the language and unit settings {Language and units }
Opening the speed limit settings {Speed }
Opening the light settings {Lighting }
Opening the door lock settings {Door locks }
Opening profiles {Profiles }
FunctionCommand
Opening the air conditioning settings {Climate}
00320051004F004C00510048000300280047004C0057004C005200510003