2013 BMW 328I CONVERTIBLE lock
[x] Cancel search: lockPage 118 of 308
117
Climate
Controls
Defrosting windows and removing
condensation
Press the button.
Quickly removes ice and conden-
sation from the windshield and
front side windows.
For this purpose, also switch on the cooling
function.
Switching cooling function on/off
The passenger compartment can only be
cooled while the engine is running.
Press the button.
The air is cooled and dehumidified
and – depending on the tempera-
ture setting – warmed again.
Depending on the weather, the windshield may
fog up briefly when the engine is started.
Pressing the AUTO button automatically
switches on the cooling function.
Rear window defroster
Press the button.
The defroster is switched off auto-
matically after a certain time.
Depending on your vehicle's equipment, the
upper wires serve as an antenna and are not
part of the rear window defroster.
Switching the system on/off
Switching off
With the blower at its lowest set-
ting, press the left side of the but-
ton to switch off the automatic cli-
mate control.
All displays are cleared except for the rear win-
dow defroster if it is switched on.
The outside air supply is blocked when
the automatic climate control is switched
off. If the air quality deteriorates or the window
fogs over, switch the system back on and
increase the air volume. <
Switching on
Press any button except the ALL or the rear
window defroster button to reactivate the auto-
matic climate control.
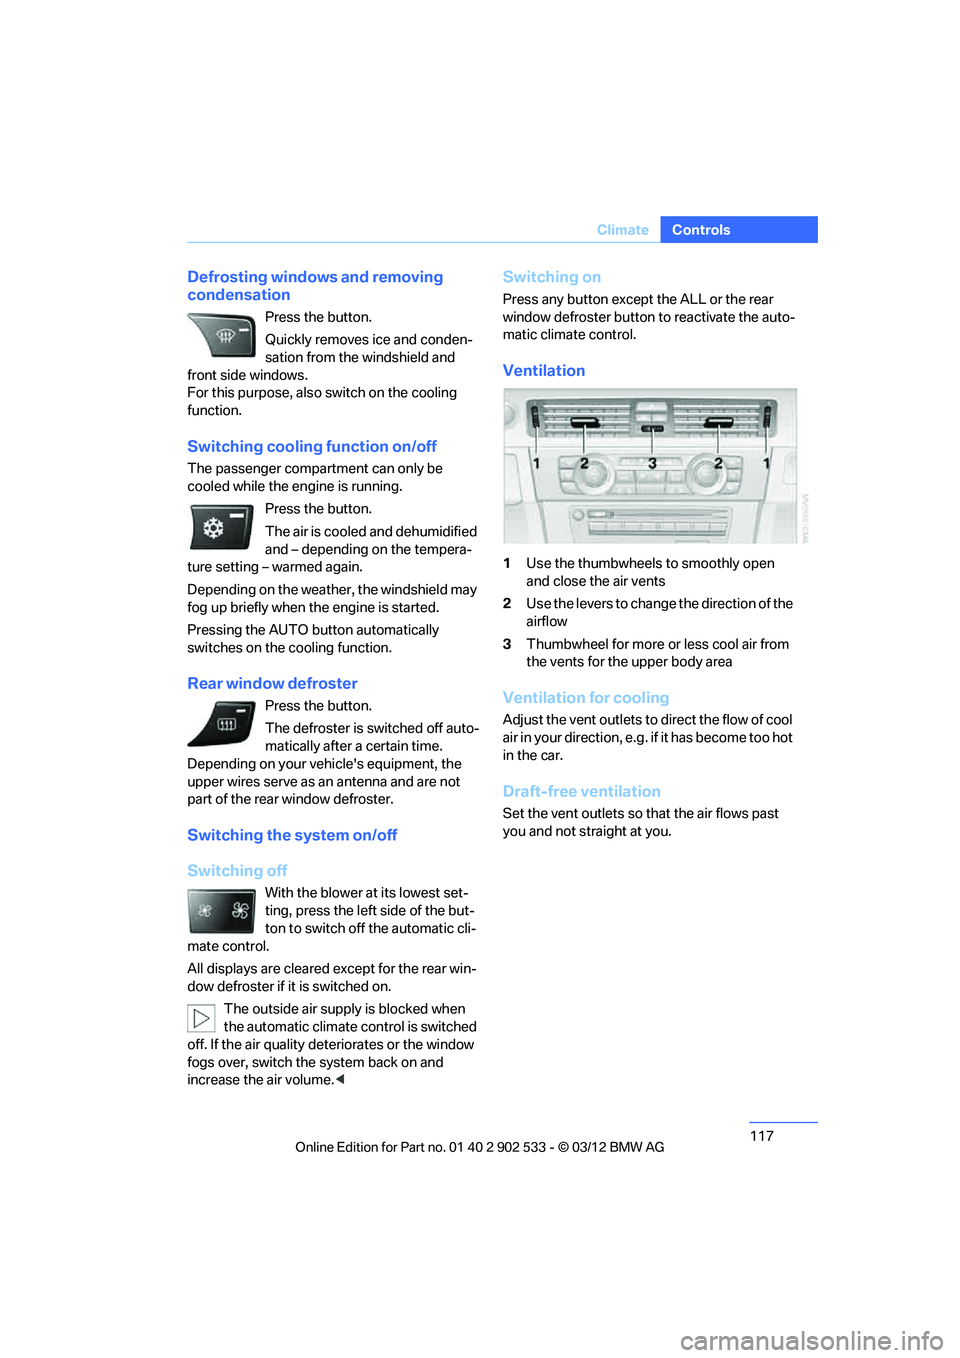
Ventilation
1Use the thumbwheels to smoothly open
and close the air vents
2 Use the levers to change the direction of the
airflow
3 Thumbwheel for more or less cool air from
the vents for the upper body area
Ventilation for cooling
Adjust the vent outlets to direct the flow of cool
air in your direction, e.g. if it has become too hot
in the car.
Draft-free ventilation
Set the vent outlets so that the air flows past
you and not straight at you.
00320051004F004C00510048000300280047004C0057004C005200510003
Page 125 of 308
124
ControlsPractical interior accessories
Coupe:
Roller sunblinds
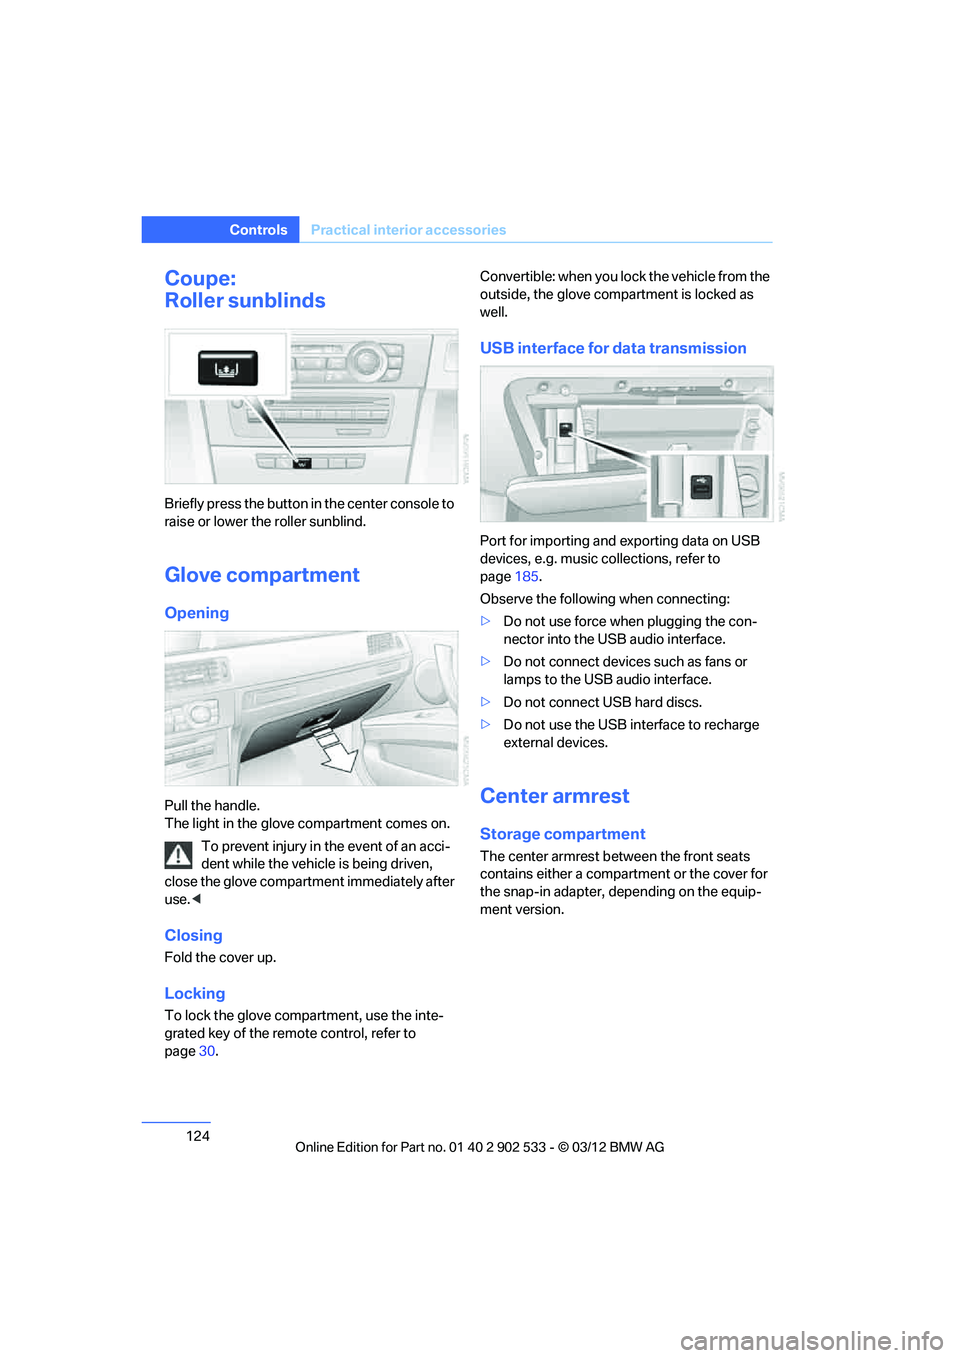
Briefly press the button in the center console to
raise or lower the roller sunblind.
Glove compartment
Opening
Pull the handle.
The light in the glove compartment comes on.
To prevent injury in the event of an acci-
dent while the vehicle is being driven,
close the glove compartment immediately after
use. <
Closing
Fold the cover up.
Locking
To lock the glove compartment, use the inte-
grated key of the remote control, refer to
page 30. Convertible: when you lock the vehicle from the
outside, the glove compartment is locked as
well.
USB interface for data transmission
Port for importing and exporting data on USB
devices, e.g. music collections, refer to
page
185.
Observe the following when connecting:
> Do not use force when plugging the con-
nector into the USB audio interface.
> Do not connect devices such as fans or
lamps to the USB audio interface.
> Do not connect USB hard discs.
> Do not use the USB interface to recharge
external devices.
Center armrest
Storage compartment
The center armrest between the front seats
contains either a compartment or the cover for
the snap-in adapter, depending on the equip-
ment version.
00320051004F004C00510048000300280047004C0057004C005200510003
Page 129 of 308
128
ControlsPractical interior accessories
Coupe:
Through-loading system
Opening
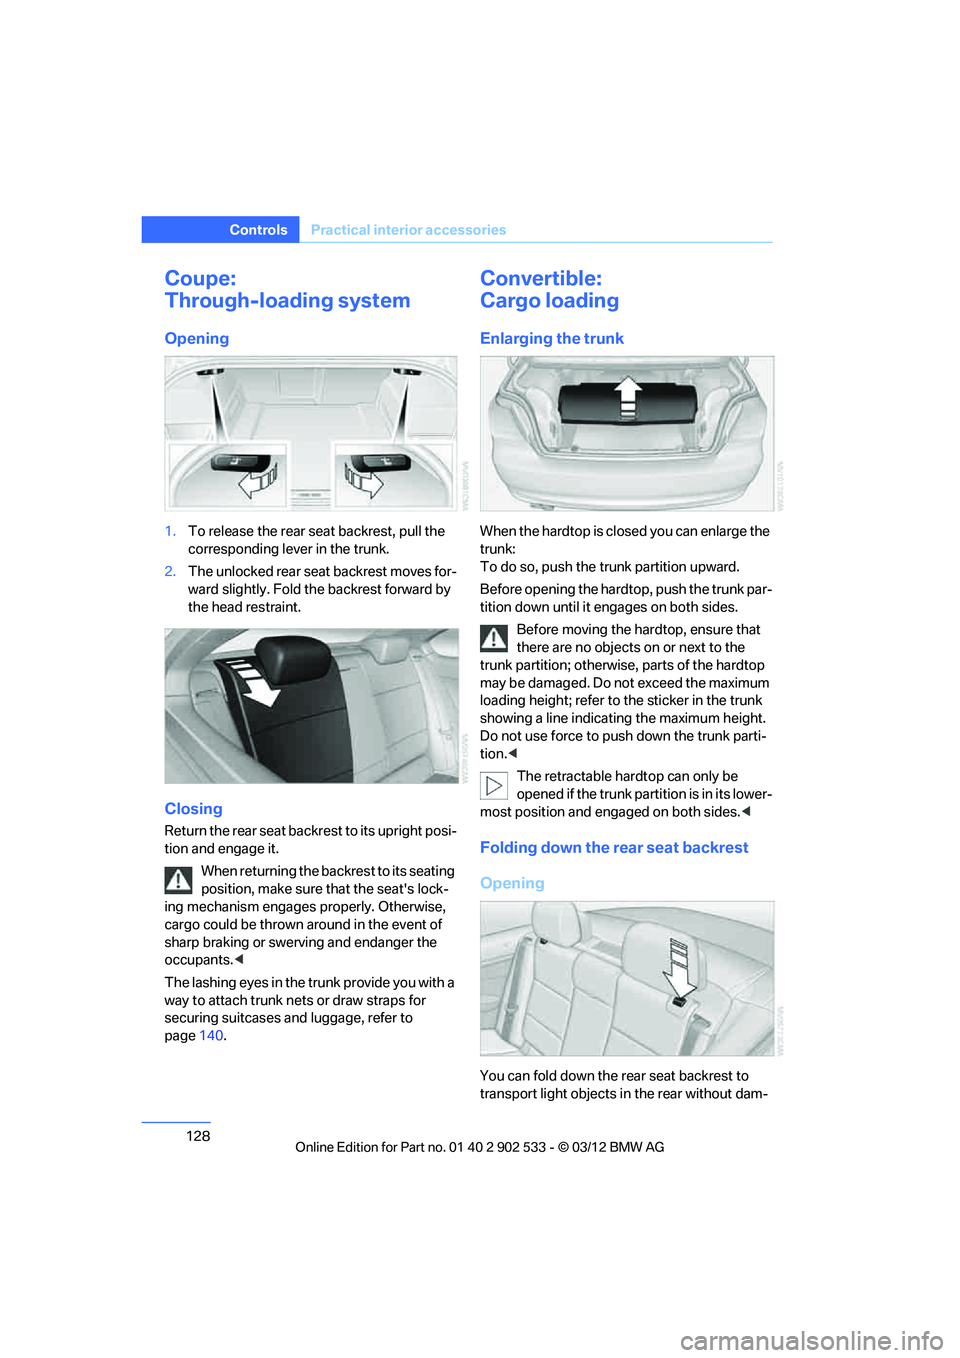
1.To release the rear seat backrest, pull the
corresponding lever in the trunk.
2. The unlocked rear seat backrest moves for-
ward slightly. Fold the backrest forward by
the head restraint.
Closing
Return the rear seat backrest to its upright posi-
tion and engage it.
When returning the backrest to its seating
position, make sure that the seat's lock-
ing mechanism engages properly. Otherwise,
cargo could be thrown around in the event of
sharp braking or swerving and endanger the
occupants. <
The lashing eyes in the trunk provide you with a
way to attach trunk nets or draw straps for
securing suitcases and luggage, refer to
page 140.
Convertible:
Cargo loading
Enlarging the trunk
When the hardtop is closed you can enlarge the
trunk:
To do so, push the trunk partition upward.
Before opening the hardtop, push the trunk par-
tition down until it engages on both sides.
Before moving the hardtop, ensure that
there are no objects on or next to the
trunk partition; otherwise, parts of the hardtop
may be damaged. Do not exceed the maximum
loading height; refer to the sticker in the trunk
showing a line indicating the maximum height.
Do not use force to push down the trunk parti-
tion. <
The retractable hardtop can only be
opened if the trunk partition is in its lower-
most position and engaged on both sides. <
Folding down the rear seat backrest
Opening
You can fold down the rear seat backrest to
transport light objects in the rear without dam-
00320051004F004C00510048000300280047004C0057004C005200510003
Page 130 of 308
129
Practical interior accessories
Controls
aging the seats. Depending on the vehicle
equipment, the mounting points for the trunk
net are found on the rear panel of the backrest.
To unlock the rear seat backrest: press the but-
ton on the driver's or the opposite side.
Closing
Return the rear seat backrest to the upright
seating position and engage it.
When returning the backrest to its seating
position, make sure that the seat's lock-
ing mechanism engages properly. Otherwise,
cargo could be thrown around in the event of
sharp braking or swerving and endanger the
occupants. <
Bag holder
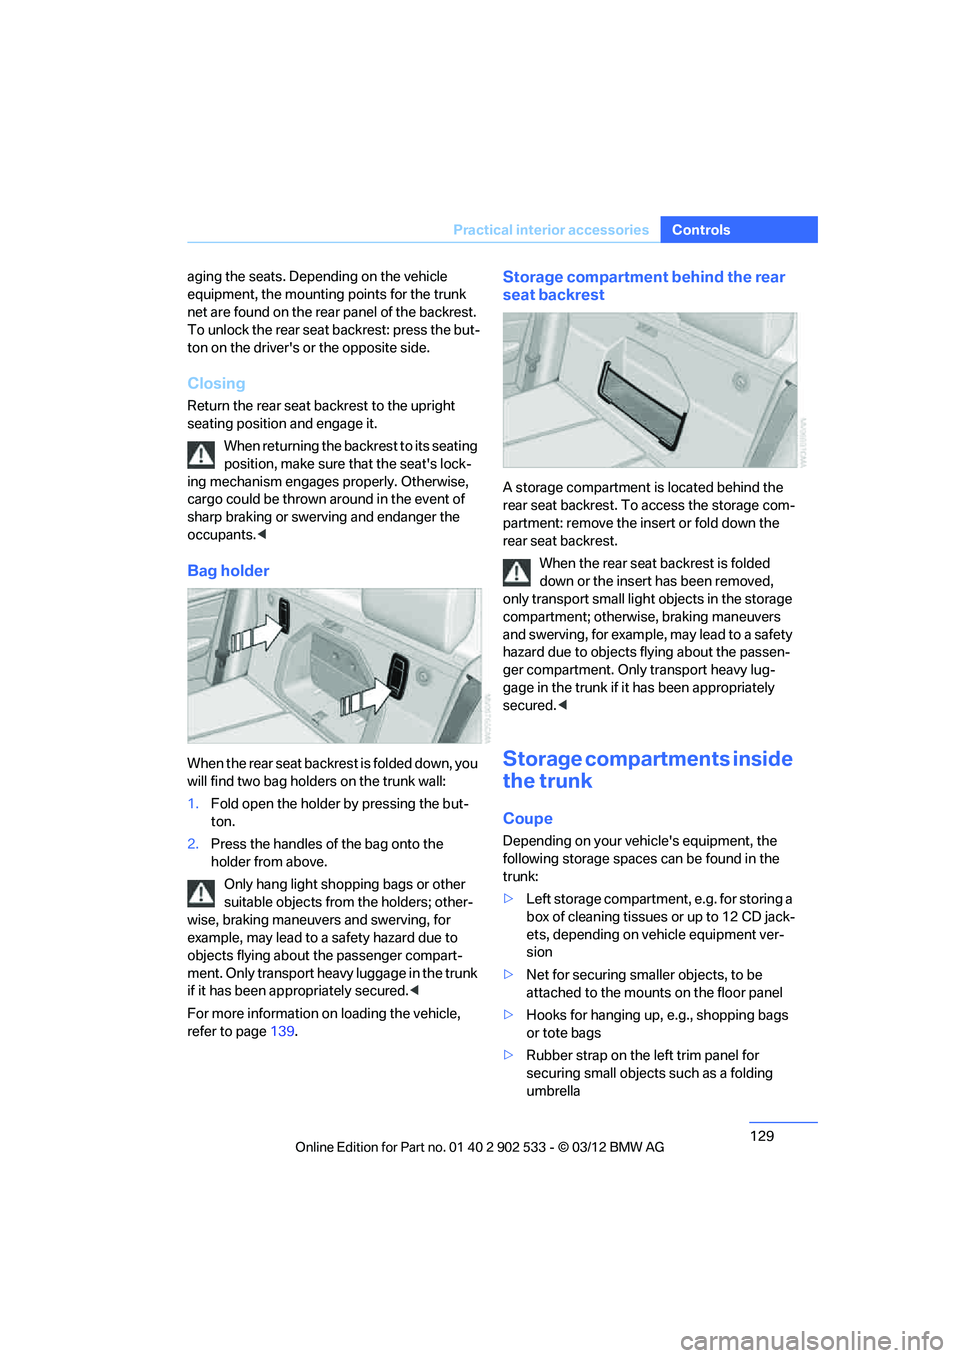
When the rear seat backrest is folded down, you
will find two bag holders on the trunk wall:
1.Fold open the holder by pressing the but-
ton.
2. Press the handles of the bag onto the
holder from above.
Only hang light shopping bags or other
suitable objects from the holders; other-
wise, braking maneuvers and swerving, for
example, may lead to a safety hazard due to
objects flying about the passenger compart-
ment. Only transport heavy luggage in the trunk
if it has been appropriately secured. <
For more information on loading the vehicle,
refer to page 139.
Storage compartment behind the rear
seat backrest
A storage compartment is located behind the
rear seat backrest. To access the storage com-
partment: remove the insert or fold down the
rear seat backrest.
When the rear seat backrest is folded
down or the insert has been removed,
only transport small ligh t objects in the storage
compartment; otherwise, braking maneuvers
and swerving, for example, may lead to a safety
hazard due to objects flying about the passen-
ger compartment. Only transport heavy lug-
gage in the trunk if it has been appropriately
secured. <
Storage compartments inside
the trunk
Coupe
Depending on your vehicle's equipment, the
following storage spaces can be found in the
trunk:
>Left storage compartment, e.g. for storing a
box of cleaning tissues or up to 12 CD jack-
ets, depending on vehicle equipment ver-
sion
> Net for securing smaller objects, to be
attached to the mounts on the floor panel
> Hooks for hanging up, e.g., shopping bags
or tote bags
> Rubber strap on the left trim panel for
securing small objects such as a folding
umbrella
00320051004F004C00510048000300280047004C0057004C005200510003
Page 158 of 308
157
Destination guidance
Navigation
4.
Turn the controller: enter the desired mile-
age.
5. Press the controller.
Resuming the original route
If the route section should no longer be
bypassed:
1."Navigation"
2. "Route information"
3. "New route for"
4. "Remove blocking"
Gas station recommendations
The remaining range is calculated and filling
stations along the route are displayed.
Even with the most up-to-date navigation data,
information about certain special destinations
may have changed; for ex ample, filling stations
may not be in operation.
1. "Navigation"
2. "Route information"
3. "Recommended refuel"
A list of filling stations is displayed.
4. Select a gas station.
5. Select the symbol.
6. "Start guidance": route guidance to the
selected filling station is started.
"Add as another destination": the filling sta-
tion is incorporated into the route.
Destination guidance
through voice instructions
Switching voice instructions on/off
Voice instructions can be switched on or off
during destination guidance.
1."Navigation"
2. "Map"
3. "Voice instructions" For rapid access, the feature can be stored on a
programmable memory key, refer to page
23.
Repeating a voice instruction
1. "Navigation"
2. "Map"
3. Highlight the symbol.
4. Press the controller twice.
Adjusting volume for voice instructions
The volume can be adjusted only while a voice
instruction is being issued.
1.Have the last voice instruction repeated, if
necessary.
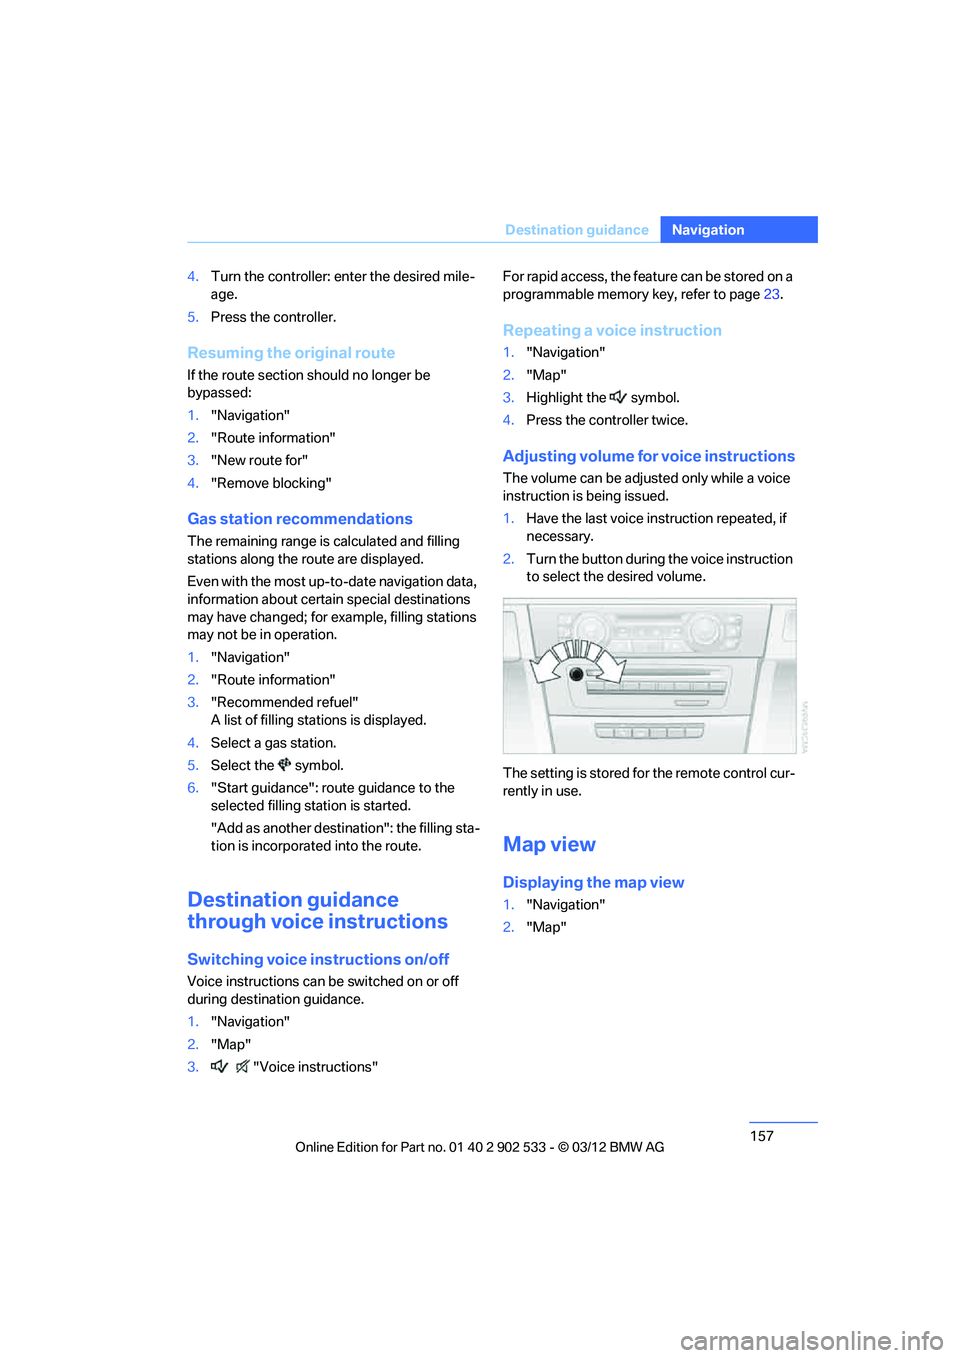
2. Turn the button during the voice instruction
to select the desired volume.
The setting is stored for the remote control cur-
rently in use.
Map view
Displaying the map view
1. "Navigation"
2. "Map"
00320051004F004C00510048000300280047004C0057004C005200510003
Page 225 of 308

224
CommunicationsConnectedDrive
ConnectedDrive
Vehicle equipment
In this chapter, all production, country, and
optional equipment that is offered in the model
range is described. Equipment is also described
that is not available because of, for example,
selected options or country version. This also
applies to safety related functions and systems.
BMW Assist
General information
BMW Assist provides a number of different ser-
vices. For example, the position data of the
vehicle can be transmitted to the BMW Assist
Response Center when an Emergency Request
is sent.
Many BMW Assist services depend on the con-
tract individually agreed upon.
After the contract has expired, the BMW Assist
system will be deactivated by the BMW Assist
Response Center without you having to visit a
BMW center. After the BMW Assist system has
been deactivated, no BMW Assist services will
be available. The BMW Assist system can be
reactivated by a BMW center after a new con-
tract has been signed.
Requirements
>The installed BMW Assist system is logged
into a mobile phone network. This network
must be capable of transmitting the ser-
vices.
> To transmit position data, the vehicle must
be able to determine its current position.
> To activate and update BMW Assist, a GPS
signal must be available. >
The BMW Assist service contract was
signed with your BMW center or with the
BMW Assist Response Center. The service
must have been fully enabled.
> BMW Assist is activated.
Services offered
>Emergency Request: when you press the
SOS button, a connection to the BMW
A s s i s t R e s p o n s e C e n t e r i s e s t a b l i s h e d . T h e
BMW Assist Response Center then speaks
with you and takes further steps to help you.
> Automatic Emergency Request: under cer-
tain conditions, a connection to the BMW
Assist Response Center is established after
a serious accident. If possible, the BMW
Assist Response Center then speaks with
you and takes further steps to help you.
> Enhanced Roadside Assistance:
BMW Roadside Assistance can be con-
tacted if assistance is needed in the event of
a breakdown. If possible, the vehicle data
and position data are transmitted during
this call.
> Customer Relations: connection to Cus-
tomer Relations for information on all
aspects of your vehicle.
> BMW TeleService: the data on your vehi-
cle's service status or required inspections
are transmitted to your BMW center, either
automatically before a service due date or
when you request a service appointment.
> Remote Door Unlock: the BMW Assist
Response Center provides assistance if, for
example, the remote control is not available
and the vehicle needs to be opened.
> Stolen Vehicle Recovery: after you report to
the police that your vehicle was stolen, the
BMW Assist Response Center can deter-
mine its position.
00320051004F004C00510048000300280047004C0057004C005200510003
Page 233 of 308
232
MobilityRefueling
Refueling
Vehicle equipment
In this chapter, all production, country, and
optional equipment that is offered in the model
range is described. For this reason, descrip-
tions will be given of some equipment that may
not be available in a vehicle, for example due to
the special options or national-market version
selected. This also applies to safety related
functions and systems.
General information
Refuel as soon as possible once your
cruising range falls below 30 miles/
50 km; otherwise, engine functions are not
ensured and damage can occur. <
Always switch off the engine before refu-
eling; otherwise, fuel cannot be added to
the tank and a message will be displayed. <
Take all precautionary measures and
observe all applicable regulations when
handling fuel. Do not carry any spare fuel con-
tainers in your vehicle. They can develop a leak
and cause an explosion or cause a fire in the
event of an accident. <
Vehicles with diesel engines
The filler neck is designed for refueling at diesel
fuel pumps.
Fuel filler flap
Opening
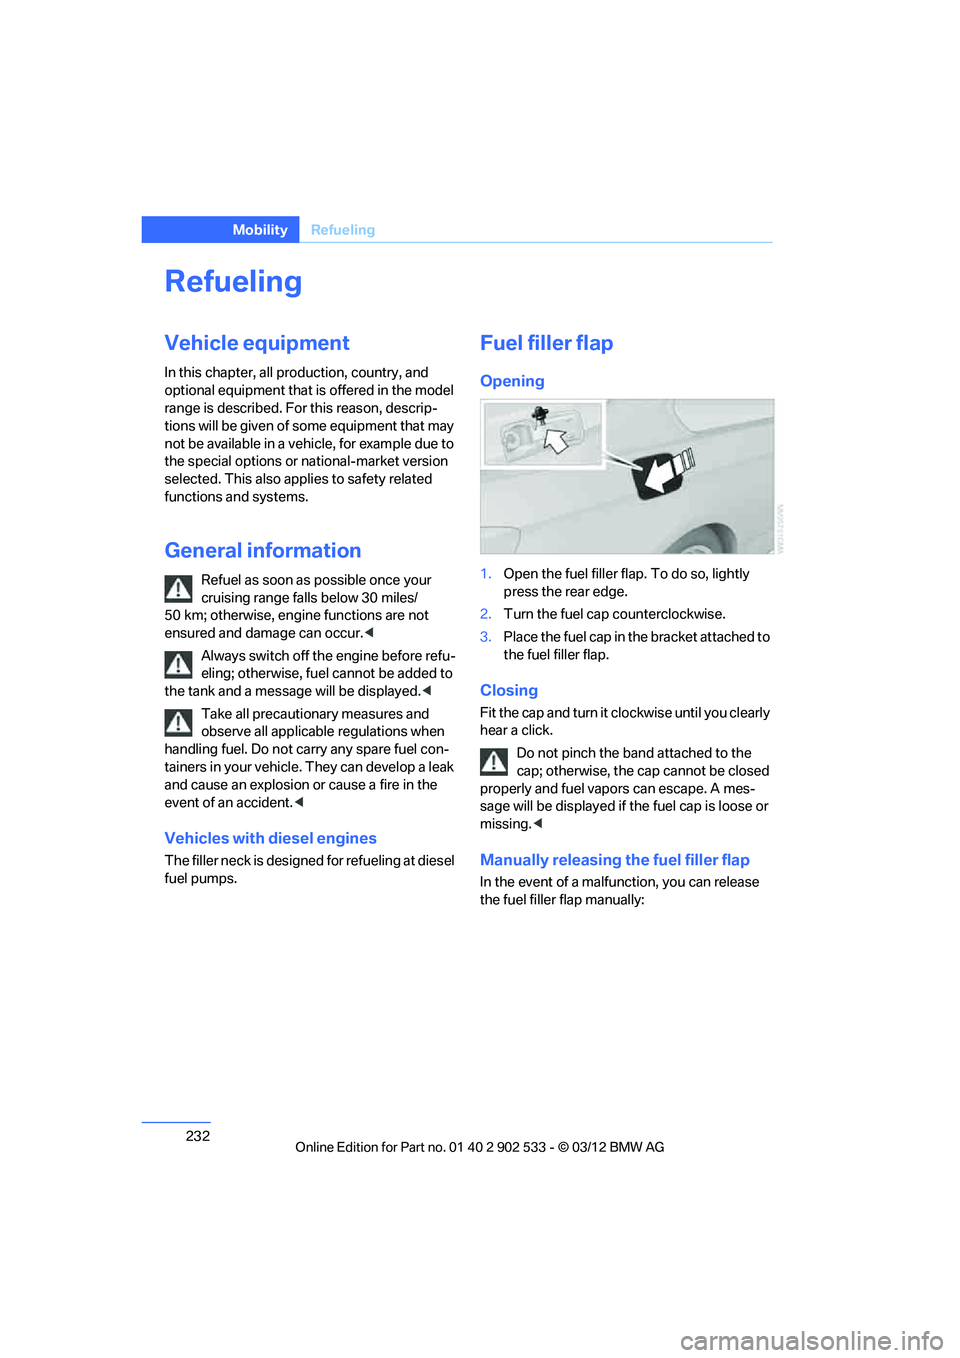
1.Open the fuel filler flap. To do so, lightly
press the rear edge.
2. Turn the fuel cap counterclockwise.
3. Place the fuel cap in the bracket attached to
the fuel filler flap.
Closing
Fit the cap and turn it clockwise until you clearly
hear a click.
Do not pinch the band attached to the
cap; otherwise, the cap cannot be closed
properly and fuel vapors can escape. A mes-
sage will be displayed if the fuel cap is loose or
missing. <
Manually releasing the fuel filler flap
In the event of a malfunction, you can release
the fuel filler flap manually:
00320051004F004C00510048000300280047004C0057004C005200510003
Page 260 of 308
259
Engine compartment
Mobility
Alternative oil types
If approved oils are not available, you can add
quantities of up to 1 US quart/1 liter of another
oil with the following specifications:
Oil change
Oil changes should only be performed by a
BMW center.
Coolant
Coolant consists of half water and half additive.
Not all commercially available additives are suit-
able for your BMW. Ask your BMW center about
suitable additives.
Only use suitable additives; otherwise,
engine damage may result. Because
additives are harmful to your health, it is impor-
tant to follow the instructions on the contain-
ers. <
Comply with the appropriate environ-
mental protection regulations when dis-
posing of coolant additives.<
Coolant temperature
If the coolant and therefore the engine over-
heats, a warning lamp lights up. A message
appears on the Control Display.
Checking coolant level
Do not add coolant to the cooling system
when the engine is hot. Escaping coolant
can cause burns. <
1. Do not open the engine hood before the
engine has cooled down.
2. Turn the cap of the expansion tank a little
counterclockwise to allow any accumulated
pressure to escape, then continue turning
to open.
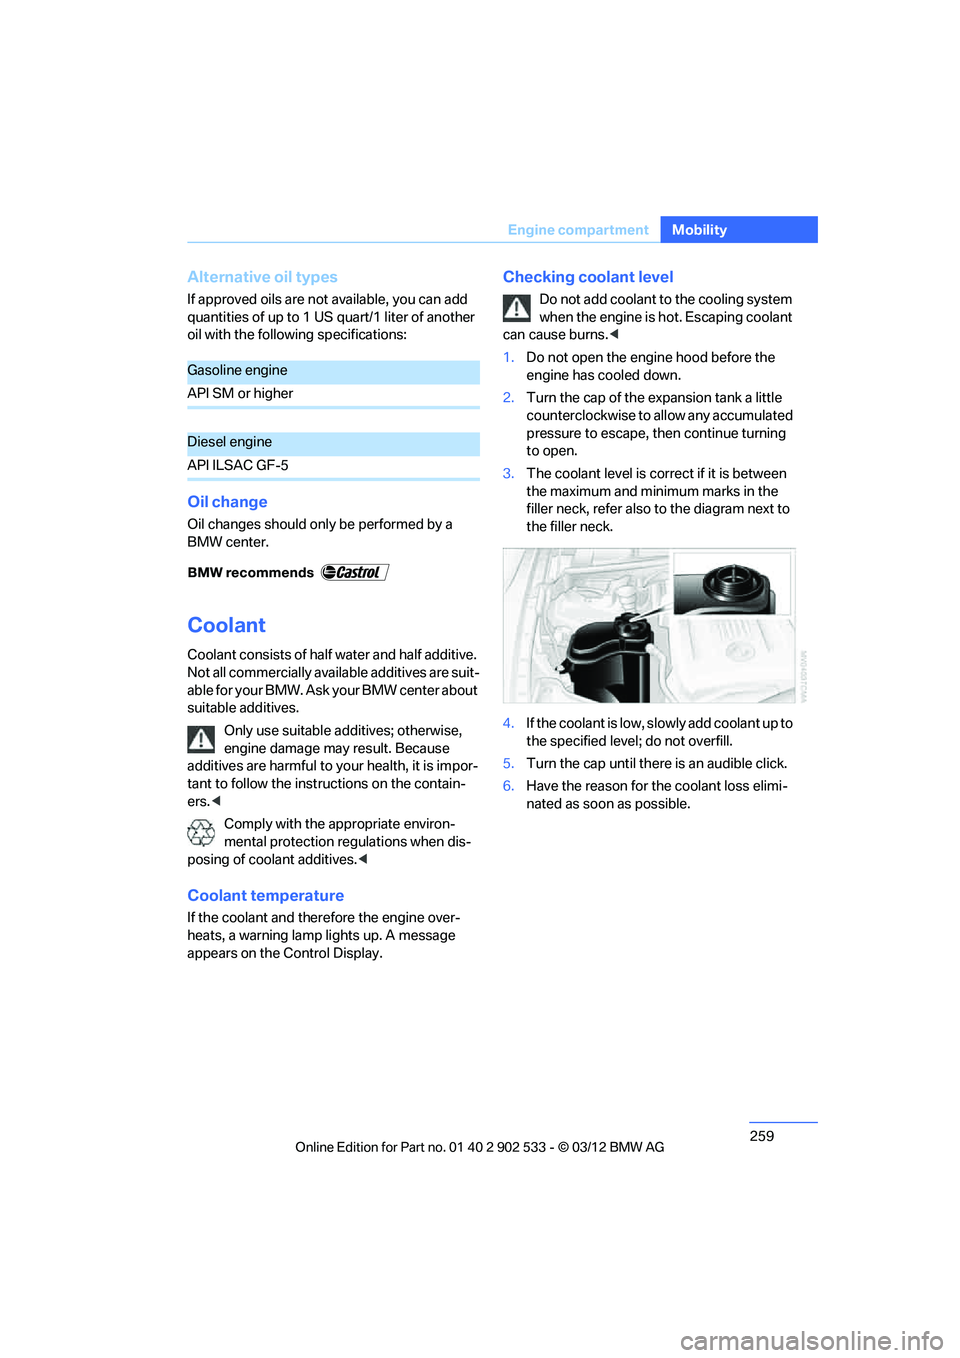
3. The coolant level is correct if it is between
the maximum and minimum marks in the
filler neck, refer also to the diagram next to
the filler neck.
4. If the coolant is low, slowly add coolant up to
the specified level; do not overfill.
5. Turn the cap until there is an audible click.
6. Have the reason for the coolant loss elimi-
nated as soon as possible.
Gasoline engine
API SM or higher
Diesel engine
API ILSAC GF-5
00320051004F004C00510048000300280047004C0057004C005200510003