2013 AUDI S4 SEDAN brake light
[x] Cancel search: brake lightPage 201 of 294
Cleaning and protect ion
General information
Regular core preserves vehicle value.
Any automobile is exposed to industrial
fumes , corrosive road salt, etc. A well cared
for Audi can look like new many years after
purchase . Regular and correct care w ill con
tr ibute to maintaining the beauty and value of
your Aud i.
Furthermore, good care may be a condition
for substantiating a warranty claim should
corrosion damage or paint defects occur.
Your authorized Audi dealer has a variety of
dedicated vehicle-care products and can ad
vise which ones to use for cleaning the exter i
or and interior of your vehicle.
Whether you use products recommended by
Audi or other commercially available cleaning
agents, please make sure you apply them cor
rectly .
.&, WARNING
-Cleaning agents may be poisonous. Keep
them out of the reach of children.
- Heed all caution labels.
- Always read directions on the container
before using any product. Follow the di
rect ions carefully.
- Most chemical cleaners are concentrated
and have to be diluted .
- Use spot removing fluids only in well
ventilated areas.
- Do not use gasoline, kerosene, d iesel
fuel, nail polish remover or other volatile
fluids. They may be toxic, flammab le or
haza rdous in other ways. Do not wash,
wax or dry the vehicle with the ignition
on or the engine running.
- Do not clean the undersides of chassis,
fenders, wheel covers, e tc. without pro
tecting your hands and arms. You may cut yourself on sharp-edged metal parts.
Cleaning and protection 199
-Moisture and ice on brakes may impair
brak ing effic iency¢
page 187. Test the
brakes carefully each time you wash the
veh icle.
@) For the sake of the environment
Select on ly environmentally friend ly clean
i ng products . Leftover cleaning products
should not d isposed of in the household
waste.
Care of exterior
Washing
Frequent washing protects the vehicle .
The best protection against environmental i n
fluences is
frequent washing and waxing . How
often th is is required depends on:
- How much the veh icle is used
- Where the veh icle is parked (garage, in the
open under trees, etc.)
- The seasonal and weather conditions
- Environmental influences
T he longer b ird droppings, insects, tree resin,
road and indus trial gr ime, tar, soot, road salt
and other materials remain on the vehicle
body, the more lasting their destructive ef
fects will be . High temperatures caused by ex
posure to intense sun light intens ify the corro
sive effect, particularly when humid ity is high
as well.
Under certain circumstances,
weekly washing
may be necessary. Under other cond itions, a
monthly washing and waxing may be ade
quate .
After the winter, the underside of the vehicle
should be thoroughly washed, preferab ly in a
professional car wash .
.&, WARNING ,_
Always read and heed all WARNINGS and
other information¢
page 199 .
•
•
Page 206 of 294
204 Cleaning and protec tio n
Cast (light) alloy wheels
Cast (light) alloy wheels require special care .
• Wash the whee ls with a sponge or hose
brush every other week.
• For deep cleaning afterwards, use only a
dedicated
aci d-fr ee cast alloy wheel cleaner .
• Rub a coat of
liq uid wax onto the r ims every
t h ree month . Be sure to reach and treat a ll
parts of the rim .
To preserve the decorat ive appearance of the
cast alloy whee ls, some specia l care is neces
sa ry. In addit ion to road dirt and sa lt, b rake
d ust is a lso corros ive. If left on for too long,
b rake dust can cause pitting.
Use only specia l
acid-free cleaners formulated
for a lloy rims . Safe p roducts are available at
your author ized Audi dealer. Never leave the
cleane r on the rims longe r than specified on
the label. If not rinsed off promptly, the acid
contained in some cleaners can attack the
threads on the whee l bolts.
Never use ab rasive or metal polishing clean
ing agents. If the protective coating has been
chipped, e .g. by k icked up road dirt, touch it
up as soon as possible.
A WARNING
- Moisture and ice on brakes may affect
braking efficiency ¢
page 187. Test the
brakes carefully each time you wash the
vehicle .
- Always read and heed all WARNINGS and
other information ¢
page 199.
-
Body cavity sealing
The body cavity sealing does no t need to be
checked.
A ll body cavities which co uld be affected by
corrosion have been thoroughly protected at
the factory.
This sealing does not require any inspection or
addit ional treatment . If any wax should seep
out of the cav ity when the ambient tempera- ture is high, it can be removed with a p
lastic
scraper and a suitable solvent.
A WARNING
-Solvents can be dangerous.
- Benzine is flammab le and toxic. If you
use benzine for removing the wax, keep
sparks, flame and lighted cigarettes
away. Never dump benz ine on the
ground, into open streams or down sew
age drains.
- Be sure to observe all safety and environ
mental regulat ions . Follow all instruc
tions on the container .
- Always read and heed all WARNINGS and
other information ¢
page 199.
, Chassis
Have the undercoating checked for damage
from time to time.
The lower body shell of your Audi is also thor
oughly protected against corros ion.
Any damage to the undercoating caused by road hazards should be repaired prompt ly .
A WARNING
Too much undercoating in the wrong p la
ces can cause a fire.
- Do not app ly additional undercoating or
r u stproof ing on or near the exhaust
manifold, exhaust pipes, catalytic con
verter or heat shields. While driving, the substance used for undercoating could
overheat and cause a fire.
'
- Always read and heed all WARNINGS and
other information ¢
page 199.
Exhaust tail pipes
Road salt and other corrosive materials will
damage the material in the exhaust tail pipes
if they are not cleaned regularly. Do not clean
the tail pipes with wheel cleaner, pa int polish,
chrome polish or other ab rasive cleaners.
Clean the tail pipes with car care products
that are suitable for stainless steel.
Page 219 of 294
Checking and fillin g 217
Engine compartment
Engine compartment
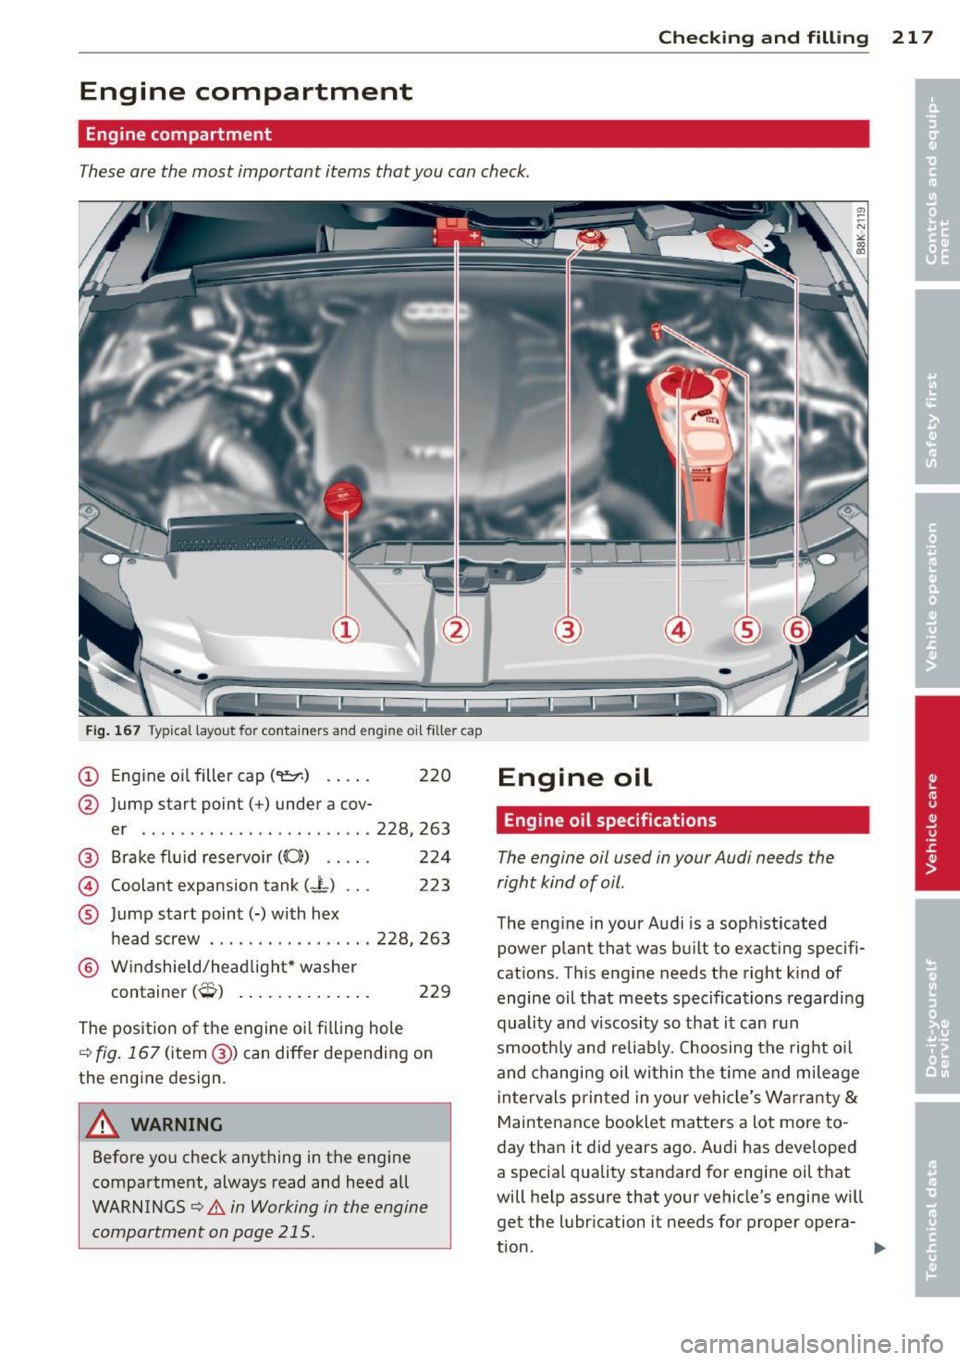
These are the most important items that you can check.
Fig. 167 Typical layout for containers and engine oil filler cap
(D Eng ine oi l filler cap (
er .. .. ... ....... ........ .. 228,263
@ Brake fl uid reservo ir
((0)) . . . . . 224
@ Coolant expansion tank (J-) . . . 223
® Jump start point(-) with hex
head screw ..... .......... .. 228, 263
® Windshie ld/headlight* washer
container
(0) . . . . . . . . . . . . . . 229
The pos ition of the engine o il fi lling hole
¢ fig . 167 (item @) can differ depending on
the eng ine design.
A WARNING
-
Before yo u check anything in the engine
compartment, always read and heed all
WARNINGS¢ &. in Working in the engine
compartment on page 215.
Engine oil
Engine oil specifications
The engine oil used in your Audi needs the
right kind of oil .
The eng ine in your Audi is a sophisticated
power p lant that was bu ilt to exacting specifi
cations . This eng ine needs the right k ind of
engine oil that meets specifications regarding
quality and viscosity so that it can run
smooth ly and reliab ly. Choosing the rig ht o il
and changi ng oil within the t ime and mileage
i n tervals printed in you r vehicle's Warranty
&
Maintenance booklet matters a lot more to
day than it did years ago . Audi has developed
a specia l quality standard for engine oil that
will help assure that your vehicle's engine w ill
get the lubr ication it needs for proper opera-
tion. .,..
Page 226 of 294
224 Checking and filling
scalding from hot coolant by following
these steps.
- Turn off the eng ine and a llow it to cool
down.
- Protect your face, hands and arms from escaping flu id and steam by cover ing
the cap with a large, thick rag.
- Turn the cap slowly and very carefully
i n a counter-clockwise direction while
apply ing l ight, downwa rd p ress ure on
the top of the cap .
- To avo id being burned, do not sp ill an
tifreeze or coolant on the exhaust sys
tem or hot engine parts . Under certain
conditions, the ethylene glyco l in en
gine coolant can catch f ire .
- Antifreeze is poisonous . Always store an
tifreeze in its or iginal container and we ll
out of the reach of children .
- If you drain the coolant, it must be
caught and safely stored in a proper con
tainer clear ly marked "poison".
@ Note
- Coolant po llutes the env ironment and
could cause an engine fire . Excess coo l
ant will be forced out through the pres
sure relief valve in the cap when the en
gine becomes hot.
- If, in an emergency, on ly water can be
added, the correct ratio between water
and antifreeze
c::> page 222 must be re
stored as soon as possible .
@ For the sake of the environment
Drained coolant should not be re used. Al
ways dispose of used coolant while observ
ing all environmental regulat ions.
Radiator fan
The radiator fan switches on automatically by
itself
The radiator fan is driven by the engine via the
V-be lt . The viscous clutch regulates the speed
of the fan according to the temperature of the
coolant. An a
uxiliary electric radiator fan* switches on
and off depending on coolant temperature
and other vehicle operat ing condit ions .
After yo u sw itch the engine off, the aux iliary
f an can continue running for up to 10 minutes
- eve n wit h the ignition off. It can even switc h
on again later by itself
c::> &. , if
- t he tempe rature of the engine coo lant rises
due to the heat build -up from the engine in
the engine compartment, or
- the engine compa rtment heats up because
the vehicle is parked in i ntense sunlight.
_& WARNING
- To reduce the risk of personal in jury nev
er touch the radiator fan.
- The auxiliary electric fan is temperat ure
controlled and can sw itch on suddenly
even when the engine is not running.
- The a uxiliary radiator fan sw itches on a u
tomatically when the engine coo lant
reaches a certai n temperature and will
continue to run until the coolant temper
ature drops.
Brake fluid
Checking brake fluid level
The brake fluid level can be checked with a
quick glance.
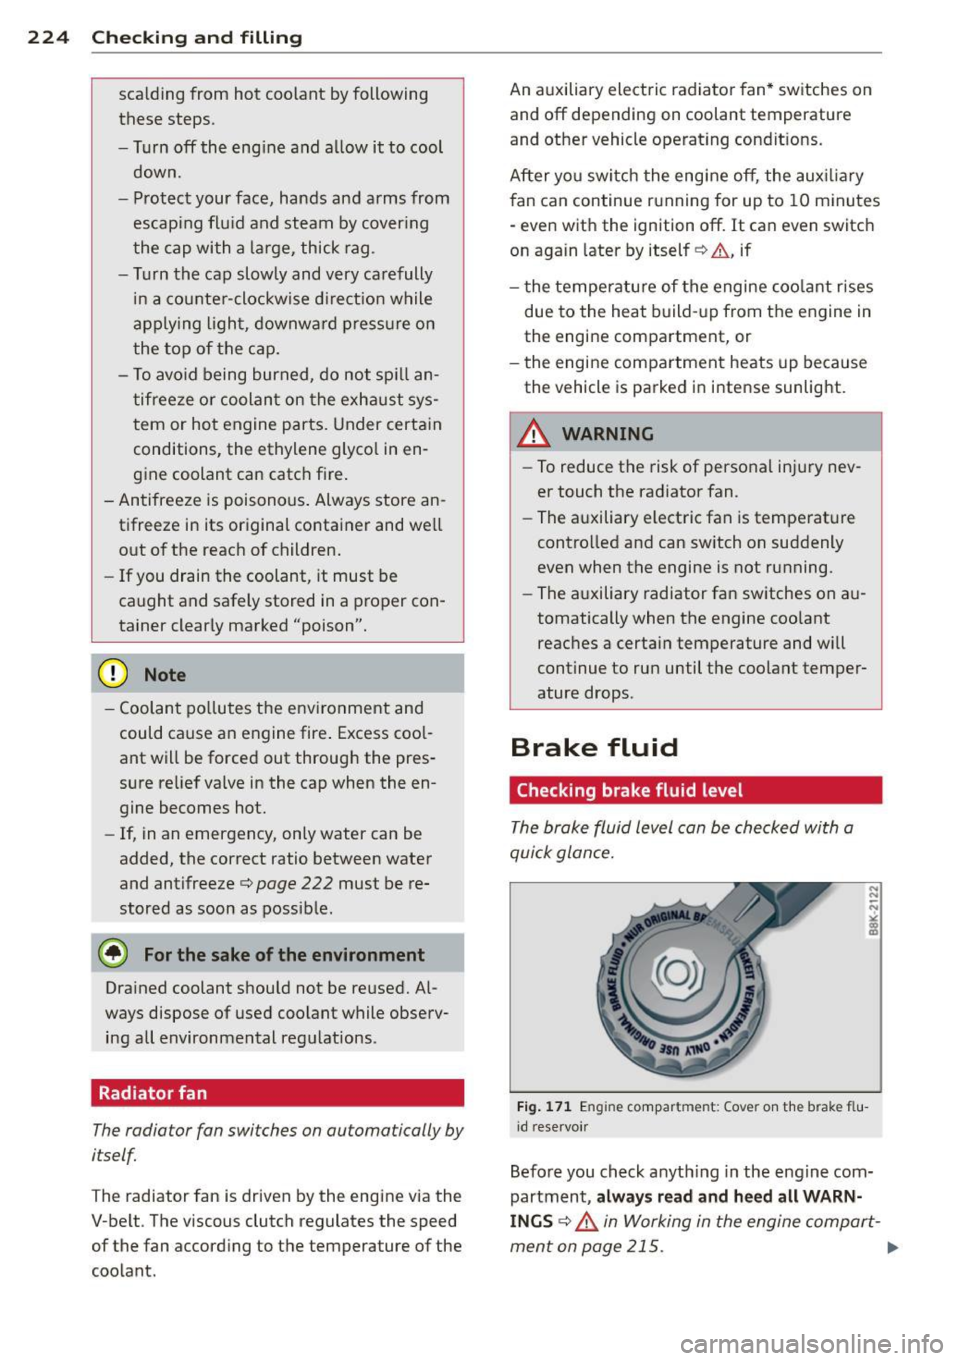
F ig . 17 1 Eng ine compartment: Cover on the brake flu
i d reservo ir
Before you check a nyth ing in the engine com
partment,
always read and h eed all WARN
INGS c::> .&. in Working in the engine compart-
ment on page 215. .,..
Page 227 of 294
~ Read the brake fluid level from the brake
fluid reservoir ¢
fig. 171, ¢ page 217,
fig . 167.
T he brake fluid level must be be
tween the "MIN" and "MAX" markings.
The brake f luid reservoir is located at the rear
partition of the engine compartment on the
l eft side ¢
page 217 .
The fluid level may drop slightly after some
time due to the automatic adjustment of the brake pads . This is not cause for alarm .
If the brake fluid level falls considerably be
l ow the "M IN" mark, the bra ke wa rning/ind i
cator light (U .S . mode ls:
1111 , Canadian
models: .) will come on
¢ page 15. Do not
continue to operate the vehicle. The complete
brake system shou ld be thoroughly checked
by an authorized Audi dealer or qualified
workshop and the cause co rrected . If the
b rake fluid level is too low, the b rake wa rn ing/
i nd icator lig ht w ill illuminate . Co ntact an a u
thor ized Audi dealer immediately.
@ Tips
The brake f luid rese rvoir is located unde r
neath the cove r.
Changing brake fluid
Have the brake fluid changed by an experi
enc ed technician .
Brake fluid ab sorbs moisture from the a ir. If
the water content in the brake fluid is too
hi gh, corrosion in the b rake system may result
after a per iod of t ime . The bo iling po int of t he
b ra ke fluid w ill also decrease con siderab ly and
d ec rease brak ing per forman ce.
Therefore, the brake flu id must be changed
every two year s. Always use new b ra ke fluid
which confo rms to Fede ral Motor Vehicle
S tand ard "FMVSS 1 16 DOT 4".
The brake flu id rese rvoir can be difficult to
r eac h, therefo re , we recommend that yo u
have the brake fl uid changed by yo ur aut ho r
iz ed Audi dealer. Your dealer has the correc t
Checking and fillin g 225
tools, the right brake fl uid and t he know -how
to do this for you .
A WARNING
- Brake fl uid is poisonous. It must be stor
ed only in the closed or iginal container
out of the reach of children!
- Brake failure can res ult from o ld or inap
propriate brake f lu id. Observe these pre
cautions:
- Use only brake fluid th at mee ts SA E
spe cificat ion
J 17 03 and conforms to
Fe dera l Mo to r Ve hicl e Standard 1 16.
Always check with yo ur autho rized Au di
dealer to make sure yo u are using the
correct brake fluid. The c orrect type of
brake f luid is also ind icated on t he
brake f luid reservoir .
- The bra ke fl uid must be new. Heavy use
of the brakes ca n cause a vapor lock if
the b rake fluid is left i n the system too
long. This can se riously affect the effi
c iency of the b rakes as well as your
safety , T his could result in an accide nt.
(!) Note
Brake fluid will damage the pai nt of your
vehicle.
@) For the sake of the environment
Because of the prob lem of proper disposal
of brake fluid as well as the spec ial too ls
r equired an d th e nec essary exper tise, w e
r ecomme nd that yo u have th e brake flu id
c hanged by yo ur aut ho rize d Aud i dea le r.
Battery
General information
U nder normal operating cond itions, the bat
te ry in your Audi does not need any ma inte
nance . With
high outside temperat ures or
lo ng da ily drives we recommend that you have
t h e e lectrolyte leve l che cked by an autho riz ed
A udi de aler or qu alified workshop. The elec
tro lyte leve l should also be checked e ach time
the battery is charged
¢ page 2 28 . 1J1>
•
•
Page 255 of 294

-To he lp prevent the vehicle from moving
sudden ly and possibly slipping off the
jack, always fully set the parking brake and block the whee l diagona lly opposite
the wheel being cha nged with the fold
ing chocks o r othe r objects. When one
front whee l is lifted off the g ro und, plac
ing the A utomat ic Transm iss ion in "P"
(Park) wi ll
not prevent the vehi cle from
moving .
- Before you change a wheel, be su re the
ground is level and f irm . If necessa ry,
use a sturdy board under the jack.
- After installing the spare tire, make s ure
that you replace the flat ti re/wheel in its
storage area proper ly and tighten the
knur led retain ing screw securely .
Q;) Note
If you are changing the wheel on a steep
incline, use a rock or similar object to
block the opposite wheel to prevent the
veh icle from mov ing.
Obey all laws .
Changing a wheel
When you change a wheel, follow the se
quence described below step -by-step and in
exactly that order.
1. Remove the d ec orative wheel c ove r* or
the
wheel bolt cap s*. Fo r more de tails see
a lso
¢ page 2 54, Decorative wheel cov
ers
or ¢ page 2 54, Wheels with wheel
bolt caps.
2 . Loosen the wheel bolts ¢ page 254.
3. Locate the proper mount ing po int for the
jack and align the jack below that point
¢ page 255.
4. Lift the car with the jack ¢ page 2 55.
S. Remove the wh eel with th e flat tire and
then install the
s pare tire¢ page 256.
6. Tighten all wheel bo lts light ly .
7.
Lower the vehicle with the jac k.
What do I do now? 253
8. U se the wheel bolt w rench and firmly
tighten a ll wheel bolts in a crisscross pat
te rn ¢
page 254.
9. Replace the decorati ve wheel co ver* or
the
wheel bolt caps* .
A WARNING
Always read and fo llow all WARNINGS and
info rmat ion¢
A in Raising the vehicle on
page 255
and ¢ page 257.
After changing a wheel
A wheel change is not complete without the
doing the following.
.,. Always store the vehicle tool kit, the jack*,
and the replaced tire in the luggage com
partme nt
¢ page 132.
.,. Check the tire pr essure of the spare ti re as
soon as possible.
.,. As soon as possib le, have the
ti ght ening
torque s
on all wheel bolts chec ked w ith a
torque wrench . The correct tightening tor
que
i s 90 ft l bs. (120 Nm) .
.,. Have the flat tire replaced as soon as possi
ble .
(D Tips
-If you notice that the wheel bo lts a re
corroded and difficult to turn while
chang ing a tire, they should be replaced
before you check the tightening torque.
- Dr ive at reduced speed until you have the
tightening torques checked. •
•
Page 257 of 294
@ Tips
-Never use the hexagonal socket in the
handle of the screwdriver to loosen or
tighten the wheel bolts.
- If a whee l bolt is very tight, you may find
it easier to loosen by carefully pushing
down on the end of the wheel bolt
wrench w ith
one foot only. As you do so,
hold on to the car to keep your ba lance
and take ca re not to slip.
Raising the vehicle
The vehicle must be li~ed with the jack first
before the wheel can be removed .
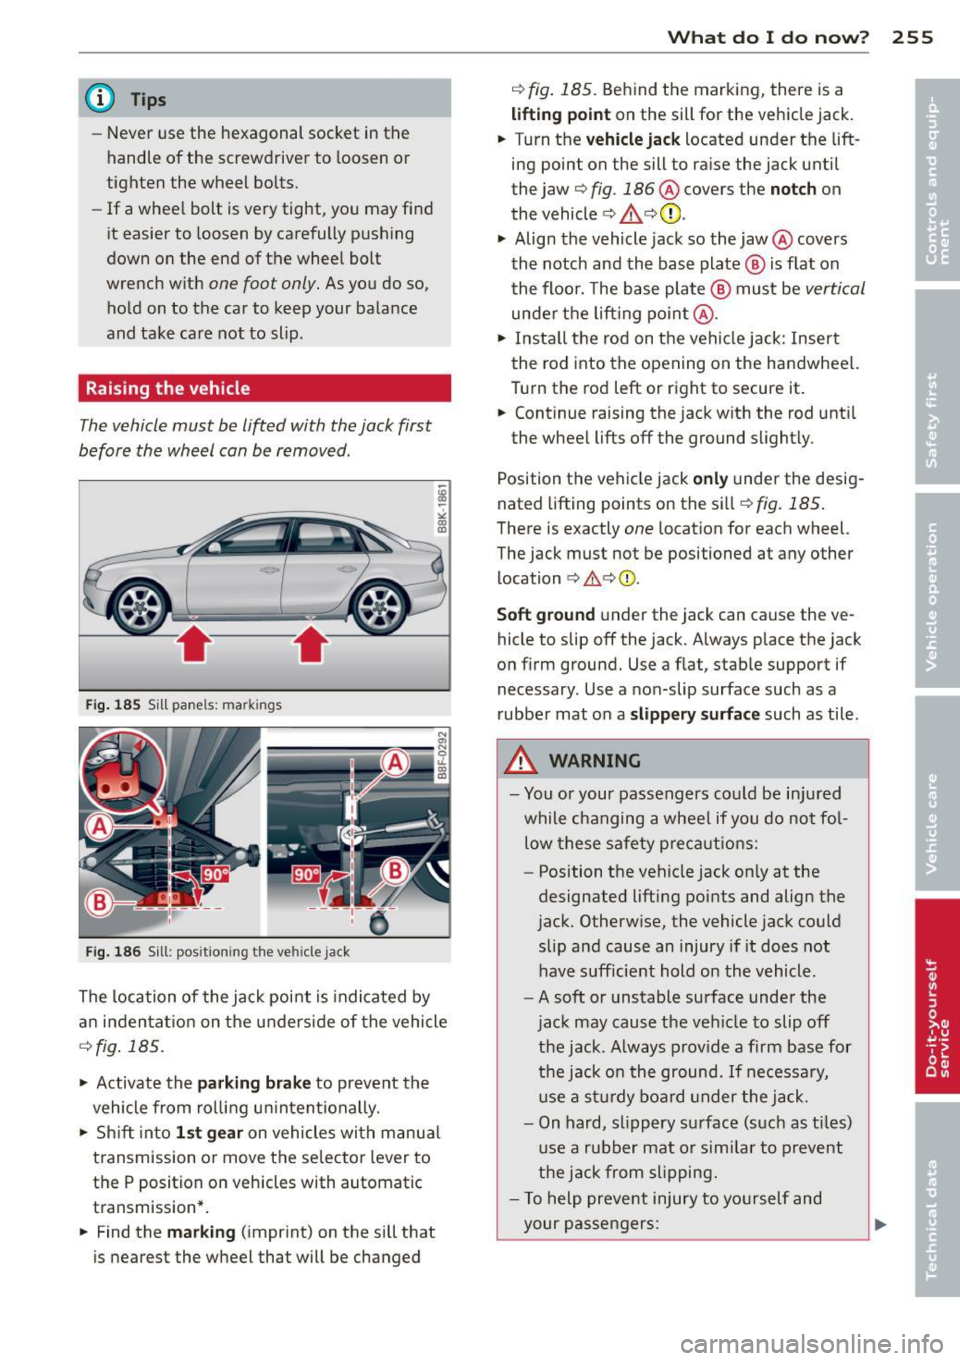
Fig. 1 85 Sill pane ls: ma rki ngs
Fi g. 186 Sill: posit ion ing the ve hicle jack
The location of the jack point is indica ted by
a n in den ta ti on on the underside of the vehicle
Q fig . 185.
"' Activate the parking brake to prevent the
vehicle from ro lling u ninten tionally.
"' Sh ift into
1 st gear on vehicles with m anua l
transmission or move the se lector lever to
the P position on vehicles with automatic
transmission* .
"' Find the
mark ing (imprint) on the sill that
is nearest the wheel that will be changed
What do I d o now ? 255
¢ fig. 185. Behind the marking, there is a
lifting point on the sill for the vehicle jack.
"' Turn the
vehicle jack located under the lift
ing point on the sill to ra ise the jack until
the jaw ¢
fig. 186 @ covers the notch on
the vehicle
¢ & ¢ (D .
"' Align the vehicle jack so the jaw@ covers
th e notch and the base plate @ is flat on
the floor. The base plate @ must be
vertical
unde r th e lift ing po in t @ .
"' Insta ll the rod on the vehi cle jack: Insert
the rod into the opening on the handwheel.
Turn the rod left or right to secure it.
"' Cont inue raising the jack w ith the rod unt il
the wheel lifts off the ground slightly.
Position the veh icle jack
only under the desig
nated lifting points on the sill ¢
fig. 185 .
There is exactly one location for each wheel.
The jack must not be positioned at any other location
¢ ,&. ¢(I) .
Soft ground under the jack can cause the ve
hicle to slip off the jack. Always place the jack
on f irm ground. Use a f lat, stab le support if
necessary . Use a non-slip surface such as a
rubber mat on a
s lipp ery surface such as tile .
A WARNING
-You or your passengers co uld be in ju red
while c hanging a whee l if you do no t fo l
low these safety p re ca utions:
- Position t he veh icle jack on ly at the
designated lifting poi nts and align the
jack. Otherw ise, the vehicle jack could
slip a nd cause an injury if it does not
have sufficie nt hold o n the vehicle.
- A soft or unstable surface under the
jac k may cause the ve hicle to slip off
the jack . A lways prov ide a fi rm base for
the jack o n the ground. If necessa ry,
u se a st ur dy boa rd under the jack .
- On hard, sl ippery su rface (such as t iles)
u se a rubber mat or simi lar to prevent
the j ack from slipping.
- T o help preve nt injury to yo urself and
your pas sengers:
Page 258 of 294

256 What do I do now?
-Do not raise the vehicle unti l yo u are
sure the jack is securely engaged.
- Passengers must not remain in the ve
h icle when it is jacked up.
- Make sure that passengers wait in a
safe p lace away from the vehicle and
well away from the road and traffic.
- Make sure jack position is correct, ad
just as necessary and then continue to ra ise the jack.
CD Note
Do not lift the vehicle by the sill. Position
the vehicle jack only at the designated lift
ing points on the sill. Otherwise, your vehi
cle will be damaged.
Taking the wheel off/installing the spare
tire
Follow these instructions step-by-step for
changing the wheel .
Fig. 187 Changing a w hee l: usi ng the screwdriver han ·
dle (with the blade r~mo ved) to turn th e bo lts
Fig. 188 C hangin g a w hee l: alig nmen t pin inside the
to p hole
After you have loosened a ll wheel bolts and
ra ised the veh icle off the ground, remove and
replace the wheel as follows:
Removing the wheel
.,. Remove the topmost whee l bolt completely
with the
hexagonal socket in the screwdriv
er handle (vehicle tool kit)¢
fig. 187 and
set it aside on a
clean surface .
.,. Screw the threaded end of the
alignment
pin
from the tool kit hand-t ight into the
empty bolt hole ¢
fig. 188.
.,. Then remove the other wheel bolts as de
scribed above.
.,. Ta ke off the wheel leaving the alignment
pin in the bolt hole
c::>(D .
Putting on the inflatable spare tire
.,. Push the spare tire over the alignment p in.
.,. Screw on the wheel bolts and tighten them
slightly using the hexagonal socket .
.,. Remove the alignment pin and insert and
tighten the remain ing wheel bolt slightly
like the rest.
.,. Turn the jack hand le counter -clockwise to
lower the veh icle until the jack is fully re
leased .
.,. Use the wheel bolt wrench to tighten all
wheel bolts firmly
c::> page 254 . Tighten
them
in a crisscross pattern, from one bolt
to the (approximately) opposite one, to keep
the wheel centered .
.,. Perform the steps required after changing
the wheel
c::> page 253, After changing a
wheel.
T he hexagonal socket ma kes it easier to re
move the wheel bolts from the rim. Care
should be tak en when removing the reversible
blade .
CD Note
When removing or installing the wheel,
the rim could hit the brake rotor and dam
age the rotor. Work carefu lly and have a
second person to help you.
(D Tips
-When mounting tires with unidirectional
tread design
make sure the tread pat
tern is pointed the right way
c::>page257. ..,.