2013.5 PEUGEOT 5008 radio
[x] Cancel search: radioPage 286 of 404

284
04
NAV2AB C3DEF5JKL4GHI6MNO8TUV7PQR S9WXYZ0*#
1RADIO MEDIA NA
V TRAFFIC
SETUPADDR
BOOK
2ABC3DEF5JKL4GHI6MNO8TUV7PQR S9WXYZ0*#
1RADIO MEDIA NA
V TRAFFIC
SETUPADDR
BOOK
2ABC3DEF5JKL4GHI6MNO8TUV7PQR S9WXYZ0*#
1RADIO MEDIA NA
V TRAFFIC
SETUPADDR
BOOK
2ABC3DEF5JKL4GHI6MNO8TUV7PQR S9WXYZ0*#
1RADIO MEDIA NA
V TRAFFIC
SETUPADDR
BOOK
2ABC3DEF5JKL4GHI6MNO8TUV7PQR S9WXYZ0*#
1RADIO MEDIA NA
V TRAFFIC
SETUPADDR
BOOK
2ABC3DEF5JKL4GHI6MNO8TUV7PQR S9WXYZ0*#
1RADIO MEDIA NA
V TRAFFIC
SETUPADDR
BOOK
2ABC3DEF5JKL4GHI6MNO8TUV7PQR S9WXYZ0*#
1RADIO MEDIA NA
V TRAFFIC
SETUPADDR
BOOK
Adding a stopover
Enter a new address, for example.
Once the new address has been entered, select "Start route guidance" and press OK to confi rm.
Position the stopover on the list and press OK to confi rm.
Press the NAV button.
Press the NAV button again or select the "Navigation" Menu function and press OK to confi rm.
Select the "Add stopover" function (5 stopovers maximum) and press OK to confi rm.
Select the "Stopovers" function and press OK to confi rm.
"Navigation" Menu"Navigation" Menu
StopoversStopovers
Add stopoverAdd stopover
Address inputAddress input
To change the stopovers, repeat operations 1 to 3 and select "Rearrange route" (select a stopover, delete it or move it on the list using the ring to change the order, confi rm its new position and fi nish with "Recalculate").
Stopovers can be added to or deleted from the route once the destination\
has been selected.
Repeat operations 1 to 7 as many times as necessary then select "Recalculate" and press OK to confi rm.
Start route guidanceStart route guidance
NAVIGATION - GUIDANCE
Page 287 of 404
285
04
NAV2AB C3DEF5JKL4GHI6MNO8TUV7PQR S9WXYZ0*#
1RADIO MEDIA NA
V TRAFFIC
SETUPADDR
BOOK
2ABC3DEF5JKL4GHI6MNO8TUV7PQR S9WXYZ0*#
1RADIO MEDIA NA
V TRAFFIC
SETUPADDR
BOOK
2ABC3DEF5JKL4GHI6MNO8TUV7PQR S9WXYZ0*#
1RADIO MEDIA NA
V TRAFFIC
SETUPADDR
BOOK
2ABC3DEF5JKL4GHI6MNO8TUV7PQR S9WXYZ0*#
1RADIO MEDIA NA
V TRAFFIC
SETUPADDR
BOOK
2ABC3DEF5JKL4GHI6MNO8TUV7PQR S9WXYZ0*#
1RADIO MEDIA NA
V TRAFFIC
SETUPADDR
BOOK
2ABC3DEF5JKL4GHI6MNO8TUV7PQR S9WXYZ0*#
1RADIO MEDIA NA
V TRAFFIC
SETUPADDR
BOOK
2ABC3DEF5JKL4GHI6MNO8TUV7PQR S9WXYZ0*#
1RADIO MEDIA NA
V TRAFFIC
SETUPADDR
BOOK
2ABC3DEF5JKL4GHI6MNO8TUV7PQR S9WXYZ0*#
1RADIO MEDIA NA
V TRAFFIC
SETUPADDR
BOOK
NAVIGATION - GUIDANCE
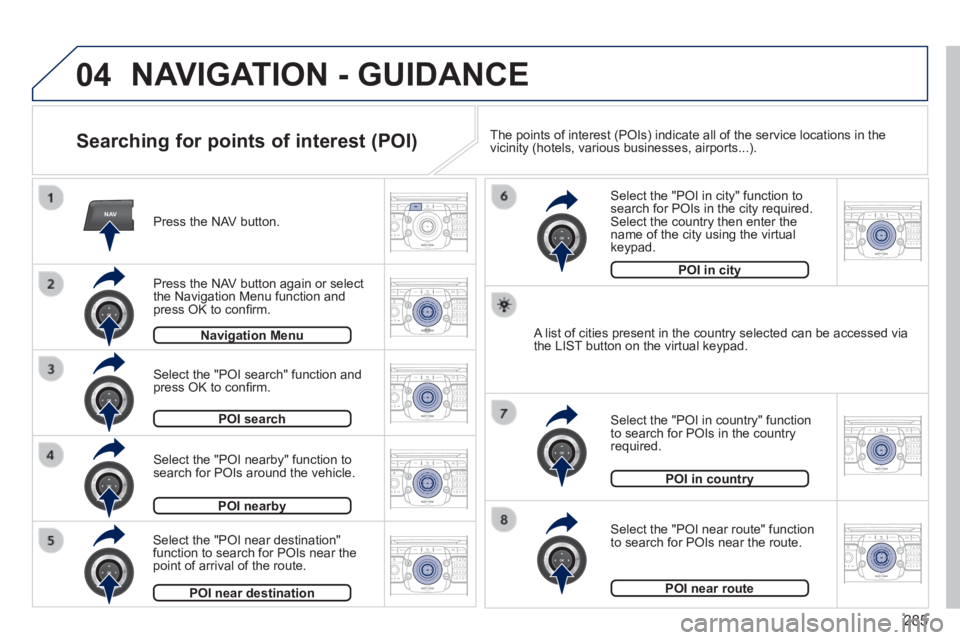
Searching for points of interest (POI)
Press the NAV button.
Press the NAV button again or select the Navigation Menu function and press OK to confi rm.
Select the "POI nearby" function to search for POIs around the vehicle.
Select the "POI search" function and press OK to confi rm.
Navigation MenuNavigation Menu
POI search
POI nearbyPOI nearby
Select the "POI in city" function to search for POIs in the city required. Select the country then enter the name of the city using the virtual keypad.
Select the "POI near route" function to search for POIs near the route.
Select the "POI in country" function to search for POIs in the country required.
Select the "POI near destination" function to search for POIs near the point of arrival of the route.
POI near destination
POI in countryPOI in country
POI near route
A list of cities present in the country selected can be accessed via the LIST button on the virtual keypad.
POI in cityPOI in city
The points of interest (POIs) indicate all of the service locations in\
the vicinity (hotels, various businesses, airports...).
Page 289 of 404

287
04
NAV2AB C3DEF5JKL4GHI6MNO8TUV7PQR S9WXYZ0*#
1RADIO MEDIA NA
V TRAFFIC
SETUPADDR
BOOK
2ABC3DEF5JKL4GHI6MNO8TUV7PQR S9WXYZ0*#
1RADIO MEDIA NA
V TRAFFIC
SETUPADDR
BOOK
NAVIGATION - GUIDANCE
Download the "POIs" update fi le onto an SD card or USB memory stick from the Internet. This service is available at http://peugeot.navigation.com.
Updating POIs
Settings
The fi les must be copied to the root on the chosen medium.
Insert the medium (SD card or USB memory stick) containing the POI database into the system's SD card reader or USB port.
Select the medium ("USB" or "SD-Card") used and press OK.
Press NAV, select Navigation Menu, then "Settings", then "Update personal POI".
Successful downloading is confi rmed by a message.
The system restarts.
The POIs version can be found in the SETUP System menu.
Update personal POIUpdate personal POI
Navigation MenuNavigation Menu
Page 290 of 404
288
NAV
04
2AB C3DEF5JKL4GHI6MNO8TUV7PQR S9WXYZ0*#
1RADIO MEDIA NA
V TRAFFIC
SETUPADDR
BOOK
2ABC3DEF5JKL4GHI6MNO8TUV7PQR S9WXYZ0*#
1RADIO MEDIA NA
V TRAFFIC
SETUPADDR
BOOK
2ABC3DEF5JKL4GHI6MNO8TUV7PQR S9WXYZ0*#
1RADIO MEDIA NA
V TRAFFIC
SETUPADDR
BOOK
2ABC3DEF5JKL4GHI6MNO8TUV7PQR S9WXYZ0*#
1RADIO MEDIA NA
V TRAFFIC
SETUPADDR
BOOK
2ABC3DEF5JKL4GHI6MNO8TUV7PQR S9WXYZ0*#
1RADIO MEDIA NA
V TRAFFIC
SETUPADDR
BOOK
2ABC3DEF5JKL4GHI6MNO8TUV7PQR S9WXYZ0*#
1RADIO MEDIA NA
V TRAFFIC
SETUPADDR
BOOK
NAVIGATION - GUIDANCE
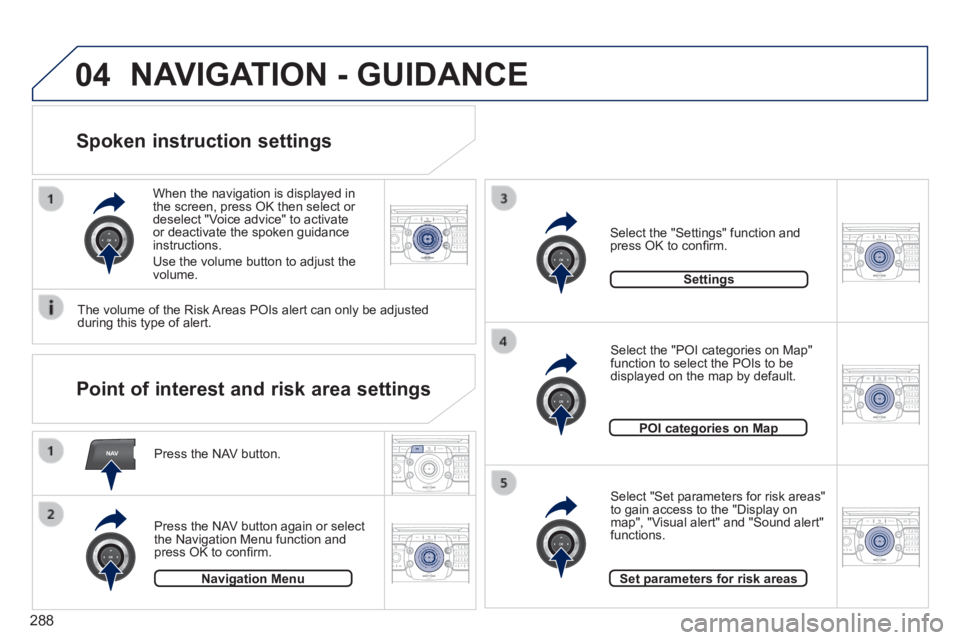
Spoken instruction settings
Press the NAV button.
Press the NAV button again or select the Navigation Menu function and press OK to confi rm.
Select the "Settings" function and press OK to confi rm.
Navigation MenuNavigation Menu
Settings
When the navigation is displayed in the screen, press OK then select or deselect "Voice advice" to activate or deactivate the spoken guidance instructions.
Use the volume button to adjust the volume.
Point of interest and risk area settings
The volume of the Risk Areas POIs alert can only be adjusted during this type of alert.
POI categories on MapPOI categories on Map
Set parameters for risk areasSet parameters for risk areas
Select "Set parameters for risk areas" to gain access to the "Display on map", "Visual alert" and "Sound alert" functions.
Select the "POI categories on Map" function to select the POIs to be displayed on the map by default.
Page 291 of 404
289
05
TRAFFIC
2ABC3DEF5JKL4GHI6MNO8TUV7PQR S9WXYZ0*#
1RADIO MEDIA NA
V TRAFFIC
SETUPADDR
BOOK
2ABC3DEF5JKL4GHI6MNO8TUV7PQR S9WXYZ0*#
1RADIO MEDIA NA
V TRAFFIC
SETUPADDR
BOOK
2ABC3DEF5JKL4GHI6MNO8TUV7PQR S9WXYZ0*#
1RADIO MEDIA NA
V TRAFFIC
SETUPADDR
BOOK
2ABC3DEF5JKL4GHI6MNO8TUV7PQR S9WXYZ0*#
1RADIO MEDIA NA
V TRAFFIC
SETUPADDR
BOOK
2ABC3DEF5JKL4GHI6MNO8TUV7PQR S9WXYZ0*#
1RADIO MEDIA NA
V TRAFFIC
SETUPADDR
BOOK
TRAFFIC INFORMATION
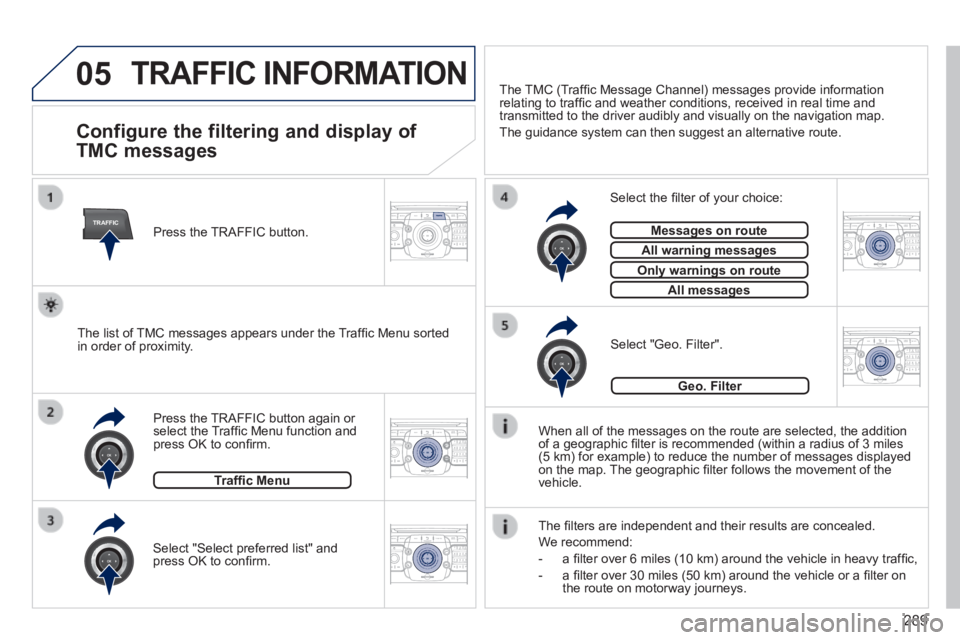
Configure the filtering and display of
TMC messages
When all of the messages on the route are selected, the addition of a geographic fi lter is recommended (within a radius of 3 miles (5 km) for example) to reduce the number of messages displayed on the map. The geographic fi lter follows the movement of the vehicle.
The fi lters are independent and their results are concealed.
We recommend:
- a fi lter over 6 miles (10 km) around the vehicle in heavy traffi c,
- a fi lter over 30 miles (50 km) around the vehicle or a fi lter on the route on motorway journeys.
Press the TRAFFIC button again or select the Traffi c Menu function and press OK to confi rm.
Select "Geo. Filter". The list of TMC messages appears under the Traffi c Menu sorted in order of proximity.
Select the fi lter of your choice:
Messages on routeMessages on route
All warning messagesAll warning messages
Only warnings on routeOnly warnings on route
All messagesAll messages
Traffi c Menu
Select "Select preferred list" and press OK to confi rm.
The TMC (Traffi c Message Channel) messages provide information relating to traffi c and weather conditions, received in real time and transmitted to the driver audibly and visually on the navigation map.
The guidance system can then suggest an alternative route.
Press the TRAFFIC button.
Geo. Filter
Page 292 of 404
290
05
2ABC3DEF5JKL4GHI6MNO8TUV7PQR S9WXYZ0*#
1RADIO MEDIA NA
V TRAFFIC
SETUPADDR
BOOK
2ABC3DEF5JKL4GHI6MNO8TUV7PQR S9WXYZ0*#
1RADIO MEDIA NA
V TRAFFIC
SETUPADDR
BOOK
TRAFFIC INFORMATION
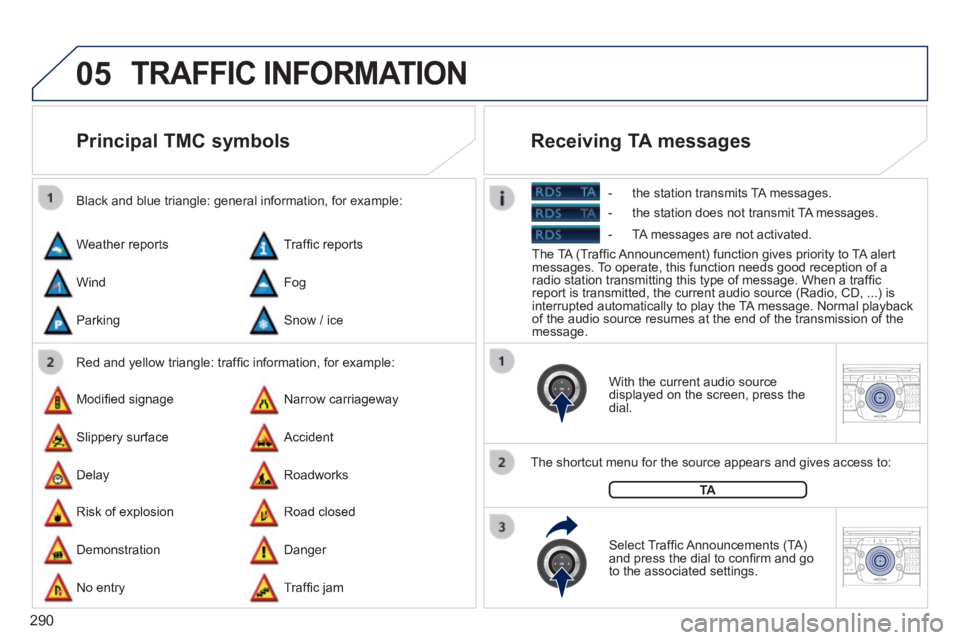
Principal TMC symbols
Red and yellow triangle: traffi c information, for example:
Black and blue triangle: general information, for example:
Weather reports
Modifi ed signage
Risk of explosion
Traffi c reports
Narrow carriageway
Road closed
Wind
Slippery surface
Demonstration
Fog
Accident
Danger
Parking
Delay
No entry
Snow / ice
Roadworks
Traffi c jam
With the current audio source displayed on the screen, press the dial.
The shortcut menu for the source appears and gives access to:
Select Traffi c Announcements (TA) and press the dial to confi rm and go to the associated settings.
TA
The TA (Traffi c Announcement) function gives priority to TA alert messages. To operate, this function needs good reception of a radio station transmitting this type of message. When a traffi c report is transmitted, the current audio source (Radio, CD, ...) is interrupted automatically to play the TA message. Normal playback of the audio source resumes at the end of the transmission of the message.
Receiving TA messages
- the station transmits TA messages.
- the station does not transmit TA messages.
- TA messages are not activated.
Page 293 of 404
291
06
RADIO
2ABC3DEF5JKL4GHI6MNO8TUV7PQR S9WXYZ0*#
1RADIO MEDIA NA
V TRAFFIC
SETUPADDR
BOOK
2ABC3DEF5JKL4GHI6MNO8TUV7PQR S9WXYZ0*#
1RADIO MEDIA NA
V TRAFFIC
SETUPADDR
BOOK
2ABC3DEF5JKL4GHI6MNO8TUV7PQR S9WXYZ0*#
1RADIO MEDIA NA
V TRAFFIC
SETUPADDR
BOOK2ABC3DEF5JKL4GHI6MNO8TUV7PQR S9WXYZ0*#
1RADIO MEDIA NA
V TRAFFIC
SETUPADDR
BOOK
RADIO NA
V TRAFFICMEDIA
RADIO NA
V TRAFFICMEDIA
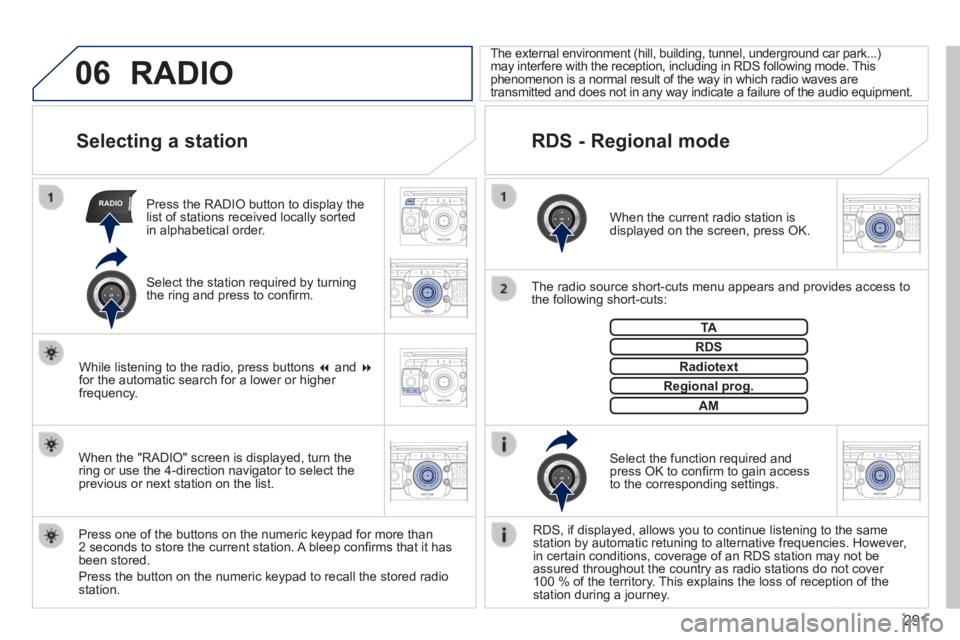
Selecting a station
When the current radio station is displayed on the screen, press OK.
The radio source short-cuts menu appears and provides access to the following short-cuts:
Select the function required and press OK to confi rm to gain access to the corresponding settings.
TA
RDS, if displayed, allows you to continue listening to the same station by automatic retuning to alternative frequencies. However, in certain conditions, coverage of an RDS station may not be assured throughout the country as radio stations do not cover 100 % of the territory. This explains the loss of reception of the station during a journey.
The external environment (hill, building, tunnel, underground car park.\
..) may interfere with the reception, including in RDS following mode. This phenomenon is a normal result of the way in which radio waves are transmitted and does not in any way indicate a failure of the audio equi\
pment.
RDS - Regional mode
Press the RADIO button to display the list of stations received locally sorted in alphabetical order.
Press one of the buttons on the numeric keypad for more than 2 seconds to store the current station. A bleep confi rms that it has been stored.
Press the button on the numeric keypad to recall the stored radio station.
RDS
Radiotext
Regional prog.Regional prog.
RADIO
When the "RADIO" screen is displayed, turn the ring or use the 4-direction navigator to select the previous or next station on the list.
While listening to the radio, press buttons and for the automatic search for a lower or higher frequency.
Select the station required by turning the ring and press to confi rm.
AM
Page 295 of 404

293
07
MEDIA
2ABC3DEF5JKL4GHI6MNO8TU V7PQRS9WXYZ0*#
1RADIOM EDIA NA
V ESC TRAFFIC
SETUPADDR
BOOK
2AB C3DEF5JKL4GHI6MNO8TUV7PQR S9WXYZ0*#
1RADIO MEDIA NA
V TRAFFIC
SETUPADDR
BOOK
2ABC3DEF5JKL4GHI6MNO8TUV7PQR S9WXYZ0*#
1RADIO MEDIA NA
V TRAFFIC
SETUPADDR
BOOK
2ABC3DEF5JKL4GHI6MNO8TUV7PQR S9WXYZ0*#
1RADIO MEDIA NA
V TRAFFIC
SETUPADDR
BOOK
2ABC3DEF5JKL4GHI6MNO8TUV7PQR S9WXYZ0*#
1RADIO MEDIA NA
V TRAFFIC
SETUPADDR
BOOK
2ABC3DEF5JKL4GHI6MNO8TUV7PQR S9WXYZ0*#
1RADIO MEDIA NA
V TRAFFIC
SETUPADDR
BOOK
RADIO NA
V TRAFFICMEDIA
Selecting / Playing
CD, MP3 / WMA CD, MP3 / WMA SD card /
USB player
The playing and displaying of an MP3/WMA compilation may depend on the recording programme and/or the parameters used. We recommend the ISO 9660 recording standard. Press the MEDIA button.
Select the "Select media" function and press OK to confi rm.
Press this button.
Select the music source required. Press OK to confi rm. Play begins.
Select media
Press the MEDIA button again or select the "Media" Menu function and press OK to confi rm.
When the "MEDIA" screen is displayed, turn the ring up or down to select the previous or next compatible source.
"Media" Menu
The list of tracks or MP3/WMA fi les appears under "Media" Menu.
Insert the audio or MP3 CD in the player, the SD card in the card reader or the USB peripheral in the USB port. Play begins automatically.
MP3 CDs, SD cards or USB peripherals are the compatible sources.
MUSIC MEDIA PLAYERS