2013.5 PEUGEOT 5008 tyre pressure
[x] Cancel search: tyre pressurePage 218 of 404

Practical information
216
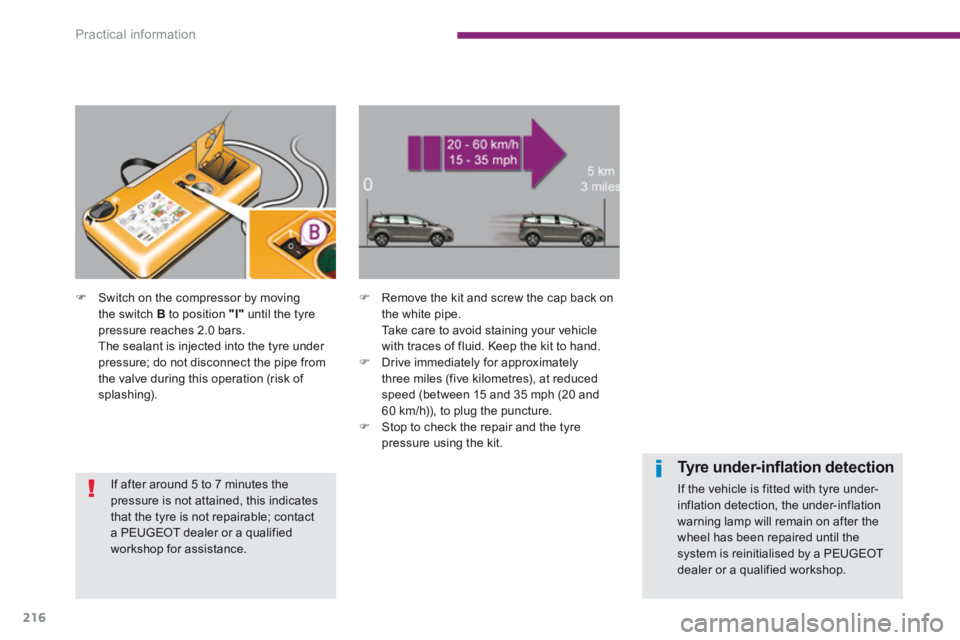
Switch on the compressor by moving the switch B to position "I" until the tyre pressure reaches 2.0 bars. The sealant is injected into the tyre under pressure; do not disconnect the pipe from the valve during this operation (risk of splashing).
Remove the kit and screw the cap back on the white pipe. Take care to avoid staining your vehicle with traces of fluid. Keep the kit to hand. Drive immediately for approximately three miles (five kilometres), at reduced speed (between 15 and 35 mph (20 and 60 km/h)), to plug the puncture. Stop to check the repair and the tyre pressure using the kit.
Tyre under-infl ation detection
If the vehicle is fitted with tyre under-inflation detection, the under-inflation warning lamp will remain on after the
wheel has been repaired until the system is reinitialised by a PEUGEOT dealer or a qualified workshop.
If after around 5 to 7 minutes the pressure is not attained, this indicates that the tyre is not repairable; contact a PEUGEOT dealer or a qualified workshop for assistance.
Page 219 of 404

11
Practical information217
Connect the compressor's electric plug to the vehicle's 12 V socket. Start the vehicle again and leave the engine running.
Turn the selector A to the "air" position. Uncoil the black pipe H fully. Connect the black pipe to the valve of the wheel.
2 . I n fl a t i o n
Adjust the pressure using the compressor (to inflate: switch B in position "I" ; to deflate: switch B in position "O" and press button C ), in accordance with the vehicle's tyre pressure label (located on the left hand door aperture). A loss of pressure indicates that the puncture has not been fully plugged; contact a PEUGEOT dealer or qualified workshop for assistance. Remove and stow the kit. Drive at reduced speed (50 mph [80 km/h] max) limiting the distance travelled to approximately 120 miles (200 km).
As soon as possible, go to a PEUGEOT dealer or a qualified workshop. You must inform the technician that you have used this kit. After inspection, the technician will advise you on whether the tyre can be repaired or if it must be replaced.
Page 220 of 404

Practical information
218
Removing the cartridge
Stow the black pipe. Detach the angled base from the white pipe. Support the compressor vertically. Unscrew the cartridge from the bottom.
Checking tyre pressures /
inflating accessories
You can also use the compressor, without injecting any product, to: - check or adjust the pressure of your tyres, - inflate other accessories (balls, bicycle tyres...).
Turn the selector A to the "Air" position. Uncoil the black pipe H fully. Connect the black pipe to the valve of the wheel or accessory. If necessary, fit one of the adaptors supplied with the kit first.
Connect the compressor's electrical connector to the vehicle's 12 V socket. Start the vehicle and let the engine run. Adjust the pressure using the compressor (to inflate: switch B in position "I" ; to deflate: switch B in position "O" and press button C ), according to the vehicle's tyre pressure label or the accessory's pressure label. Remove the kit then stow it.
Beware of discharges of fluid. The expiry date of the fluid is indicated on the cartridge. The sealant cartridge is designed for single use; even if only partly used, it must be replaced. After use, do not discard the cartridge into the environment, take it to an authorised waste disposal site or a PEUGEOT dealer. Do not forget to obtain a new sealant cartridge, available from PEUGEOT dealers or from a qualified workshop.
Page 222 of 404

Practical information
220
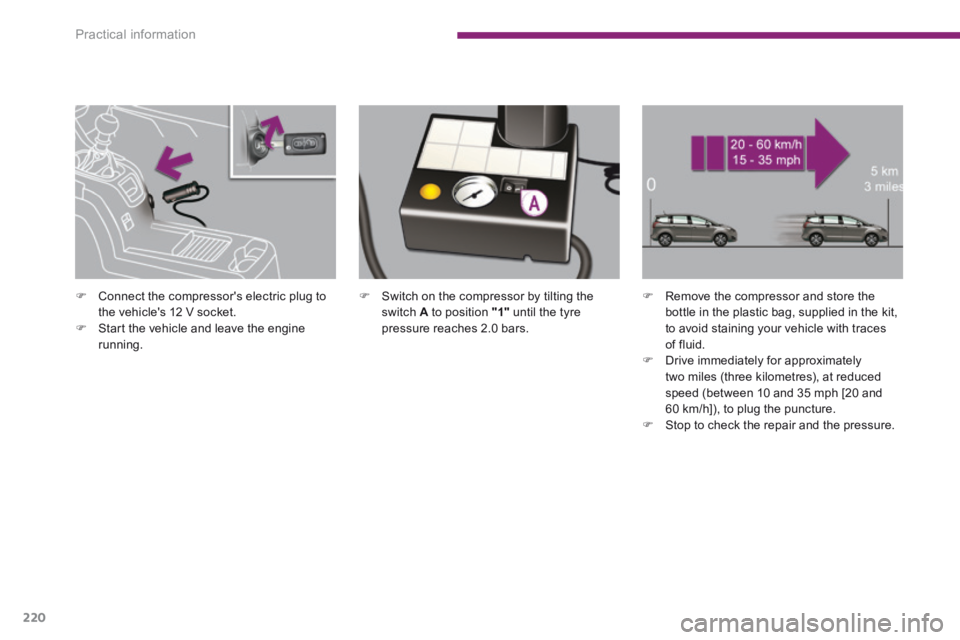
Switch on the compressor by tilting the switch A to position "1" until the tyre pressure reaches 2.0 bars.
Remove the compressor and store the bottle in the plastic bag, supplied in the kit, to avoid staining your vehicle with traces of fluid. Drive immediately for approximately two miles (three kilometres), at reduced speed (between 10 and 35 mph [20 and 60 km/h]), to plug the puncture. Stop to check the repair and the pressure.
Connect the compressor's electric plug to the vehicle's 12 V socket. Start the vehicle and leave the engine running.
Page 223 of 404

11
Practical information221
Connect the compressor pipe directly to the valve of the repaired wheel.
If this pressure has not been reached after approximately five to ten minutes, the tyre cannot be repaired; contact a PEUGEOT or a qualified workshop to have your vehicle repaired.
Connect the compressor's electric plug to the vehicle's 12 V socket again. Start the vehicle again and leave the engine running.
Adjust the pressure using the compressor (to inflate: switch A in position "1" ; to deflate: switch A in position "0" and press button B ), in accordance with the vehicle's tyre pressure label (located on the door aperture on the driver's side), then remember to check that the leak is plugged correctly (no further loss of pressure after several miles [kilometres]).
Remove the compressor, then store the whole kit. Drive at reduced speed (50 mph [80 km/h] max) for no more than approximately 125 miles (200 km). Visit a PEUGEOT dealer or a qualified workshop as soon as possible to have the tyre repaired or replaced by a technician.
Page 253 of 404

11
Practical information251
Braking
Towing a trailer increases the braking distance. To avoid overheating of the brakes on a long mountain type of descent, the use of engine braking is recommended.
Ty r e s
Check the tyre pressures of the towing vehicle and of the trailer, observing the recommended pressures.
Lighting
Check the electrical lighting and signalling on the trailer.
If the warning lamp and the STOP warning lamp come on, stop the vehicle and switch off the engine as soon as possible.
Side wind
Take into account the increased sensitivity to side wind.
Cooling
Towing a trailer on a slope increases the temperature of the coolant. As the fan is electrically controlled, its cooling capacity is not dependent on the engine speed. To lower the engine speed, reduce your speed. The maximum towed load on a long incline depends on the gradient and the ambient temperature. In all cases, keep a check on the coolant temperature.
The rear parking sensors will be deactivated automatically if a genuine PEUGEOT towbar is used.
Page 266 of 404

Technical data
264
Identifi cation markings
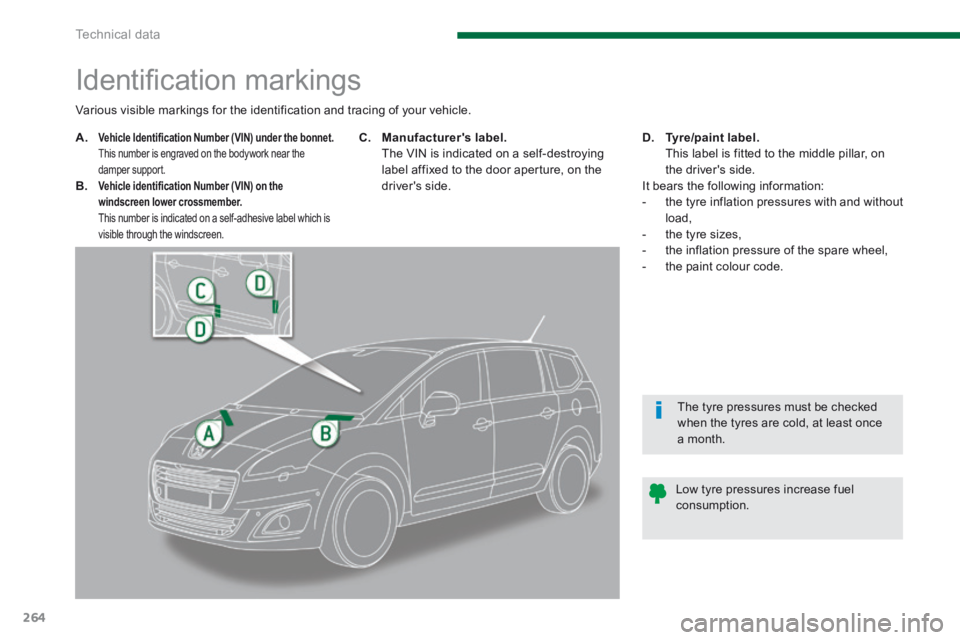
A.Vehicle Identification Number (VIN) under the bonnet. This number is engraved on the bodywork near the damper support. B. Vehicle identification Number (VIN) on the windscreen lower crossmember. This number is indicated on a self-adhesive label which is visible through the windscreen.
C. Manufacturer's label. The VIN is indicated on a self-destroying label affixed to the door aperture, on the driver's side.
D. Tyre/paint label. This label is fitted to the middle pillar, on the driver's side. It bears the following information: - the tyre inflation pressures with and without load, - the tyre sizes, - the inflation pressure of the spare wheel, - the paint colour code.
Various visible markings for the identification and tracing of your vehicle.
Low tyre pressures increase fuel consumption.
The tyre pressures must be checked when the tyres are cold, at least once
a month.
Page 390 of 404

Alphabetical index
388
Accessories ..................................................254Accessory socket, 12V ...............................117, 120, 125, 126, 130Access to the 3rd row .....................................74Adjusting headlamps ....................................107Adjusting head restraints ..........................68, 71Adjusting seat belt height .............................15 8Adjusting the steering wheel ..........................80Airbags ............................................................38Airbags, curtain .....................................16 4, 165Airbags, front.........................................162, 165Airbags, lateral ......................................16 4, 165Air conditioning ...............................................25Air conditioning, automatic .............................59Air conditioning, digital ...................................63Air conditioning, manual ...........................59, 60Air filter ..........................................................Air filter ..........................................................Air filter2 11Air flow ............................................................25Air vents ..........................................................58Alarm ...............................................................87Anti-pinch ................................................89, 124Anti-theft .........................................................84Armrest, rear .................................................Armrest, rear .................................................Armrest, rear126Assistance call .....................................265, 266Audible warning ............................................152Audio streaming (Bluetooth) .................352, 379Audio systems .................................................53Audio/video sockets ......................................296Automatic illumination of headlamps ......................................101, 10 6Automatic operation of hazard warning lamps ............................................152Automatic rain sensitive windscreen wipers ..............................109, 112Auxiliary socket .....................................353, 376Auxiliary sockets ...................................296, 374
A
D
Checks ..................................206, 207, 211, 212Child lock .......................................................151Children .........................................140, 145, 146Child seats ...........................132, 133, 137, 150Child seats, conventional ......................139, 140Closing the boot ........................................82, 94Closing the doors ......................................82, 91Cold climate screen ......................................253Colour screen, retractable ........................51, 53Concertina boards ..........................75, 125, 126Connectors, audio ..................118, 119, 374, 376Control for panoramic sunroof blind .............124Coolant level ...........................................39, 210Coolant temperature indicator ........................Coolant temperature indicator ........................Coolant temperature indicator39Courtesy lamps .............................................114Courtesy mirror .............................................Courtesy mirror .............................................Courtesy mirror118Cruise control ................................................181Cup holder ......................................Cup holder ......................................Cup holder117, 125, 126
Date (setting) ......................................44, 46, 48Deactivating ESP ..........................................157Deactivating the passenger airbag ...............162Deadlocking ....................................................82Defrosting ............................................60, 62, 78Demisting ........................................................60Dials and gauges ............................................27Diesel additive level ......................................210Dimensions ...................................................263Dipped beam .................................100, 231-233Dipstick ....................................................42, 208Directional lighting ........................................108
Backup starting .............................................245Battery ............................................211, 244-246Battery, charging ...........................................246Battery, remote control .............................85, 86Blind for panoramic sunroof ..........................Blind for panoramic sunroof ..........................Blind for panoramic sunroof124Blinds.............................................................131Bluetooth (hands-free) ..........297-299, 336, 377Bluetooth (telephone) ....................297-299, 336Bonnet ...........................................................204Bonnet stay ...................................................204Boot .................................................................94Boot lamp ..............................................116, 131Brake discs ....................................................212Brake lamps ..................................................234Brake pads ....................................................212Brakes ...........................................................212
Capacity, fuel tank ..........................................96CD MP3 .........................................................373Central locking ..........................................82, 92Centre console ..............................................11 9Changing a bulb ............................231, 234-236Changing a fuse ............................................237Changing a wheel ................................223, 225Changing a wiper blade ........................113, 248Changing the date ..............................44, 46, 48Changing the remote control battery ..............85Changing the time ..............................44, 46, 48Checking levels .....................................208 -210Checking the engine oil level ..........................42Checking tyre pressures (using the kit) ........213
B
C