2013.5 PEUGEOT 5008 spare wheel
[x] Cancel search: spare wheelPage 28 of 404

Familiarisation
26
Limit the causes of excess
consumption
Spread loads throughout the vehicle; place the heaviest items in the bottom of the boot, as close as possible to the rear seats. Limit the loads carried in the vehicle and reduce wind resistance (roof bars, roof rack, bicycle carrier, trailer...). Use a roof box in preference. Remove roof bars and roof racks after use.
At the end of winter, remove snow tyres and refit your summer tyres.
Observe the recommendations on maintenance
Check the tyre pressures regularly, when cold, referring to the label in the door aperture, driver's side.
Have your vehicle serviced regularly (engine oil, oil filter, air filter...) and observe the schedule of operations recommended by the manufacturer.
Carry out this check in particular: - before a long journey, - at each change of season, - after a long period out of use. Don't forget the spare wheel and the tyres on any trailer or caravan.
When refuelling, do not continue after the third cut-off of the nozzle to avoid any over flow.
At the wheel of your new vehicle, it is only after the first 1 800 miles (3 000 kilometres) that you will see the fuel consumption settle down to a consistent average.
Page 155 of 404

8
Safety153
Tyre under-infl ation detection
System which automatically checks the pressures of the tyres while driving. The system continuously monitors the pressures of the four tyres, as soon as the vehicle is moving. A pressure sensor is located in the valve of a each tyres (except the spare wheel). The system triggers an alert if a drop in pressure is detected in one or more tyres.
This system does not avoid the need to check the tyre pressures regularly (including the spare wheel) and before a long journey. Driving with under-inflated tyres adversely affects road holding, extends braking distances and causes premature tyre wear, particularly under arduous conditions (vehicle loaded, high speed, long journey).
The tyre pressures for your vehicle can be found on the tyre pressure label (see the "Identification markings" section). The tyre pressures must be checked when the tyres cold (vehicle stopped for 1 hour or after driving for less then 6 miles (10 km) at moderate speed). Other wise, add 0.3 bar to the values indicated on the label.
Driving with under-inflated tyres increases fuel consumption.
The tyre under-inflation detection system is an aid to driving which does
not replace the need for the driver to be vigilant or to drive responsibly.
Page 156 of 404

Safety
154
The alert is given by the fixed illumination of this warning lamp, accompanied by an audible signal, and depending on equipment, the display of a message.
Under-inflation alert
The flashing and then fixed illumination of the under-inflation warning lamp accompanied by the illumination of the "service" warning lamp indicates a fault with the system.
Operating fault
In the event of a problem on one of the tyres, the symbol or the message appears, according
to equipment, to identify it.
Reduce speed, avoid sudden steering movements or harsh brake applications. Stop as soon as it is safe to do so. In the event of a puncture, use the temporary puncture repair kit or the spare
wheel (according to equipment), or if you have a compressor, the one in the temporary puncture repair kit for example, check the four tyre pressures when cold, or if it is not possible to check the tyre pressures at the time, drive carefully at reduced speed.
The loss of pressure detected does not always lead to visible deformation of the tyre. Do not rely on just a visual check.
The alert is maintained until the tyre or tyres concerned is reinflated, repaired or replaced. The spare wheel (space-saver type or a steel rim) does not have a sensor.
This alert is also displayed when one or more wheels is not fitted with a sensor (for example, a space-saver or steel spare wheel).
In this case, monitoring of the tyre pressures is not assured.
Go to a PEUGEOT dealer or a qualified workshop to have the system checked or, following the repair of a puncture, to have the original wheel, equipped with a sensor, refitted.
Page 225 of 404

11
Practical information223
Changing a wheel *
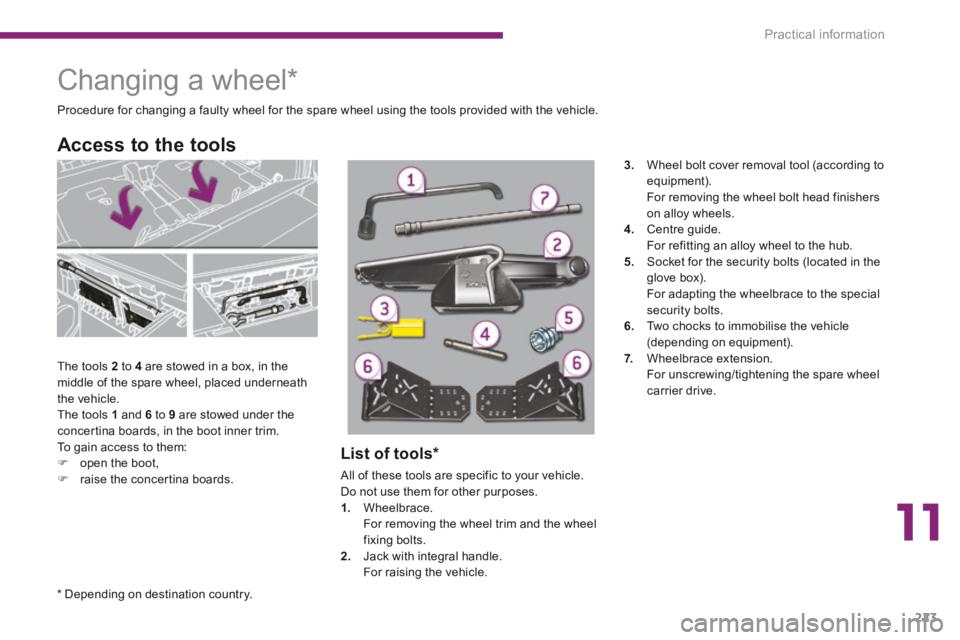
The tools 2 to 4 are stowed in a box, in the middle of the spare wheel, placed underneath the vehicle. The tools 1 and 6 to 9 are stowed under the concertina boards, in the boot inner trim. To gain access to them: open the boot, raise the concertina boards.
Access to the tools
Procedure for changing a faulty wheel for the spare wheel using the tools provided with the vehicle.
List of tools *
All of these tools are specific to your vehicle. Do not use them for other purposes. 1. Wheelbrace. For removing the wheel trim and the wheel fixing bolts. 2. Jack with integral handle. For raising the vehicle.
3. Wheel bolt cover removal tool (according to equipment). For removing the wheel bolt head finishers on alloy wheels. 4. Centre guide. For refitting an alloy wheel to the hub. 5. Socket for the security bolts (located in the glove box). For adapting the wheelbrace to the special security bolts. 6. Two chocks to immobilise the vehicle (depending on equipment). 7. Wheelbrace extension. For unscrewing/tightening the spare wheel carrier drive.
* Depending on destination country.
Page 227 of 404

11
Practical information225
Access to the spare wheel *
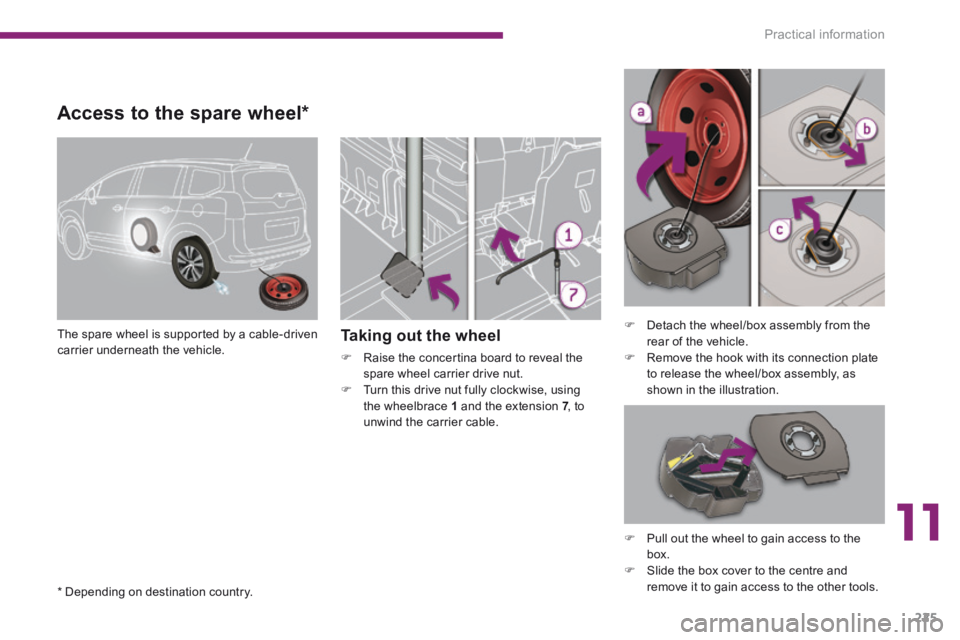
The spare wheel is supported by a cable-driven carrier underneath the vehicle. Taking out the wheel
Raise the concertina board to reveal the spare wheel carrier drive nut. Turn this drive nut fully clockwise, using the wheelbrace 1 and the extension 7 , to 7 , to 7unwind the carrier cable.
Detach the wheel/box assembly from the rear of the vehicle. Remove the hook with its connection plate to release the wheel/box assembly, as shown in the illustration.
Pull out the wheel to gain access to the box. Slide the box cover to the centre and remove it to gain access to the other tools. * Depending on destination country.
Page 228 of 404

Practical information
226
Putting the wheel back in place
Store the tools used in the box and close the cover. Position the box on the ground and centre the spare wheel on it. Pass the hook with its connection plate into the wheel then the box, as illustrated.
Raise the wheel/box assembly underneath the vehicle by turning the carrier drive nut anticlockwise using the wheelbrace 1 and the extension 7 . 7 . 7 Tighten fully and check that the wheel is horizontally flush against the floor.
Tyre under-infl ation detection
The spare wheel (space-saver or steel rim) does not have a sensor. The punctured wheel must be repaired by a PEUGEOT dealer or a qualified workshop.
Page 230 of 404

Practical information
228
Fitting the "space-saver" spare wheel
If your vehicle is fitted with alloy wheels, when tightening the bolts on fitting it is normal to notice that the washers do not come into contact with the "space-saver" spare wheel. The wheel is secured by the conical contact of each bolt.
After changing a wheel
To store the punctured wheel in the boot correctly, first remove the central cover. When using the "space-saver" type spare wheel, do not exceed 50 mph (80 km/h). Have the tightening of the bolts and the pressure of the spare wheel checked by a PEUGEOT dealer or a qualified workshop without delay. Have the punctured wheel repaired and replace it on the vehicle as soon as possible.
Position the base plate of the jack on the ground and ensure that it is directly below the location A or B used. Extend the jack until its head is in contact with A or B . Raise the vehicle until there is sufficient space between the wheel and the ground
to admit the spare (not punctured) wheel easily.
Remove the bolts and store them in a clean place. Remove the wheel.
Ensure that the jack is stable. If the ground is slippery or loose, the jack might slip and drop. Position the jack only at the locations Aor B . Ensure that the head of the jack is positioned centrally on the jacking location. Otherwise there is a risk of damage to the vehicle and the jack may drop.
Page 232 of 404

Practical information
230
Snow chains
In wintry conditions, snow chains improve traction as well as the behaviour of the vehicle when braking.
The snow chains must be fitted only to the front wheels. They must never be fitted to "space-saver" type spare wheels.
Take account of the legislation in force
in your country on the use of snow chains and the maximum running speed authorised.
Advice on installation
If you have to fit the chains during a journey, stop the vehicle on a flat sur face on the side of the road. Apply the parking brake and position any wheel chocks to prevent movement of your vehicle. Fit the chains following the instructions provided by the manufacturer. Move off gently and drive for a few moments, without exceeding 30 mph (50 km/h). Stop your vehicle and check that the snow chains are correctly tightened.
Avoid driving on roads that have been cleared of snow, to avoid damaging your vehicle's tyres and the road sur face. It is recommended that before you leave, you practise fitting the snow chains on a level and dry sur face. If your vehicle is fitted with alloy wheels, check that no part of the chain or its
fixings is in contact with the wheel rim.
Use only the chains designed to be fitted to the type of wheel fitted to your vehicle:
Original tyre size Maximum link size.
215/55 R16
9 mm 215/50 R17
215/45 R18
For more information on snow chains, contact a PEUGEOT dealer or a qualified workshop.