2013.5 Peugeot 308 CC headlamp
[x] Cancel search: headlampPage 4 of 268

2
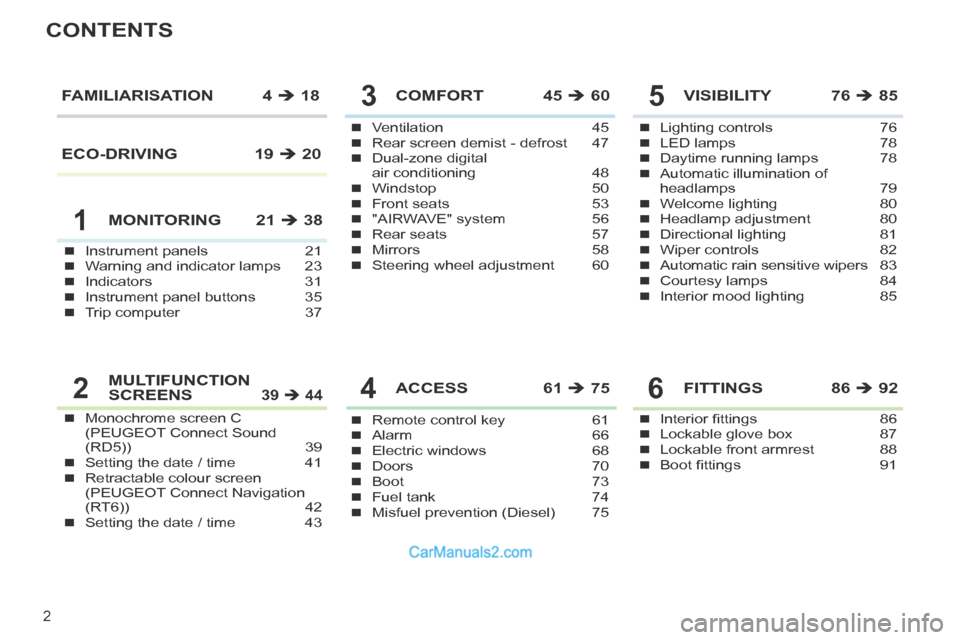
CONTENTS
Instrument panels 21Warning and indicator lamps 23Indicators 31Instrument panel buttons 35Trip computer 37
Ventilation 45Rear screen demist - defrost 47Dual-zone digital air conditioning 48Windstop 50Front seats 53"AIRWAVE" system 56Rear seats 57Mirrors 58Steering wheel adjustment 60
COMFORT 45 60
Remote control key 61Alarm 66Electric windows 68Doors 70Boot 73Fuel tank 74Misfuel prevention (Diesel) 75
ACCESS 61 75
Lighting controls 76LED lamps 78Daytime running lamps 78Automatic illumination of headlamps 79Welcome lighting 80Headlamp adjustment 80Directional lighting 81Wiper controls 82Automatic rain sensitive wipers 83Courtesy lamps 84Interior mood lighting 85
VISIBILITY 76 85FAMILIARISATION 4 18
MONITORING 21 38
Monochrome screen C (PEUGEOT Connect Sound (RD5)) 39Setting the date / time 41Retractable colour screen (PEUGEOT Connect Navigation (RT6)) 42Setting the date / time 43
MULTIFUNCTION SCREENS 39 44
Interior fi ttings 86Lockable glove box 87Lockable front armrest 88Boot fi ttings 91
FITTINGS 86 92
1
5
4
3
26
ECO-DRIVING 19 20
Page 7 of 268

61 85 74
80
5
FAMILIARISATION
Remote control key
A. Unfolding / Folding the key
(fi rst press this button).
Normal locking
(press once; fi xed lighting of
the direction indicators).
Fuel tank
1. Opening the fuel fi ller fl ap.
2. Opening and hooking the fuel fi ller cap.
Capacity of the tank: approximately
60 litres.
Unlocking and partial opening
of the boot
(press for more than two sec-
onds).
When the light is poor, detected by a
sensor, the remote switching on of the
dipped beam headlamps, sidelamps
and side spotlamps makes your ap-
proach to the vehicle easier.
In the same way, the passenger com-
partment lighting, such as the courtesy
lamps, the door sill lamps and the foot-
well lamps, comes on.
or
Deadlocking of the vehicle
(press twice in succession;
fi xed lighting of the direction
indicators).
ACCESS
Complete or selective unlock-
ing of the vehicle
(rapid fl ashing of the direction
indicators).
Locking the vehicle using the remote
control or the key also locks the glove
box and the front armrest.
Page 11 of 268

9
FAMILIARISATION
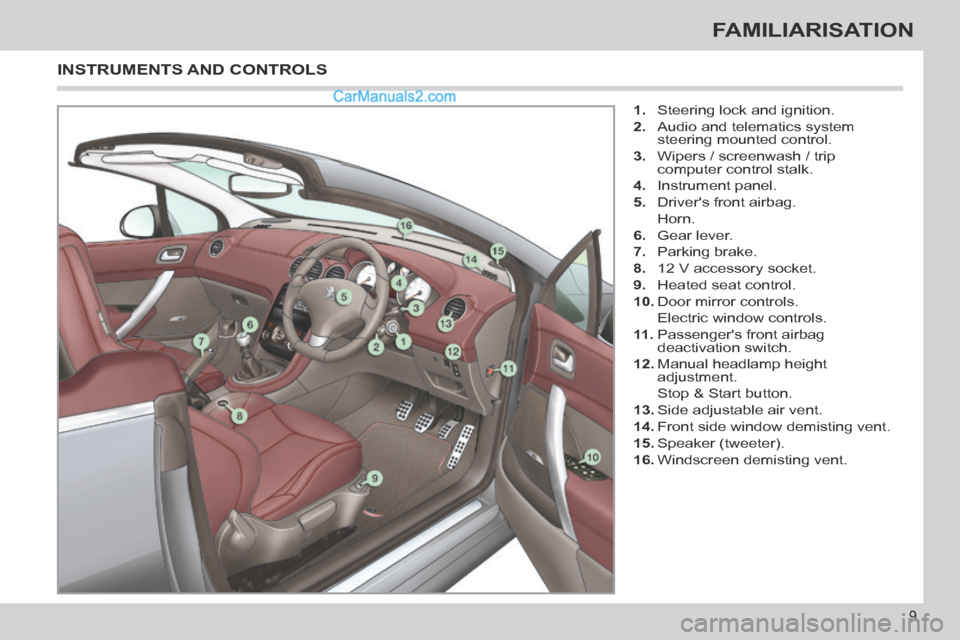
1. Steering lock and ignition.
2. Audio and telematics system steering mounted control.
3. Wipers / screenwash / trip computer control stalk.
4. Instrument panel.
5. Driver's front airbag.
Horn.
6. Gear lever.
7. Parking brake.
8. 12 V accessory socket.
9. Heated seat control.
10. Door mirror controls.
Electric window controls.
11 . Passenger's front airbag
deactivation switch.
12. Manual headlamp height adjustment.
Stop & Start button.
13. Side adjustable air vent.
14. Front side window demisting vent.
15. Speaker (tweeter).
16. Windscreen demisting vent.
INSTRUMENTS AND CONTROLS
Page 16 of 268

76 93 83 82
14
FAMILIARISATION
SEEING CLEARLY
Lighting
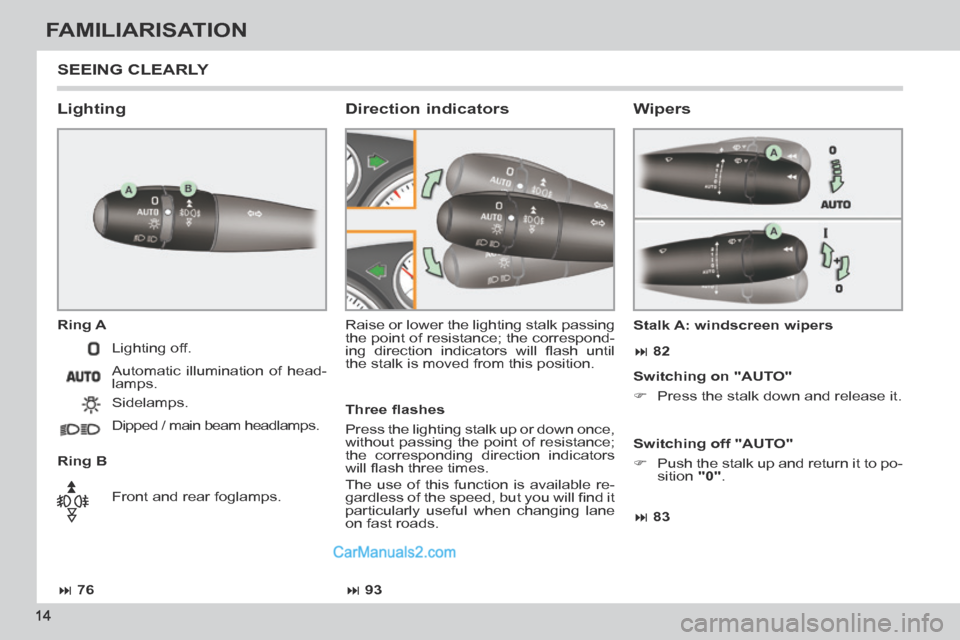
Ring A
Ring B Raise or lower the lighting stalk passing
the point of resistance; the correspond-
ing direction indicators will fl ash until
the stalk is moved from this position.
Direction indicators
Lighting off.
Automatic illumination of head-
lamps.
Sidelamps.
Dipped / main beam headlamps.
Front and rear foglamps. Stalk A: windscreen wipers
Wipers
Three fl ashes
Press the lighting stalk up or down once,
without passing the point of resistance;
the corresponding direction indicators
will fl ash three times.
The use of this function is available re-
gardless of the speed, but you will fi nd it
particularly useful when changing lane
on fast roads.
Switching on "AUTO"
Press the stalk down and release it.
Switching off "AUTO"
Push the stalk up and return it to po-
sition "0" .
Page 21 of 268

19
ECO-DRIVING
Eco-driving is a range of everyday practices that allow the motorist to \
optimise their fuel consumption and CO2 emissions.
Optimise the use of your gearbox
With a manual gearbox, move off gently and change up
without waiting. During acceleration change up early.
With an automatic or electronic gearbox, give preference to
automatic mode and avoid pressing the accelerator pedal
heavily or suddenly.
The gear shift indicator invites you engage the most suitable
gear: as soon as the indication is displayed in the instru-
ment panel, follow it straight away.
For vehicles fi tted with an electronic or automatic gearbox,
this indicator appears only in manual mode.
Drive smoothly
Maintain a safe distance between vehicles, use engine
braking rather than the brake pedal, and press the accel-
erator progressively. These practices contribute towards a
reduction in fuel consumption and CO
2 emissions and also
helps reduce the background traffi c noise.
If your vehicle has cruise control, make use of the system at
speeds above 25 mph (40 km/h) when the traffi c is fl owing
well.
Control the use of your electrical equipment
Before moving off, if the passenger compartment is too
warm, ventilate it by opening the windows and air vents
b efore using the air conditioning.
Above 30 mph (50 km/h), close the windows and leave the
air vents open.
Remember to make use of equipment that can help keep the
temperature in the passenger compartment down (s unroof
and window blinds...).
Switch off the air conditioning, unless it has automatic regu-
lation, as soon as the desired temperature is attained.
Switch off the demisting and defrosting controls, if not
a utomatic.
Switch off the heated seat as soon as possible.
Switch off the headlamps and front foglamps when the level
of light does not require their use.
Avoid running the engine before moving off, particularly in
winter; your vehicle will warm up much faster while driving.
As a passenger, if you avoid connecting your multimedia
devices (fi lm, music, video game...), you will contribute
t owards limiting the consumption of electrical energy, and
so of fuel.
Disconnect your portable devices before leaving the vehicle.
Page 27 of 268

1
25
MONITORING
Service temporarily,
accompanied
by a message. Minor faults have occurred
for which there is no
specifi c warning lamp. Identify the fault by reading the message
displayed in the screen, such as, for example:
- doors, boot or bonnet open,
- low engine oil level,
- low screenwash/headlamp wash reservoir
level,
- remote control battery fl at,
- a fault with tyre under-infl ation detection,
- saturation of the particle emission fi lter (Diesel) (see the "Checks" - "Checking
levels / Particle emissions fi lter" section).
For any other faults, contact a PEUGEOT dealer
or a qualifi ed workshop.
fi xed,
accompanied
by a message
and an audible signal. Major faults have occurred
for which there is no
specifi c warning lamp.
Identify the fault by reading the message shown
in the screen and
you must then contact a
PEUGEOT dealer or a qualifi ed workshop.
Warning lamp
is on Cause Action/Observations
Engine
autodiagnosis system fl ashing.
The engine management
system has a fault. Risk of destruction of the catalytic converter.
Have it checked by a PEUGEOT dealer or a
qualifi ed workshop.
fi xed. The emission control
system has a fault. The warning lamp should go off when the engine
is started.
If it does not go off, contact a PEUGEOT dealer
or qualifi ed workshop without delay.
Directional
headlamps fl ashing. The directional headlamps
system has a fault. Have it checked by a PEUGEOT dealer or a
qualifi ed workshop.
Page 30 of 268

1
28
MONITORING
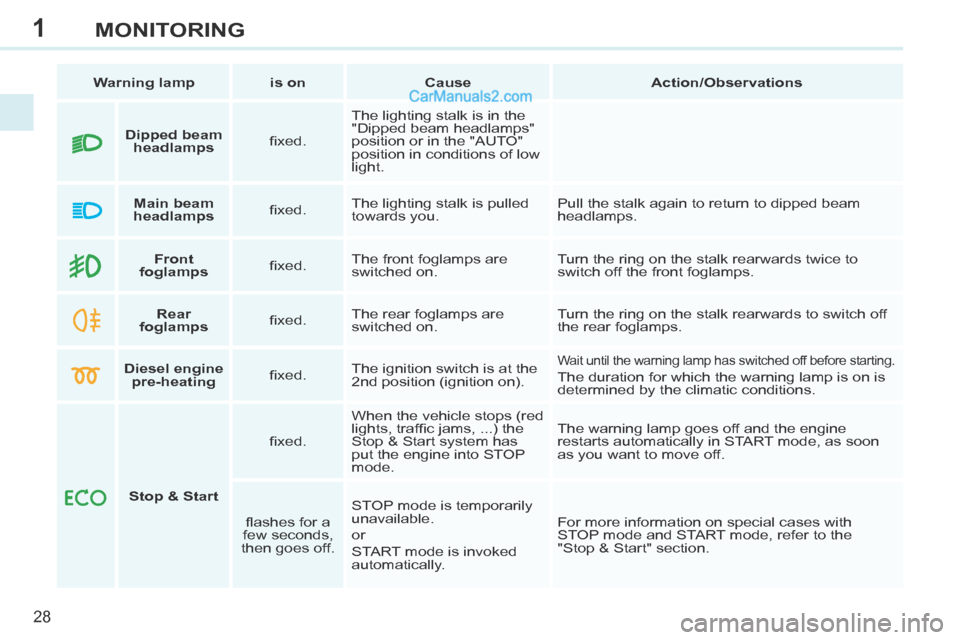
Warning lamp is on Cause Action/Observations
Front
foglamps fi xed. The front foglamps are
switched on. Turn the ring on the stalk rearwards twice to
switch off the front foglamps.
Rear
foglamps fi xed. The rear foglamps are
switched on. Turn the ring on the stalk rearwards to switch off
the rear foglamps.
Diesel engine
pre-heating fi xed. The ignition switch is at the
2nd position (ignition on).
Wait until the warning lamp has switched off before starting.
The duration for which the warning lamp is on is
determined by the climatic conditions.
Stop & Start fi xed.
When the vehicle stops (red
lights, traffi c jams, ...) the
Stop & Start system has
put the engine into STOP
mode. The warning lamp goes off and the engine
restarts automatically in START mode, as soon
as you want to move off.
fl ashes for a
few seconds,
then goes off. STOP mode is temporarily
unavailable.
or
START mode is invoked
automatically. For more information on special cases with
STOP mode and START mode, refer to the
"Stop & Start" section.
Dipped beam
headlamps fi xed. The lighting stalk is in the
"Dipped beam headlamps"
position or in the "AUTO"
position in conditions of low
light.
Main beam
headlamps fi xed. The lighting stalk is pulled
towards you. Pull the stalk again to return to dipped beam
headlamps.
Page 42 of 268

2
40
MULTIFUNCTION SCREENS
Example: setting of the duration of the
"guide-me-home" lighting
Press the " " or " " buttons, then
the "OK" button to select the menu
required.
Press the " " or " " buttons,
then the "OK" button to select the
"Guide-me-home headlamps" line. "Diagnosis vehicle"
menu
Press the "MENU" button to gain
access to the main menu.
Press the arrows, then the "OK"
button to select the " Diagnosis vehi-cle " menu. On the "
Diagnosis vehicle " menu,
select the following application:
Alert log
This summarises the active warning
messages, displaying them in succes-
sion in the multifunction screen. Once this menu has been selected, you
can consult the alert log.
Defi ne the vehicle parameters
Once this menu has been selected, you
can activate or deactivate the following
equipment:
- selective unlocking (refer to "Access"),
- "guide-me-home" lighting (refer to
"Visibility"),
- interior mood lighting (refer to "Vis- ibility"),
-
daytime running lamps (refer to "Visibility"),
- rear parking sensors (refer to "Driving").
"Personalisation-
Configuration" menu
Once this menu has been selected, you
have access to the following functions:
- defi ne the vehicle parameters,
- display confi guration,
- choice of language.
"Telephone" menu
With the PEUGEOT Connect Sound
switched on, once this menu has
been selected you can confi gure your
Bluetooth hands-free kit (pairing), con-
sult the various telephone directories
(calls log, services...) and manage your
communications (pick up, hang up, call
waiting, secret mode...).
For more information on the "Telephone"
application, refer to the PEUGEOT
Connect Sound section.