Page 84 of 268
5
82
VISIBILITY
WIPER CONTROLS
Control stalk for the various windscreen
wiping modes for clearing rain and
cleaning the windscreen.
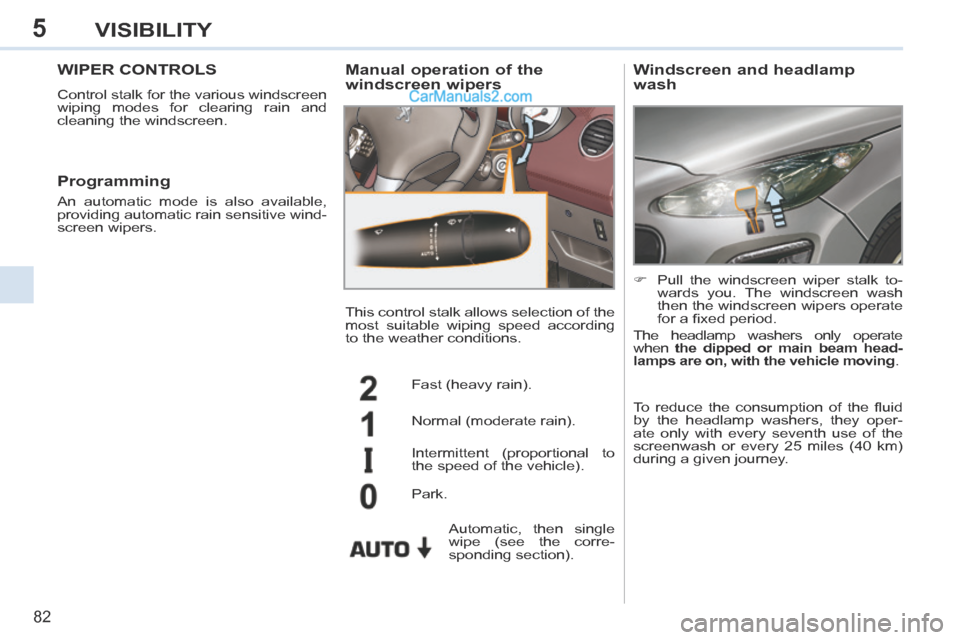
Manual operation of the
windscreen wipers
Fast (heavy rain).
Normal (moderate rain).
Intermittent (proportional to
the speed of the vehicle).
Park.
Programming
An automatic mode is also available,
providing automatic rain sensitive wind-
screen wipers. This control stalk allows selection of the
most suitable wiping speed according
to the weather conditions.
Automatic, then single
wipe (see the corre-
sponding section).
Windscreen and headlamp
wash
Pull the windscreen wiper stalk to-wards you. The windscreen wash
then the windscreen wipers operate
for a fi xed period.
The headlamp washers only operate
when the dipped or main beam head-
lamps are on , with the vehicle moving .
To reduce the consumption of the fl uid
by the headlamp washers, they oper-
ate only with every seventh use of the
screenwash or every 25 miles (40 km)
during a given journey.
Page 85 of 268
5
!
i
83
VISIBILITY
Screenwash/headlamp wash low In the case of vehicles fi tted
with headlamp washers, when
the minimum level of the res-
ervoir is reached, this warning
lamp and/or the service warning lamp
is displayed in the instrument panel, ac-
companied by an audible signal and a
message in the screen.
Next time you stop, fi ll the screenwash /
headlamp wash fl uid reservoir.
The warning lamp is displayed when
the ignition is switched on, or every time
the stalk is operated, until the reservoir
is fi lled. Automatic rain sensitive
windscreen wipers
The windscreen wipers operate automati-
cally, without any action on the part of the
driver, if rain is detected (sensor behind
the rear view mirror), adapting their speed
to the intensity of the rainfall.
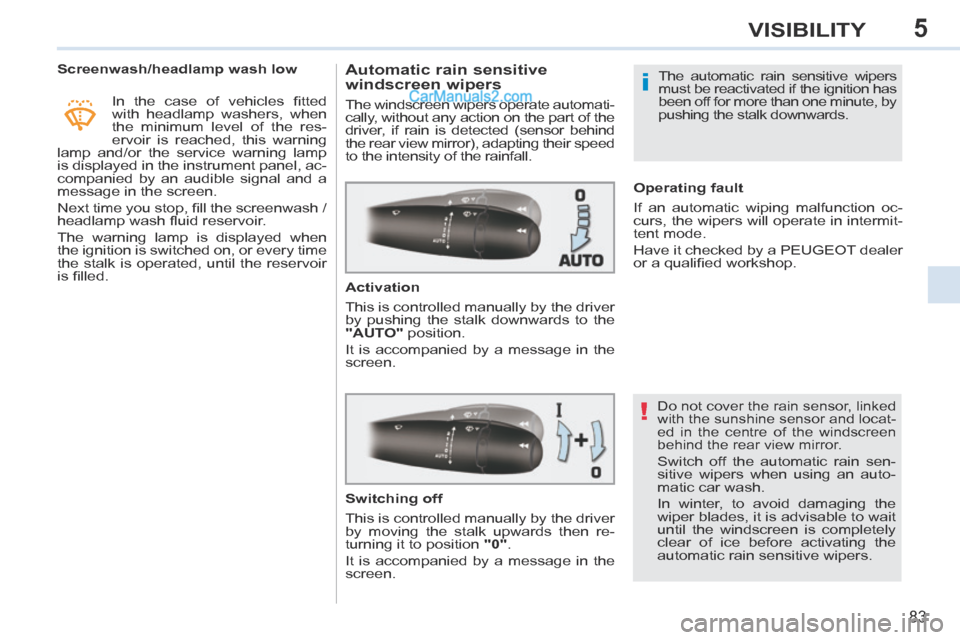
Activation
This is controlled manually by the driver
by pushing the stalk downwards to the
"AUTO" position.
It is accompanied by a message in the
screen.
Do not cover the rain sensor, linked
with the sunshine sensor and locat-
ed in the centre of the windscreen
behind the rear view mirror.
Switch off the automatic rain sen-
sitive wipers when using an auto-
matic car wash.
In winter, to avoid damaging the
wiper blades, it is advisable to wait
until the windscreen is completely
clear of ice before activating the
automatic rain sensitive wipers. The automatic rain sensitive wipers
must be reactivated if the ignition has
been off for more than one minute, by
pushing the stalk downwards.
Switching off
This is controlled manually by the driver
by moving the stalk upwards then re-
turning it to position "0" .
It is accompanied by a message in the
screen. Operating fault
If an automatic wiping malfunction oc-
curs, the wipers will operate in intermit-
tent mode.
Have it checked by a PEUGEOT dealer
or a qualifi ed workshop.
Page 135 of 268
9
133
CHECKS
PETROL ENGINES
The various caps and covers allow access
for checking the levels of the various fl uids
and for replacing certain components.
1. Power steering reservoir.
2. Screenwash and headlamp wash reservoir.
3. Coolant reservoir.
4. Brake fl uid reservoir.
5. Battery/Fuses.
6. Fusebox.
7. Air fi lter.
8. Engine oil dipstick.
9. Engine oil fi ller cap.
Page 136 of 268
9
134
CHECKS
DIESEL ENGINES
The various caps and covers allow ac-
cess for checking the levels of the various
fl uids, for replacing certain components
and for priming the fuel system.
1. Power steering reservoir.
2. Screenwash and headlamp wash reservoir.
3. Coolant reservoir.
4. Brake fl uid reservoir.
5. Battery / Fuses.
6. Fusebox.
7. Air fi lter.
8. Engine oil dipstick.
9. Engine oil fi ller cap.
10. Priming pump * .
* According to engine.
Page 139 of 268
9
!
137
CHECKS
Screenwash and headlamp
wash fluid
In the case of vehicles fi tted
with headlamp washers, the
low fl uid level is indicated by an
audible signal and a message
in the instrument panel screen.
Top up the reservoir when you next stop
the vehicle.
Fluid specifi cation
For optimum cleaning and to avoid
freezing, this fl uid must not be topped
up with or replaced with plain water. Avoid prolonged contact of used oil
or fl uids with the skin.
Most of these fl uids are harmful to
health or indeed very corrosive.
Do not discard used oil or fl uids
into sewers or onto the ground.
Take used oil to a PEUGEOT deal-
er or a qualifi ed workshop (France)
or to an authorised waste disposal
site.
Used products
Diesel fuel additive level (Diesel
with particle emissions filter)
Topping up
The reservoir must be topped up with-
out delay by a PEUGEOT dealer or a
qualifi ed workshop. The additive reservoir low level
is indicated by fi xed illumination
of this warning lamp, accompa-
nied by an audible signal and a
message that the particle emis-
sions fi lter additive level is too
low.
In wintry conditions, the use of an ethyl
alcohol or methanol base fl uid is recom-
mended.
Page 152 of 268
10
!
!
!
150
PRACTICAL INFORMATION
Risk of electrocution
Xenon bulbs (D1S) must be re-
placed by a PEUGEOT dealer or a
qualifi ed workshop.
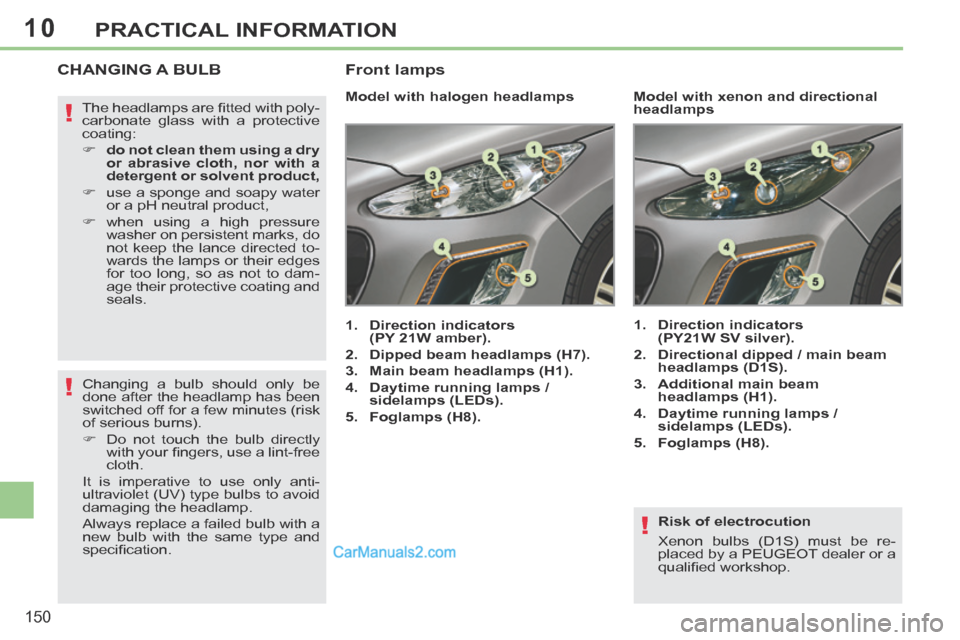
CHANGING A BULB
Model with halogen headlamps
1. Direction indicators (PY 21W amber).
2. Dipped beam headlamps (H7).
3. Main beam headlamps (H1).
4. Daytime running lamps / sidelamps (LEDs).
5. Foglamps (H8). 1. Direction indicators
(PY21W SV silver).
2. Directional dipped / main beam headlamps (D1S).
3. Additional main beam headlamps (H1).
4. Daytime running lamps / sidelamps (LEDs).
5. Foglamps (H8).
Model with xenon and directional
headlamps
The headlamps are fi tted with poly-
carbonate glass with a protective
coating:
do not clean them using a dry
or abrasive cloth, nor with a
detergent or solvent product,
use a sponge and soapy water or a pH neutral product,
when using a high pressure washer on persistent marks, do
not keep the lance directed to-
wards the lamps or their edges
for too long, so as not to dam-
age their protective coating and
seals.
Front lamps
Changing a bulb should only be
done after the headlamp has been
switched off for a few minutes (risk
of serious burns).
Do not touch the bulb directly with your fi ngers, use a lint-free
cloth.
It is imperative to use only anti-
ultraviolet (UV) type bulbs to avoid
damaging the headlamp.
Always replace a failed bulb with a
new bulb with the same type and
specifi cation.
Page 153 of 268
10
i
!
151
PRACTICAL INFORMATION
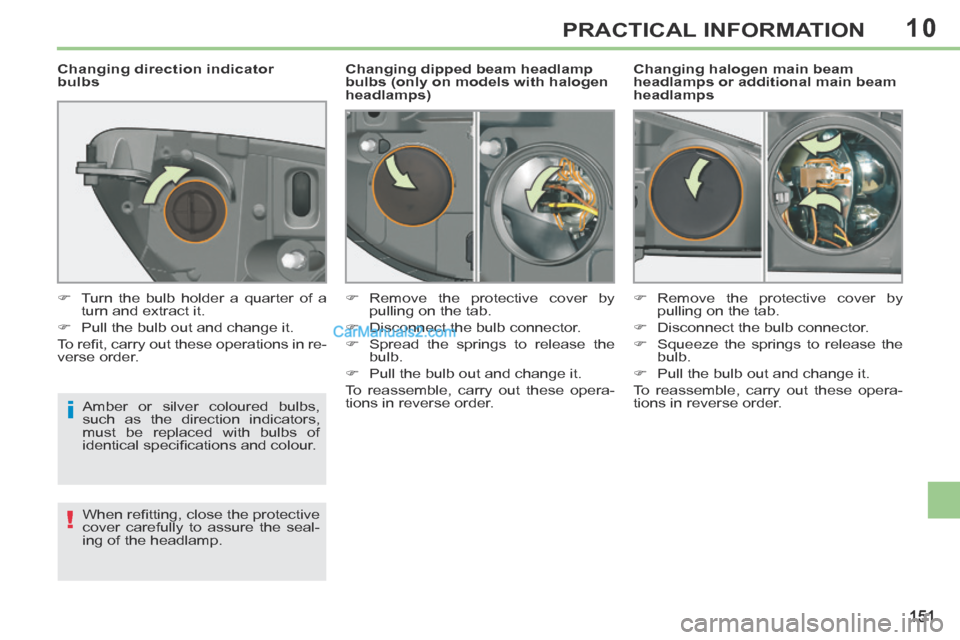
Changing halogen main beam
headlamps or additional main beam
headlamps
Changing dipped beam headlamp
bulbs (only on models with halogen
headlamps)
Changing direction indicator
bulbs
Amber or silver coloured bulbs,
such as the direction indicators,
must be replaced with bulbs of
identical specifi cations and colour.
When refi tting, close the protective
cover carefully to assure the seal-
ing of the headlamp.
Turn the bulb holder a quarter of a
turn and extract it.
Pull the bulb out and change it.
To refi t, carry out these operations in re-
verse order. Remove the protective cover by
pulling on the tab.
Disconnect the bulb connector.
Spread the springs to release the bulb.
Pull the bulb out and change it.
To reassemble, carry out these opera-
tions in reverse order. Remove the protective cover by
pulling on the tab.
Disconnect the bulb connector.
Squeeze the springs to release the bulb.
Pull the bulb out and change it.
To reassemble, carry out these opera-
tions in reverse order.
Page 156 of 268
10
!
154
PRACTICAL INFORMATION
Changing the third brake lamp
(LEDs)
For the replacement of this type of LED
lamp, contact a PEUGEOT dealer or a
qualifi ed workshop. Changing the number plate lamp
bulbs (W5W)
Insert a thin screwdriver in one of
the exterior holes of the lens.
Push it towards the outside to unclip it.
Remove the lens.
Pull the bulb out and change it. High pressure washing
When using this type of washing
on stubborn dirt, do not persist on
the headlamps, the lamps and their
surrounds to avoid damaging their
protective coating and seals.