2013.5 PEUGEOT 2008 towing
[x] Cancel search: towingPage 5 of 336

.
.
Contents
Direction indicators 123
Hazard warning lamps 123
Emergency or assistance call 124
H or n 124
ESC system 125
Grip control 128
Front seat belts 130
Airbags 133
Child seats 137
Deactivating the passenger's front airbag 139
ISOFIX child seats 146
Child lock 150
Safety
Temporary puncture repair kit 151
Changing a wheel 157
Snow chains 164
Changing a bulb 165
Changing a fuse 172
Battery 178
Electrical energy economy mode 181
Changing a wiper blade 182
Towing the vehicle 183
Towing a trailer 185
Fitting roof bars 187
Advice on care and maintenance 187
Accessories 188
Practical information
Bonnet 191
Petrol engines 192
Diesel engines 193
Fuel tank 194
Misfuel prevention (Diesel) 196
Running out of fuel (Diesel) 198
Checking levels 199
Checks 202
Checks
Petrol engines 204
Petrol weights 205
Diesel engines 206
Diesel weights 208
Dimensions 211
Identifi cation markings 212
Technical data
Emergency or assistance 213
Touch screen 215
Audio system / Bluetooth 277
Audio system 303
Audio equipment and telematics
Visual search
Alphabetical index
Page 66 of 336

64
Comfort
In order for these systems to be fully effective, follow the operation and maintenance guidelines below: To obtain an even air distribution, take care not to obstruct the exterior air intake grilles located at the base of the windscreen, the nozzles, the vents and the air outlets, as well as the air extractor located in the boot. Do not cover the sunshine sensor, located on the dashboard; this is used for regulation of the air conditioning system. Operate the air conditioning system for at least 5 to 10 minutes, once or twice a month to keep it in per fect working order. Ensure that the passenger compartment filter is in good condition and have the filter elements replaced regularly. We recommend the use of a combined passenger compartment filter. Thanks to its special active additive, it contributes to the purification of the air breathed by the occupants and the cleanliness of the passenger compartment (reduction of allergic symptoms, bad odours and greasy deposits). To ensure correct operation of the air conditioning system, you are also advised to have it checked regularly as recommended in the warranty and maintenance record. If the system does not produce cold air, switch it off and contact a PEUGEOT dealer or a qualified workshop. When towing the maximum load on a steep gradient in high temperatures, switching off the air conditioning increases the available engine power and so improves the towing ability.
Recommendations for ventilation and air conditioning
If after an extended stop in sunshine, the interior temperature is very high, first ventilate the passenger compartment for a few moments. Put the air flow control at a setting high enough to quickly change the air in the passenger compartment.
The air conditioning system does not contain chlorine and does not present any danger to the ozone layer.
The condensation created by the air conditioning results in a discharge of water under the vehicle which is per fectly normal.
Stop & Start
The heating and air conditioning systems only work when the engine is running. To maintain a comfortable temperature in the passenger compartment, you can temporarily deactivate the Stop & Start system (see the corresponding section).
Page 77 of 336

75
3
Comfort
Boot fi ttings
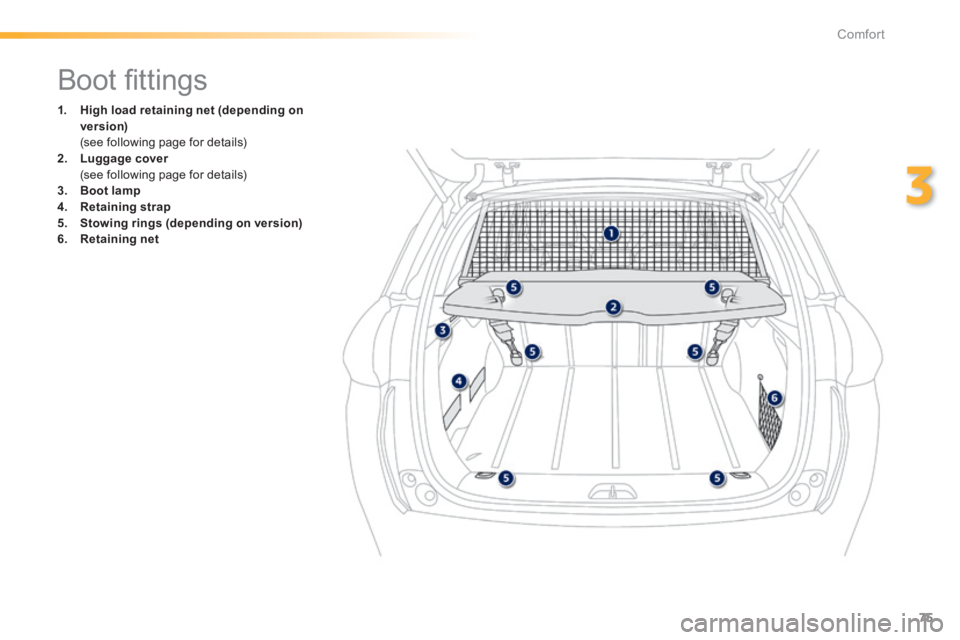
1. High load retaining net (depending on version) (see following page for details) 2. Luggage cover Luggage cover Luggage cover (see following page for details) 3. Boot lamp4. Retaining strap5. Stowing rings (depending on version)6. Retaining net
Page 80 of 336

78
Comfort
Warning triangle (stowing)
Before leaving your vehicle to set up and install the triangle, put on your high visibility vest.
The dimensions of the triangle (once folded) or
its storage box must be: - A : length = 438 mm, - B : height = 56 mm, - C : width = 38 mm. To use the triangle, refer to the manufacturer's instructions.
Placing the triangle in the road
The location for stowing a folded triangle or its box is under the front seat or under the boot carpet (depending on version).
Distance from your vehicle (in metres)
Road
Motor way
DayNight
50 m 80 m 150 m
These are the internationally recognised values. Use the triangle in line with local driving regulations.
The triangle is available as an accessory, contact a PEUGEOT dealer or a qualified workshop.
Place the triangle at a distance behind the vehicle, as shown in the table below, according to the type of road and the level of ambient light.
Page 109 of 336

107
4
Driving
In bad weather and in winter, ensure that the sensors are not covered by road dirt, ice or snow.
In the event of a fault, have the system checked by a PEUGEOT dealer or a qualified workshop.
If the system is deactivated during a manoeuvre, the drive should reactivate it manually to repeat the measurement.
If the lateral distance between your vehicle and the space is too great, the system may not be able to measure the space. Anything projecting beyond the envelope of the vehicle (long or wide load) is not taken into account by the Park Assist system during a manoeuvre.
Deactivation
A message is displayed in the screen.
The driver then takes back control of the vehicle's steering.
The system is deactivated automatically: - on switching off the ignition, - if the engine stalls, - if no manoeuvre is started within 5 minutes of selection of the type of manoeuvre, - after a prolonged stop of the vehicle during a manoeuvre, - if the road wheel anti-spin regulation (ASR) is triggered, - if the speed of the vehicle exceeds the stated limit, - when the driver interrupts movement of the steering wheel, - if the driver presses the Park Assist control, - if correct positioning of the vehicle is not possible (too many manoeuvres needed to insert or extract the vehicle), - if the driver's door is open, - if one of the front wheels encounters an obstacle.
Switching off
The system is switched off automatically: - when towing a trailer, - if the driver's door is opened, - if the speed of the vehicle is above 42 mph (70 km/h). To switch the system of for a prolonged period, contact a PEUGEOT dealer or a qualified workshop.
Operating faults
In the event of a fault with the system, this warning lamp is displayed in the instrument panel and/or a message appears in the screen, accompanied by an audible signal (short beep). The indicator lamp in the control flashes for a few
seconds. If the problem occurs while using the system, the indicator lamp goes off.
In the event of a fault with the power steering, these warning lamps come on in the instrument panel. Contact a PEUGEOT dealer or a qualified workshop.
Page 125 of 336

123
6
Safety
Direction indicators
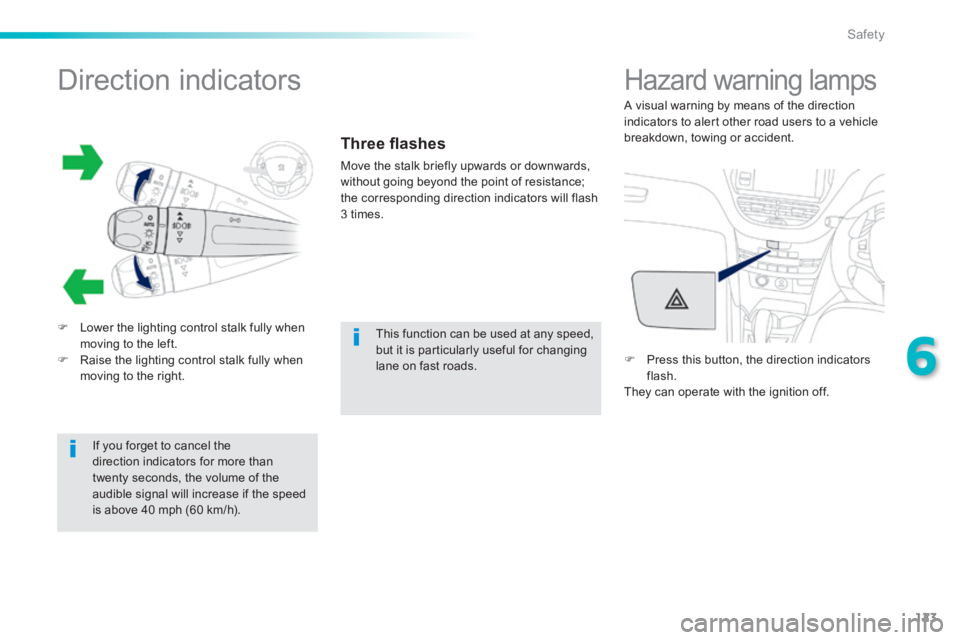
Lower the lighting control stalk fully when moving to the left. Raise the lighting control stalk fully when moving to the right.
Three fl ashes
Move the stalk briefly upwards or downwards, without going beyond the point of resistance; the corresponding direction indicators will flash 3 times.
If you forget to cancel the direction indicators for more than twenty seconds, the volume of the audible signal will increase if the speed is above 40 mph (60 km/h).
Hazard warning lamps
Press this button, the direction indicators flash. They can operate with the ignition off.
This function can be used at any speed, but it is particularly useful for changing lane on fast roads.
A visual warning by means of the direction indicators to alert other road users to a vehicle breakdown, towing or accident.
Page 153 of 336

151
7
Practical information
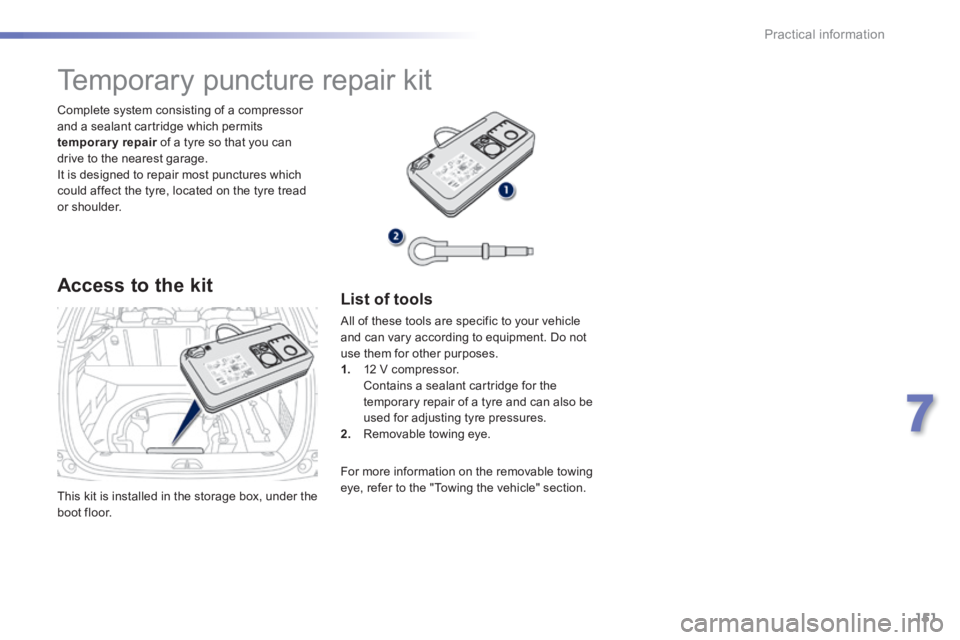
This kit is installed in the storage box, under the boot floor.
Complete system consisting of a compressor and a sealant cartridge which permits temporary repair of a tyre so that you can temporary repair of a tyre so that you can temporary repairdrive to the nearest garage. It is designed to repair most punctures which could affect the tyre, located on the tyre tread or shoulder.
Temporary puncture repair kit
Access to the kit List of tools
All of these tools are specific to your vehicle and can vary according to equipment. Do not use them for other purposes. 1. 12 V compressor. Contains a sealant cartridge for the temporary repair of a tyre and can also be used for adjusting tyre pressures. 2. Removable towing eye.
For more information on the removable towing eye, refer to the "Towing the vehicle" section.
Page 159 of 336

157
7
Practical information
Changing a wheel
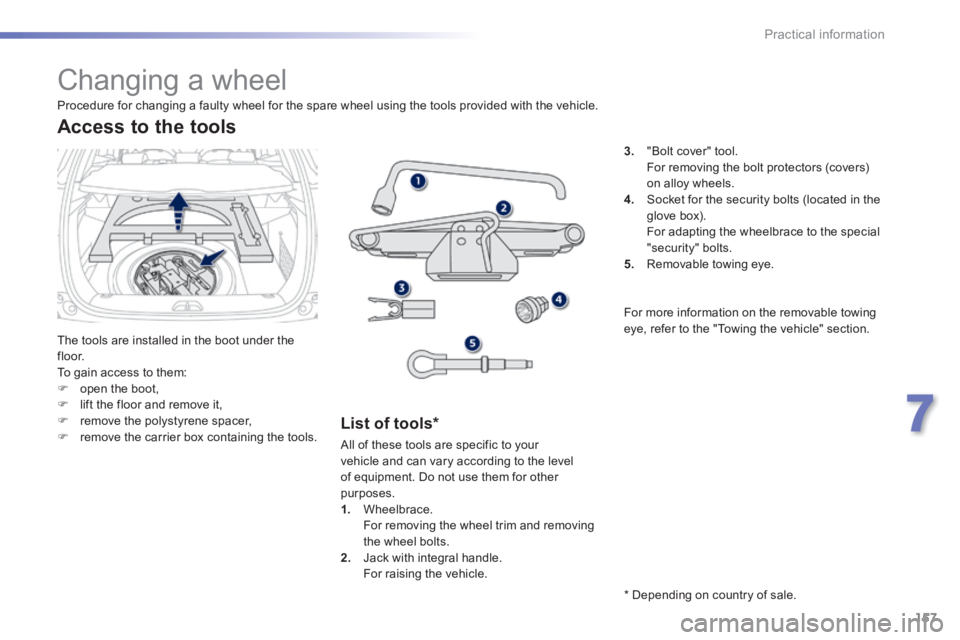
The tools are installed in the boot under the f l o o r. To gain access to them: open the boot, lift the floor and remove it, remove the polystyrene spacer, remove the carrier box containing the tools.
Access to the tools
List of tools *
3. "Bolt cover" tool. For removing the bolt protectors (covers) on alloy wheels. 4. Socket for the security bolts (located in the glove box).
For adapting the wheelbrace to the special "security" bolts. 5. Removable towing eye.
Procedure for changing a faulty wheel for the spare wheel using the tools provided with the vehicle.
All of these tools are specific to your vehicle and can vary according to the level of equipment. Do not use them for other purposes. 1. Wheelbrace. For removing the wheel trim and removing the wheel bolts. 2. Jack with integral handle. For raising the vehicle.
* Depending on country of sale.
For more information on the removable towing eye, refer to the "Towing the vehicle" section.