2013.5 Citroen DS4 RHD sensor
[x] Cancel search: sensorPage 34 of 400

Driving safely
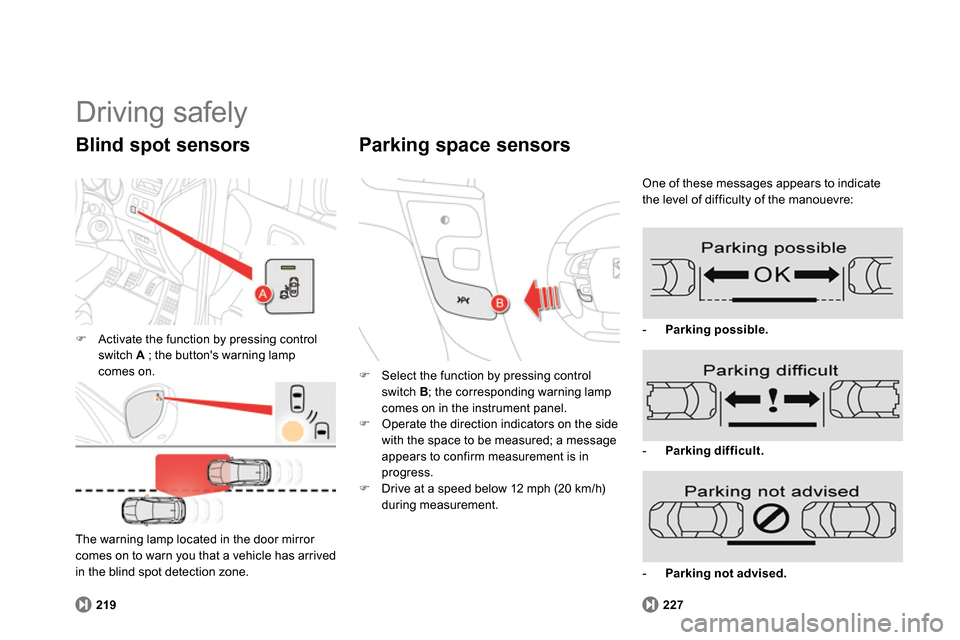
Activate the function by pressing control
switch A
; the button's warning lamp
comes on.
Blind spot sensors
219
The warning lamp located in the door mirror
comes on to warn you that a vehicle has arrived
in the blind spot detection zone.
Select the function by pressing control
switch B
; the corresponding warning lamp
comes on in the instrument panel.
Operate the direction indicators on the side
with the space to be measured; a message
appears to confirm measurement is in
progress.
Drive at a speed below 12 mph (20 km/h)
during measurement.
Parking space sensors
One of these messages appears to indicate
the level of difficulty of the manouevre:
- Parking possible.
227
- Parking difficult.
- Parking not advised.
Page 51 of 400

49Monitoring
Power steering
fixed. The power steering has a fault. Drive carefully at reduced speed.
Have it checked by a CITROËN dealer or a qualified
workshop.
Under-inflation
fixed. The pressure in one or more wheels
is too low. Check the pressure of the tyres as soon as possible.
This check should preferably be carried out when the
tyres are cold.
+
flashing then fixed,
accompanied by the
Ser vice warning lamp. The tyre pressure monitoring system
has a fault or no sensor is detected
on one of the wheels. Under-inflation detection is not assured.
Have the system checked by a CITROËN dealer or a
qualified workshop.
Directional
headlamps
flashing. The directional headlamps system
has a fault. Have it checked by a CITROËN dealer or a qualified
workshop.
Warning lamp
is on
Cause
Action/Observations
Foot on the brake
pedal
fixed. The brake pedal is not pressed. With an electronic gearbox, press the brake pedal to
start the engine (lever in position N
).
If you wish to release the parking brake without
pressing the brake pedal, this warning lamp will remain
on.
flashing. With an electronic gearbox, if you hold
the vehicle on a rising incline using
the accelerator for too long, the clutch
overheats. Use the brake pedal and/or the electric parking brake.
Airbags
temporarily. This lamp comes on for a few
seconds when you turn on the
ignition, then goes off. This lamp should go off when the engine is started.
If it does not go off, contact a CITROËN dealer or a
qualified workshop.
fixed. One of the airbag or seat belt
pretensioner systems has a fault. Have it checked by a CITROËN dealer or a qualified
workshop.
Page 54 of 400

Lighting dimmer
fixed. The lighting dimmer is making an
adjustment. You can adjust the level of illumination of the
instruments between 1 and 16.
Passenger's
airbag system
fixed in the seat belt
and passenger's front
airbag warning lamps
display.
The control switch, located in the glove
box, has been placed in the "ON"
position.
The passenger's front airbag is activated.
In this case, do not install a "rear facing"
child seat. Move the control switch to the "OFF"
position
to deactivate the passenger's front airbag.
In this case, you can install a "rear facing" child seat.
Automatic wiping
fixed. The wiper control is pushed
downwards. Automatic front wiping is activated.
To deactivate automatic wiping, operate the control
stalk downwards or put the stalk into another position.
Warning lamp
is on
Cause
Action/Observations
Stop & Start
fixed. When the vehicle stops (red lights,
traffic jams,...) the Stop & Start
system has put the engine into STOP
mode. The warning lamp goes off and the engine restarts
automatically in START mode, as soon as you want to
move off.
flashes for a few
seconds, then goes
off. STOP mode is temporarily
unavailable.
or
START mode is invoked
automatically. For more information on special cases with STOP
mode and START mode, refer to the "Stop & Start"
section.
Parking space
sensors
fixed. The parking space sensors function
is selected. To start measurement, operate the direction indicator
on the side of the space to be measured, and do not
exceed 12 mph (20 km/h). A message is displayed
once the measurement has been completed.
Page 66 of 400

Monochrome screen C
This displays the following information:
- time,
- date,
- ambient temperature (this flashes if there is
a risk of ice),
- parking sensor information,
- parking space measurement,
- current audio source,
- telephone or Bluetooth system information,
- trip computer (refer to the end of the
section),
- alert messages,
- settings menus for the screen and the
vehicle equipment.
Displays in the screen
From the control panel of your audio system,
you can press:
button A
to chooses between the display
of audio information in full screen or the
shared display of audio and trip computer
information,
the "MENU"
button for access to the main
menu
,
the "
" or "
" buttons to scroll through the
items on the screen,
the "
" or "
" buttons to change a setting
value,
the "OK"
button to confirm,
or
the "Back"
button to abandon the
operation in progress.
Controls
Press the "MENU"
button for access to the
main menu
:
- "Multimedia",
- "Telephone",
- "Trip computer",
- "Bluetooth connection",
- "Personalisation-configuration",
Press the "
" or "
" button to select the
menu required, then confirm by pressing
the "OK"
button.
Main menu
Page 70 of 400

Colour screen
It displays the following information
automatically and directly:
- time,
- date,
- altitude,
- ambient temperature (the value displayed
flashes if there is a risk of ice),
- parking sensor information,
- parking space measurement,
- audio functions,
- directory and telephone information,
- satellite navigation system information.
Displays in the screen
From the navigation system control panel, to
select one of the applications:
press the dedicated "RADIO"
, "MUSIC"
,
"NAV"
, "TRAFFIC"
, "PHONE"
or
"SETUP"
button for access to the
corresponding menu,
turn the dial A
to select a function, an item
in a list,
press button B
to confirm the selection,
or
press the "ESC"
button to abandon the
current operation and return to the previous
display.
Controls
For more information on these applications,
refer to the "Audio and Telematics" section.
Page 81 of 400

79Comfort
Recommendations for ventilation and air conditioning
If after an extended stop in sunshine,
the interior temperature is very
high, first ventilate the passenger
compartment for a few moments.
Put the air flow control at a setting high
enough to quickly change the air in the
passenger compartment.
The air conditioning system does not
contain chlorine and does not present
any danger to the ozone layer. In order for these systems to be fully effective, follow the operation and maintenance
guidelines below:
To obtain an even air distribution, take care not to obstruct the exterior air intake grilles
located at the base of the windscreen, the nozzles, the vents and the air outlets, as well
as the air extractor located in the boot.
Do not cover the sunshine sensor, located on the dashboard; this is used for regulation
of the air conditioning system.
Operate the air conditioning system for at least 5 to 10 minutes, once or twice a month
to keep it in per fect working order.
Ensure that the passenger compartment filter is in good condition and have the filter
elements replaced regularly.
We recommend the use of a combined passenger compartment filter. Thanks to its
special active additive, it contributes to the purification of the air breathed by the
occupants and the cleanliness of the passenger compartment (reduction of allergic
symptoms, bad odours and greasy deposits).
To ensure correct operation of the air conditioning system, you are also advised to have
it checked regularly as recommended in the maintenance and warranty guide.
If the system does not produce cold air, switch it off and contact a CITROËN dealer or
a qualified workshop.
When towing the maximum load on a steep gradient in high temperatures, switching off the
air conditioning increases the available engine power and so improves the towing ability.
The condensation created by the air
conditioning results in a discharge
of water under the vehicle which is
per fectly normal.
Stop & Start
The heating and air conditioning systems only work when the engine is running. To maintain
a comfortable temperature in the passenger compartment, you can temporarily deactivate
the Stop & Start system (see the corresponding section).
Page 98 of 400

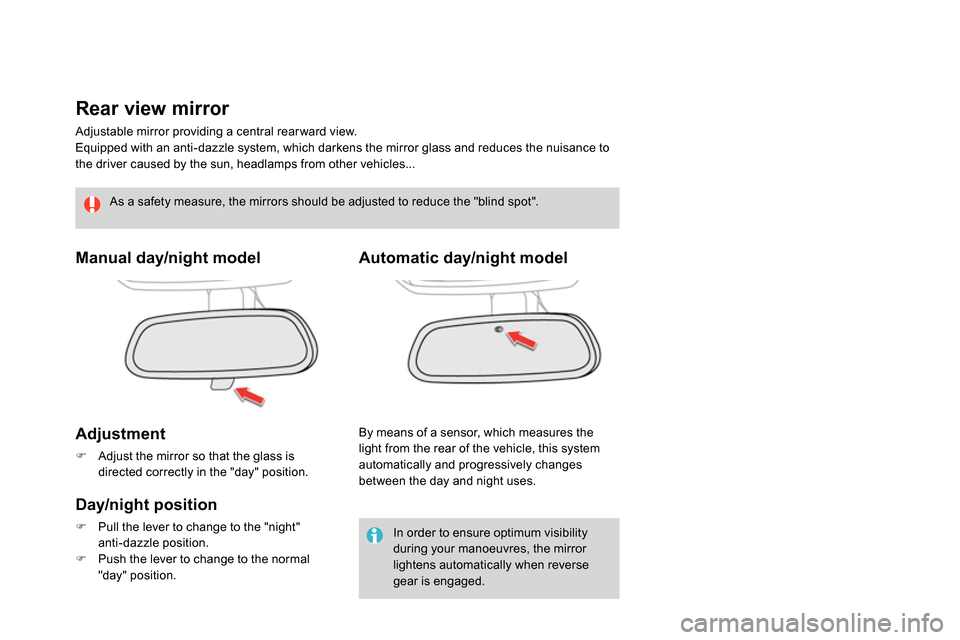
Rear view mirror
Adjustable mirror providing a central rear ward view.
Equipped with an anti-dazzle system, which darkens the mirror glass and reduces the nuisance to
the driver caused by the sun, headlamps from other vehicles...
Manual day/night model
Adjustment
Adjust the mirror so that the glass is
directed correctly in the "day" position.
Day/night position
Pull the lever to change to the "night"
anti-dazzle position.
Push the lever to change to the normal
"day" position.
By means of a sensor, which measures the
light from the rear of the vehicle, this system
automatically and progressively changes
between the day and night uses.
Automatic day/night model
In order to ensure optimum visibility
during your manoeuvres, the mirror
lightens automatically when reverse
gear is engaged.
As a safety measure, the mirrors should be adjusted to reduce the "blind spot".
Page 128 of 400

C.
Foglamp selection ring.
The foglamps operate with the dipped and main
beam headlamps.
Rotate and release the ring C
:
for wards a first time to switch on the front
foglamps ,
for wards a second time to switch on the
rear foglamps,
rear wards a first time to switch off the rear
foglamps,
rear wards a second time to switch off the
front foglamps.
Model with front and rear
foglamps
In good or rainy weather, by both day
and night, the front foglamps and the
rear foglamps are prohibited. In these
situations, the power of their beams
may dazzle other drivers. They should
only be used in fog or falling snow.
In these weather conditions, you should
switch on the foglamps and dipped
beam headlamps manually, as the
sunshine sensor may detect sufficient
light.
Do not forget to switch off the front and
rear foglamps when they are no longer
necessary. front and rear foglamps
When the headlamps switch off with automatic
illumination of headlamps (AUTO model)
or when the dipped beam headlamps are
switched off manually, the foglamps and
sidelamps remain on.
Turn the ring rear wards to switch off the
foglamps, the sidelamps will then switch off.