Page 30 of 86

INSTRUMENT AND CONTROL FUNCTIONS
3-14
3
●
Do not exceed the maximum
load of 185 kg (408 lb) for the ve-
hicle.
NOTICE
ECA10081
Keep the following points in mind
when using the storage compart-
ment.●
Since the storage compartment
accumulates heat when ex-
posed to the sun and/or the en-
gine heat, do not store anything
susceptible to heat, consum-
ables or flammable items inside
it.
●
To avoid humidity from spread-
ing through the storage com-
partment, wrap wet articles in a
plastic bag before storing them
in the compartment.
●
Since the storage compartment
may get wet while the scooter is
being washed, wrap any articles
stored in the compartment in a
plastic bag.
●
Do not keep anything valuable
or breakable in the storage com-
partment.
To store a helmet in the storage com-
partment, place the helmet with the
front facing backward.TIP●
Some helmets cannot be stored in
the storage compartment because
of their size or shape.
●
Do not leave your scooter unat-
tended with the seat open.
EAUM2490
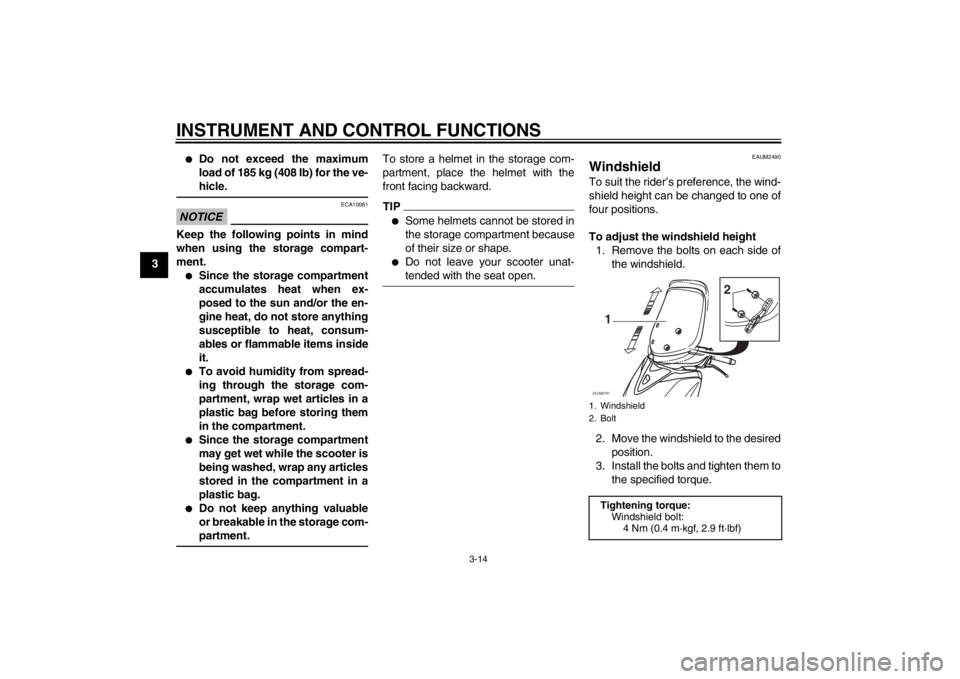
Windshield To suit the rider’s preference, the wind-
shield height can be changed to one of
four positions.
To adjust the windshield height
1. Remove the bolts on each side of
the windshield.
2. Move the windshield to the desired
position.
3. Install the bolts and tighten them to
the specified torque.1. Windshield
2. BoltTightening torque:
Windshield bolt:
4 Nm (0.4 m·kgf, 2.9 ft·lbf)ZAUM0797
1
2
U16PE3E0.book Page 14 Tuesday, June 19, 2012 5:17 PM
Page 43 of 86
PERIODIC MAINTENANCE AND ADJUSTMENT
6-2
6
EAU17471
Owner’s tool kit The owner’s tool kit is located inside the
rear storage compartment. (See page
3-13.)
The service information included in this
manual and the tools provided in the
owner’s tool kit are intended to assist
you in the performance of preventive
maintenance and minor repairs. How-
ever, additional tools such as a torque
wrench may be necessary to perform
certain maintenance work correctly.TIPIf you do not have the tools or experi-
ence required for a particular job, have
a Yamaha dealer perform it for you.
U16PE3E0.book Page 2 Tuesday, June 19, 2012 5:17 PM
Page 51 of 86

PERIODIC MAINTENANCE AND ADJUSTMENT
6-10
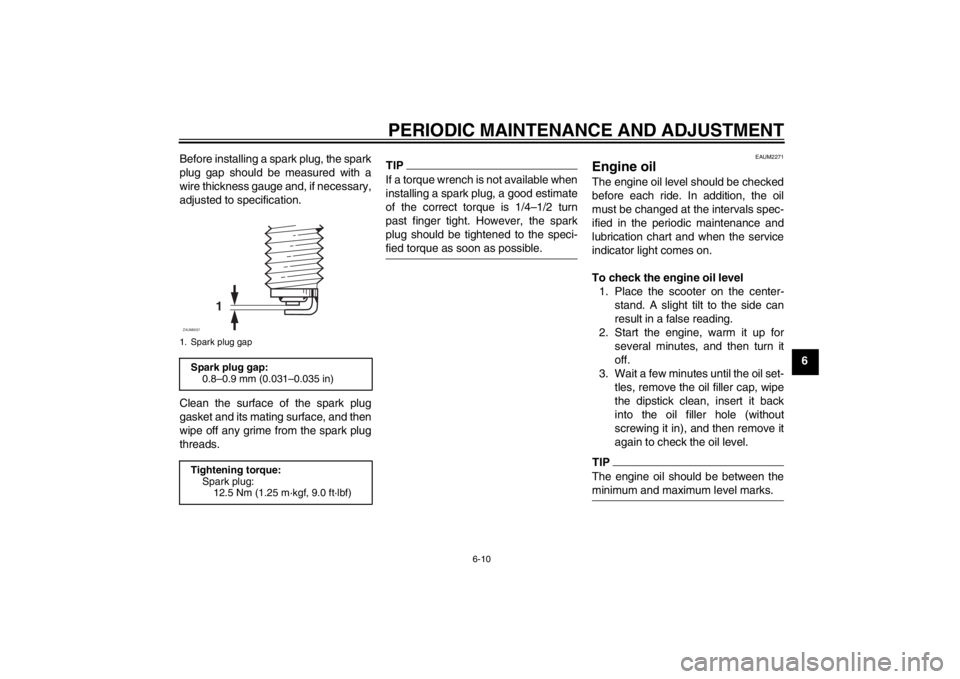
6 Before installing a spark plug, the spark
plug gap should be measured with a
wire thickness gauge and, if necessary,
adjusted to specification.
Clean the surface of the spark plug
gasket and its mating surface, and then
wipe off any grime from the spark plug
threads.
TIPIf a torque wrench is not available when
installing a spark plug, a good estimate
of the correct torque is 1/4–1/2 turn
past finger tight. However, the spark
plug should be tightened to the speci-
fied torque as soon as possible.
EAUM2271
Engine oil The engine oil level should be checked
before each ride. In addition, the oil
must be changed at the intervals spec-
ified in the periodic maintenance and
lubrication chart and when the service
indicator light comes on.
To check the engine oil level
1. Place the scooter on the center-
stand. A slight tilt to the side can
result in a false reading.
2. Start the engine, warm it up for
several minutes, and then turn it
off.
3. Wait a few minutes until the oil set-
tles, remove the oil filler cap, wipe
the dipstick clean, insert it back
into the oil filler hole (without
screwing it in), and then remove it
again to check the oil level.TIPThe engine oil should be between the
minimum and maximum level marks.
1. Spark plug gapSpark plug gap:
0.8–0.9 mm (0.031–0.035 in)
Tightening torque:
Spark plug:
12.5 Nm (1.25 m·kgf, 9.0 ft·lbf)
1
ZAUM0037
U16PE3E0.book Page 10 Tuesday, June 19, 2012 5:17 PM
Page 53 of 86

PERIODIC MAINTENANCE AND ADJUSTMENT
6-12
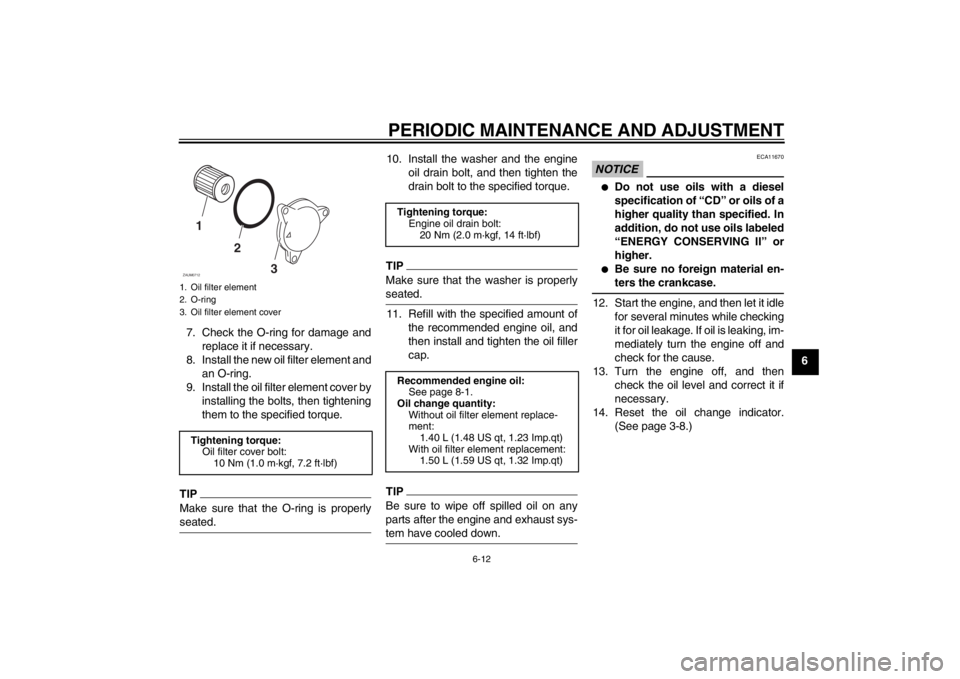
6 7. Check the O-ring for damage and
replace it if necessary.
8. Install the new oil filter element and
an O-ring.
9. Install the oil filter element cover by
installing the bolts, then tightening
them to the specified torque.
TIPMake sure that the O-ring is properly
seated.
10. Install the washer and the engine
oil drain bolt, and then tighten the
drain bolt to the specified torque.TIPMake sure that the washer is properly
seated.11. Refill with the specified amount of
the recommended engine oil, and
then install and tighten the oil filler
cap.TIPBe sure to wipe off spilled oil on any
parts after the engine and exhaust sys-
tem have cooled down.
NOTICE
ECA11670
●
Do not use oils with a diesel
specification of “CD” or oils of a
higher quality than specified. In
addition, do not use oils labeled
“ENERGY CONSERVING II” or
higher.
●
Be sure no foreign material en-
ters the crankcase.
12. Start the engine, and then let it idle
for several minutes while checking
it for oil leakage. If oil is leaking, im-
mediately turn the engine off and
check for the cause.
13. Turn the engine off, and then
check the oil level and correct it if
necessary.
14. Reset the oil change indicator.
(See page 3-8.)
1. Oil filter element
2. O-ring
3. Oil filter element coverTightening torque:
Oil filter cover bolt:
10 Nm (1.0 m·kgf, 7.2 ft·lbf)1
2
3
ZAUM0712
Tightening torque:
Engine oil drain bolt:
20 Nm (2.0 m·kgf, 14 ft·lbf)
Recommended engine oil:
See page 8-1.
Oil change quantity:
Without oil filter element replace-
ment:
1.40 L (1.48 US qt, 1.23 Imp.qt)
With oil filter element replacement:
1.50 L (1.59 US qt, 1.32 Imp.qt)
U16PE3E0.book Page 12 Tuesday, June 19, 2012 5:17 PM
Page 54 of 86

PERIODIC MAINTENANCE AND ADJUSTMENT
6-13
6
EAU20066
Final transmission oil The final transmission case must be
checked for oil leakage before each
ride. If any leakage is found, have a
Yamaha dealer check and repair the
scooter. In addition, the final transmis-
sion oil must be changed as follows at
the intervals specified in the periodic
maintenance and lubrication chart.
1. Start the engine, warm up the final
transmission oil by riding the
scooter for several minutes, and
then stop the engine.
2. Place the scooter on the center-
stand.
3. Place an oil pan under the final
transmission case to collect the
used oil.
4. Remove the final transmission oil
filler cap and its O-ring from the fi-
nal transmission case.5. Remove the final transmission oil
drain bolt and its gasket to drain
the oil from the final transmission
case.6. Install the final transmission oil
drain bolt and its new gasket, and
then tighten the bolt to the speci-
fied torque.
7. Refill with the specified amount of
the recommended final transmis-
sion oil. WARNING! Make sure
that no foreign material enters
the final transmission case.
Make sure that no oil gets on the
tire or wheel.
[EWA11311]
8. Install the final transmission oil fill-
er cap and its new O-ring, and then
tighten the oil filler cap.
9. Check the final transmission case
for oil leakage. If oil is leaking,
check for the cause.
1. Final transmission oil filler cap
1. Final transmission oil drain bolt
1
ZAUM0658 ZAUM0703
1
Tightening torque:
Final transmission oil drain bolt:
20 Nm (2.0 m·kgf, 14 ft·lbf)
Recommended final transmission
oil:
See page 8-1.
Oil quantity:
0.21 L (0.22 US qt, 0.18 Imp.qt)
U16PE3E0.book Page 13 Tuesday, June 19, 2012 5:17 PM