2012 YAMAHA XCITY 125 clock
[x] Cancel search: clockPage 22 of 86
INSTRUMENT AND CONTROL FUNCTIONS
3-6
3
●
two tripmeters (which show the
distance traveled since they were
last set to zero, the time passed
since the tripmeters were set to ze-
ro, and the average speed traveled
during this time)
●
a fuel reserve tripmeter (which
shows the distance traveled since
the fuel level warning light came
on)
●
a clock
●
an ambient temperature display
●
an oil change indicator (which
comes on when the engine oil
should be changed)
TIP●
For the UK, the distance traveled
is displayed in miles and the tem-
perature reading is displayed in °F.
●
For other countries, the distance
traveled is displayed in kilometers
and the temperature reading is dis-
played in °C.
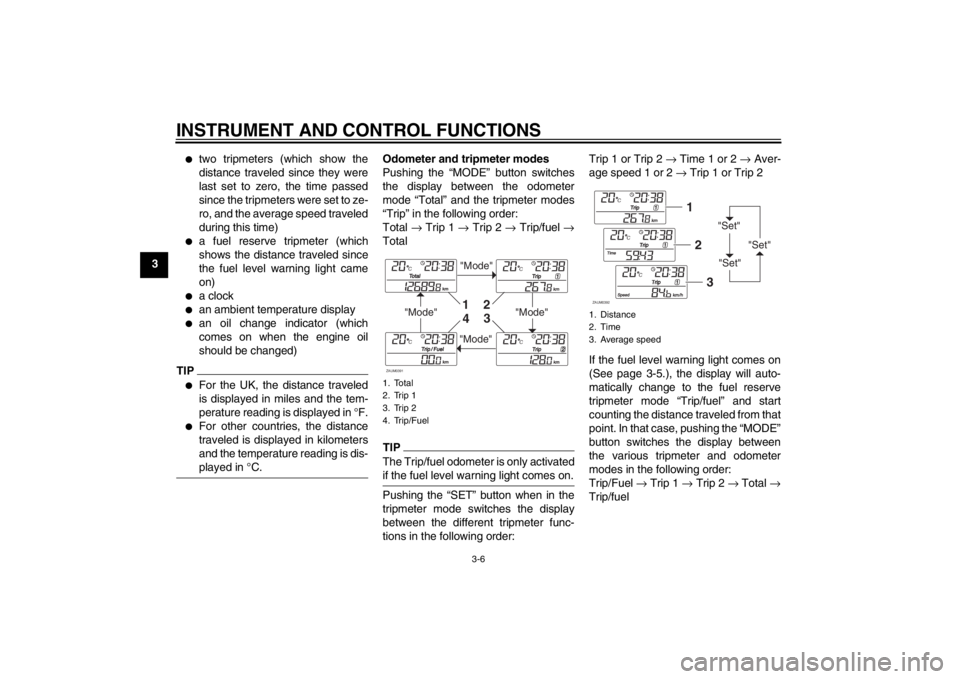
Odometer and tripmeter modes
Pushing the “MODE” button switches
the display between the odometer
mode “Total” and the tripmeter modes
“Trip” in the following order:
Total → Trip 1 → Trip 2 → Trip/fuel →
TotalTIPThe Trip/fuel odometer is only activated
if the fuel level warning light comes on.Pushing the “SET” button when in the
tripmeter mode switches the display
between the different tripmeter func-
tions in the following order:Trip 1 or Trip 2 → Time 1 or 2 → Aver-
age speed 1 or 2 → Trip 1 or Trip 2
If the fuel level warning light comes on
(See page 3-5.), the display will auto-
matically change to the fuel reserve
tripmeter mode “Trip/fuel” and start
counting the distance traveled from that
point. In that case, pushing the “MODE”
button switches the display between
the various tripmeter and odometer
modes in the following order:
Trip/Fuel → Trip 1 → Trip 2 → Total →
Trip/fuel1. Total
2. Trip 1
3. Trip 2
4. Trip/Fuel
"Mode"
"Mode"
"Mode"
"Mode"
1
2
3
4
ZAUM0391
1. Distance
2. Time
3. Average speed
"Set"
"Set""Set"
12
3
ZAUM0392
U16PE3E0.book Page 6 Tuesday, June 19, 2012 5:17 PM
Page 23 of 86
INSTRUMENT AND CONTROL FUNCTIONS
3-7
3
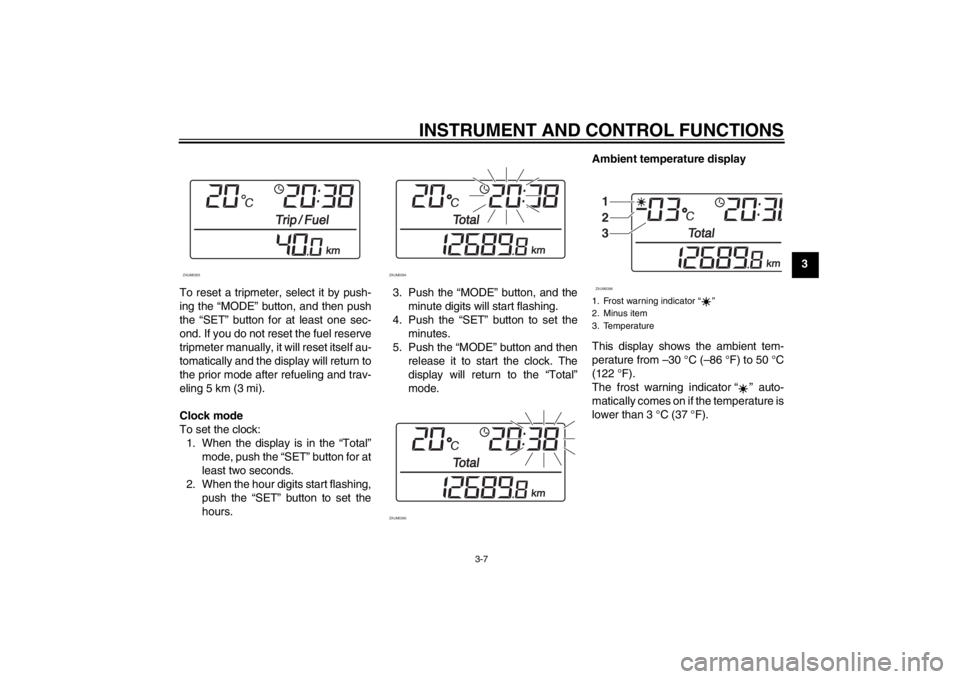
To reset a tripmeter, select it by push-
ing the “MODE” button, and then push
the “SET” button for at least one sec-
ond. If you do not reset the fuel reserve
tripmeter manually, it will reset itself au-
tomatically and the display will return to
the prior mode after refueling and trav-
eling 5 km (3 mi).
Clock mode
To set the clock:
1. When the display is in the “Total”
mode, push the “SET” button for at
least two seconds.
2. When the hour digits start flashing,
push the “SET” button to set the
hours.3. Push the “MODE” button, and the
minute digits will start flashing.
4. Push the “SET” button to set the
minutes.
5. Push the “MODE” button and then
release it to start the clock. The
display will return to the “Total”
mode.Ambient temperature display
This display shows the ambient tem-
perature from –30 °C (–86 °F) to 50 °C
(122 °F).
The frost warning indicator “ ” auto-
matically comes on if the temperature is
lower than 3 °C (37 °F).
ZAUM0393
ZAUM0394
ZAUM0395
1. Frost warning indicator ì î
2. Minus item
3. Temperature
1
2
3ZAUM0396
U16PE3E0.book Page 7 Tuesday, June 19, 2012 5:17 PM
Page 26 of 86
INSTRUMENT AND CONTROL FUNCTIONS
3-10
3
EAUM2161
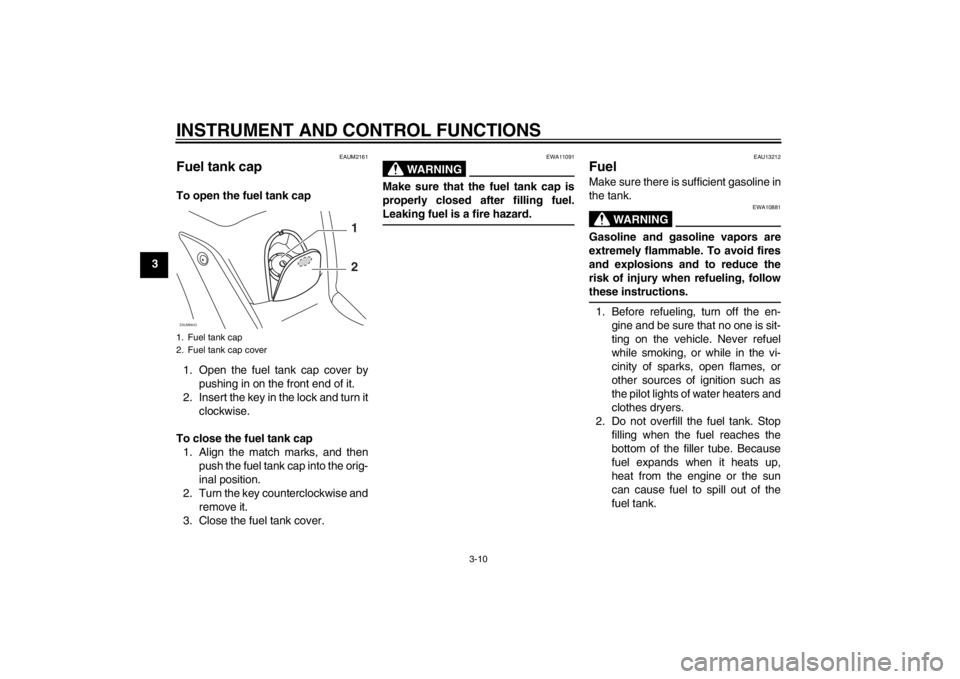
Fuel tank cap To open the fuel tank cap
1. Open the fuel tank cap cover by
pushing in on the front end of it.
2. Insert the key in the lock and turn it
clockwise.
To close the fuel tank cap
1. Align the match marks, and then
push the fuel tank cap into the orig-
inal position.
2. Turn the key counterclockwise and
remove it.
3. Close the fuel tank cover.
WARNING
EWA11091
Make sure that the fuel tank cap is
properly closed after filling fuel.
Leaking fuel is a fire hazard.
EAU13212
Fuel Make sure there is sufficient gasoline in
the tank.
WARNING
EWA10881
Gasoline and gasoline vapors are
extremely flammable. To avoid fires
and explosions and to reduce the
risk of injury when refueling, follow
these instructions.1. Before refueling, turn off the en-
gine and be sure that no one is sit-
ting on the vehicle. Never refuel
while smoking, or while in the vi-
cinity of sparks, open flames, or
other sources of ignition such as
the pilot lights of water heaters and
clothes dryers.
2. Do not overfill the fuel tank. Stop
filling when the fuel reaches the
bottom of the filler tube. Because
fuel expands when it heats up,
heat from the engine or the sun
can cause fuel to spill out of the
fuel tank.
1. Fuel tank cap
2. Fuel tank cap coverZAUM0643
1
2
U16PE3E0.book Page 10 Tuesday, June 19, 2012 5:17 PM
Page 28 of 86
INSTRUMENT AND CONTROL FUNCTIONS
3-12
3
EAU13445
Catalytic converters This vehicle is equipped with catalytic
converters in the exhaust system.
WARNING
EWA10862
The exhaust system is hot after op-
eration. To prevent a fire hazard or
burns:●
Do not park the vehicle near
possible fire hazards such as
grass or other materials that
easily burn.
●
Park the vehicle in a place
where pedestrians or children
are not likely to touch the hot
exhaust system.
●
Make sure that the exhaust sys-
tem has cooled down before do-
ing any maintenance work.
●
Do not allow the engine to idle
more than a few minutes. Long
idling can cause a build-up of
heat.
NOTICE
ECA10701
Use only unleaded gasoline. The use
of leaded gasoline will cause unre-
pairable damage to the catalytic
converter.
EAU13932
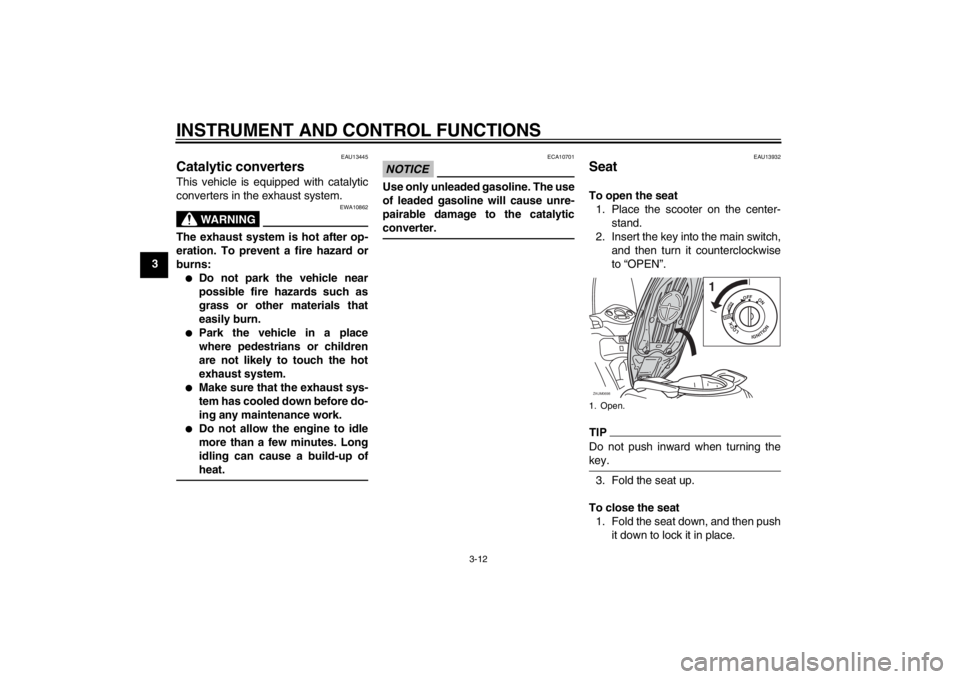
Seat To open the seat
1. Place the scooter on the center-
stand.
2. Insert the key into the main switch,
and then turn it counterclockwise
to “OPEN”.TIPDo not push inward when turning the
key.3. Fold the seat up.
To close the seat
1. Fold the seat down, and then push
it down to lock it in place.1. Open.ZAUM0698
1
PUSHOPEN
OFFON
LOCK
IGNITION
U16PE3E0.book Page 12 Tuesday, June 19, 2012 5:17 PM
Page 29 of 86
INSTRUMENT AND CONTROL FUNCTIONS
3-13
3 2. Remove the key from the main
switch if the scooter will be left un-
attended.
TIPMake sure that the seat is properly se-
cured before riding.
EAUM2522
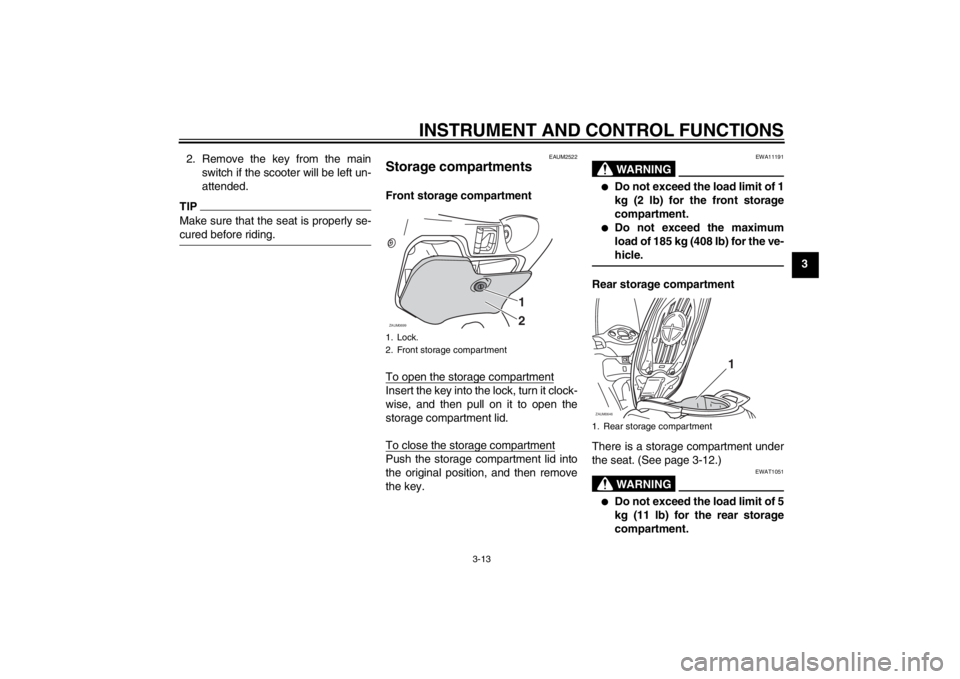
Storage compartments Front storage compartment
To open the storage compartmentInsert the key into the lock, turn it clock-
wise, and then pull on it to open the
storage compartment lid.
To close the storage compartmentPush the storage compartment lid into
the original position, and then remove
the key.
WARNING
EWA11191
●
Do not exceed the load limit of 1
kg (2 lb) for the front storage
compartment.
●
Do not exceed the maximum
load of 185 kg (408 lb) for the ve-
hicle.
Rear storage compartment
There is a storage compartment under
the seat. (See page 3-12.)
WARNING
EWAT1051
●
Do not exceed the load limit of 5
kg (11 lb) for the rear storage
compartment.
1. Lock.
2. Front storage compartment
1
2
ZAUM0699
1. Rear storage compartmentZAUM0646
1
U16PE3E0.book Page 13 Tuesday, June 19, 2012 5:17 PM
Page 69 of 86
PERIODIC MAINTENANCE AND ADJUSTMENT
6-28
6
EAUM2182
Replacing a headlight bulb This model is equipped with halogen
bulb headlights. If a headlight bulb
burns out, replace it as follows.NOTICE
ECA10650
Take care not to damage the follow-
ing parts:●
Headlight bulb
Do not touch the glass part of
the headlight bulb to keep it free
from oil, otherwise the transpar-
ency of the glass, the luminosity
of the bulb, and the bulb life will
be adversely affected. Thor-
oughly clean off any dirt and fin-
gerprints on the headlight bulb
using a cloth moistened with al-
cohol or thinner.
●
Headlight lens
Do not affix any type of tinted
film or stickers to the headlight
lens.
Do not use a headlight bulb of a
wattage higher than specified.
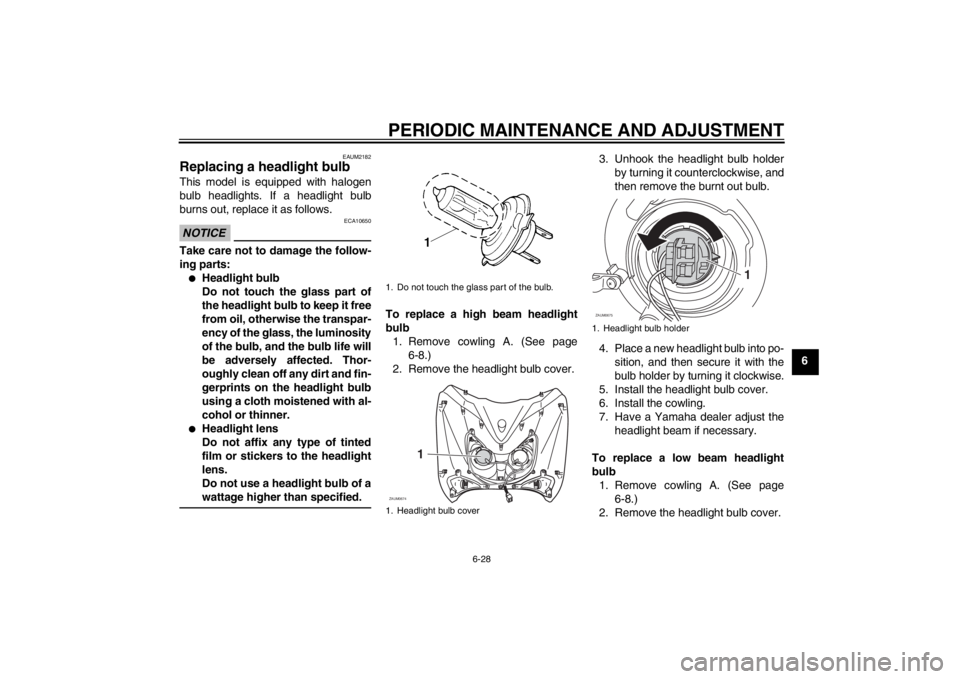
To replace a high beam headlight
bulb
1. Remove cowling A. (See page
6-8.)
2. Remove the headlight bulb cover.3. Unhook the headlight bulb holder
by turning it counterclockwise, and
then remove the burnt out bulb.
4. Place a new headlight bulb into po-
sition, and then secure it with the
bulb holder by turning it clockwise.
5. Install the headlight bulb cover.
6. Install the cowling.
7. Have a Yamaha dealer adjust the
headlight beam if necessary.
To replace a low beam headlight
bulb
1. Remove cowling A. (See page
6-8.)
2. Remove the headlight bulb cover.1. Do not touch the glass part of the bulb.
1. Headlight bulb cover
1
ZAUM0674
1. Headlight bulb holderZAUM0675
1
U16PE3E0.book Page 28 Tuesday, June 19, 2012 5:17 PM
Page 70 of 86
PERIODIC MAINTENANCE AND ADJUSTMENT
6-29
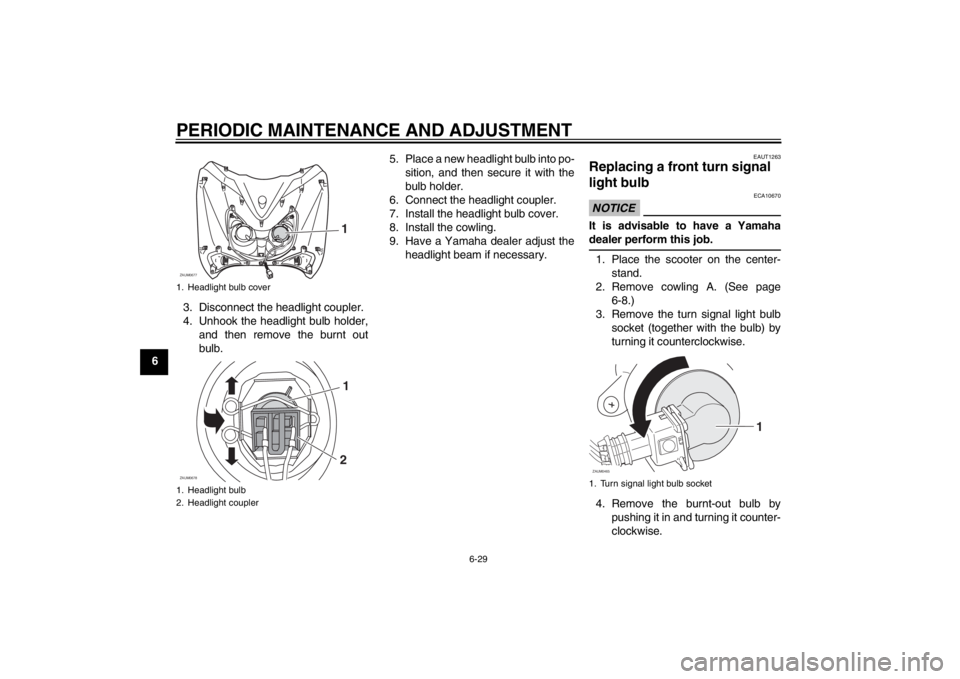
63. Disconnect the headlight coupler.
4. Unhook the headlight bulb holder,
and then remove the burnt out
bulb.5. Place a new headlight bulb into po-
sition, and then secure it with the
bulb holder.
6. Connect the headlight coupler.
7. Install the headlight bulb cover.
8. Install the cowling.
9. Have a Yamaha dealer adjust the
headlight beam if necessary.
EAUT1263
Replacing a front turn signal
light bulb NOTICE
ECA10670
It is advisable to have a Yamaha
dealer perform this job.1. Place the scooter on the center-
stand.
2. Remove cowling A. (See page
6-8.)
3. Remove the turn signal light bulb
socket (together with the bulb) by
turning it counterclockwise.
4. Remove the burnt-out bulb by
pushing it in and turning it counter-
clockwise.
1. Headlight bulb cover
1. Headlight bulb
2. Headlight coupler
1
ZAUM0677 ZAUM0678
1
2
1. Turn signal light bulb socket
1
ZAUM0465
U16PE3E0.book Page 29 Tuesday, June 19, 2012 5:17 PM
Page 71 of 86
PERIODIC MAINTENANCE AND ADJUSTMENT
6-30
6 5. Insert a new bulb into the socket,
push it in, and then turn it clock-
wise until it stops.
6. Install the socket (together with the
bulb) by turning it clockwise.
7. Install the cowling.
EAUM2191
Replacing a tail/brake light
bulb or a rear turn signal light
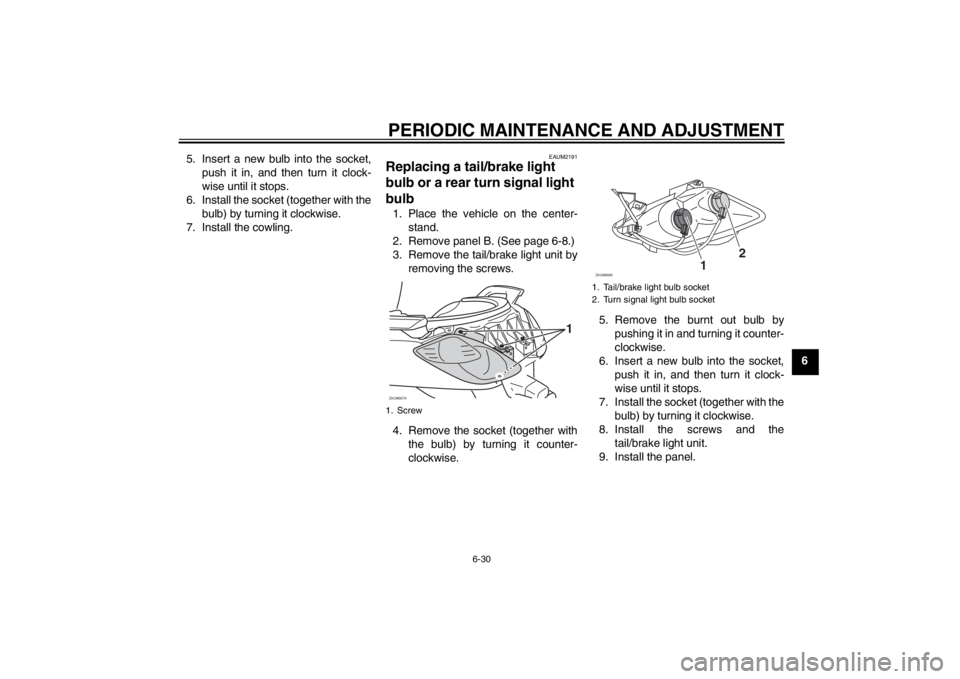
bulb 1. Place the vehicle on the center-
stand.
2. Remove panel B. (See page 6-8.)
3. Remove the tail/brake light unit by
removing the screws.
4. Remove the socket (together with
the bulb) by turning it counter-
clockwise.5. Remove the burnt out bulb by
pushing it in and turning it counter-
clockwise.
6. Insert a new bulb into the socket,
push it in, and then turn it clock-
wise until it stops.
7. Install the socket (together with the
bulb) by turning it clockwise.
8. Install the screws and the
tail/brake light unit.
9. Install the panel.1. ScrewZAUM0679
1
1. Tail/brake light bulb socket
2. Turn signal light bulb socketZAUM0680
12
U16PE3E0.book Page 30 Tuesday, June 19, 2012 5:17 PM