Page 65 of 104
Pre-operation checks
59
locked in place. (See page 29 for telescopic
steering system operation procedures.)
EJU32644Quick Shift Trim System (Q.S.T.S.) checks
Operate the Q.S.T.S. selector lock lever and
the Q.S.T.S. selector several times to make
sure that operation is smooth throughout the
whole range. Also, make sure that the jet
thrust nozzle moves as the Q.S.T.S. selector
is operated and that the Q.S.T.S. selector se-curely locks in place. (See page 32 for
Q.S.T.S. operation procedures.)
EJU32634Reverse system checks
WARNING
EWJ00031
Do not touch the reverse gate while the
shift lever is being operated, otherwise
you could be pinched.
Operate the shift lever several times to make
sure that operation is smooth throughout the
whole range. Also, make sure that the reverse
UF2R73E0.book Page 59 Monday, June 20, 2011 9:44 AM
Page 66 of 104

EJU41431Th")
Pre-operation checks
60
gate moves up and down according to the op-
eration of the shift lever and that the gate
makes contact with the stoppers. (See page
31 for reverse system operation.)
EJU41431Throttle lever checks
Operate the throttle lever several times to
make sure that operation is smooth through-
out the whole range. Also, make sure that the
throttle lever returns automatically to its fully
closed (idle) position when released.Face the handlebars straight ahead with the
handlebars in the lowest position and the
throttle lever in the fully closed (idle) position,
and then make sure that there is the proper
amount of throttle lever free play when the
throttle lever is in the fully closed (idle) posi-
tion. (See page 29 for telescopic steering sys-
tem operation procedures.)
EJU40112Remote control transmitter check
Make sure that the remote control transmitter
operates properly. (See page 26 for Yamaha
Security System setting procedures and page
33 for Low RPM Mode activation procedures.)
1Stopper
1
1Lowest position with handlebars facing
straight ahead
1Throttle lever free play
Throttle lever free play:
2.0–5.0 mm (0.08–0.20 in)
1
1
UF2R73E0.book Page 60 Monday, June 20, 2011 9:44 AM
Page 67 of 104
 check
Make sure that the engine shut-off cord (lan-
yard) is not damaged. If the cord is damaged,
replace it. WARNING! Never try to repa")
Pre-operation checks
61
EJU32663Engine shut-off cord (lanyard) check
Make sure that the engine shut-off cord (lan-
yard) is not damaged. If the cord is damaged,
replace it. WARNING! Never try to repair
the engine shut-off cord (lanyard) or tie it
together. The engine shut-off cord (lan-
yard) may not pull free when the operator
falls off, allowing the watercraft to contin-
ue to run and cause an accident.
[EWJ01220]
EJU32675
Switch checks
NOTICE
ECJ01310
Do not run the engine over 4000 r/min on
land. Also, do not run the engine for more
than 15 seconds without supplying water,
otherwise the engine could overheat.
Check the start switch, the engine stop
switch, and the engine shut-off switch forproper operation. (See pages 27 to 27 for in-
formation on operating each switch.)
To check the operation of the switches:
(1) If the lock mode is selected for the
Yamaha Security System setting, select
the unlock mode. (See page 26 for
Yamaha Security System setting proce-
dures.)
(2) Push the start switch to make sure that
the engine starts.
(3) As soon as the engine starts running,
push the engine stop switch to make sure
that the engine stops immediately.
(4) Restart the engine, and then pull the en-
gine shut-off cord (lanyard) to remove the
clip from the engine shut-off switch to
make sure that the engine stops immedi-
ately.
EJU40101Storage compartment checks
Make sure that the storage compartments are
not damaged and that water has not collected
in the compartments. (See page 42 for infor-
mation on the storage compartments.)
1Engine shut-off switch
2Clip
3Start switch
4Engine stop switch
5Engine shut-off cord (lanyard)
23 1
5 4
UF2R73E0.book Page 61 Monday, June 20, 2011 9:44 AM
Page 68 of 104

Pre-operation checks
62
EJU41081Fire extinguisher holder, cover, and band
checks
Make sure that the fire extinguisher holder,
cover, and band are not damaged and that
the cover is securely held in place using the
band. (See page 45 for information on the fire
extinguisher holder, cover, and band.)
EJU32543Fire extinguisher check
Check that there is a full fire extinguisher on
board.
To check the fire extinguisher, see the instruc-
tions supplied by the fire extinguisher manu-
facturer. Always keep the fire extinguisher
secured in the holder with its cover in place.
Always carry a fire extinguisher on board. A
fire extinguisher is not standard equipment
with this watercraft. If you do not have one,
contact a Yamaha dealer or a fire extinguisher
dealer to obtain one meeting the proper spec-
ifications.
EJU40121Safety equipment check
Check that safety equipment meeting the ap-
plicable regulations is on board.
EJU32352Hull and deck check
Check the hull and deck for damage or other
problem.
EJU32656Jet intake checks
Make sure that the jet intake is not damaged
or clogged with weeds or debris. If the jet in-take is clogged, clean it. (See page 90 for in-
formation on the jet intake.)
EJU32475Stern drain plug checks
Loosen the stern drain plugs and remove
them, and then make sure that the plugs are
not damaged and that there is no foreign ma-
terial on the threads. NOTICE: Before in-
stalling the stern drain plugs, clean the
drain plug threads to remove any foreign
materials, such as dirt or sand. Otherwise,
the stern drain plugs could be damaged,
allowing water to enter the engine com-
partment. Make sure that the stern drain
plugs are tightened securely before
launching the watercraft. Otherwise, water
may flood the engine compartment and
cause the watercraft to submerge.
[ECJ00361]
Securely install the stern drain plugs by tight-
ening them until they stop.
1Stern drain plug
1
UF2R73E0.book Page 62 Monday, June 20, 2011 9:44 AM
Page 69 of 104

Pre-operation checks
63
EJU41440Hood check
Push down on the rear of the hood and make
sure that it is securely closed.
EJU40144Post-launch checks
Perform the post-launch checks in the pre-op-
eration checklist while the watercraft is in the
water and the engine is running.
To perform the post-launch checks:
(1) Launch the watercraft. (See page 65 for
information on launching the watercraft.)
(2) Perform the checks and make sure that
there are no malfunctioning items or oth-
er problems.
EJU41810Cooling water pilot outlet check
Make sure that water is discharged from the
port (left) cooling water pilot outlet while the
engine is running. (See page 29 for informa-
tion on the cooling water pilot outlets.)
EJU37451Dual analog meter unit check
Make sure that the dual analog meter unit op-
erates properly. (See page 35 for information
on proper operation of the dual analog meter
unit.)
EJU41330Engine idling speed check
Start the engine and warm it up. Use the ta-
chometer in the dual analog meter unit to
make sure that the engine idling speed is not
significantly above or below the specified
range.
Engine idling speed:
1250 ±100 r/min
UF2R73E0.book Page 63 Monday, June 20, 2011 9:44 AM
Page 70 of 104

Operation
64
EJU32902
Operating your watercraft
WARNING
EWJ00510
Before operating your watercraft, become
familiar with all of the controls. Consult a
Yamaha dealer about any control or func-
tion that you do not fully understand. Fail-
ure to understand how the controls work
could cause an accident or prevent you
from avoiding an accident.
EJU32942Getting to know your watercraft
Operating your watercraft requires skills ac-
quired through practice over a period of time.
Take the time to learn the basic techniques
well before attempting more difficult maneu-
vers.
Operating your new watercraft can be a very
enjoyable activity, providing you with hours of
pleasure. However, it is essential to familiar-
ize yourself with the operation of the water-
craft to achieve the skill level necessary to
enjoy riding safely.
Before operating this watercraft, read this
owner’s/operator’s manual, the Riding Prac-
tice Guide, the Riding Instruction card, and all
labels on the watercraft. Pay particular atten-
tion to the safety information beginning on
page 11. These materials should give you an
understanding of the watercraft and its opera-
tion.
Remember: This watercraft is designed to
carry the operator and 1 passenger. Never
exceed the maximum load limit or allow more
than 2 persons to ride the watercraft at any
time.
EJU36042Learning to operate your watercraft
Before operating the watercraft, always per-
form the pre-operation checks listed on page
54. The short time spent checking the water-
craft will reward you with added safety and re-
liability.
Check local laws before operating your water-
craft.
Operate defensively at safe speeds and keep
a safe distance away from people, objects,
and other watercraft. Select a wide area to
learn in, where there is good visibility and light
boat traffic.
Use the buddy system—operate with some-
one nearby. Scan constantly for people, ob-
jects, and other watercraft. Be alert for
conditions that limit your visibility or block your
vision of others.
You should grip the handlebars firmly and
keep both feet on the floor of the footwell. Do
not attempt to ride with a passenger until your
operating skills are fully developed.
Maximum load:
160 kg (353 lb)
Load is the total weight of cargo, oper-
ator, and passenger.
UF2R73E0.book Page 64 Monday, June 20, 2011 9:44 AM
Page 71 of 104

Operation
65
EJU41340Riding position
Operator riding position
The operator should grip the handlebars firm-
ly with both hands and sit astride the seat with
both feet on the floor of the footwell.
Passenger riding position
The passenger should hold on firmly to the
operator and sit astride the seat with both feet
on the floor of the footwell. Never allow a pas-
senger to ride in front of the operator.
EJU32802Launching the watercraft
When launching the watercraft, make sure
that there are no obstacles around you.
If the watercraft is launched from a trailer,
someone should make sure that waves do not
push the watercraft into the trailer.
EJU36345Starting the engine on water
WARNING
EWJ01530
Do not apply throttle when anyone is at the
rear of the watercraft. Turn the engine off
or keep it at idle. Water and debris exiting
the jet thrust nozzle can cause severe inju-
ry.
To start the engine:
(1) If the lock mode is selected for the
Yamaha Security System setting, select
the unlock mode. (See page 26 for
Yamaha Security System setting proce-
dures.)
(2) Move the watercraft to an area that is free
from weeds and debris, and has a water
depth of at least 60 cm (2 ft) from the bot-
tom of the watercraft. NOTICE: Never
run the engine in water that is less
than 60 cm (2 ft) deep from the bottom
of the watercraft, otherwise pebbles or
sand could be sucked into the jet in-
take, causing impeller damage and en-
gine overheating.
[ECJ00472]
(3) Attach the engine shut-off cord (lanyard)
to your left wrist, and then attach the clip
to the engine shut-off switch. (See page
27 for information on operating the en-
gine shut-off switch.) WARNING! Check
that the engine shut-off cord (lanyard)
60 cm (2 ft)
UF2R73E0.book Page 65 Monday, June 20, 2011 9:44 AM
Page 72 of 104
 is not attached
correctly, it may not pull free when the
operator falls off, allowing the water-
craft to continue to run and")
Operation
66
is attached correctly. If the engine
shut-off cord (lanyard) is not attached
correctly, it may not pull free when the
operator falls off, allowing the water-
craft to continue to run and cause an
accident.
[EWJ00581]
(4) With the throttle lever released, push the
start switch (green button) to start the en-
gine. (See page 27 for information on op-
erating the start switch.)
EJU32862Stopping the engine
Release the throttle lever, and then push the
engine stop switch (red button) to stop the en-
gine. WARNING! You need throttle to steer.
Shutting the engine off can cause you to
hit an obstacle you are attempting toavoid. A collision could result in severe in-
jury or death.
[EWJ00601]
EJU32872
Leaving the watercraft
If leaving the watercraft, remove the clip from
the engine shut-off switch to prevent acciden-
tal starting or unauthorized operation by chil-
dren or others.
EJU40221Operating the watercraft
When the shift lever is in the forward position
and the engine is running, the watercraft will
move forward. The watercraft will move for-
ward at trolling speed even if the throttle lever
1Clip
2Engine shut-off switch
3Engine shut-off cord (lanyard)
12
3
UF2R73E0.book Page 66 Monday, June 20, 2011 9:44 AM
 1
1 2
2 3
3 4
4 5
5 6
6 7
7 8
8 9
9 10
10 11
11 12
12 13
13 14
14 15
15 16
16 17
17 18
18 19
19 20
20 21
21 22
22 23
23 24
24 25
25 26
26 27
27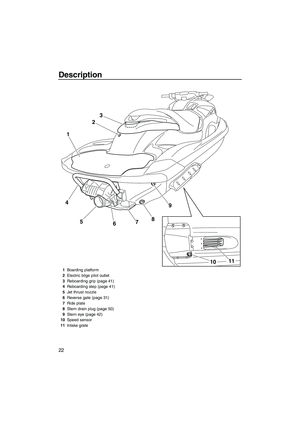 28
28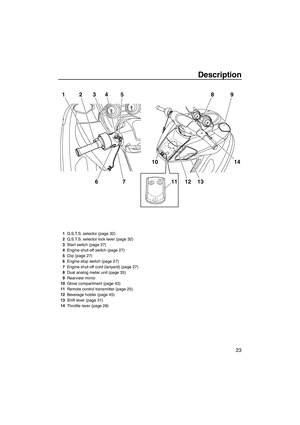 29
29 30
30 31
31 32
32 33
33 34
34 35
35 36
36 37
37 38
38 39
39 40
40 41
41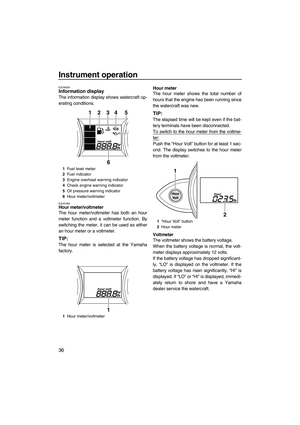 42
42 43
43 44
44 45
45 46
46 47
47 48
48 49
49 50
50 51
51 52
52 53
53 54
54 55
55 56
56 57
57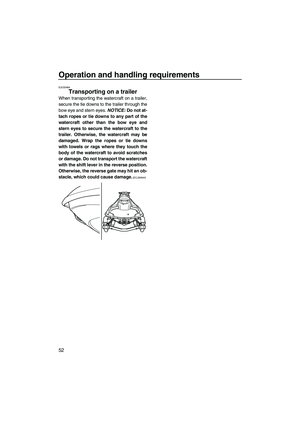 58
58 59
59 60
60 61
61 62
62 63
63 64
64 65
65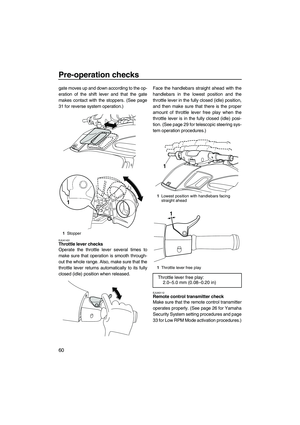 66
66 67
67 68
68 69
69 70
70 71
71 72
72 73
73 74
74 75
75 76
76 77
77 78
78 79
79 80
80 81
81 82
82 83
83 84
84 85
85 86
86 87
87 88
88 89
89 90
90 91
91 92
92 93
93 94
94 95
95 96
96 97
97 98
98 99
99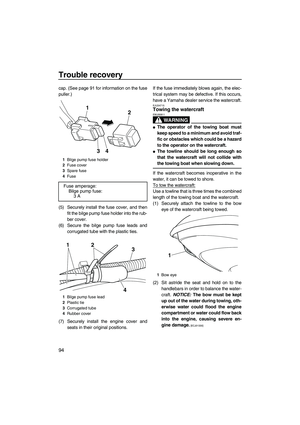 100
100 101
101 102
102 103
103
EJU32644Quick Shift Trim System (Q.S.T.S.) checks
Operate the Q.S.T.S. selector lock lever")