Page 41 of 78

CHARGING THE BATTERY
6-7
2
3
4
567
8
9
pears in the display during charg-
ing. The display goes off if the
charging plug is unplugged during
charging.
Even if the key is turned to “ON”,
the vehicle does not enter thestandby mode during charging.
Completing charging
When the battery is fully charged, the
display goes off automatically after a
few minutes. 1. Grasp the charging plug, and then unplug it from the electrical outlet.
NOTICE: Do not pull the charg-
ing cord to unplug the charging
plug from the electrical outlet.
This could damage the charging
cord.
[ECA17470]
2. Open the seat. (See page 4-12 for
more information.)
3. Hold the charging plug, and while pressing the charging cord into the
groove, wind it clockwise as
shown. NOTICE: If the charging
cord is not wound properly, the
vehicle, charging cord or charg- ing plug can be damaged when
closing the seat.
[ECA17480]
4. Secure the charging cord by plac- ing it in the holder as shown.
1. Charging plug
1
1. Charging plug
2. Groove
3. Charging cord
1. Holder
1 2
3
1
1CB-9-EA.book 7 ページ 2012年4月11日 水曜日 午前9時34分
Page 42 of 78

CHARGING THE BATTERY
6-8
1
2
3
4
56
7
8
95. Close the seat, and push down on
the back to lock it in position.
TIP
Before closing the seat, make sure
that nothing is left under the seat.
Make sure that the seat is securelylocked before riding.
6. Remove the key.WARNING
EWA15900
When not in use, do not leave the
charging plug plugged into an out-
let. Dust or foreign objects could
build up and cause a fire. Be sure to
unplug the charging plug from theoutlet after use.
EAU50402
Charging time Normal charging
Charging time varies depending on the
riding conditions before charging, re-
maining battery level, and ambient tem-
perature. It takes approximately seven
hours to charge the battery from a 0%
charged level in the optimum ambient
temperature range of 15 C – 25 C.TIPWhen the charging process is complet-
ed, the power from the built-in batterycharger is cut off automatically.
Waiting mode for charging
The vehicle enters a waiting mode if the temperature is not suitable for charging
as follows:
The battery may be above the
maximum 50
C immediately after
riding. In this case, the charger en-
ters a waiting mode and “HEAT”
flashes until the battery and bat-
tery charger reach the specified
temperature.
If ambient temperature is below –5
C, “COOL” flashes until the bat-
tery and battery charger reach the
specified temperature.
When the temperature is suitable for
charging, charging starts automatically.
100
50
0 2.0 4.0 7.0
Charging time (hours)
Battery
level (%)
1CB-9-EA.book 8 ページ 2012年4月11日 水曜日 午前9時34分
Page 43 of 78
 b")
CHARGING THE BATTERY
6-9
2
3
4
567
8
9
EAU50411
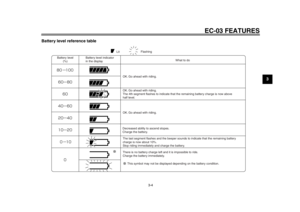
Display of charging progress
status The charging process is displayed by
the battery level indicator.
EAU50425
About the battery Lithium-ion (Li-ion) battery
The Li-ion battery used in the EC-03
features high energy density and has a
high voltage (approximately three times
that of nickel-cadmium (Ni-Cd) or nick-
el-hydrogen (Ni-MH) batteries), mean-
ing it can be made both compact and
lightweight.
Nickel-cadmium and nickel-hydrogen
batteries have a memory effect that
causes electric output capacity to de-
crease as a result of repeated partial
discharging and charging, so that they
need to have to be completely dis-
charged periodically. Li-ion batteries
can be repeatedly partially charged
without requiring fully discharging.TIP
It is not necessary to use up the
battery before charging.
The electric output capacity de-
creases over time and use, but the
rate at which it depletes depends
on condition of use.
The battery discharge may vary
depending on the ambient temper-ature. At low temperatures, the
traveling distance on a single
charge is reduced compared with
normal temperatures and charging
also takes longer. At low tempera-
tures, the electric output capacity
decreases, compared with normal
temperatures, and traveling dis-
tance on a single charge is re-
duced, but this is normal.
Storing the vehicle in an extremely
hot or cold place could decrease
the electric output capacity.
Even if the battery is not used, thebattery discharges gradually.
Recycling the battery
Li-ion batteries can be recycled. If the
electric output capacity decreases ex-
cessively due to depletion, have a
Yamaha dealer replace the battery. Al-
ways follow local regulations regarding
the disposal of batteries.
0 2020 40
40 60
60 80
80 99
100
Charging progress
status in the display
Charging progress
status (%)
Not displayed
Lit Flashing
1CB-9-EA.book 9 ページ 2012年4月11日 水曜日 午前9時34分
Page 44 of 78

CHARGING THE BATTERY
6-10
1
2
3
4
56
7
8
9Battery depletion
The electric output capacity of the
Li-ion battery used in the EC-03 gradu-
ally decreases in the course of use. Al-
though the extent of depletion varies
based on the conditions of use, electric
output capacity typically decreases to
70% of a new battery when having trav-
eled 8000–10000 km for two years.
This is equivalent to charging about
500 times with the condition of riding
16–20 km on a single charge.
Battery electric output auto-stop-
ping function
The battery is equipped with a function
to prevent further use in case of exces-
sive depletion. When eight years have
passed since initial battery charging or the accumulated charging amount has
reached 14000 Ah, the battery will no
longer be usable.
TIP
When the battery is replaced with
a new one, fully charge the battery
once before using it. If the battery
is not fully charged, the battery lev-
el indicator does not show the pre-
cise battery level.
At low temperatures such as 0
C,
the electric output capacity de-
creases by approximately 20%
compared with normal tempera-
ture.
If a depleted battery is used at low
temperatures, the electric output
capacity decreases by approxi-
mately 20% compared with normaltemperatures.
1CB-9-EA.book 10 ページ 2012年4月11日 水曜日 午前9時34分
Page 45 of 78

7-1
2
3
4
5
678
9
OPERATION AND IMPORTANT RIDING POINTS
EAU15951
Read the Owner’s Manual carefully to
become familiar with all controls. If
there is a control or function you do not
understand, ask your Yamaha dealer.
WARNING
EWA10271
Failure to familiarize yourself with
the controls can lead to loss of con-
trol, which could cause an accidentor injury.
EAU50093
Preparations for starting off TIPMake sure the accelerator grip is
closed before starting off. An error
could occur if the accelerator grip isturned.
1. Stand on the left side of the vehi- cle.
2. While pulling the rear brake lever with your left hand and holding the
grab bar with your right hand, push
the vehicle off the centerstand.
WARNING
EWA15661
Before placing the vehicle on or
pushing it off the centerstand or sit-
ting on the seat, be sure the key is
“OFF”. Otherwise, the vehicle could start moving unexpectedly if the ac-
celerator grip is turned accidentally.
3. Put your right foot on the footrest, and sit on the seat. At the same
time support the vehicle with your
left foot so that the vehicle does
not fall over.
4. Squeeze the rear brake with your left hand to prevent the vehicle
from moving.
1CB-9-EA.book 1 ページ 2012年4月11日 水曜日 午前9時34分
Page 46 of 78

OPERATION AND IMPORTANT RIDING POINTS
7-2
1
2
3
4
5
67
8
95. Turn the key to “ON”.
After all displays come on for a few
seconds, the vehicle enters the
standby mode.
TIP
When the security lock is locked,
the security lock indicator “ LOCK” comes on.
If the accelerator grip is turned
while the vehicle is in the standbymode, the beeper sounds.
6. Cancel the standby mode by pressing one of the buttons.
The vehicle enters the security
lock unlocking mode.
“– – – – –” is displayed.
TIPIf the security lock is not locked, after
canceling the standby mode, the vehi-
cle enters the riding mode. When the
vehicle is in the riding mode, the beeper
sounds. The beeper stops sounding
when either brake lever is squeezed or
the vehicle starts moving. Proceed tostep 8.
7. Enter the security number using the buttons.
Entering the correct number un-
locks the security lock and the ve-
hicle enters the riding mode.
1. Security lock indicator “ LOCK”
1
1. Button 1 “POWER”
2. Button 2 “SET”
3. Button 3 “SELECT”
12
3
1. Input number indicator “– – – – –”
1
1CB-9-EA.book 2 ページ 2012年4月11日 水曜日 午前9時34分
Page 47 of 78

OPERATION AND IMPORTANT RIDING POINTS
7-3
2
3
4
5
678
9
TIPWhen the vehicle enters the riding
mode, the beeper sounds. The beeper
stops sounding when either brake lever
is squeezed or the vehicle starts mov-ing.
If the entered security number is
incorrect, the buzzer sounds, “NG”
flashes for a few seconds, and the
vehicle returns to the standby
mode.
If this occurs, repeat the procedure
from the step 6.TIPIf an incorrect security number is en-
tered three times in succession, the se- curity lock cannot be unlocked even if
the correct security number is entered.
Repeat the procedure after first turning
the key to “OFF” and then back to “ON”
again.
8. Check the battery level indicator to make sure that the remaining
charged level is sufficient. (See
page 3-3 for more information
about the charge level.)
EAU53940
Starting off 1. Check that the operating status in-dicator “RUN” is displayed, and
that the vehicle is in the riding
mode.
2. Switch the turn signal on.
1. Incorrect number indicator “NG”
1
1. Battery level indicator
1
1. Operating status indicator “RUN”
1
1CB-9-EA.book 3 ページ 2012年4月11日 水曜日 午前9時34分
Page 48 of 78

OPERATION AND IMPORTANT RIDING POINTS
7-4
1
2
3
4
5
67
8
9
TIPThe beeper sounds while the turn sig-nal switch is signaling.3. Check in front of and behind the vehicle to make sure that it is safe
to start off.
4. Release the rear brake lever.
5. Check for oncoming traffic, and then slowly turn the accelerator
grip in order to start off.
6. Push the turn signal switch to can- cel the turn signals.TIPTo protect the battery, the EC-03 is
equipped with an auto-off function. The
power stops automatically if the vehicle
is stopped for more than five minutes. To restart the vehicle after the vehicle
has been stopped for more than five
minutes, turn the key to “OFF” and then
back to “ON” again.
EAU50111
Acceleration and deceleration The speed can be adjusted by opening
and closing the accelerator grip. To in-
crease the speed, turn the accelerator
grip in direction (a). To reduce the
speed, turn the accelerator grip in di-
rection (b).
(a)
(b)
1CB-9-EA.book 4 ページ 2012年4月11日 水曜日 午前9時34分