2012 VOLKSWAGEN TRANSPORTER tow
[x] Cancel search: towPage 118 of 486
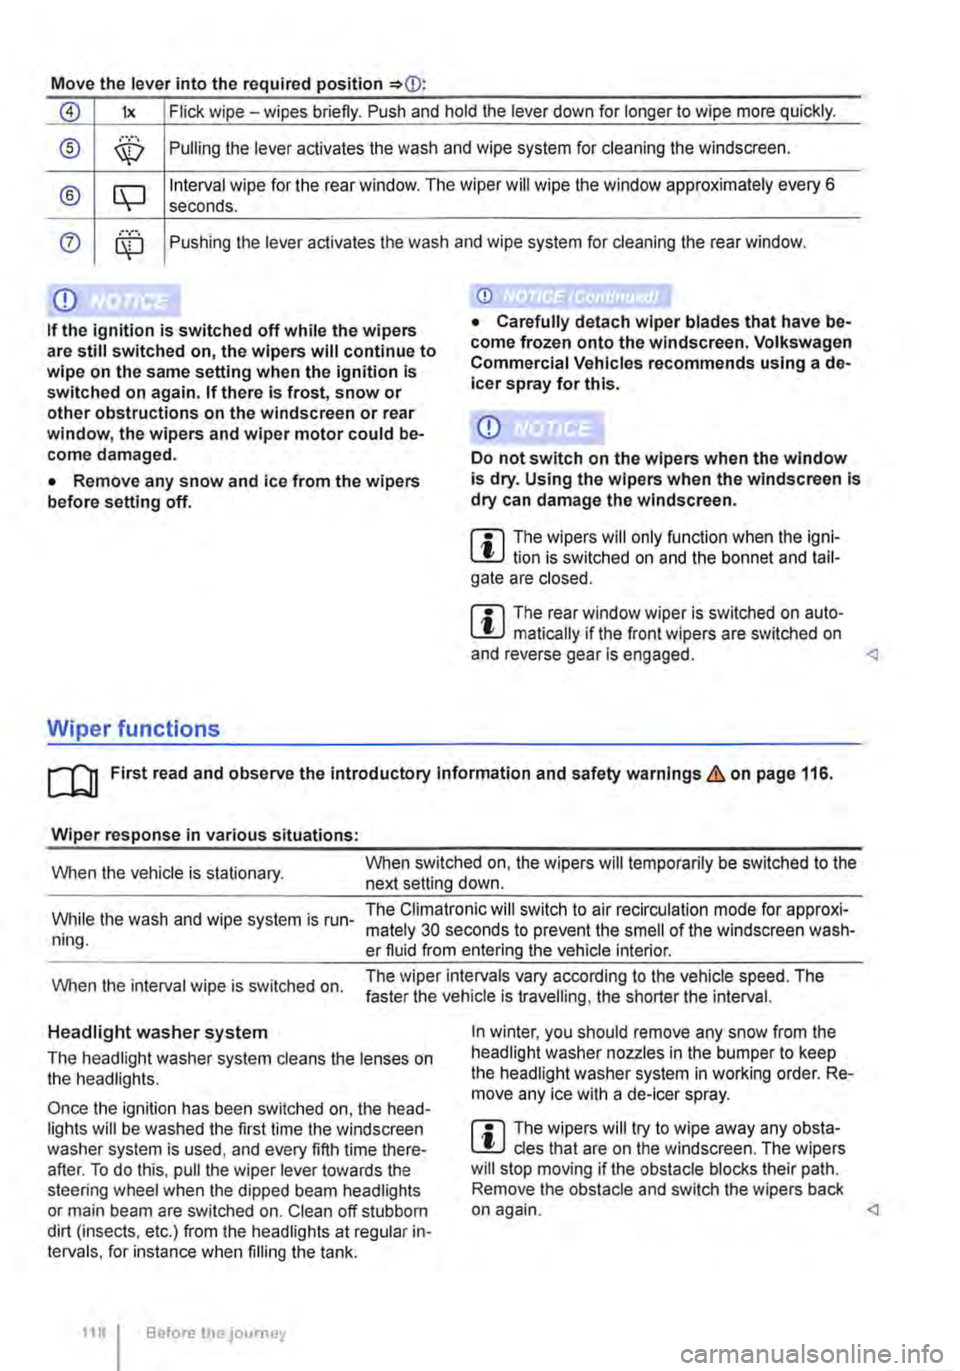
Move the lever into the required position
0 lx Flick wipe -wipes briefly. Push and hold the lever down for longer to wipe more quickly.
® ,··.··· \X:) Pulling the lever aclivates the wash and wipe system for cleaning the windscreen.
® CQ Interval wipe for the rear window. The wiper will wipe the window approximately every 6 seconds .
0 ........ Pushing the lever activates the wash and wipe system for cleaning the rear window.
Q)
If the ignition is switched off while the wipers are still switched on, the wipers will continue to wipe on the same setting when the ignition Is switched on again. If there Is frost, snow or other obstructions on the windscreen or rear window, the wipers and wiper motor could be-come damaged.
• Remove any snow and ice from the wipers before setting off.
Wiper functions
Q)
Do not switch on the wipers when the window is dry. Using the wipers when the windscreen Is dry can damage the windscreen.
m The wipers will only function when the igni-W lion is switched on and the bonnet and tail-gate are closed.
m The rear window wiper is switched on auto-W matically if the front wipers are switched on and reverse gear is engaged.
Wiper response in various situations:
When the vehicle is stationary. When switched on, the wipers will temporarily be switched to the next setting down.
While the wash and wipe system is run-ning.
The Climatronic will switch to air recirculation mode for approxi-mately 30 seconds to prevent the smell of the windscreen wash-er fluid from entering the vehicle interior.
When the interval wipe is switched on. The wiper intervals vary according to the vehicle speed. The faster the vehicle is travelling, the shorter the interval.
Headlight washer system
The headlight washer system cleans the lenses on the headlights.
Once the ignition has been switched on, the head-lights will be washed the first time the windscreen washer system is used, and every fifth time there-after. To do this, pull the wiper lever towards the steering wheel when the dipped beam headlights or main beam are switched on. Clean off stubborn dirt (insects, etc.) from the headlights at regular in-tervals, for instance when filling the tank.
118 Before the journey
In winter, you should remove any snow from the headlight washer nozzles in the bumper to keep the headlight washer system in working order. Re-move any ice with a de-icer spray.
m The wipers will try to wipe away any obsta-W cles that are on the windscreen. The wipers will stop moving if the obstacle blocks their path. Remove the obstacle and switch the wipers back on again.
Page 122 of 486

A WARNING (Continued)
asthma or similar illnesses. Immediately en-sure that there is a sufficient supply of fresh air and get out of the vehicle. If this is not possible, open all of the windows and doors.
• If the electrolyte fluid gets into the eyes or onto the skin, immediately wash the area with plenty of water for at least 15 minutes and consult a doctor.
• If the electrolyte fluid gets onto shoes or clothing, wash immediately with plenty of wa-ter for at least 15 minutes. Clean shoes and clothes thoroughly before wearing them again.
Interior mirror
A WARNING (Continued)
• If the electrolyte fluid is swallowed, imme-diately rinse the mouth with plenty of water for at least 15 minutes. Do not induce vomit-ing unless instructed to do so by a doctor. Seek medical assistance immediately.
CD
If the glass of an automatic anti-dazzle mirror is broken, electrolyte fluid can leak from the mir-ror. This fluid corrodes plastic surfaces. Re-move the fluid as soon as possible, e.g. using a wet sponge.
BSG-0101.
Fig. 99 On the windscreen: manual anti-dazzle in-terior mirror.
1"'111 First read and observe the introductory L-lo::JJ information and safety warnings & on page 121.
The driver must adjust the interior mirror so that they can see clearly through the rear window.
1221 Before the journey
The driver's rear view may be restricted or com-pletely obscured by objects such as a sun blind on the rear window, items of clothing stowed on the luggage compartment cover, or a rear window that is covered in ice, snow or dirt.
Automatic anti-dazzle interior mirror
When the ignition is switched on, the interior mirror will darken automatically according to the amount of light it receives.
Key to Fig. 98:
G) Sensor for detemnining light incidence from the rear.
® Sensor for detemnining light incidence from the front.
If the light on the sensors is hindered or interrup-ted, e.g. by a sunblind, the automatic anti-dazzle interior mirror will not function or will not function correctly.
The automatic anti-dazzle function is deactivated when the reverse gear is selected. .,..
Page 123 of 486
Do not attach external navigation devices to the windscreen or near interior automatic anti-dazzle
Manual anti-dazzle interior mirror
• Basic position: the lever on the lower part of the mirror is pointing towards the windscreen.
• Pull the lever to the back to select the anti-daz-zle function 99.
Exterior mirrors
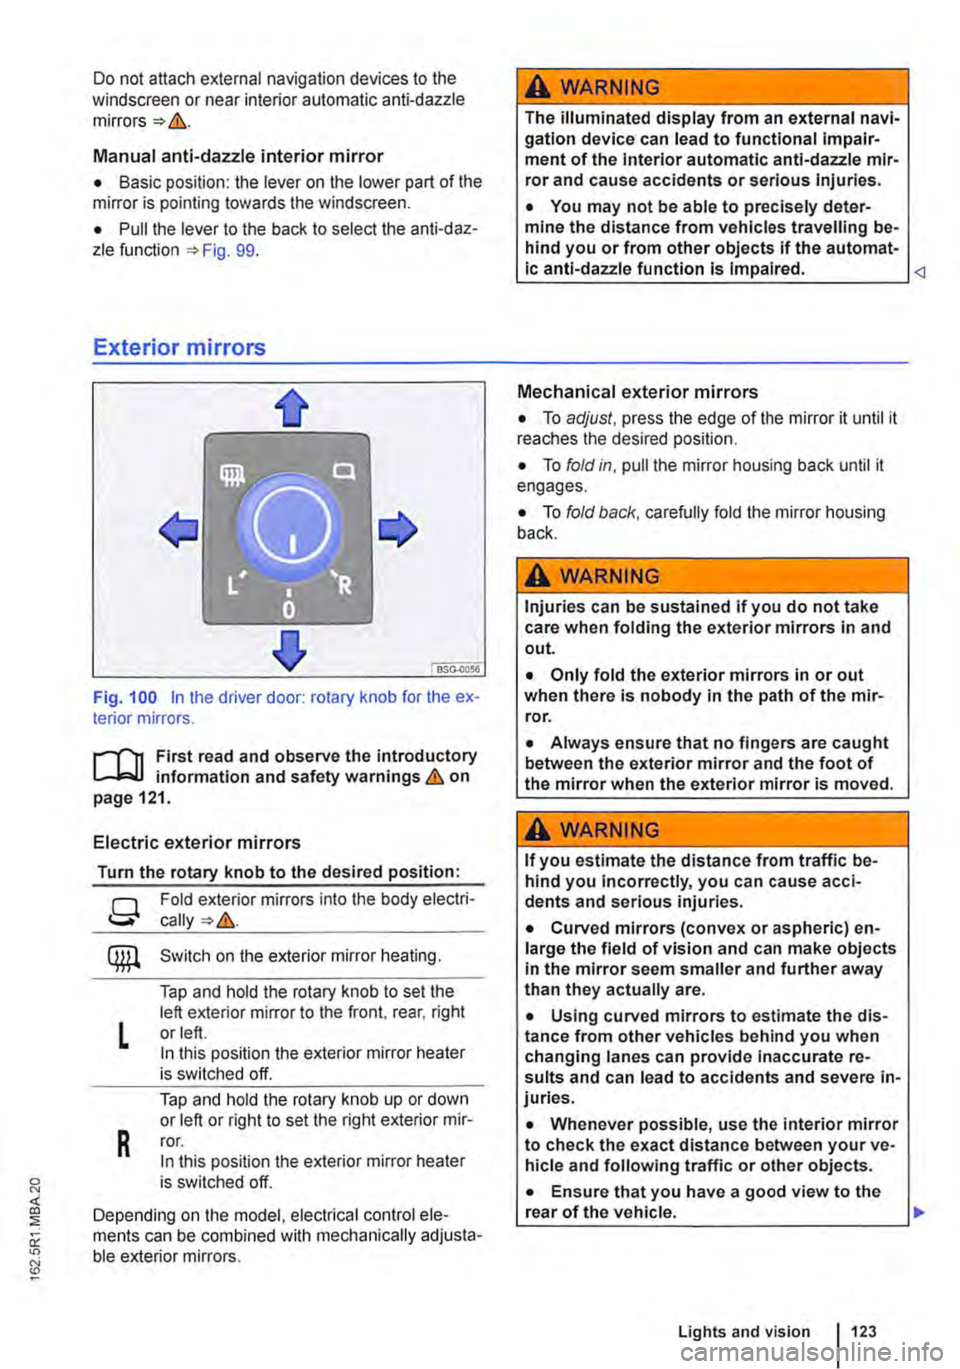
Fig. 100 in the driver door: rotary knob for the ex-terior mirrors.
First read and observe the introductory L..-Jr:.U information and safety warnings & on page 121.
Electric exterior mirrors
Turn the rotary knob to the desired position:
g
L
R
Fold exterior mirrors into the body electri-
Switch on the exterior mirror heating.
Tap and hold the rotary knob to set the left exterior mirror to the front, rear, right or left. In this position the exterior mirror heater is switched off.
Tap and hold the rotary knob up or down or left or right to set the right exterior mir-ror. In this position the exterior mirror heater is switched off.
Depending on the model, electrical control ele-ments can be combined with mechanically adjusta-ble exterior mirrors.
A WARNING
The illuminated display from an external navi-gation device can lead to functional impair-ment of the Interior automatic anti-dazzle mir-ror and cause accidents or serious injuries.
• You may not be able to precisely deter-mine the distance from vehicles travelling be-hind you or from other objects if the automat-ic anti-dazzle function is Impaired.
• To adjust, press the edge of the mirror it until it reaches the desired position.
• To fold in, pull the mirror housing back until it engages.
• To fold back, carefully fold the mirror housing back.
A WARNING
Injuries can be sustained if you do not take care when folding the exterior mirrors in and out.
• Only fold the exterior mirrors in or out when there is nobody in the path of the mir-ror.
• Always ensure that no fingers are caught between the exterior mirror and the foot of the mirror when the exterior mirror is moved.
A WARNING
If you estimate the distance from traffic be-hind you Incorrectly, you can cause acci-dents and serious injuries.
• Curved mirrors (convex or aspheric) en-large the field of vision and can make objects in the mirror seem smaller and further away than they actually are.
• Using curved mirrors to estimate the dis-tance from other vehicles behind you when changing lanes can provide inaccurate re-sults and can lead to accidents and severe in-juries.
• Whenever possible, use the interior mirror to check the exact distance between your ve-hicle and following traffic or other objects.
• Ensure that you have a good view to the rear of the vehicle. .,..
Lights and vision 123
Page 125 of 486
Transporting items
Driving notes
ClJl Introduction
This chapter contains information on the following subjects:
Stowing items of luggage . . . . . . . . . . . . . . . . . 126
Stowing cargo . . . . . . . . . . . . . . . . . . 127
Buckle straps . . . . . . . . . . . . . . . . . . . . . . . . . . . 128
Ratchet straps . . . . . . . . . . . . . . . . . . . 128 Driving with an open tailgate or open wing doors . . . . . . . . . . . . . . . . . . . . . 129
Driving a loaded vehicle .... 130
Always secure the load transported in the luggage compartment or load compartment, on the roof car-rier, on the load surface or trailer. Always use suita-ble securing straps with the fastening rings to se-cure heavy items. Never exceed the vehicle's max-imum payload. Both the payload and the distribu-tion of the load in the vehicle will have an effect on the driving response and braking distance &.
Using securing straps
• Follow the instructions for the securing straps.
• Observe specifications for maximum load rat-ing.
• The securing straps must be long enough for the item you wish to secure.
Damaged securing straps
Never use the securing straps if:
• Damage to the warp and weft of the webbing (cuts or fraying) accounts for more than 10% of the webbing.
• The seams are damaged.
• The webbing is deformed by friction or heat.
• The securing straps are cracked, especially if cracked across the strap, or if the straps have notches.
• The securing straps have splits or corrosion damage.
• There is damage to the tightening device and connection elements.
Additional information and warnings:
• Tailgate 49
• Wing doors 52
• Lights 106
• Luggage compartment 130
• Roof carrier 137
• Towing a trailer 139
• Wheels and tyres 367
• Vehicle weight and axle weight rating 450
A WARNING
Objects that are not secured, or are secured incorrectly, can cause serious injuries in the event of a sudden driving or braking manoeu-vre or accident. This applies particularly if objects are struck by the airbag when activa-ted and then flung through the vehicle interi-or. To reduce the risk of accidents, please ob-serve the following guidelines:
• Always stow all objects in the vehicle se· curely.
• Always use suitable straps to prevent ob-jects entering the deployment zones of the curtain alrbag, the combined curtain and side airbag or the front airbag during a sudden driving or braking manoeuvre.
• Objects should be stowed in the vehicle interior In such a way that they can never en-ter the alrbag deployment zones while the ve-hicle is In motion.
• Always keep stowage compartments closed while the vehicle is In motion.
• The front airbag must be switched off and the indicator lamp PASSENGER AIR BAG OFF 'Ji; must light up for as long as the front passenger seat backrest is folded forwards.
• Stowed objects must never cause passen-gers to assume an incorrect sitting position.
• If an item is being stowed on a seat, this seat must not be used by any passengers.
A WARNING
Transporting heavy objects changes the vehi-cle driving characteristics and increases the braking distance. Heavy loads which are not properly stowed or secured in the vehicle can lead to a loss of vehicle control and cause se-rious injury. .,..
Transporting items 125
Page 126 of 486
A WARNING (Continued)
• Transporting heavy objects changes the vehicle's handling and the centre of gravity.
• The load should be distributed as evenly and low as possible In the vehicle.
• Always secure heavy objects in the lug-gage compartment as far in front of the rear axle as possible.
A WARNING
The vehicle handling and braking effect may alter significantly If large or heavy objects are being transported.
• Always adapt your speed and driving style to suit visibility, weather, road and traffic con-ditions.
• Accelerate carefully and gently .
• Avoid sudden braking and driving ma-noeuvres.
• Brake earlier than in normal driving.
A WARNING
Unsuitable or damaged securing straps could rip In the event of a braking manoeuvre or ac-cident. This could cause objects to be flung through the interior and lead to severe or fa-tal injuries.
• Always use suitable and undamaged se-curing straps.
• Attach securing straps securely to the fas-tening rings.
• Never load the securing straps in excess of the load rating.
A wARNING
Securing straps, if used incorrectly, may get detached in the event of a sudden braking manoeuvre or accident. This could cause ob-jects to be flung through the interior and lead to severe or fatal injuries.
Stowing items of luggage
1'"'1'11 First read and observe the introductory L-.lr::.U information and safety warnings & on page 125. .,..
1261 Before the journey
A WARNING (Continued)
• Never fix securing straps between the fas-tening rings In the side panel and the fasten-ing rings in the vehicle floor.
• Never fix securing straps between oppo-site side walls.
• Observe the Information on the side trim panels.
A WARNING
Incorrect use of fastening rings can cause se-vere or fatal accidents.
• Always use suitable and undamaged se-curing straps.
• Attach securing straps securely to the fas-tening rings.
• loose objects in the vehicle can suddenly slide and change the way the vehicle han-dles.
• Never exceed the maximum load rating of the fastening rings when securing objects.
• Small and light objects should also be se-cured.
• Never secure a child seat to the fastening rings.
• Rotating single seats must always be turned In the direction of travel If a load is se-cured behind this seat using fastening rings.
• Never use elastic straps or nets to tie down loads.
• Distribute the load on the fastening rings evenly.
• Ensure that the load retains its form and position once it has been secured. Use stable packaging and anti-slip floor surfacing for your load.
m Suitable fastening belts and luggage stowage L!.J systems are available from a qualified work-shop. Volkswagen Commercial Vehicles recom-mends using a Voikswagen Commercial Vehicles dealership for this purpose.
Page 127 of 486
Always stow all items of luggage in the vehicle securely.
• Distribute items in the vehicle, on the roof and on the trailer as evenly as possible.
• Place heavy objects as far forward in the lug-gage compartment as possible. Position the rear seat backrests securely in the upright position.
• Secure luggage in the luggage compartment to the fastening rings with suitable straps 130.
• Adjust the headlight range 106.
• Adjust the tyre pressure according to the vehi-cle load. Adhere to the tyre pressure plate 367.
• In vehicles with a tyre monitoring system, set the new vehicle load level as necessary 318.
Stowing cargo
r-111 First read and observe the introductory L-l=:.LI information and safety warnings & on page 125.
Stow the load securely in the vehicle or on the load surface
• Before loading the vehicle, place a sturdy mat or similar cover flush with the vehicle floor. Where necessary, do not cover protruding parts of the ve-hicle floor.
• If necessary, remove the seats to increase the load area.
• The vehicle floor must be free of oil and dust, dry and fully clean in order to help prevent the load from sliding.
• Observe gross axle weight ratings and the gross vehicle weight rating.
• Distribute items in the vehicle, on the load sur-face, on the roof and on the trailer as evenly as possible.
• Stow heavy objects directly on the floor and above or in front of the rear axle and engage the rear seat backrests securely in an upright position.
CD
Hard objects on the shelf can chafe against the wires of the heating element in the rear window and cause damage.
m • Observe any information concerning the l!J loading of a trailer 139 .
• Observe any information concerning the load-ing of a roof carrier 137.
• Protect the seat rails or seat anchor points from damage.
• Secure luggage with suitable securing straps on the fastening rings 130.
• Adjust the headlight range 106.
• Adjust the tyre pressure according to the vehi-cle load. Adhere to the tyre pressure plate 367.
• In vehicles with a tyre monitoring system, set the new vehicle load level as necessary 318.
CD
Hard objects on the shelf can chafe against the wires of the heating element in the rear window and cause damage.
m • Observe any information concerning the l!J loading of a trailer =>page 139 .
• Observe any information concerning the load-ing of a roof carrier =>page 137 .
Page 129 of 486
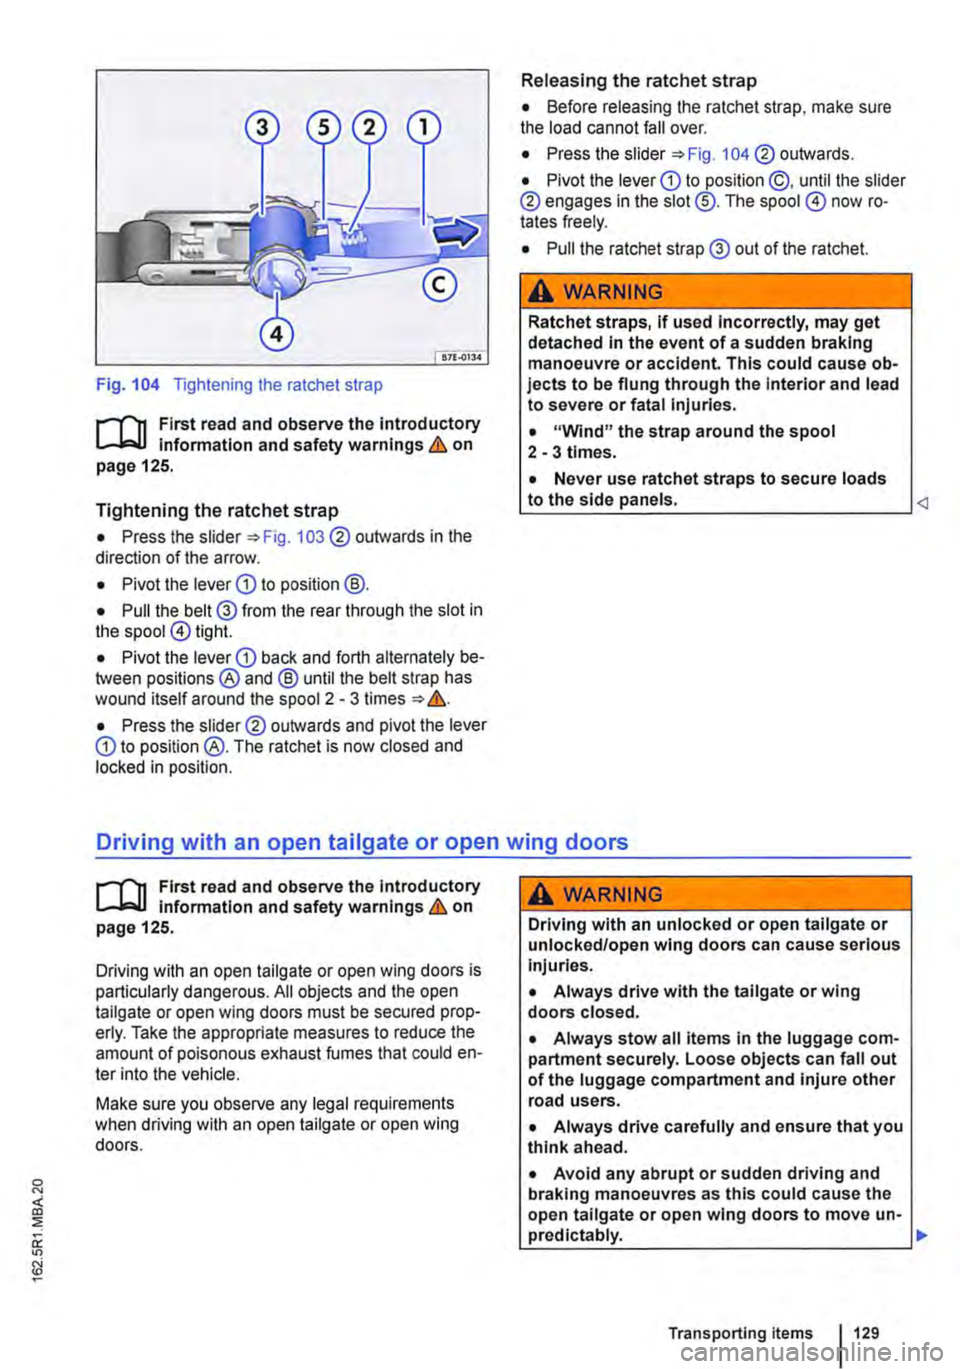
Fig. 104 Tightening the ratchet strap
r--f'n First read and observe the Introductory l.-..lr:=-ll information and safety warnings & on page 125.
Tightening the ratchet strap
• Press the slider =:>Fig. 103 ® outwards in the direction of the arrow.
• Pivot the lever CD to position@.
• Pull the belt@ from the rear through the slot in the spool@ tight.
• Pivot the lever CD back and forth alternately be-tween positions ® and @ until the belt strap has wound itself around the spool 2 -3 times ::. &.
• Press the slid er® outwards and pivot the lever CD to position @. The ratchet is now closed and locked in position.
Releasing the ratchet strap
• Before releasing the ratchet strap, make sure the load cannot fall over.
• Press the slider =:>Fig. 104 ® outwards.
• Pivot the lever CD to position @, until the slider ® engages in the slot@. The spool @) now ro-tates freely.
• Pull the ratchet strap @ out of the ratchet.
A WARNING
Ratchet straps, if used Incorrectly, may get detached in the event of a sudden braking manoeuvre or accident. This could cause ob-jects to be flung through the Interior and lead to severe or fatal injuries.
• "Wind" the strap around the spool 2-3 times.
• Never use ratchet straps to secure loads to the side panels.
r--f'n First read and observe the Introductory l.-..lr:=-ll Information and safety warnings & on page 125.
Driving with an open tailgate or open wing doors is particularly dangerous. All objects and the open tailgate or open wing doors must be secured prop-erly. Take the appropriate measures to reduce the amount of poisonous exhaust fumes that could en-ter into the vehicle.
Make sure you observe any legal requirements when driving with an open tailgate or open wing doors.
A WARNING
Driving with an unlocked or open tailgate or unlocked/open wing doors can cause serious injuries.
• Always drive with the tailgate or wing doors closed.
• Always stow all items in the luggage com-partment securely. Loose objects can fall out of the luggage compartment and injure other road users.
• Always drive carefully and ensure that you think ahead.
• Avoid any abrupt or sudden driving and braking manoeuvres as this could cause the open tailgate or open wing doors to move un-pred lctably. .,.
Transporting items 129
Page 130 of 486
A WARNING (Continued)
• Any objects protruding from the luggage compartment must be marked to ensure that they are visible to other road users. Comply with legal regulations.
• If items protrude out of the luggage com-partment, never use the tail gate or wing doors to "hold them in position".
• If you drive with the tailgate or wing doors open, remove any racks and luggage from the tail gate or a wing door.
A WARNING
Poisonous exhaust fumes can get into the in-terior when the tailgate or wing doors are open. This can result in loss of conscious-ness, carbon monoxide poisoning, serious Injury and accidents.
Driving a loaded vehicle
1"''l1 First read and observe the introductory L--Wl information and safety warnings & on page 125.
For good vehicle handling when driving a loaded vehicle, please observe the following:
• Stow all items of luggage page 127.
• Accelerate carefully and gently.
• Avoid sudden braking and driving manoeuvres.
• Brake earlier than in normal driving.
• If applicable, heed the information about driving with a trailer 139.
• If applicable, observe the information concern-ing the roof carrier 137.
Luggage compartment
CO Introduction
This chapter contains information on the following subjects:
Luggage compartment cover . . . . . . . . . . . . . . 132
130 Before the JOUrney
A WARNING (Continued)
• Always drive with the wing doors or tail-gate closed to prevent poisonous exhaust fumes getting into the vehicle.
• If exceptional circumstances require you to drive with an open tallgate or open wing doors, do the following to reduce the amount of poisonous exhaust fumes that could enter into the vehicle:
CD
-Close all windows and the sliding/tilting roof.
-Switch off air reclrculatlon mode.
-Open all vents In the dash panel.
-Switch the blowers to the highest set-ting.
The vehicle length and height are different when the wing doors or tailgate are open.
A wARNING
Moving loads can severely impair the vehi-cle's stability and driving safety which could cause accidents and severe Injuries.
• Secure objects properly to prevent them from sliding.
• Use suitable straps when securing heavy objects.
• Engage the rear seat backrests securely In