2012 VOLKSWAGEN TRANSPORTER instrument cluster
[x] Cancel search: instrument clusterPage 42 of 486
Locking and unlocking the vehicle from inside
c
1 PSG-0030
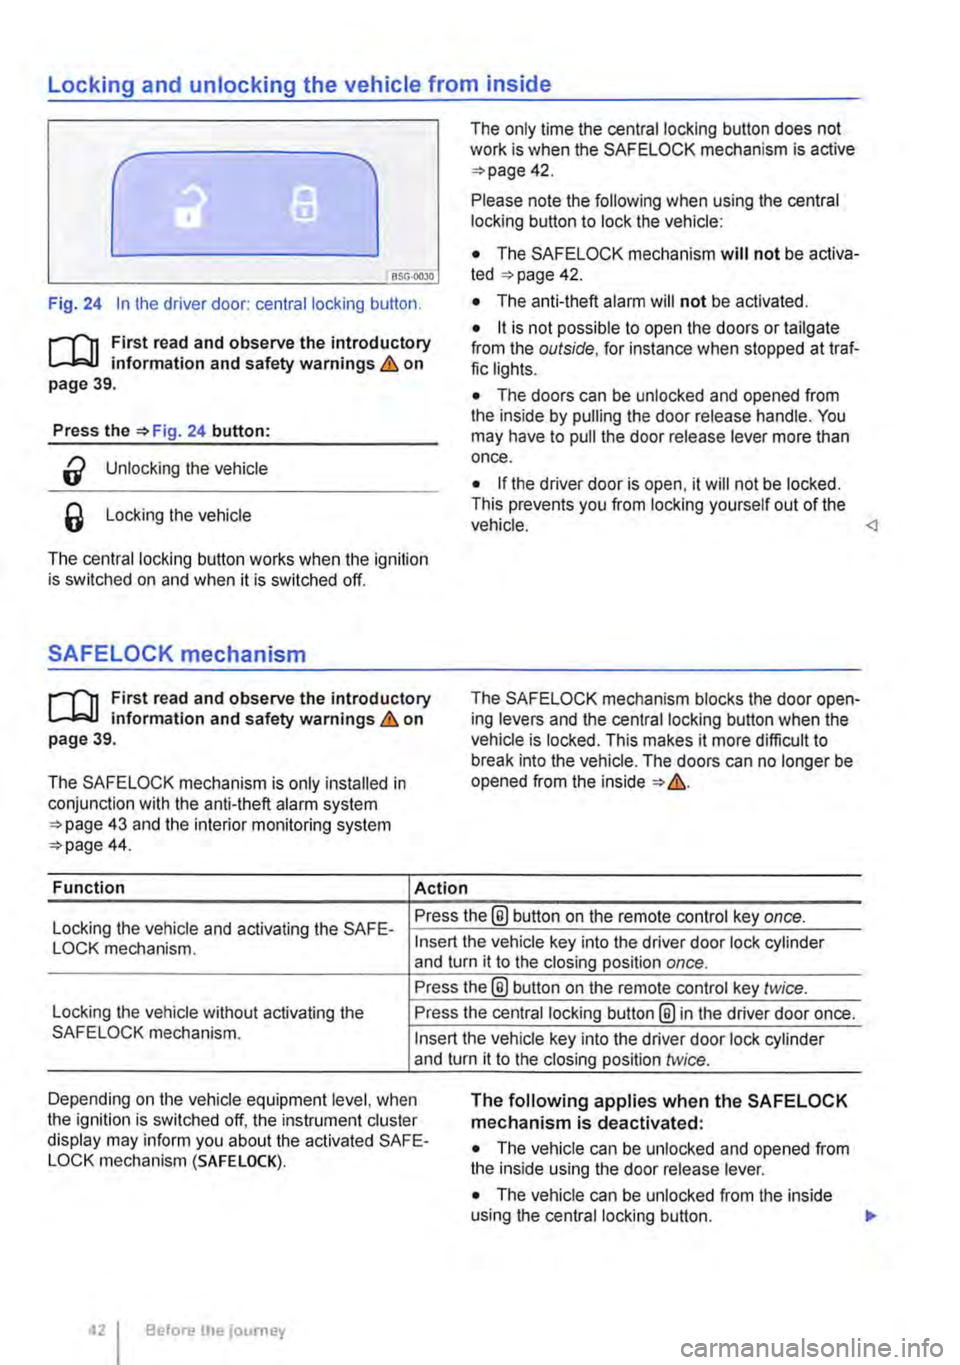
Fig. 24 In the driver door: central locking button.
rf'n First read and observe the introductory L.-J=.I.I information and safety warnings & on page 39.
Press the =>Fig. 24 button:
a Unlocking the vehicle
6 Locking the vehicle
The central locking button works when the ignition is switched on and when it is switched off.
SAFELOCK mechanism
rf'n First read and observe the introductory L.-J=.I.I information and safety warnings & on page 39.
The SAFELOCK mechanism is only installed in conjunction with the anti-theft alarm system =>page 43 and the interior monitoring system =>page 44.
Function Action
The only time the central locking button does not work is when the SAFE LOCK mechanism is active =>page 42.
Please note the following when using the central locking button to lock the vehicle:
• The SAFELOCK mechanism will not be activa-ted =:>page 42.
• The anti-theft alarm will not be activated.
• it is not possible to open the doors or tailgate from the outside, for instance when stopped at traf-fic lights.
• The doors can be unlocked and opened from the inside by pulling the door release handle. You may have to pull the door release lever more than once.
• If the driver door is open, it will not be locked. This prevents you from locking yourself out of the vehicle.
Locking the vehicle and activating the SAFE-Press the® button on the remote control key once.
LOCK mechanism.
Locking the vehicle without activating the SAFELOCK mechanism.
Insert the vehicle key into the driver door lock cylinder and turn it to the closing position once.
Press the@ button on the remote control key twice.
Press the central locking button@ in the driver door once.
Insert the vehicle key into the driver door lock cylinder and turn it to the closing position twice.
Depending on the vehicle equipment level, when the ignition is switched off, the instrument cluster display may inform you about the activated SAFE-LOCK mechanism (SAFE LOCK).
The following applies when the SAFELOCK mechanism is deactivated:
• The vehicle can be unlocked and opened from the inside using the door release lever.
• The vehicle can be unlocked from the inside using the central locking button. .,.
Before the journey
Page 45 of 486
• If the vehicle is being transported (e.g. on a fer-ry).
• If the vehicle is in a car wash.
Doors
CO Introduction
This chapter contains information on the following subjects:
Warning lamp . . . . . . . . . . . . . . . . . . . . . . . . . . . 45
Additional information and warnings:
• Exterior views page 5
• Vehicle key set 36
• Central locking system 39
• Manual opening and closing 413
A WARNING
Any door that Is not properly closed could open suddenly while the vehicle Is In motion. This could lead to severe Injuries.
Warning lamp
m If doors or the tailgate are still open when the W anti-theft alarm is activated, only the anti-theft alarm is activated. Interior monitoring and the anti-tow alarm are not activated until all doors and the tailgate are closed. <1
A WARNING (ConUnued)
• Stop as soon as possible and close the door.
• Make sure that the door Is closed properly and that the lock has engaged. The closed door must be flush with the surrounding body panels.
• Doors should only be opened or closed when you are sure there Is no-one in their path.
A WARNING
Any door being held open by the door arrest-er could close unexpectedly In strong winds or if the vehicle Is on a slope. This could lead to Injuries.
• Always keep a good grip on the handle when opening and closing doors.
m First read and observe the Introductory information and safety warnings&,. on page 45.
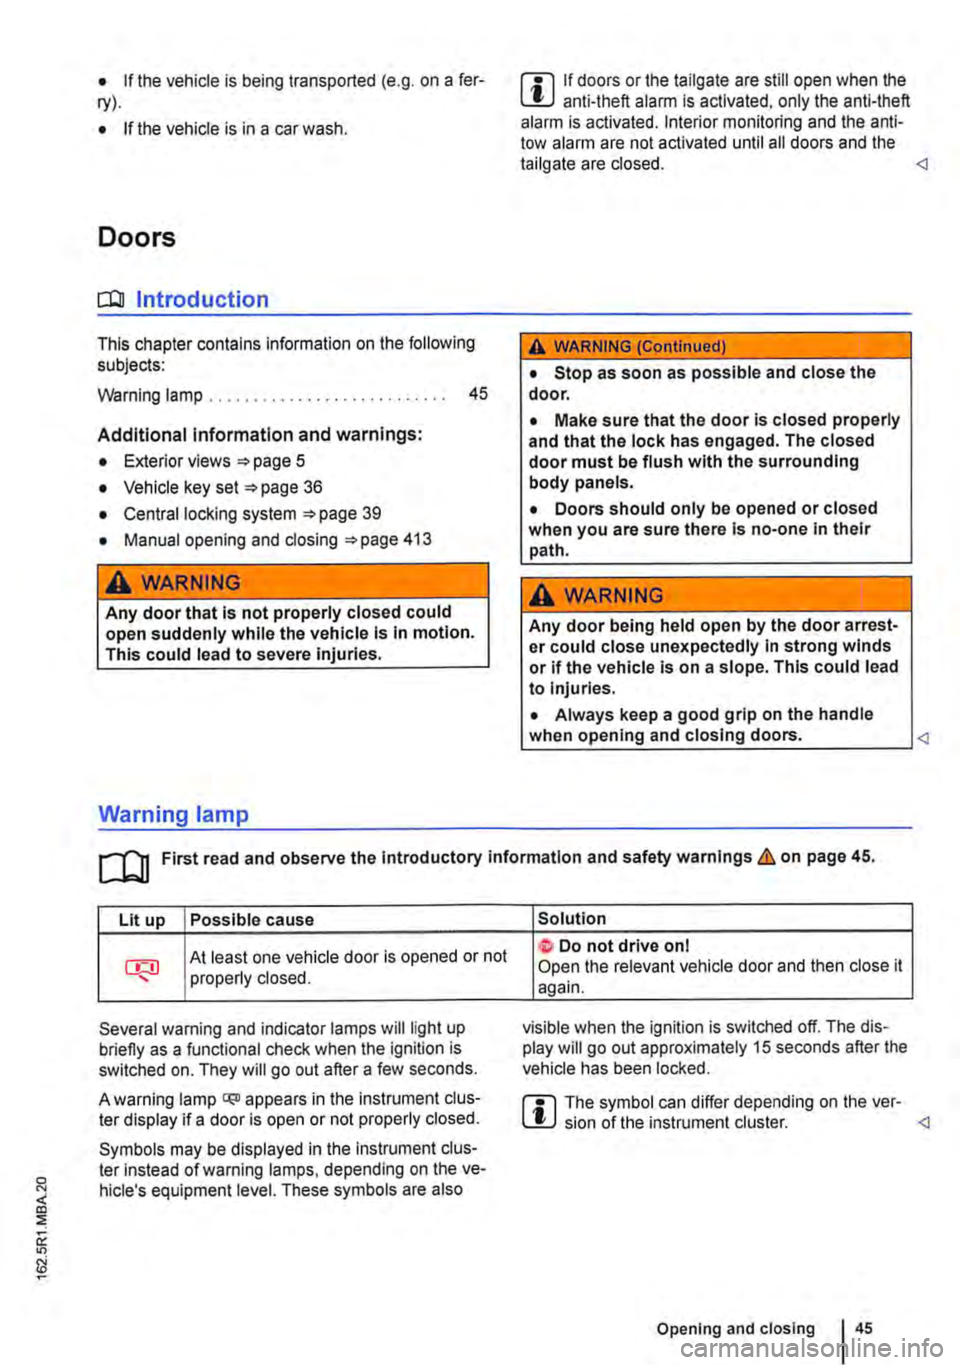
Lit up Possible cause
At least one vehicle door is opened or not properly closed.
Several warning and indicator lamps will light up briefly as a functional check when the ignition is switched on. They will go out after a few seconds.
A warning lamp q;o appears in the instrument clus-ter display if a door is open or not properly closed.
Symbols may be displayed in the Instrument clus-ter instead of warning lamps, depending on the ve-hicle's equipment level. These symbols are also
Solution
t Do not drive on I Open the relevant vehicle door and then close it again.
visible when the ignition is switched off. The dis-play will go out approximately 15 seconds after the vehicle has been locked.
m The symbol can differ depending on the ver-W sion of the instrument cluster. <1
Opening and closing 45
Page 50 of 486
CD
Before opening the tailgate, please check that there is enough space to open and close the tailgate, e.g. when towing a trailer or when in a garage.
Warning lamp
CD
Never use the gas-filled strut on the tallgate to fix or hold a load. This could lead to damage and make it Impossible to close the tallgate.
Lit up Possible cause
c:5 The taiigate is open or not properly closed.
Several warning and indicator lamps will light up briefly as a functional check when the ignition is switched on. They will go out after a few seconds.
A warning lamp c:s appears in the instrument clus-ter display if the taiigate is open or not property closed.
Symbols may be displayed in the instrument clus-ter instead of warning lamps, depending on the ve-hicle's equipment level. These symbols are also visible when the ignition is switched off. The dis-play will go out approximately 15 seconds after the vehicle has been locked.
Solution
e Do not drive on I Open the tailgate and close it again.
A WARNING
If the tail gate is not properly closed it could open suddenly while the vehicle is in motion. This could lead to severe injuries.
• Stop as soon as possible and close the tailgate.
• After closing the tailgate, always check that it is properly secured.
m The symbol can differ depending on the ver-L!J sion of the instrument cluster.
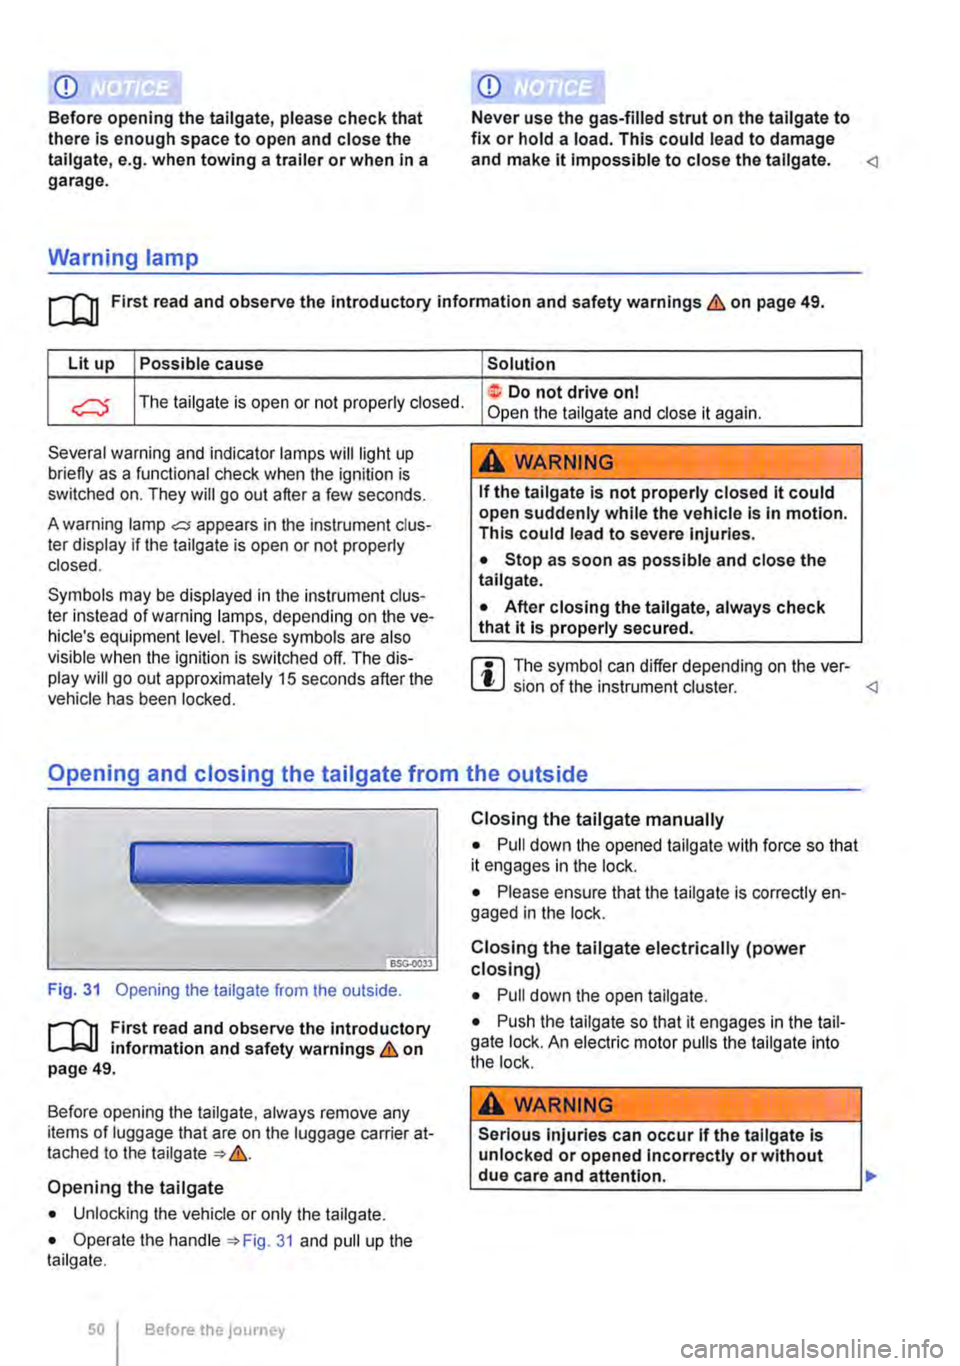
Fig. 31 Opening the tailgate from the outside.
r-Ill First read and observe the introductory L-Wl information and safety warnings & on page 49.
Before opening the taiigate, always remove any items of luggage that are on the luggage carrier at-tached to the tailgate &.
Opening the tailgate
• Unlocking the vehicle or only the tailgate.
• Operate the handle 31 and pull up the tailgate.
Before the journey
Closing the tailgate manually
• Pull down the opened tailgate with force so that it engages in the lock.
• Please ensure that the taiigate is correctly en-gaged in the lock.
Closing the tailgate electrically (power closing)
• Pull down the open tailgate.
• Push the taiigate so that it engages in the tail-gate lock. An electric motor pulls the tailgate into the lock.
A WARNING
Serious injuries can occur if the tallgate is unlocked or opened Incorrectly or without
________________
Page 80 of 486
A WARNING (Continued)
• If the belt webbing or any other part of the seat belt becomes damaged, the seat belt may tear during an accident or sudden brak-Ing manoeuvre.
• Damaged seat belts must be replaced Im-mediately with new seat belts approved by Volkswagen Commercial Vehicles for your ve-hicle type. Seat belts subjected to stress and stretched d urlng an accident must be re-placed by a qualified workshop. Renewal may
Warning lamp
sn-0110
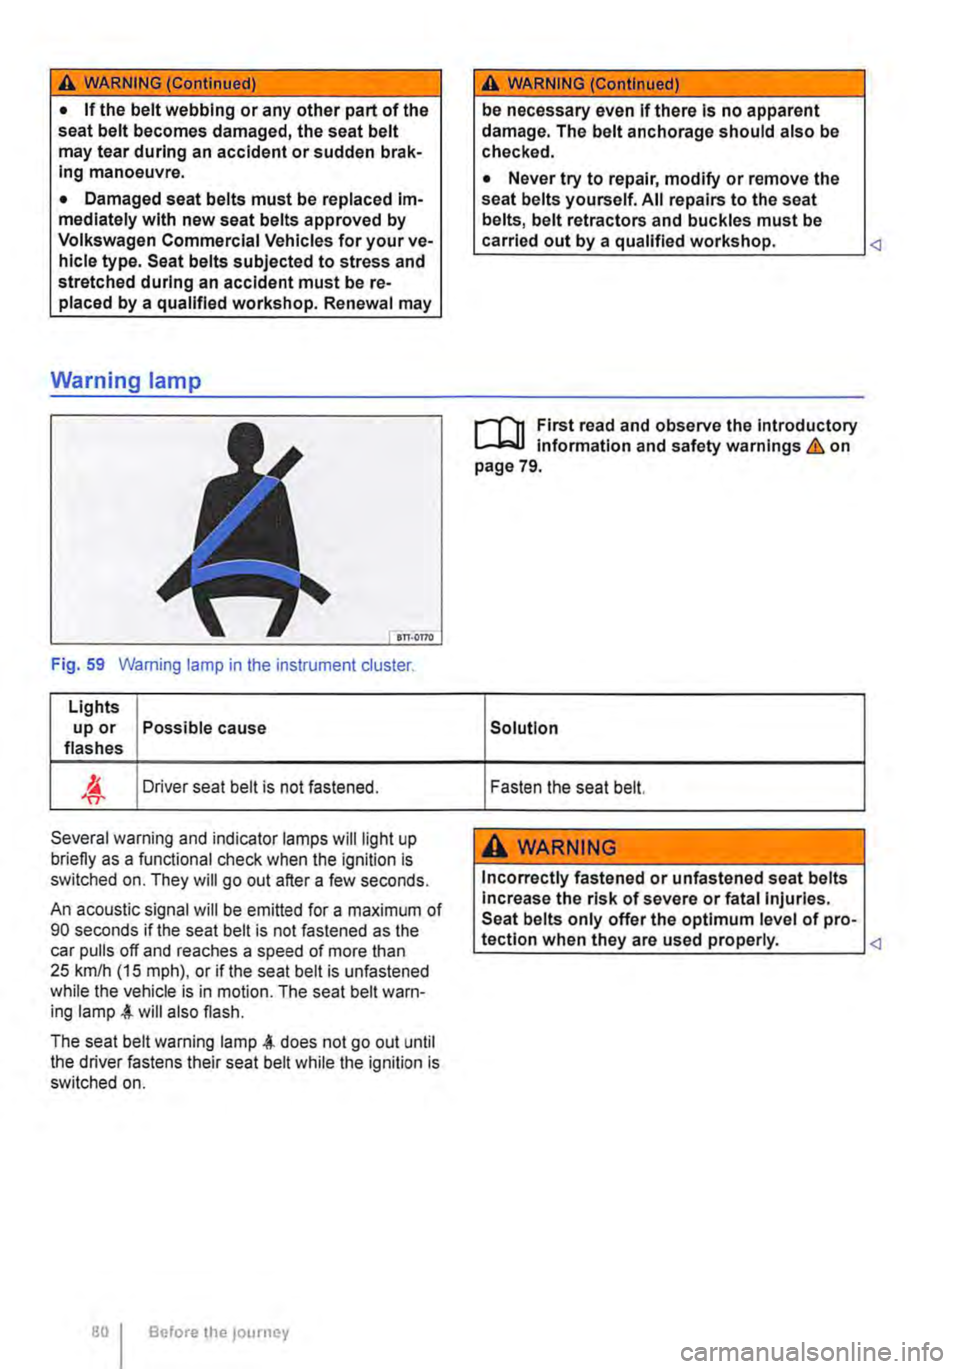
Fig. 59 Warning lamp in the instrument cluster.
Lights up or Possible cause flashes
'IT-Driver seat belt is not fastened.
Several warning and indicator lamps will light up briefly as a functional check when the ignition is switched on. They will go out after a few seconds.
An acoustic signal will be emitted for a maximum of 90 seconds if the seat belt is not fastened as the car pulls off and reaches a speed of more than 25 km/h (15 m ph), or if the seat belt is unfastened while the vehicle is in motion. The seat belt warn-ing will also flash.
The seat belt warning lamp does not go out until the driver fastens their seat belt while the ignition is switched on.
Before the journey
A WARNING (Continued)
be necessary even If there Is no apparent damage. The belt anchorage should also be checked.
• Never try to repair, modify or remove the seat belts yourself. All repairs to the seat belts, belt retractors and buckles must be carried out by a qualified workshop.
r-Y'n First read and observe the Introductory information and safety warnings & on page 79.
Solution
Fasten the seat belt.
A WARNING
Incorrectly fastened or unfastened seat belts Increase the risk of severe or fatal Injuries. Seat belts only offer the optimum level of pro-tection when they are used properly.
Page 89 of 486
A WARNING (Continued)
• If dust has entered your eyes, rinse them with water.
A WARNING
Cleaning agents that contain solvents cause the surface of the alrbag modules to become porous. In an accident that triggers the air-bag, loose plastic parts can cause serious In-jury.
• Never clean the dash panel or the airbag covers with cleansers that contain solvents.
CQI First read and observe the introductory information and safety warnings & on page 87.
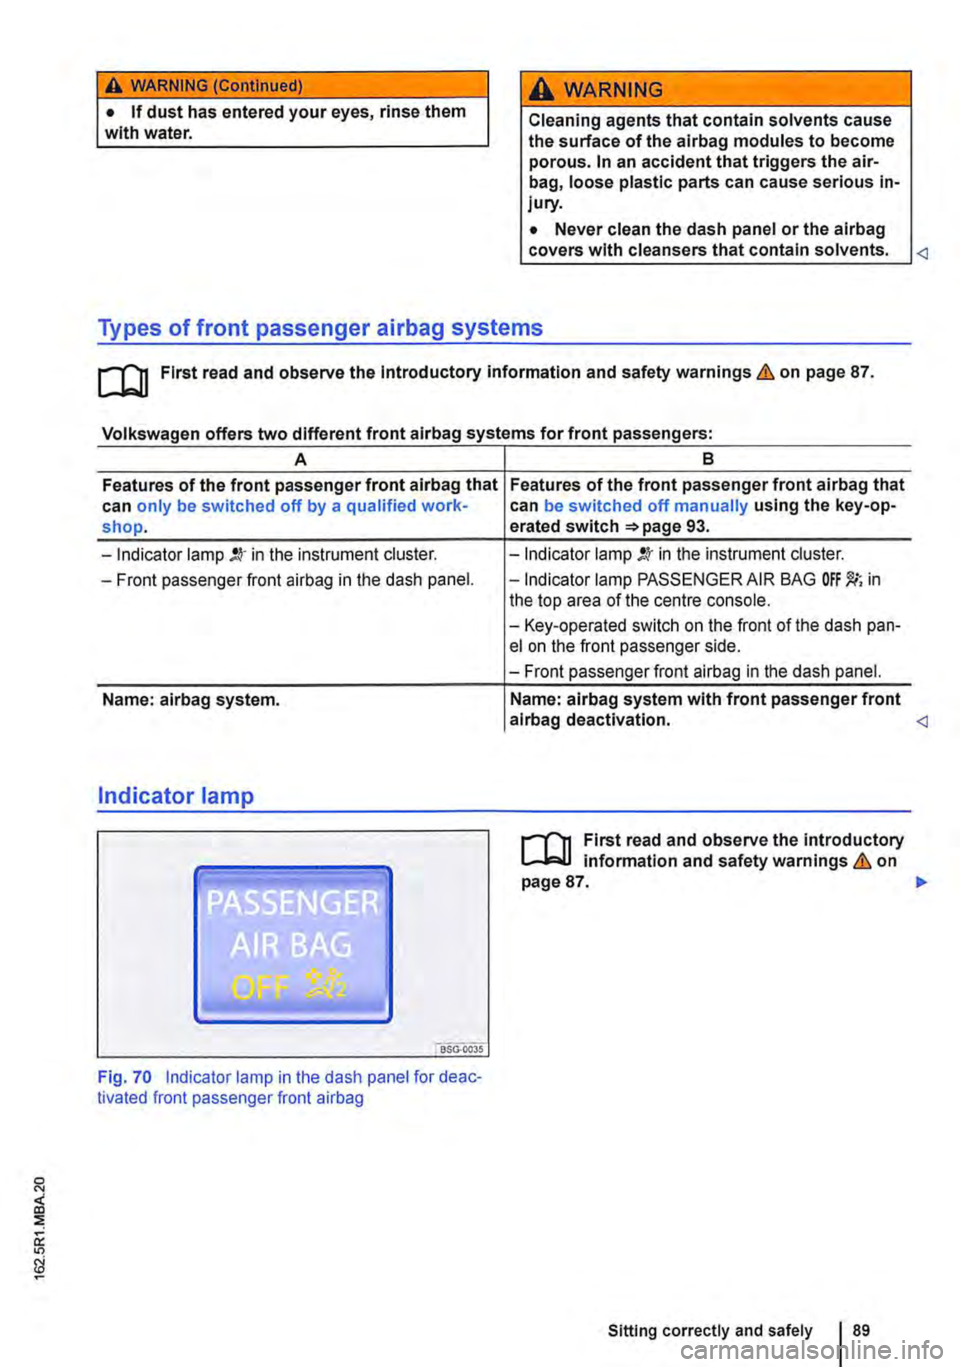
Volkswagen offers two different front airbag systems for front passengers:
A 8
Features of the front passenger front airbag that Features of the front passenger front airbag that can only be switched off by a qualified work-can be switched off manually using the key-op-shop. erated switch =>page 93.
-Indicator lamp in the instrument cluster.
-Front passenger front airbag in the dash panel.
Name: airbag system.
Indicator lamp
"'iSG."oo3s
Fig. 70 Indicator lamp in the dash panel for deac-tivated front passenger front airbag
-Indicator lamp !.lr in the instrument cluster.
-Indicator lamp PASSENGER AIR BAG in the top area of the centre console.
-Key-operated switch on the front of the dash pan-el on the front passenger side.
-Front passenger front airbag in the dash panel.
Name: airbag system with front passenger front alrbag deactivation. <1
r-f"'n First read and observe the introductory l.-.lo:-l.l information and safety warnings & on page 87. .,.
Sitting correctly and safely 89
Page 90 of 486
Lit up Location Possible cause Solution
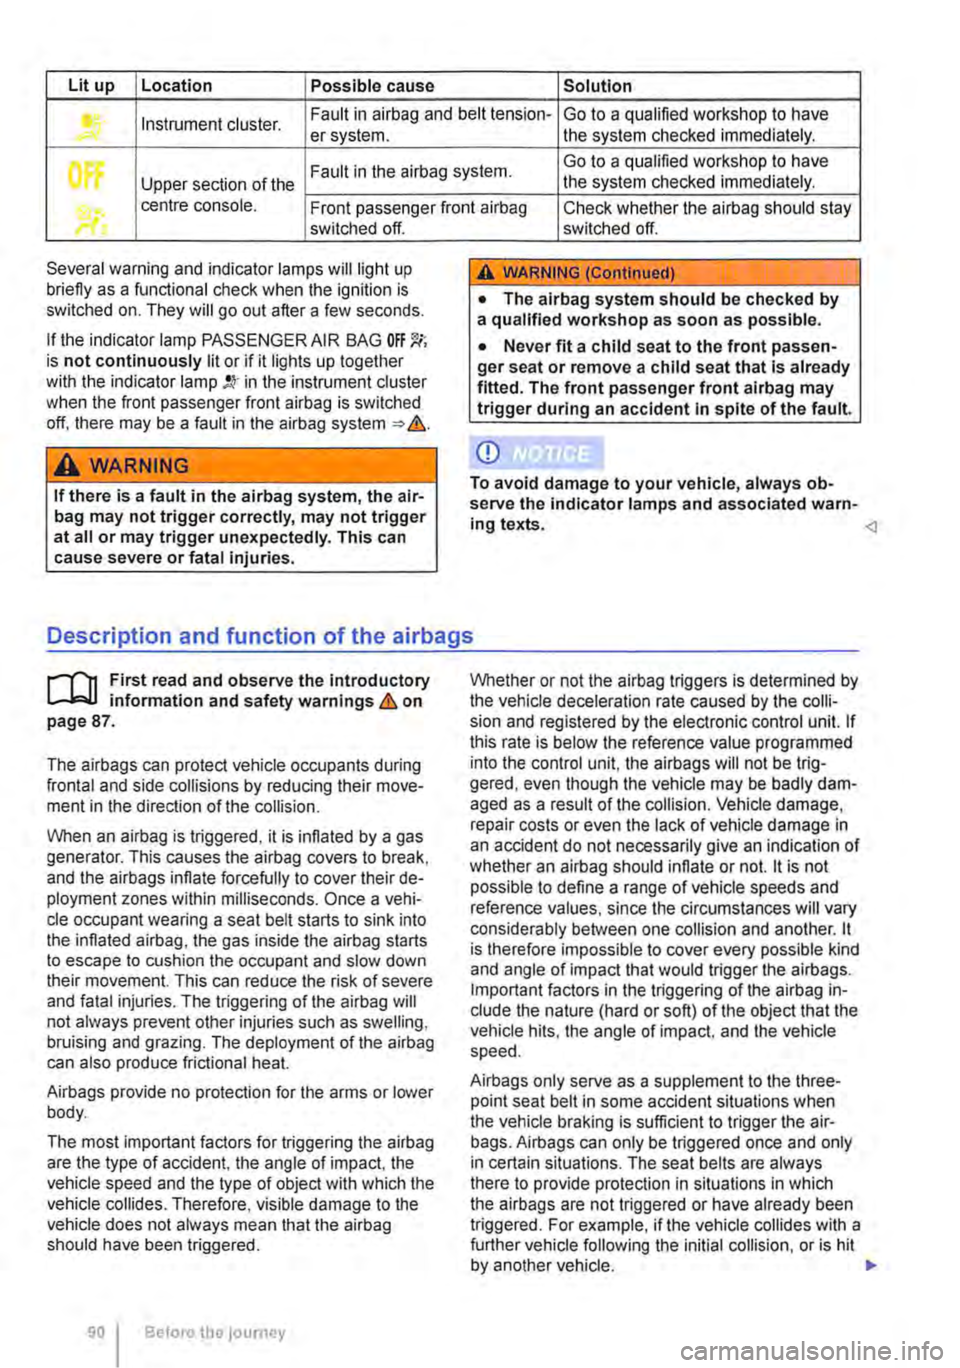
Instrument cluster. Fault in airbag and belt tension-Go to a qualified workshop to have er system. the system checked immediately.
Fault in the airbag system. Go to a qualified workshop to have
Upper section of the the system checked immediately.
• centre console. Front passenger front airbag Check whether the airbag should stay switched off.
Several warning and indicator lamps will light up briefly as a functional check when the ignition is switched on. They will go out after a few seconds.
If the indicator lamp PASSENGER AIR BAG OFF 'J(; is not continuously lit or if it lights up together with the indicator lamp !Q' in the instrument cluster when the front passenger front airbag is switched off. there may be a fault in the airbag system => &.
A WARNING
If there is a fault in the airbag system, the air-bag may not trigger correctly, may not trigger at all or may trigger unexpectedly. This can cause severe or fatal injuries.
switched off.
A WARNING (Continued)
• The alrbag system should be checked by a qualified workshop as soon as possible.
• Never fit a child seat to the front passen-ger seat or remove a child seat that Is already fitted. The front passenger front alrbag may trigger during an accident In spite of the fault.
CD
To avoid damage to your vehicle, always ob-serve the indicator lamps and associated warn-ing texts. <1
Description and function of the airbags
r-('n First read and observe the introductory l..-lc:.l.l information and safety warnings & on page 87.
The airbags can protect vehicle occupants during frontal and side collisions by reducing their move-ment in the direction of the collision.
When an airbag is triggered, it is inflated by a gas generator. This causes the airbag covers to break, and the airbags inflate forcefully to cover their de-ployment zones within milliseconds. Once a vehi-cle occupant wearing a seat belt starts to sink into the inflated airbag, the gas inside the airbag starts to escape to cushion the occupant and slow down their movement. This can reduce the risk of severe and fatal injuries. The triggering of the airbag will not always prevent other injuries such as swelling, bruising and grazing. The deployment of the airbag can also produce frictional heat.
Airbags provide no protection for the arms or lower body.
The most important factors for triggering the airbag are the type of accident, the angle of impact, the vehicle speed and the type of object with which the vehicle collides. Therefore, visible damage to the vehicle does not always mean that the airbag should have been triggered.
90 Before the journey
Whether or not the airbag triggers is determined by the vehicle deceleration rate caused by the colli-sion and registered by the electronic control unit. If this rate is below the reference value programmed into the control unit, the airbags will not be trig-gered, even though the vehicle may be badly dam-aged as a result of the collision. Vehicle damage, repair costs or even the Jack of vehicle damage in an accident do not necessarily give an indication of whether an airbag should inflate or not. it is not possible to define a range of vehicle speeds and reference values, since the circumstances will vary considerably between one collision and another. it is therefore impossible to cover every possible kind and angle of impact that would trigger the airbags. Important factors in the triggering of the airbag in-clude the nature (hard or soft) of the object that the vehicle hits, the angle of impact, and the vehicle speed.
Airbags only serve as a supplement to the three-point seat belt in some accident situations when the vehicle braking is sufficient to trigger the air-bags. Airbags can only be triggered once and only in certain situations. The seat belts are always there to provide protection in situations in which the airbags are not triggered or have already been triggered. For example, if the vehicle collides with a further vehicle following the initial collision, or is hit by another vehicle. .,.
Page 93 of 486
A DANGE;R (Continued) --
• No other people, animals or objects may be carried between the occupants of the front seats and the alrbag deployment zone. Make sure that children and passengers also keep to this rule.
• Do not attach any objects, e.g. mobile nav-igation devices, to the windscreen above the front alrbag on the front passenger side.
• Do not cover or stick anything on the steering wheel hub or the soft plastic surface of the alrbag unit In the dash panel on the front passenger side, and do not modify them In any way.
A WARNING
The front alrbags are deployed In front of the steering wheel "*Fig. 71 and dash panel '*Fig. 72.
• When driving, always hold the steering wheel with both hands on the outside of the ring at the 9 o'clock and 3 o'clock positions.
• Adjust the driver seat so that there is at least 25 cm between your breastbone and the hub of the steering wheel. Contact a qualified workshop if your physical build makes this Impracticable.
• Adjust the front passenger seat so that the distance between the passenger and the
__ ____
Switching the front passenger front airbag on and off manually using the
key-operated switch
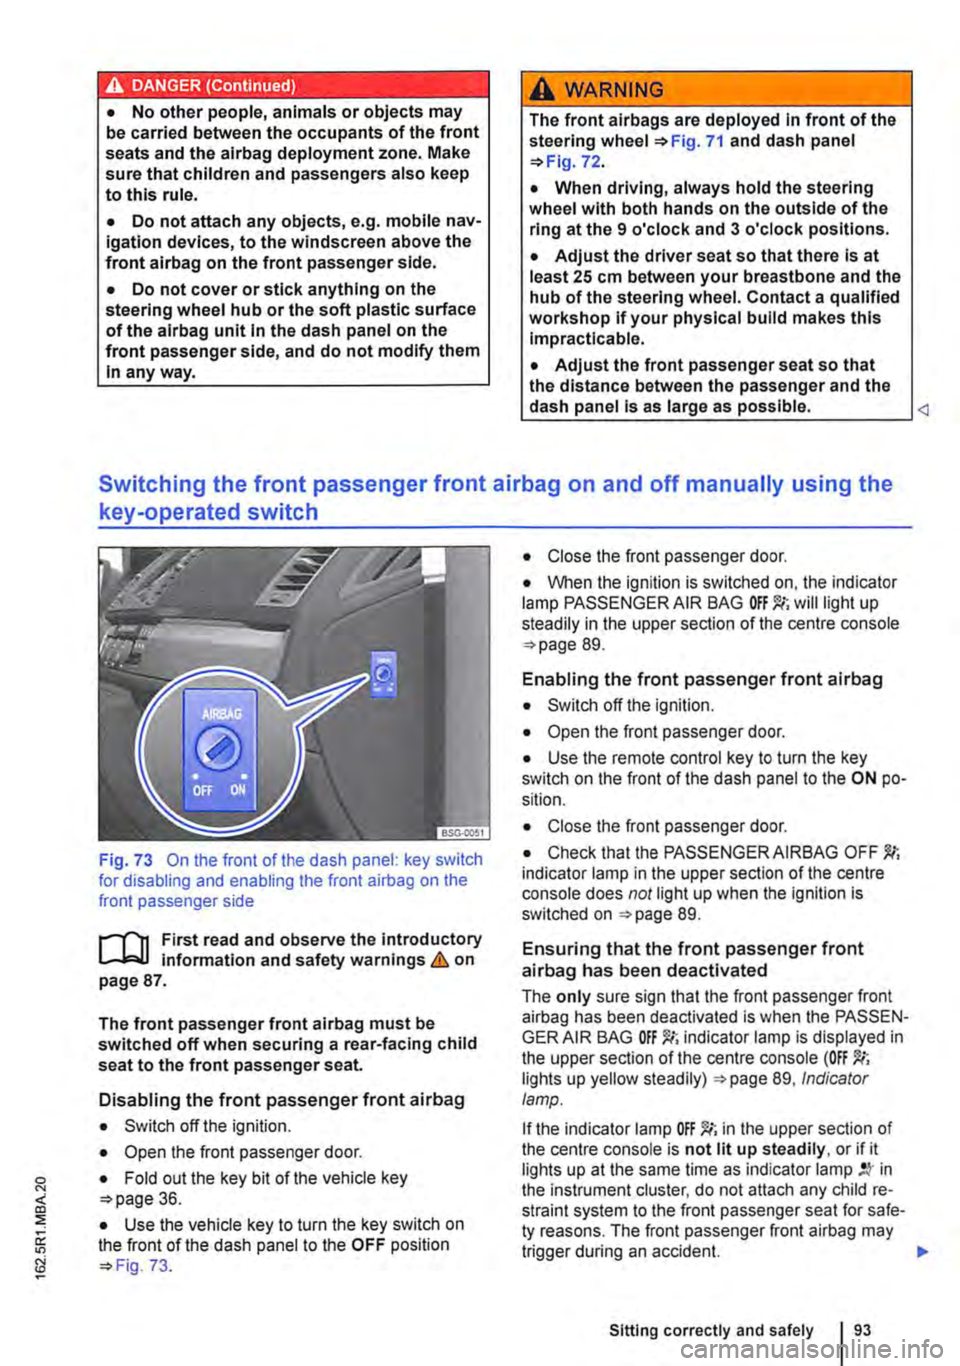
Fig. 73 On the front of the dash panel: key switch for disabling and enabling the front airbag on the front passenger side
l""'rn First read and observe the introductory L-J,::.U information and safety warnings&. on page 87.
The front passenger front airbag must be switched off when securing a rear-facing child seat to the front passenger seat.
Disabling the front passenger front airbag
• Switch off the ignition.
• Open the front passenger door.
• Fold out the key bit of the vehicle key o>page 36.
• Use the vehicle key to turn the key switch on the front of the dash panel to the OFF position o> Fig. 73.
• Close the front passenger door.
• When the ignition is switched on, the indicator lamp PASSENGER AIR BAG will light up steadily in the upper section of the centre console o> page 89.
Enabling the front passenger front airbag
• Switch off the ignition.
• Open the front passenger door.
• Use the remote control key to turn the key switch on the front of the dash panel to the ON po-sition.
• Close the front passenger door.
• Check that the PASSENGER AIRBAG OFF indicator lamp in the upper section of the centre console does not light up when the Ignition is switched on =>page 89.
Ensuring that the front passenger front airbag has been deactivated
The only sure sign that the front passenger front airbag has been deactivated is when the PASSEN-GER AIR BAG indicator lamp is displayed in the upper section of the centre console (OFF lights up yellow steadily) =>page 89, Indicator lamp.
If the indicator lamp OFF )!(; in the upper section of the centre console is not lit up steadily, or if it lights up at the same time as indicator lamp in the instrument cluster, do not attach any child re-straint system to the front passenger seat for safe-ty reasons. The front passenger front airbag may trigger during an accident.
Sitting correctly and safely
Page 106 of 486
Lights and vision
Lights
0::0 Introduction
This chapter contains information on the following subjects:
Indicator lamps . . . . . . . . . . . . . . . . . 106
Turn signal and main beam lever . . 107 Switching lights on and off . . . . . . . . 108
Lights and vision -functions . . . . . . . . . . . . . . 109
Main beam assist ....................... 110
Masking or switching over headlights for driving abroad . . . . . . . . . 111
Coming Home and Leaving Home functions (orientation lighting).............. 112
Headlight range control, instrument and switch lighting . . . . . 113 Interior and reading lights . . . . . . . . . 114
Observe any country-specific regulations when us-ing vehicle lighting.
The driver is responsible for the correct headlight position and the correct headlight setting.
Additional information and warnings:
• Exterior views ""page 5
• Volkswagen information system =oo page 24
• Changing bulbs =oo page 432
Indicator lamps
A WARNING
Accidents and serious injuries can occur if roads are not sufficiently Illuminated and oth-er road users have difficulty seeing the vehi-cle, or cannot see it at all.
• Always switch the dipped beam head-lights on if it is dark, raining or visibility is poor.
A WARNING
Setting headlights too high, and the incorrect use of the main beam, could distract and daz-zle other road users. This can lead to acci-dents and serious injuries.
• Always ensure that the headlights are ad-j usted correctly.
• Never use the main beam or the headlight flasher if other road users could be dazzled.
[Qj First read and observe the introductory information and safety warnings & on page 106.
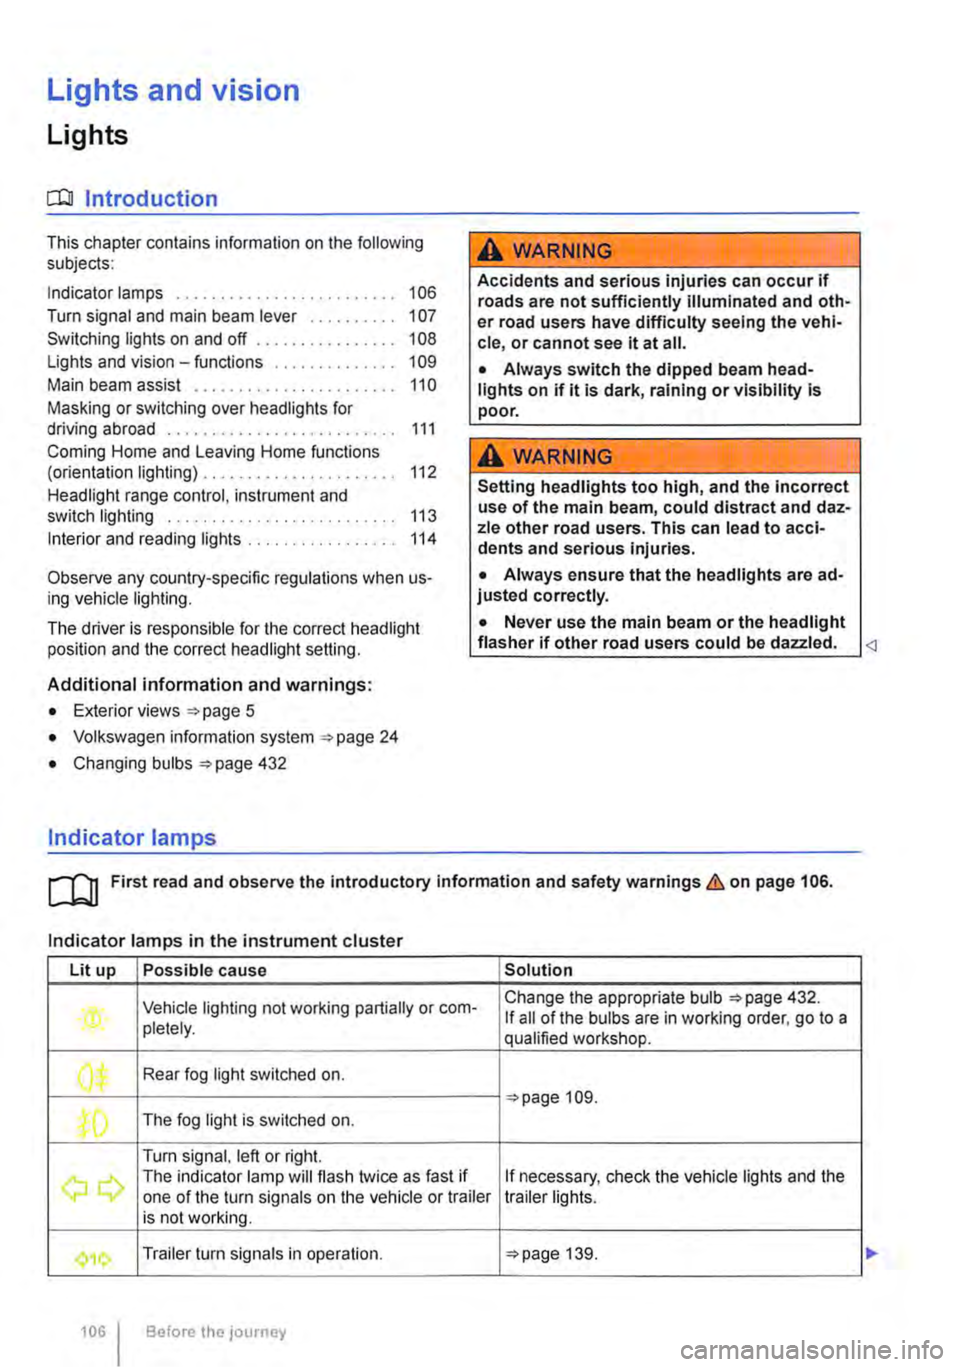
Indicator lamps in the instrument cluster
Lit up Possible cause Solution
Vehicle lighting not working partially or corn-Change the appropriate bulb 432. If all of the bulbs are in working order. go to a pletely. qualified workshop.
' Rear fog light switched on. J", =oopage 109.
,( The fog light is switched on.
Turn signal, left or right.
r The indicator lamp will flash twice as fast if If necessary, check the vehicle lights and the one of the turn signals on the vehicle or trailer trailer lights. is not working.
'111 Trailer turn signals in operation. 139.
106 Before the journey