Page 4 of 636

TABLE OF CONTENTSIndex
4
3-1. Using the air conditioning system and defogger
Air conditioning system ...... 326
Using the steering wheel climate remote control
switches ........................... 337
Solar Ventilation System .... 339
Remote Air Conditioning System ............................. 342
Rear window and outside rear view mirror defogger
switch ............................... 346
3-2. Using the audio system Audio system types ............ 347
Using the AUX port/USB port .......................... 352
3-3. Using the interior lights Interior lights list ................. 353
• Front interior lights ........... 354
• Personal lights ................. 355
• Rear interior light .............. 355 3-4. Using the storage features
List of storage features ....... 357
• Glove boxes ..................... 358
• Console box ..................... 359
• Cup holders ...................... 360
• Bottle holders ................... 362
• Auxiliary boxes ................. 363
3-5. Other interior features Sun visors ........................... 364
Vanity mirrors ..................... 365
Outside temperature display .............................. 366
Power outlets ...................... 367
Seat heaters ....................... 369
Armrest ............................... 371
Floor mats........................... 372
Luggage compartment features ............................ 374
Garage door opener ........... 380
Safety Connect ................... 388
3Interior features
Page 11 of 636
11
A
Anti-glare inside rear view mirror
Garage door opener switches
P. 118
P. 380
Sun visors P. 364
SRS curtain shield airbags P. 140
Rear interior light P. 355
Vanity mirrors P. 365
Front interior/personal lights P. 355
: If equipped
*: Refer to “Display Audio System Owner’s Manual” or “Navigation System Owner’s Manual”.
Microphone* P. 388
“SOS” button
Moon roof switch
Auxiliary box
P. 388
P. 126
P. 363
Page 119 of 636

119
1-4. Adjustable components (s
eats, mirrors, steering wheel)
1
Before driving
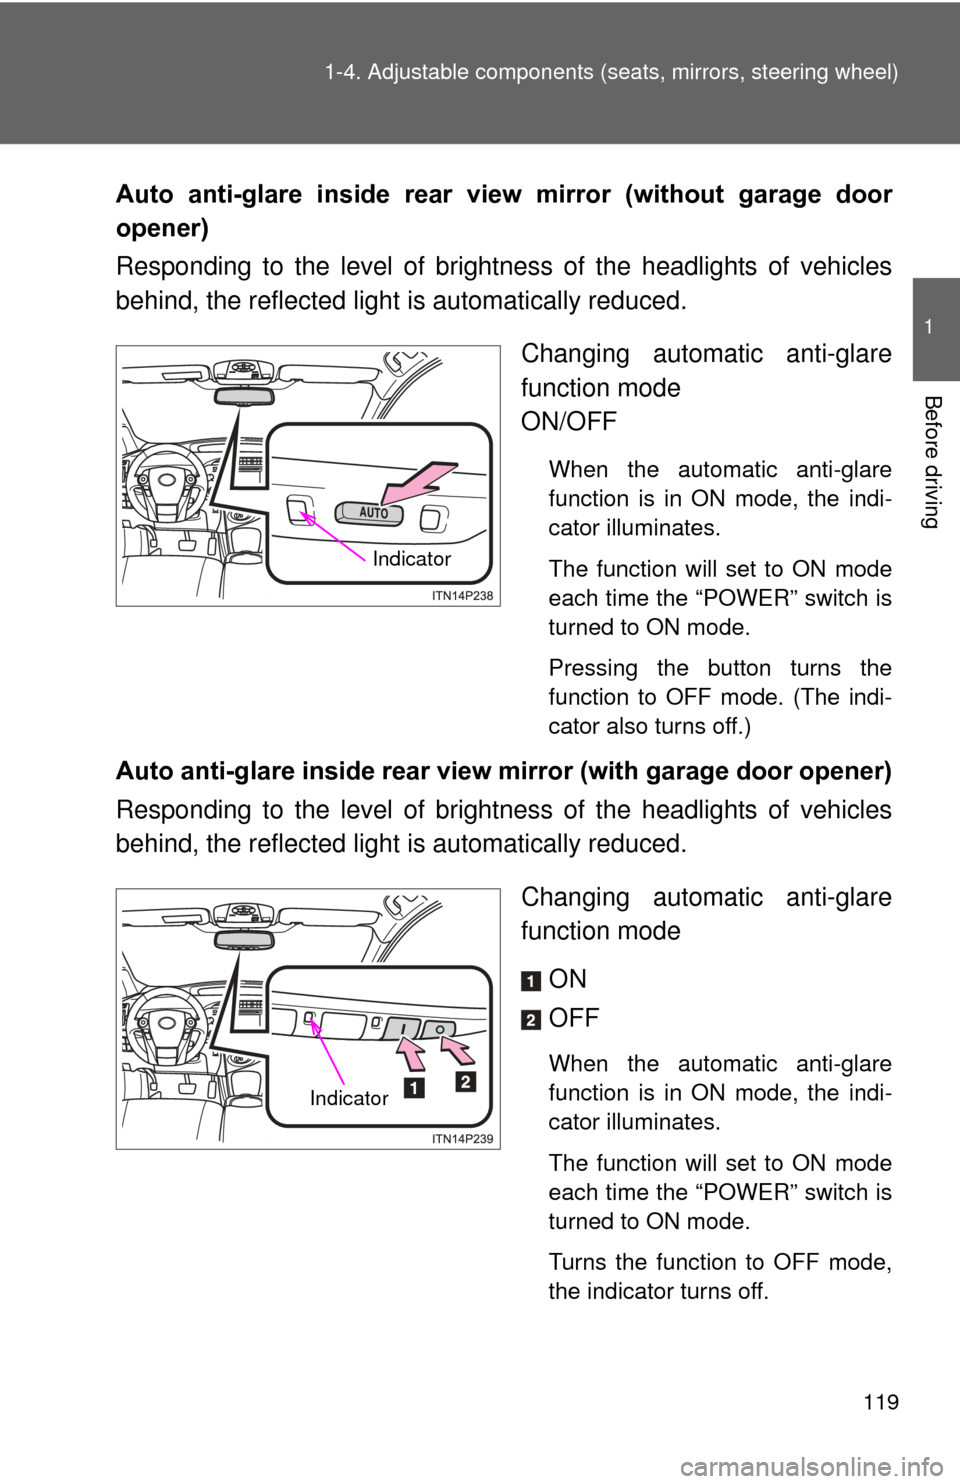
Auto anti-glare inside rear view mirror (without garage door
opener)
Responding to the level of brightness of the headlights of vehicles
behind, the reflected light is automatically reduced.
Changing automatic anti-glare
function mode
ON/OFF
When the automatic anti-glare
function is in ON mode, the indi-
cator illuminates.
The function will set to ON mode
each time the “POWER” switch is
turned to ON mode.
Pressing the button turns the
function to OFF mode. (The indi-
cator also turns off.)
Auto anti-glare inside rear vi ew mirror (with garage door opener)
Responding to the level of brightness of the headlights of vehicles
behind, the reflected light is automatically reduced.
Changing automatic anti-glare
function modeON
OFF
When the automatic anti-glare
function is in ON mode, the indi-
cator illuminates.
The function will set to ON mode
each time the “POWER” switch is
turned to ON mode.
Turns the function to OFF mode,
the indicator turns off.
Indicator
Indicator
Page 120 of 636
120 1-4. Adjustable components (seats, mirrors, steering wheel)
■To prevent sensor error (veh icles with auto anti-glare inside rear view
mirror)
Without garage door opener
With garage door opener
CAUTION
■ Caution while driving
Do not adjust the position of the mirror while driving.
Doing so may lead to mishandling of the vehicle and cause an accident,
resulting in death or serious injury.
To ensure that the sensors operate prop-
erly, do not touch or cover them.
Page 325 of 636

Interior features3
325
3-1. Using the air conditioning system and defogger
Air conditioning system ........................... 326
Using the steering wheel climate remote control
switches ......................... 337
Solar Ventilation System ........................... 339
Remote Air Conditioning System ........................... 342
Rear window and outside rear view mirror defogger
switch ............................. 346
3-2. Using the audio system Audio system types .......... 347
Using the AUX port/USB port................................. 352 3-3. Using the interior lights
Interior lights list ............... 353
• Front interior lights ......... 354
• Personal lights ............... 355
• Rear interior light ........... 355
3-4. Using the storage features List of storage features .... 357
• Glove boxes ................... 358
• Console box ................... 359
• Cup holders ................... 360
• Bottle holders ................. 362
• Auxiliary boxes ............... 363
3-5. Other interior features Sun visors ........................ 364
Vanity mirrors ................... 365
Outside temperature display............................ 366
Power outlets ................... 367
Seat heaters..................... 369
Armrest ............................ 371
Floor mats ........................ 372
Luggage compartment features .......................... 374
Garage door opener......... 380
Safety Connect ................ 388
Page 380 of 636
380
3-5. Other interior features
Garage door opener
The garage door opener (HomeLink® Universal Transceiver) is manufac-
tured under license from HomeLink®.
Programming the HomeLink® (for U.S.A. owners)
The HomeLink
® compatible transceiver in your vehicle has 3 buttons
which can be programmed to operate 3 different devices. Refer to the
programming method below appropriate for the device.
Buttons
Indicator light
: If equipped
The garage door opener can be programmed to operate garage
doors, gates, entry doors, door locks, hom e lighting systems, secu-
rity systems, and other devices.
Page 383 of 636

383
3-5. Other interior features
3
Interior features
■
Programming a rolling code s ystem (for U.S.A. owners)
If your device is rolling code e quipped, follow the steps under the
heading “Programming HomeLink
®” before proceeding with the
steps listed below.
Locate the training button on the ceiling mounted garage door
opener motor. The exact location and color of the button may
vary by brand of garage door opener motor.
Refer to the operation manual supplied with the garage door opener
for the location of the training button.
Press the training button.
Following this step, you have 30 seconds in which to initiate step 3
below.
Press and hold the vehicle’s programmed HomeLink® button
for 2 seconds and release it. Repeat this step once again. The
garage door may open.
If the garage door opens, the programming process is complete. If
the door does not open, press and hold the button a third time, and
release after 2 seconds. This third press and release will complete
the programming process by opening the garage door.
The ceiling mounted garage door opener motor should now recog-
nize the HomeLink
® signal and operate the garage door.
Repeat the steps above to prog ram another rolling code sys-
tem for any of the remaining HomeLink® buttons.
STEP 1
STEP 2
STEP 3
STEP 4
Page 386 of 636

386 3-5. Other interior features
■Before programming
●Install a new battery in the remote control transmitter.
● The battery side of the remote control transmitter must be pointed away
from the HomeLink
® button.
■ Certification for the garage door opener
For vehicles sold in the U.S.A.
FCC ID: NZLOBIHL4
NOTE:
This device complies with Part 15 of the FCC Rules.
Operation is subject to the following two conditions: (1) this device may not
cause harmful interference, and (2) this device must accept any interference
received, including interference that may cause undesired operation.
FCC WARNING:
Changes or modifications not expressly approved by the party responsible
for compliance could void the user’s authority to operate the equipment.
For vehicles sold in Canada
IC ID: 4112A-OBIHL4
NOTE:
Operation is subject to the following two conditions: (1) this device may not
cause interference, and (2) this device must accept any interference, includ-
ing interference that may cause undesired operation of the device.
■ When support is necessary
Visit on the web at www.homelink.com
or call 1-800-355-3515.