Page 612 of 692
612 5-2. Steps to take in an emergency
L/C200_EE (OM60G38E)
Before putting the sealant into use
Check the degree of the tire damage before making use of the seal-
ant in the emergency tire puncture repair kit.
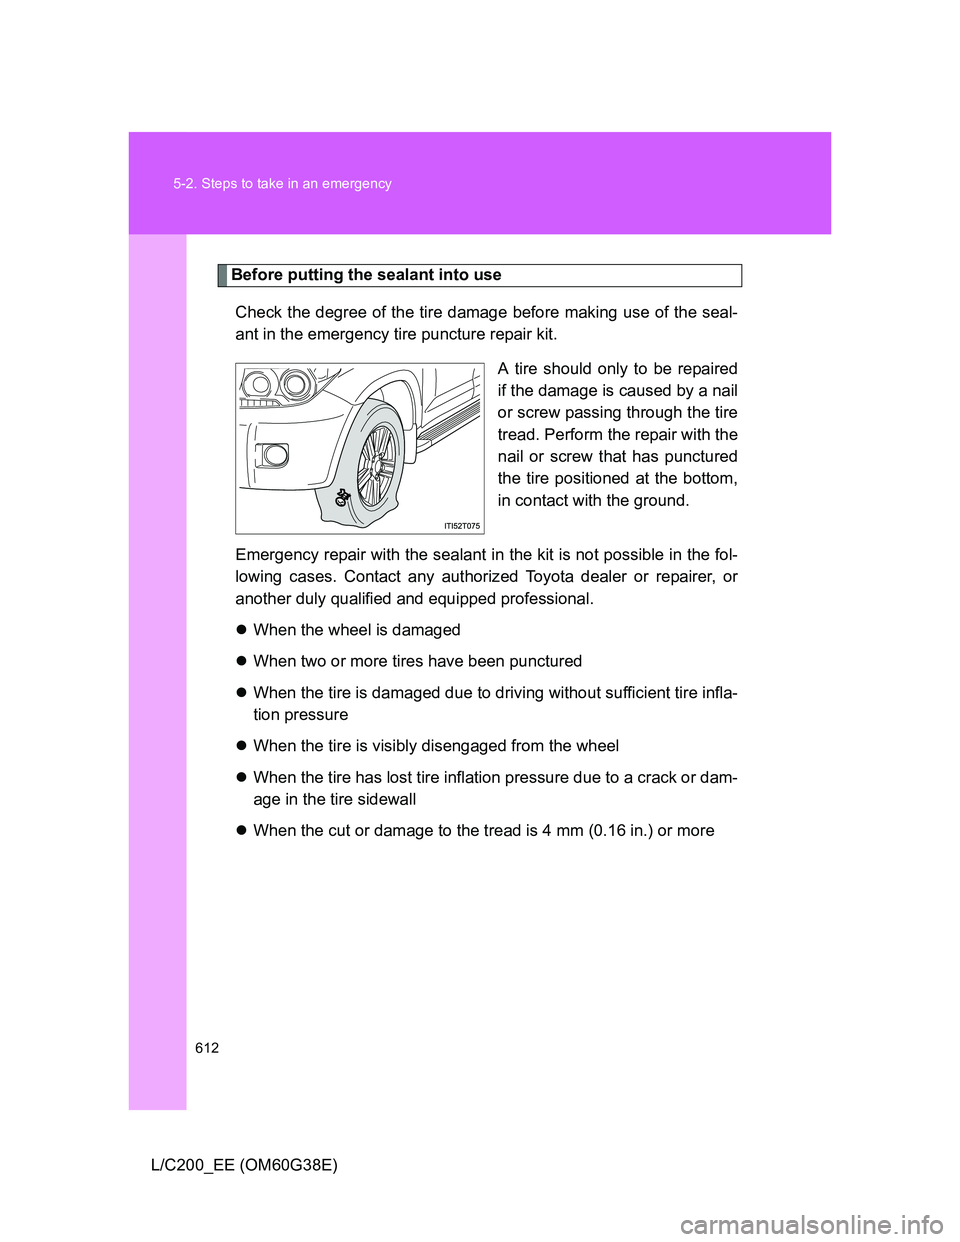
A tire should only to be repaired
if the damage is caused by a nail
or screw passing through the tire
tread. Perform the repair with the
nail or screw that has punctured
the tire positioned at the bottom,
in contact with the ground.
Emergency repair with the sealant in the kit is not possible in the fol-
lowing cases. Contact any authorized Toyota dealer or repairer, or
another duly qualified and equipped professional.
When the wheel is damaged
When two or more tires have been punctured
When the tire is damaged due to driving without sufficient tire infla-
tion pressure
When the tire is visibly disengaged from the wheel
When the tire has lost tire inflation pressure due to a crack or dam-
age in the tire sidewall
When the cut or damage to the tread is 4 mm (0.16 in.) or more
Page 620 of 692
620 5-2. Steps to take in an emergency
L/C200_EE (OM60G38E)
Sealant
One tire can be repaired using two bottles of sealant stored in the emer-
gency tire puncture repair kit.
The sealant can be used when the outside temperature is from -30°C
(-22°F) to 60°C (140°F).
The sealant has a limited lifespan. The expiry date is marked on the bot-
tle. The sealant should be replaced before the expiry date. Contact any
authorized Toyota dealer or repairer, or another duly qualified and
equipped professional.
If the sealant gets on your clothes, it may stain.
After using the sealant, bring the empty bottles of sealant to any autho-
rized Toyota dealer or repairer, or another duly qualified and equipped
professional and purchase a new bottle. Keep the new bottles of sealant
in your vehicle.
Compressor
The compressor is a pneumatic filling type for passenger vehicles.
When the compressor is operating, a loud operating noise will be pro-
duced.
This does not indicate a malfunction.
The wheel of a tire that has been repaired
If you remove the sealant adhering to the wheel with a rag, you can reuse
the wheel. However, in the case of the valve, replace it with a new one.
Page 622 of 692
622 5-2. Steps to take in an emergency
L/C200_EE (OM60G38E)
NOTICE
Vehicles with a flat tire
Do not continue driving with a flat tire.
Driving even a short distance with a flat tire can damage the tire and the
wheel beyond repair.
When performing an emergency repair
Perform the emergency repair without removing the nail or screw that has
punctured the tread of the tire. If the object that has punctured the tire is
removed, the repair using the sealant in the emergency tire puncture repair
kit may fail.
When fixing the flat tire
Do not put the valve core on dirty ground or in the sand.
Store it in a clean place.
Do not remove the inside cap of the sealant bottle.
Turn the valve core tool with your hand when screwing it in. If you use
another tool in conjunction with the valve core tool, damage may occur.
Do not operate the compressor continuously for more than 10 minutes.
The motor may overheat and be damaged. Let the compressor cool before
using it again.
Compressor precautions
The compressor power source should be 12 V DC suitable for vehicle use.
Do not connect the compressor to 24 V DC or any other power source.
The compressor is an oil-less type. Do not lubricate with oil.
Page 638 of 692
638
5-2. Steps to take in an emergency
L/C200_EE (OM60G38E)
If the vehicle becomes stuck
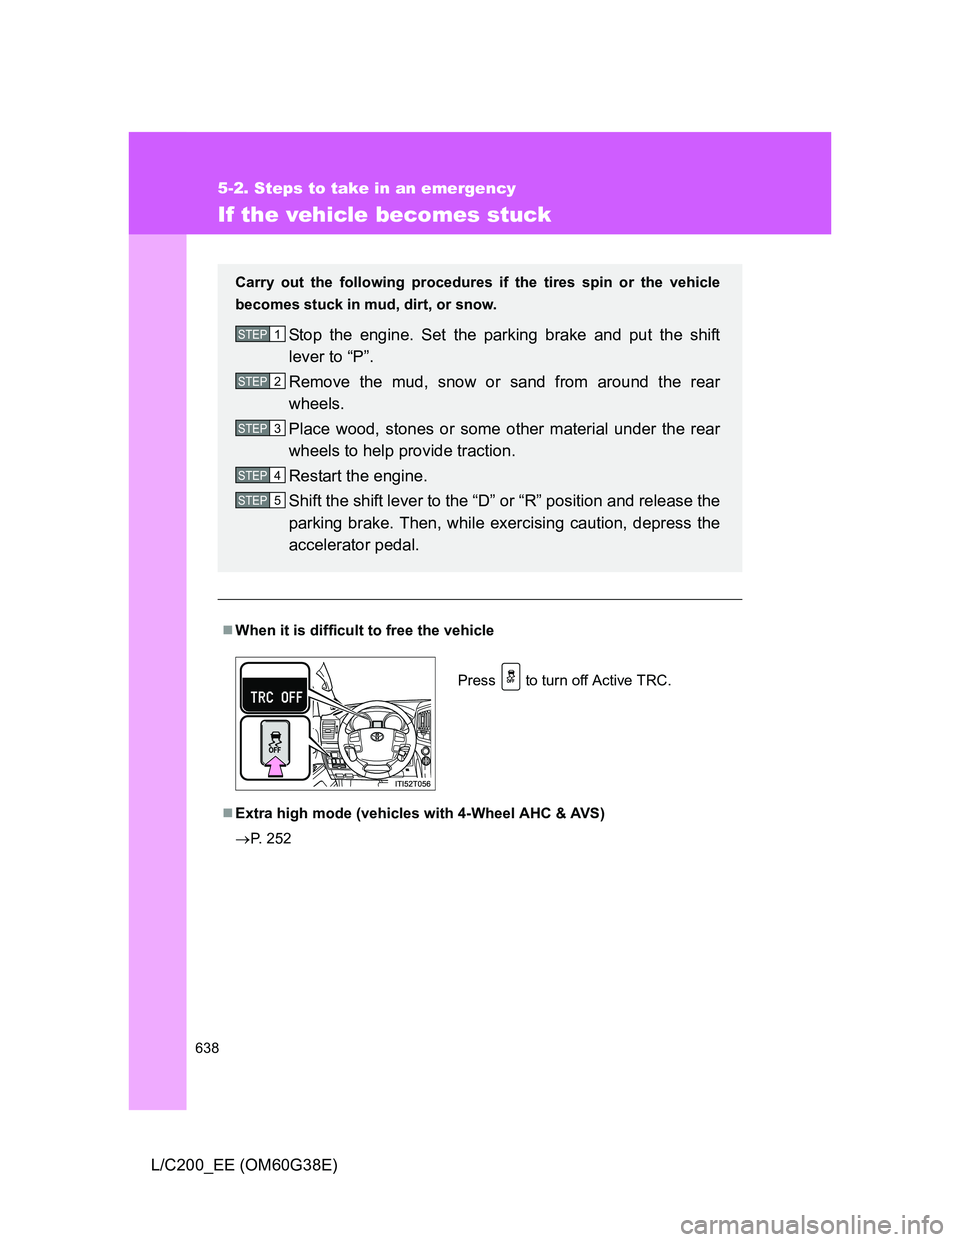
When it is difficult to free the vehicle
Extra high mode (vehicles with 4-Wheel AHC & AVS)
P. 252
Carry out the following procedures if the tires spin or the vehicle
becomes stuck in mud, dirt, or snow.
Stop the engine. Set the parking brake and put the shift
lever to “P”.
Remove the mud, snow or sand from around the rear
wheels.
Place wood, stones or some other material under the rear
wheels to help provide traction.
Restart the engine.
Shift the shift lever to the “D” or “R” position and release the
parking brake. Then, while exercising caution, depress the
accelerator pedal.STEP1
STEP2
STEP3
STEP4
STEP5
Press to turn off Active TRC.
Page 639 of 692
5
639 5-2. Steps to take in an emergency
When trouble arises
L/C200_EE (OM60G38E)
CAUTION
When attempting to free a stuck vehicle
If you choose to push the vehicle back and forth to free it, make sure the sur-
rounding area is clear, to avoid striking other vehicles, objects or people. The
vehicle may also lunge forward or lunge back suddenly as it becomes free.
Use extreme caution.
When shifting the shift lever
Be careful not to shift the shift lever with the accelerator pedal depressed.
This may lead to unexpected rapid acceleration of the vehicle that may
cause an accident resulting in death or serious injury.
NOTICE
To avoid damage to the transmission and other components
Avoid spinning the rear wheels and depressing the accelerator pedal more
than necessary.
If the vehicle remains stuck even after these procedures are performed,
the vehicle may require towing to be freed.
Page 641 of 692
5
641 5-2. Steps to take in an emergency
When trouble arises
L/C200_EE (OM60G38E)
CAUTION
If the engine has to be turned off while driving
Power assist for the brakes and steering wheel will be lost, making the brake
pedal harder to depress and the steering wheel heavier to turn. Decelerate
as much as possible before turning off the engine.
Page 644 of 692
644
L/C200_EE (OM60G38E)
6-1. Specifications
Maintenance data (fuel, oil level, etc.)
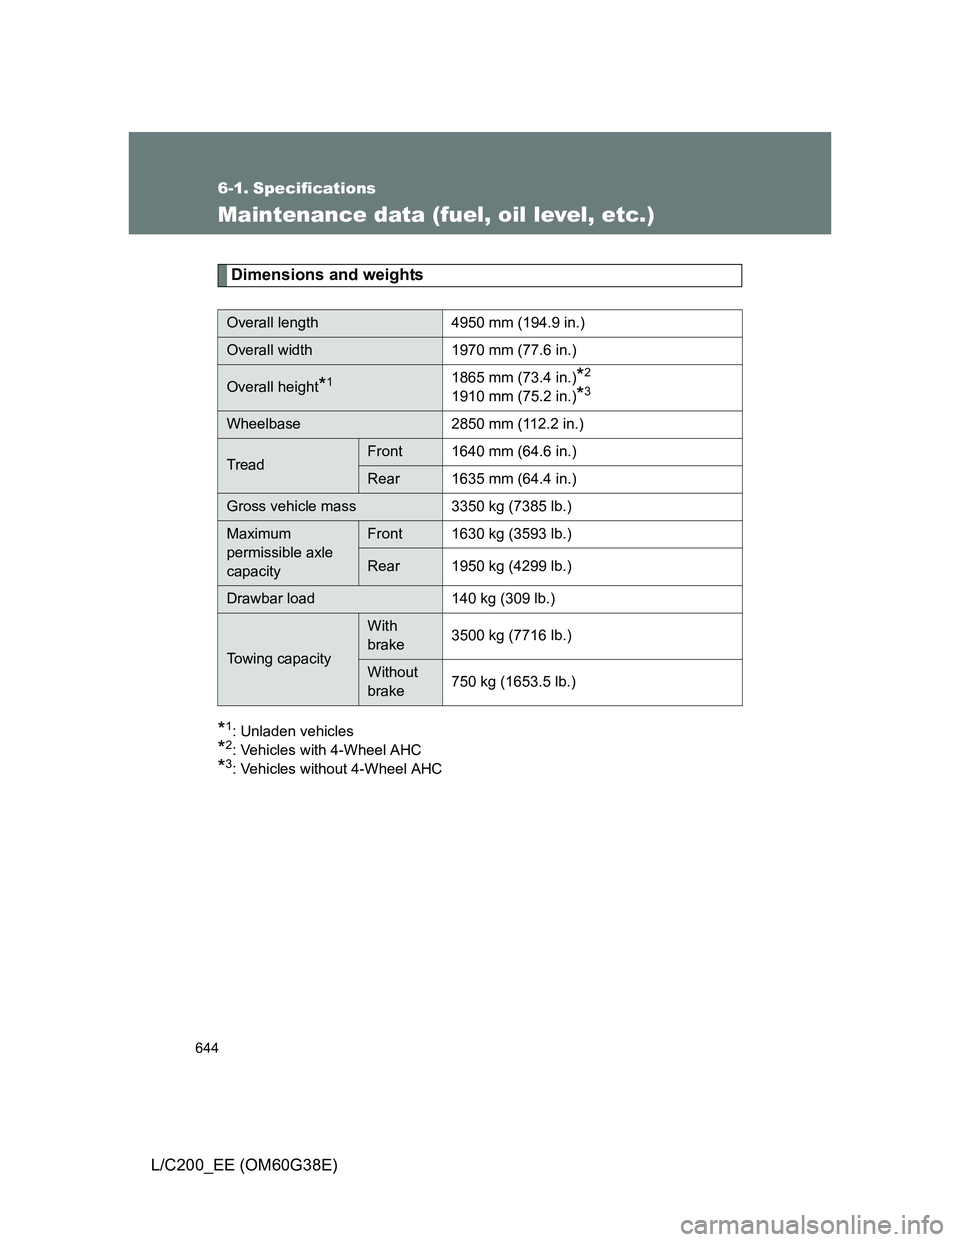
Dimensions and weights
*1: Unladen vehicles
*2: Vehicles with 4-Wheel AHC
*3: Vehicles without 4-Wheel AHC
Overall length 4950 mm (194.9 in.)
Overall width 1970 mm (77.6 in.)
Overall height*11865 mm (73.4 in.)*2
1910 mm (75.2 in.)*3
Wheelbase 2850 mm (112.2 in.)
TreadFront 1640 mm (64.6 in.)
Rear 1635 mm (64.4 in.)
Gross vehicle mass 3350 kg (7385 lb.)
Maximum
permissible axle
capacityFront 1630 kg (3593 lb.)
Rear 1950 kg (4299 lb.)
Drawbar load 140 kg (309 lb.)
Towing capacity
With
brake3500 kg (7716 lb.)
Without
brake750 kg (1653.5 lb.)
Page 658 of 692
658 6-1. Specifications
L/C200_EE (OM60G38E)
Chassis lubrication
Steering
Suspension (Vehicles with 4-Wheel AHC)
Propeller
shafts
SpiderLithium base chassis grease, NLGI No.2
Slide yoke
Molybdenum-disulfide lithium base chas-
sis grease, NLGI No.2 or Lithium base
chassis grease, NLGI No.2
Free playLess than 30 mm (1.18 in.)
Power steering fluid typeAutomatic transmission fluid DEXRON® II
or III
Fluid typeSuspension fluid AHC