Page 98 of 328
98
3. ADDRESS BOOK
■TO CHANGE “Location”
1Touch “Edit”.
2Touch one of the 8 directional screen
buttons to move the cursor to the
desired point on the map.
3Touch “OK”.
The previous screen will be displayed.
■TO CHANGE “Phone #” (PHONE
NUMBER)
1Touch “Edit”.
2Enter the number using the number
keys.
3Touch “OK”.
The previous screen will be displayed.
1Press the “SETUP” button.
2Touch “Navigation” on the “Setup”
screen.
3Touch “Address Book” on the “Navi-
gation Settings” screen.
4Touch “Delete” .
DELETING ADDRESS BOOK
ENTRIES
Page 101 of 328
101
3. ADDRESS BOOK
3
NAVIGATION SYSTEM
6Touch “Edit” next to the item to be ed-
ited.
“Show Name on Map”:
The name of an
area to be avoided that may be dis-
played on the map by touching “On” or
“Off” .
(See page 101.)
“Active”: To turn on or off the area to avoid
feature. To turn on the feature, touch “On”
on the “Area to Avoid” screen. To turn off
the feature, touch “Off” on the “Area to
Avoid” screen.
7Touch “OK”.
■TO CHANGE “Name”
1Touch “Edit”.
2Enter the name using the alphanumer-
ic keys.
Up to 32 characters can be entered.
3Touch “OK”.
The previous screen will be displayed.
■DISPLAYING NAMES OF AREAS
TO BE AVOIDED
1Touch “On”, next to “Show Name on
Map”, to display the area to be avoided
name on the map. Touch “Off” to not
display it.
No.FunctionPage
To edit the name of the
area to avoid. The name
can be displayed on the
map.
101
To edit the area location.102
To edit the area size.102
Page 114 of 328
114
4. SETUP
■TO EDIT “Dealer” OR “Contact”
1Touch “Edit” next to “Dealer” or “Con-
tact”.
2Enter the name using the alphanumer-
ic keys.
Up to 32 characters can be entered.
3Touch “OK”.
The previous screen will be displayed.
■TO EDIT “Location”
1Touch “Edit” next to “Location”.
2Touch one of the 8 directional screen
buttons to move the cursor to the
desired point on the map screen.
3Touch “OK”.
The previous screen will be displayed.
■TO EDIT “Phone #” (PHONE NUM-
BER)
1Touch “Edit” next to “Phone #”.
2Enter the number using number keys.
3Touch “OK”.
The previous screen will be displayed.
Page 128 of 328

128
1. PHONE OPERATION
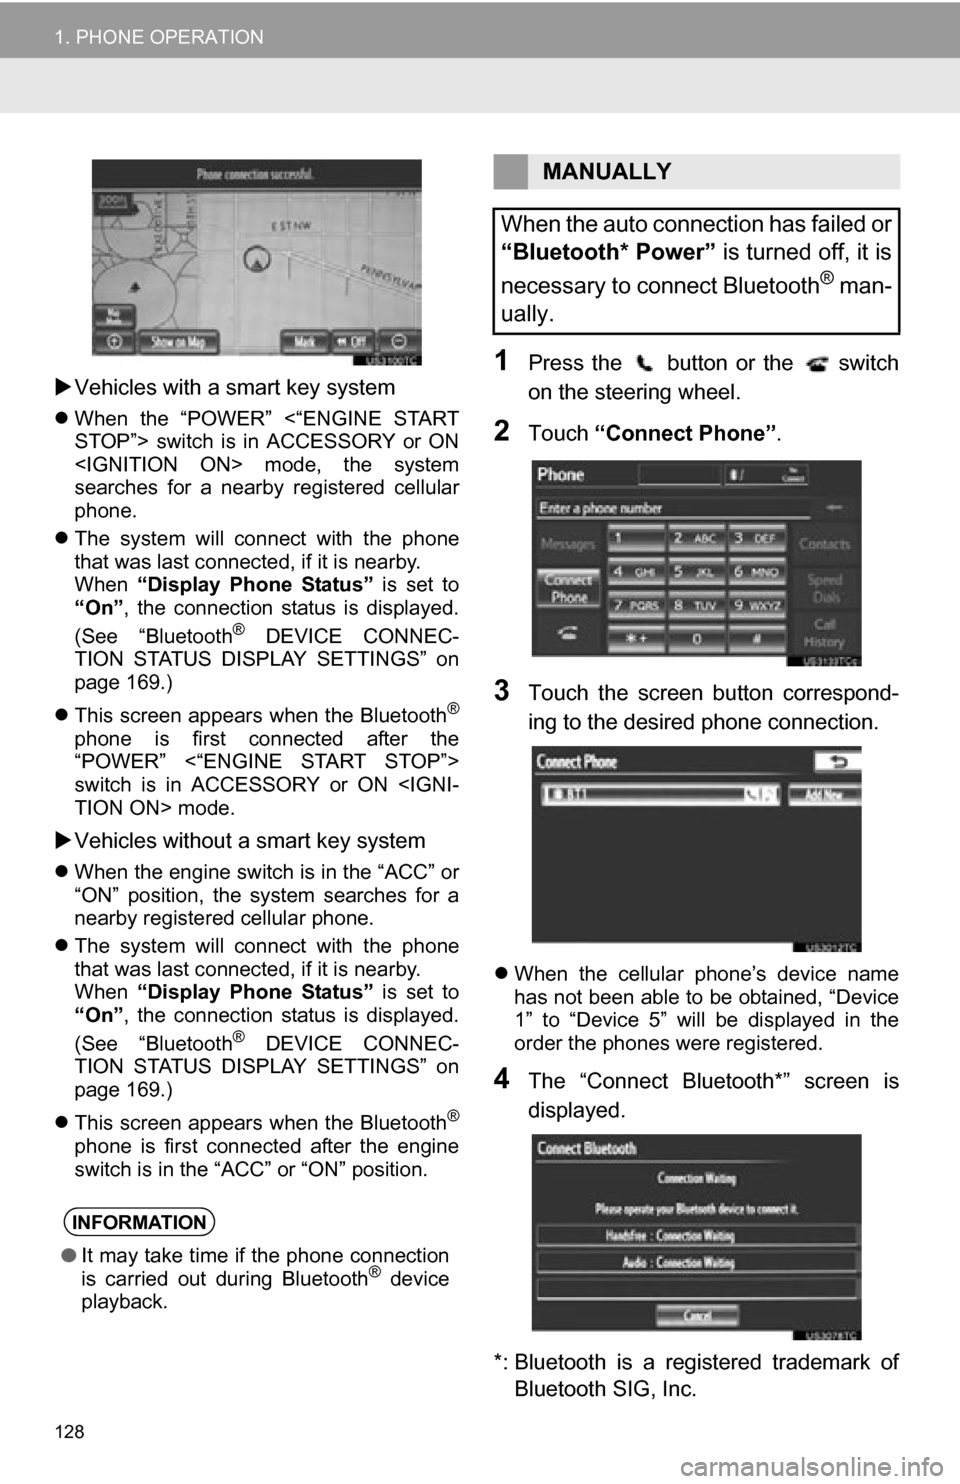
Vehicles with a smart key system
When the “POWER” <“ENGINE START
STOP”> switch is in ACCESSORY or ON
mode, the system
searches for a nearby registered cellular
phone.
The system will connect with the phone
that was last connected, if it is nearby.
When “Display Phone Status” is set to
“On” , the connection status is displayed.
(See “Bluetooth
® DEVICE CONNEC-
TION STATUS DISPLAY SETTINGS” on
page 169.)
This screen appears when the Bluetooth
®
phone is first connected after the
“POWER” <“ENGINE START STOP”>
switch is in ACCESSORY or ON
TION ON> mode.
Vehicles without a smart key system
When the engine switch is in the “ACC” or
“ON” position, the system searches for a
nearby registered cellular phone.
The system will connect with the phone
that was last connected, if it is nearby.
When “Display Phone Status” is set to
“On” , the connection status is displayed.
(See “Bluetooth
® DEVICE CONNEC-
TION STATUS DISPLAY SETTINGS” on
page 169.)
This screen appears when the Bluetooth
®
phone is first connected after the engine
switch is in the “ACC” or “ON” position.
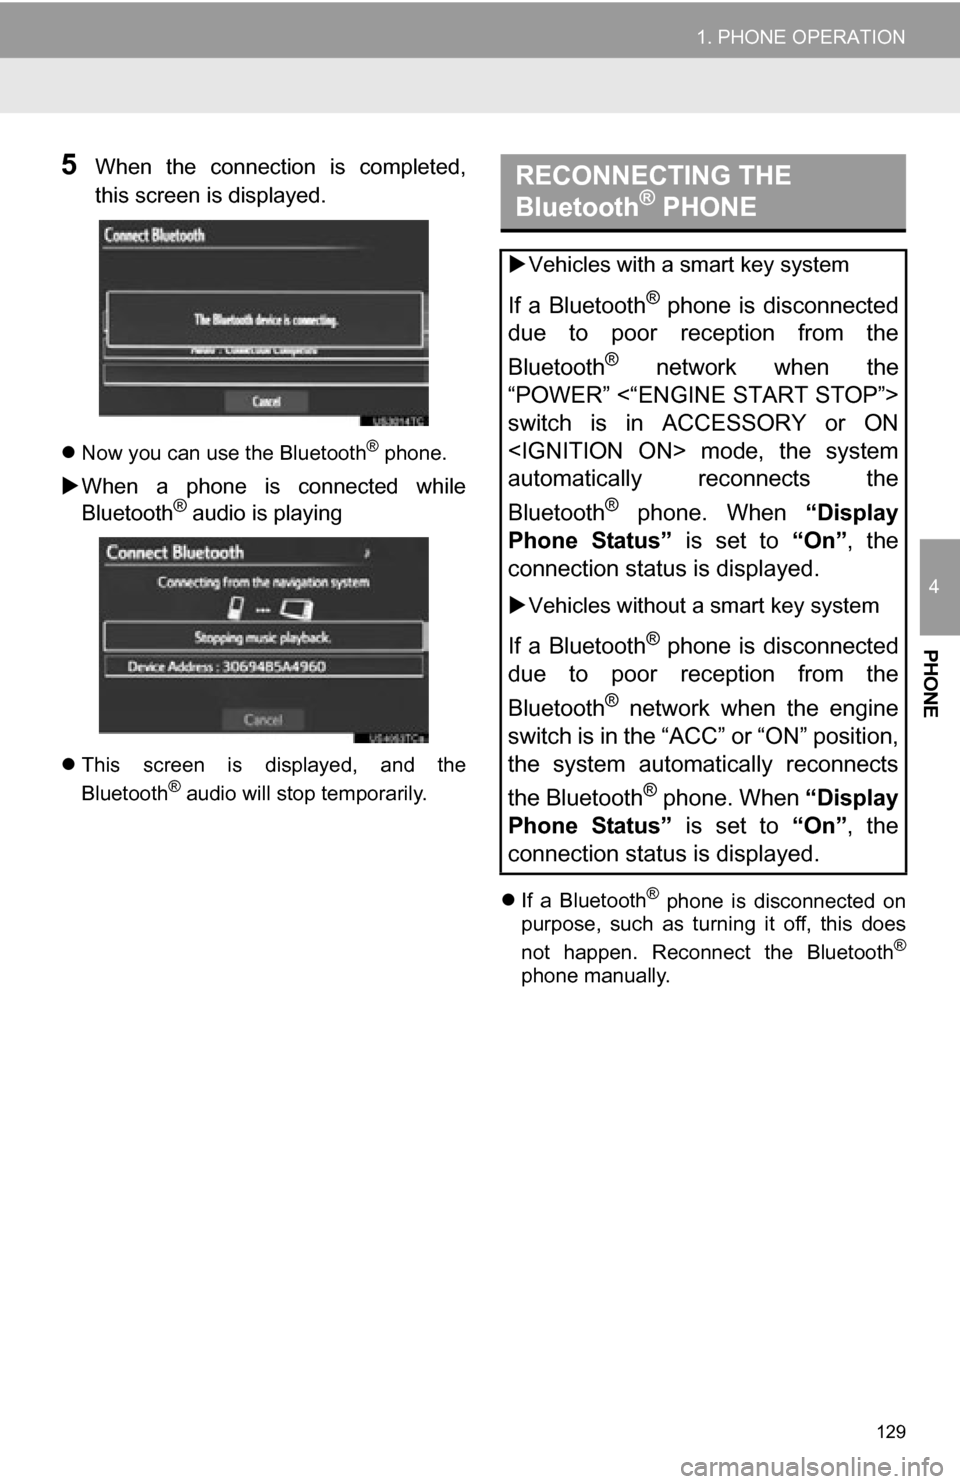
1Press the button or the switch
on the steering wheel.
2Touch “Connect Phone” .
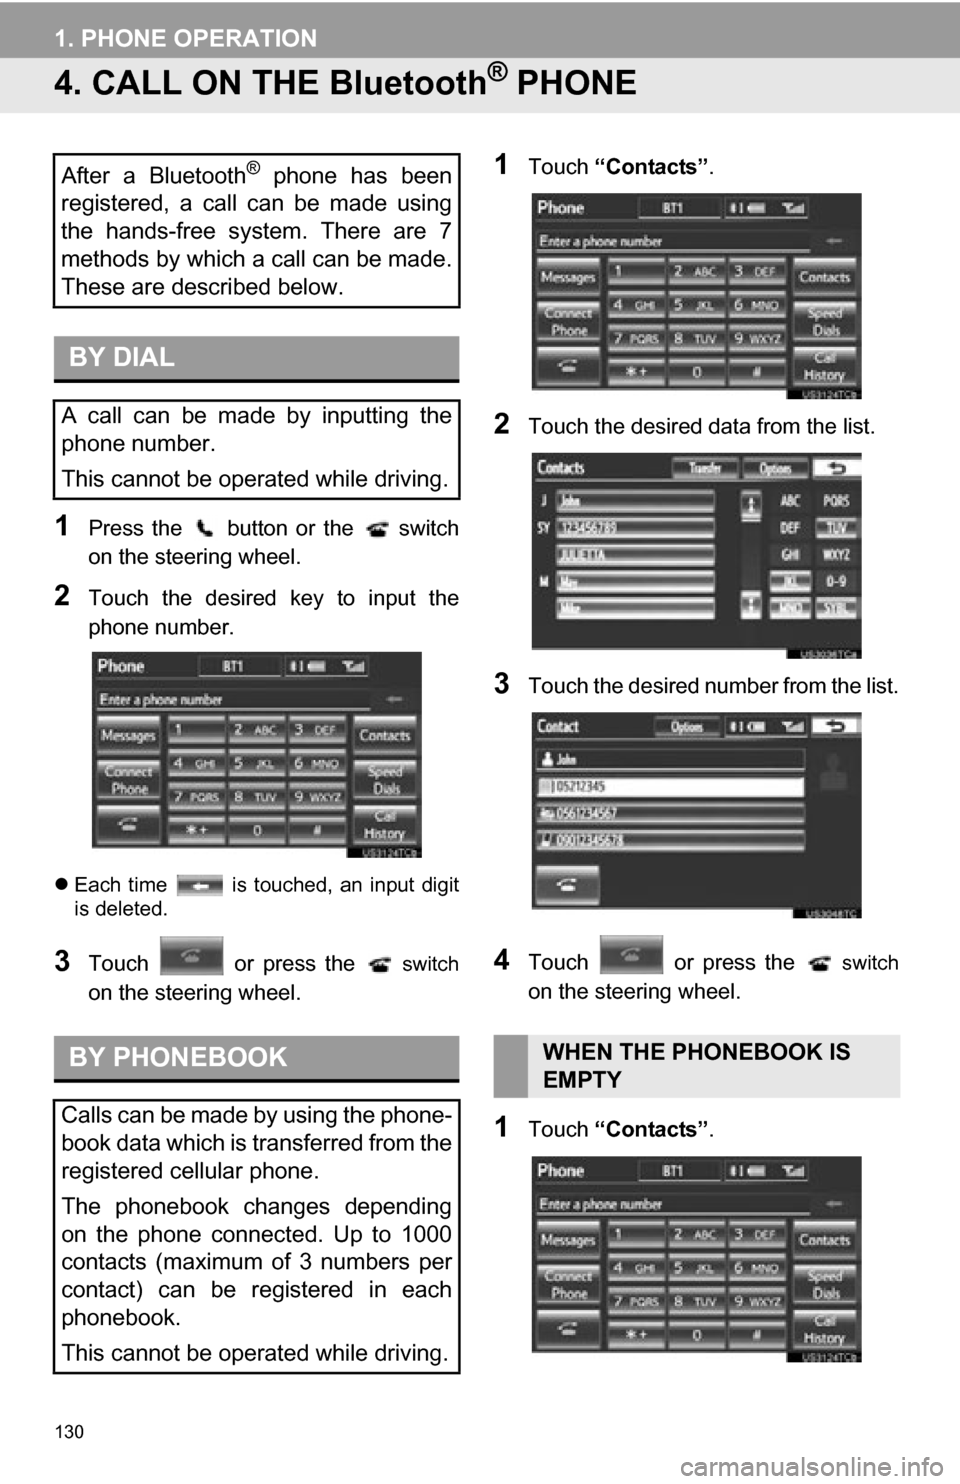
3Touch the screen button correspond-
ing to the desired phone connection.
When the cellular phone’s device name
has not been able to be obtained, “Device
1” to “Device 5” will be displayed in the
order the phones were registered.
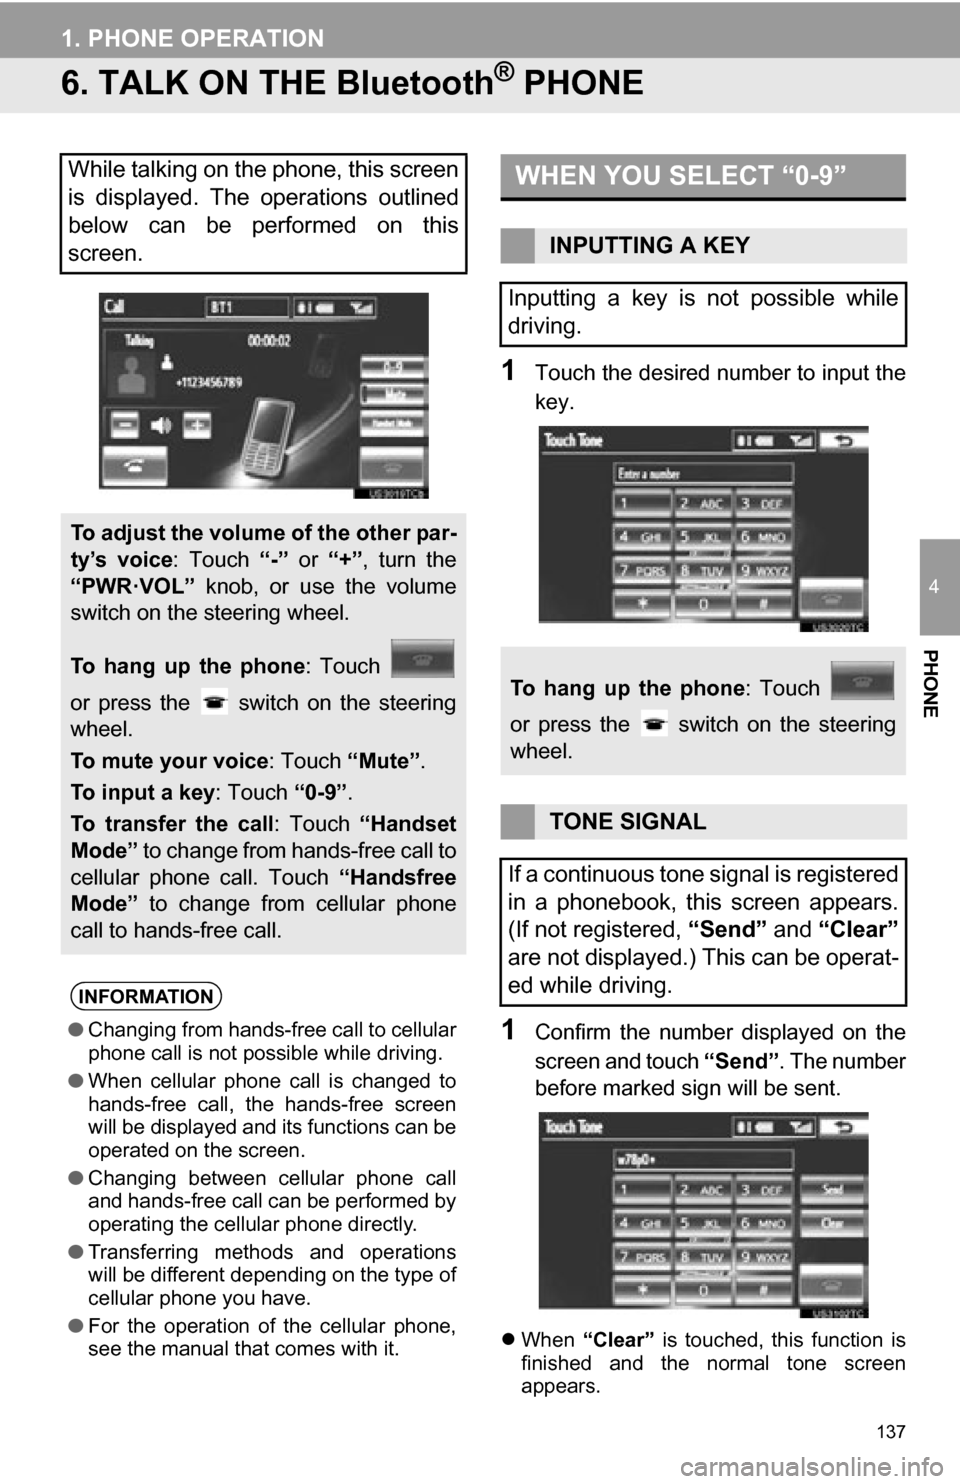
4The “Connect Bluetooth*” screen is
displayed.
*: Bluetooth is a registered trademark of Bluetooth SIG, Inc.
INFORMATION
● It may take time if the phone connection
is carried out during Bluetooth® device
playback.
MANUALLY
When the auto connection has failed or
“Bluetooth* Power” is turned off, it is
necessary to connect Bluetooth
® man-
ually.
Page 129 of 328

129
1. PHONE OPERATION
4
PHONE
5When the connection is completed,
this screen is displayed.
Now you can use the Bluetooth® phone.
When a phone is connected while
Bluetooth® audio is playing
This screen is displayed, and the
Bluetooth® audio will stop temporarily.
If a Bluetooth
® phone is disconnected on
purpose, such as turning it off, this does
not happen. Reconnect the Bluetooth
®
phone manually.
RECONNECTING THE
Bluetooth® PHONE
Vehicles with a smart key system
If a Bluetooth® phone is disconnected
due to poor reception from the
Bluetooth
® network when the
“POWER” <“ENGINE START STOP”>
switch is in ACCESSORY or ON
mode, the system
automatically reconnects the
Bluetooth
® phone. When “Display
Phone Status” is set to “On”, the
connection status is displayed.
Vehicles without a smart key system
If a Bluetooth® phone is disconnected
due to poor reception from the
Bluetooth
® network when the engine
switch is in the “ACC” or “ON” position,
the system automatically reconnects
the Bluetooth
® phone. When “Display
Phone Status” is set to “On”, the
connection status is displayed.
Page 130 of 328

130
1. PHONE OPERATION
4. CALL ON THE Bluetooth® PHONE
1Press the button or the switch
on the steering wheel.
2Touch the desired key to input the
phone number.
Each time is touched, an input digit
is deleted.
3Touch or press the switch
on the steering wheel.
1Touch “Contacts” .
2Touch the desired data from the list.
3Touch the desired number from the list.
4Touch or press the switch
on the steering wheel.
1Touch “Contacts” .
After a Bluetooth® phone has been
registered, a call can be made using
the hands-free system. There are 7
methods by which a call can be made.
These are described below.
BY DIAL
A call can be made by inputting the
phone number.
This cannot be operated while driving.
BY PHONEBOOK
Calls can be made by using the phone-
book data which is transferred from the
registered cellular phone.
The phonebook changes depending
on the phone connected. Up to 1000
contacts (maximum of 3 numbers per
contact) can be registered in each
phonebook.
This cannot be operated while driving.
WHEN THE PHONEBOOK IS
EMPTY
Page 137 of 328

137
1. PHONE OPERATION
4
PHONE
6. TALK ON THE Bluetooth® PHONE
1Touch the desired number to input the
key.
1Confirm the number displayed on the
screen and touch “Send”. The number
before marked sign will be sent.
When “Clear” is touched, this function is
finished and the normal tone screen
appears.
While talking on the phone, this screen
is displayed. The operations outlined
below can be performed on this
screen.
To adjust the volume of the other par-
ty’s voice : Touch “-” or “+”, turn the
“PWR·VOL” knob, or use the volume
switch on the steering wheel.
To hang up the phone : Touch
or press the switch on the steering
wheel.
To mute your voice : Touch “Mute”.
To input a key : Touch “0-9”.
To transfer the call : Touch “Handset
Mode” to change from hands-free call to
cellular phone call. Touch “Handsfree
Mode” to change from cellular phone
call to hands-free call.
INFORMATION
● Changing from hands-free call to cellular
phone call is not possible while driving.
● When cellular phone call is changed to
hands-free call, the hands-free screen
will be displayed and its functions can be
operated on the screen.
● Changing between cellular phone call
and hands-free call can be performed by
operating the cellular phone directly.
● Transferring methods and operations
will be different depending on the type of
cellular phone you have.
● For the operation of the cellular phone,
see the manual that comes with it.
WHEN YOU SELECT “0-9”
INPUTTING A KEY
Inputting a key is not possible while
driving.
To hang up the phone : Touch
or press the switch on the steering
wheel.
TONE SIGNAL
If a continuous tone signal is registered
in a phonebook, this screen appears.
(If not registered, “Send” and “Clear”
are not displayed.) This can be operat-
ed while driving.
Page 147 of 328
147
2. SETUP
4
PHONE
4When the transfer is complete, “Done”
will appear on the screen. Touch
“Done” .
When another Bluetooth® device is con-
nected
When another Bluetooth
® device is cur-
rently connected, this screen is displayed.
To disconnect it, touch “Yes”.
From “Contacts” screen
1Press the button or the switch
on the steering wheel.
2Touch “Contacts” on the “Phone”
screen.
3Touch “Transfer” .
4This screen is displayed. The following
operations are performed in the same
manner as when they are performed
from the “Setup” screen.
■REGISTERING THE PHONEBOOK
DATA
1Touch “New Contact” .
2Use the software keyboard to input the
name and touch “OK”.
Phonebooks of PBAP incompatible but
OPP compatible phones can also be
transferred from the “Contacts” screen.
The phonebook data can be regis-
tered.
Up to 3 numbers per person can be
registered. New phonebook data can-
not be added for PBAP compatible
Bluetooth
® phones.