2012 SUBARU TRIBECA oil
[x] Cancel search: oilPage 7 of 420
4
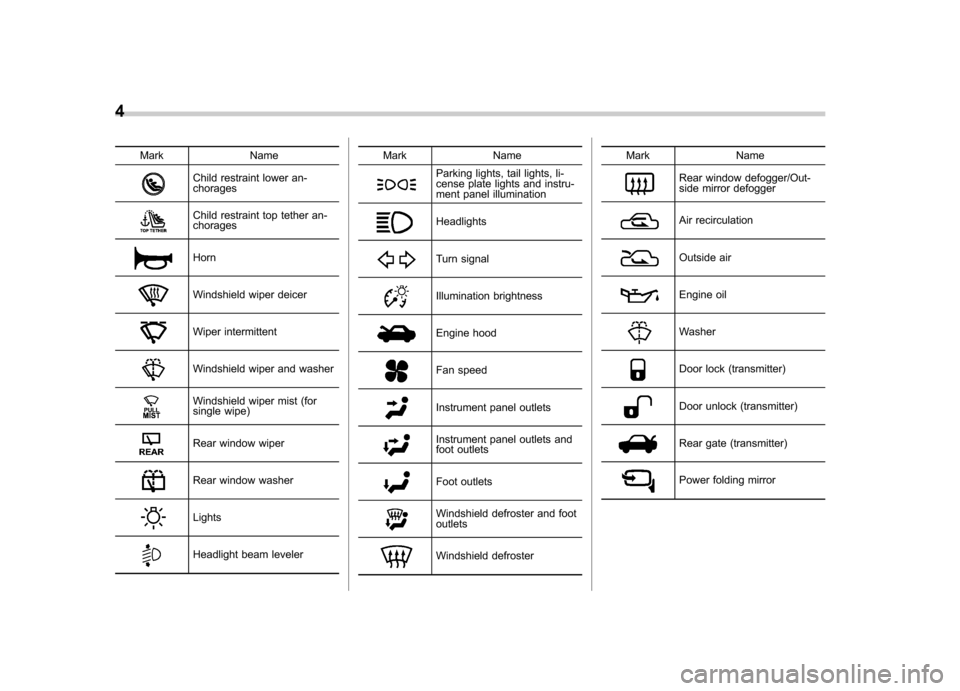
Mark Name
Child restraint lower an- chorages
Child restraint top tether an- chorages
Horn
Windshield wiper deicer
Wiper intermittent
Windshield wiper and washer
Windshield wiper mist (for
single wipe)
Rear window wiper
Rear window washer
Lights
Headlight beam levelerMark Name
Parking lights, tail lights, li-
cense plate lights and instru-
ment panel illumination
Headlights
Turn signal
Illumination brightness
Engine hood
Fan speed
Instrument panel outlets
Instrument panel outlets and
foot outlets
Foot outlets
Windshield defroster and foot outlets
Windshield defrosterMark Name
Rear window defogger/Out-
side mirror defogger
Air recirculation
Outside air
Engine oil
Washer
Door lock (transmitter)
Door unlock (transmitter)
Rear gate (transmitter)
Power folding mirror
Page 25 of 420

22
&Warning and indicator lights
Mark Name Page
Driver ’s seatbelt warning
light 3-10
Front passenger
’s seat-
belt warning light 3-10
SRS airbag system
warning light 3-11
CHECK ENGINE warn-
ing light/Malfunction indi-
cator light3-12
Charge warning light 3-13
Oil pressure warning light 3-13
AT OIL TEMP warning light
3-13
/ABS warning light 3-15
/Brake system warning light
3-16
Door open warning light
3-17Mark Name Page
Low fuel warning light 3-17
AWD warning light 3-18
Vehicle Dynamics Con-
trol warning light (U.S.-
spec. models and
Canada-spec. models)/
Vehicle Dynamics Con-
trol operation indicator
light (all models)
3-18
Traction Control system
OFF indicator light (U.S.-
spec. models and
Canada-spec. models)
3-19
Vehicle Dynamics Con-
trol warning light (Latin
America-spec. models)/
Traction Control system
OFF indicator light (Latin
America-spec. models) 3-19
Security indicator light 3-21
Turn signal indicator lights
3-21
High beam indicator light 3-22
Front fog light indicator light3-22Mark Name Page
Headlight indicator light 3-22
Cruise control indicator light
3-22
Cruise control set indica-
tor light
3-22
Low tire pressure warn-
ing light3-14
Passenger airbag ON in-
dicator light
3-12
Passenger airbag OFF
indicator light3-12
SPORT mode indicator light3-21
Windshield washer fluid
warning light3-17
Rear differential oil tem-
perature warning light3-13
Page 55 of 420
1-26Seat, seatbelt and SRS airbags
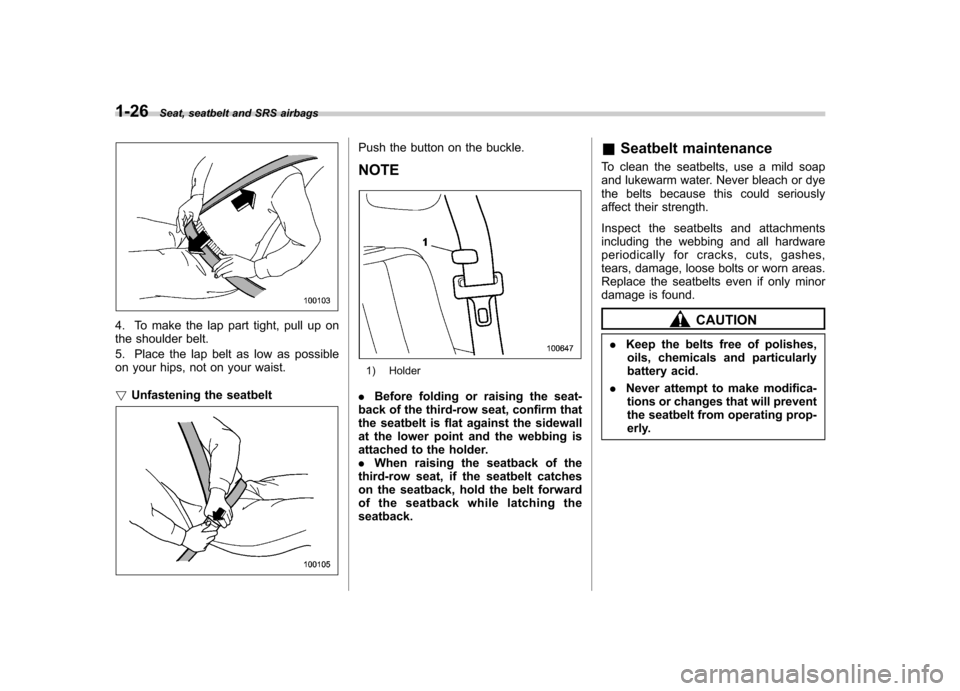
4. To make the lap part tight, pull up on
the shoulder belt.
5. Place the lap belt as low as possible
on your hips, not on your waist. !Unfastening the seatbelt
Push the button on the buckle. NOTE
1) Holder
. Before folding or raising the seat-
back of the third-row seat, confirm that
the seatbelt is flat against the sidewall
at the lower point and the webbing is
attached to the holder.. When raising the seatback of the
third-row seat, if the seatbelt catches
on the seatback, hold the belt forward
of the seatback while latching theseatback. &
Seatbelt maintenance
To clean the seatbelts, use a mild soap
and lukewarm water. Never bleach or dye
the belts because this could seriously
affect their strength.
Inspect the seatbelts and attachments
including the webbing and all hardware
periodically for cracks, cuts, gashes,
tears, damage, loose bolts or worn areas.
Replace the seatbelts even if only minor
damage is found.
CAUTION
. Keep the belts free of polishes,
oils, chemicals and particularly
battery acid.
. Never attempt to make modifica-
tions or changes that will prevent
the seatbelt from operating prop-
erly.
Page 114 of 420
&Sounding a panic alarm
To activate the alarm, press the “PANIC ”
button once.
The horn will sound and the turn signal
lights will flash.
To deactivate the panic alarm, press any
button on the remote transmitter. Unless a
button on the remote transmitter is
pressed, the alarm will be deactivated
after approximately 30 seconds. & Selecting audible signal op- eration
Using an electronic chirp, the system will
give you an audible signal when the doors
lock and unlock. If desired, you may turn
the audible signal off.
Do the following to deactivate the audible signal. You can also use the same steps
to restore the function.
1. Sit in the driver
’s seat and shut all
doors and the rear gate.
2. Hold down the UNLOCK side of the
power door locking switch.
3. While holding down the “UNLOCK ”
side of the power door locking switch, pull
the key out and re-insert it into the ignition
switch at least 6 times within 10 seconds
after Step 2.
4. Open and close the driver ’s door once
within 10 seconds after step 3.
5. The turn signal lights flash 3 times to
indicate completion of the setting.
You may have the above settings done by
your SUBARU dealer.
& Replacing the battery
CAUTION
. Do not let dust, oil or water get on
or in the transmitter when repla-
cing the battery.
. Be careful not to damage the
printed circuit board in the trans-
mitter when replacing the battery.
. Be careful not to allow children to
touch the battery and any re-
moved parts; children could swallow them.
. There is a danger of explosion if
an incorrect replacement battery
is used. Replace only with the
same or equivalent type of bat-
tery.
. Batteries should not be exposed
to excessive heat such as sun-
shine, fire or the like.
When the transmitter battery begins to get
weak, transmitter range will begin to
decrease. Replace the battery as soon
as possible.
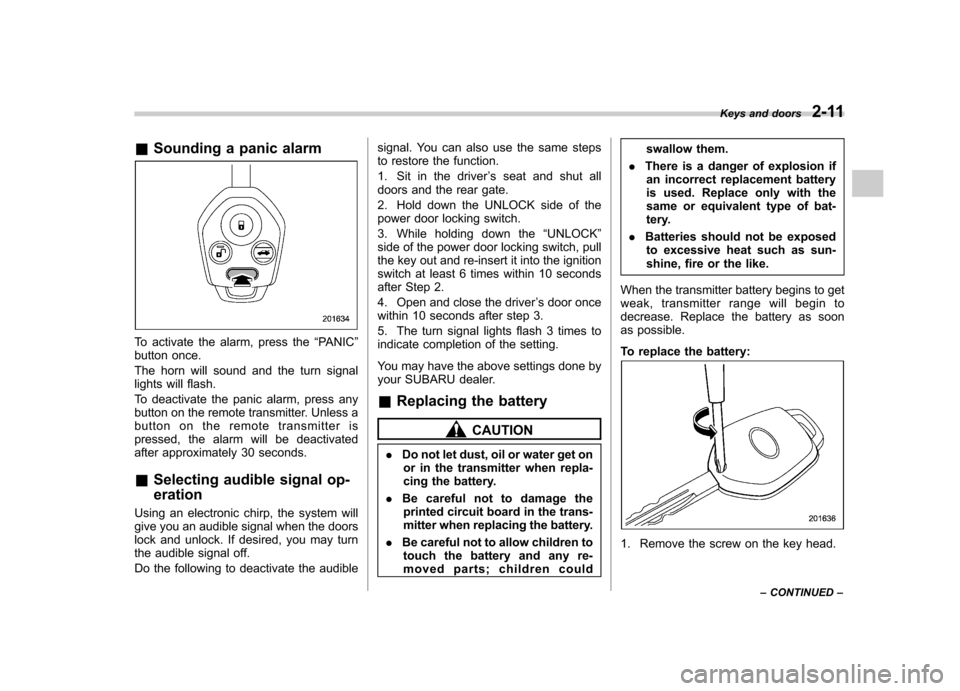
To replace the battery:
1. Remove the screw on the key head. Keys and doors
2-11
– CONTINUED –
Page 132 of 420
Ignition switch..................................................... 3-3
LOCK .................................................................. 3-3
Acc..................................................................... 3-4
ON...................................................................... 3-4
START ................................................................ 3-4
Key reminder chime ............................................ 3-4
Ignition switch light ............................................. 3-4
Hazard warning flasher ....................................... 3-5
Meters and gauges. ............................................. 3-5
Combination meter illumination ........................... 3-5
Canceling the function for meter needle/gauge movement and combination meter sequential
illumination upon turning on the ignition switch ............................................................... 3-5
Speedometer ....................................................... 3-6
Odometer ............................................................ 3-6
Double trip meter ................................................ 3-7
Tachometer ......................................................... 3-7
Fuel gauge .......................................................... 3-8
Temperature gauge ............................................. 3-8
Warning and indicator lights .............................. 3-9
Seatbelt warning light and chime ........................ 3-10
SRS airbag system warning light ........................ 3-11
Front passenger ’s frontal airbag ON and OFF
indicators ......................................................... 3-12
CHECK ENGINE warning light/Malfunction indicator light ................................................... 3-12
Charge warning light .......................................... 3-13
Oil pressure warning light .................................. 3-13
AT OIL TEMP warning light ................................. 3-13 Rear differential oil temperature warning
light ................................................................ 3-13
Low tire pressure warning light .......................... 3-14
ABS warning light .............................................. 3-15
Brake system warning light ................................ 3-16
Low fuel warning light ....................................... 3-17
Door open warning light .................................... 3-17
Windshield washer fluid warning light ................ 3-17
All-Wheel Drive warning light ... .......................... 3-18
Vehicle Dynamics Control warning light (U.S.- spec models and Canada-spec. models)/Vehicle
Dynamics Control operation indicator light (allmodels) ........................................................... 3-18
Traction Control system OFF indicator light (U.S.-spec models and Canada-spec.models) ........................................................... 3-19
Vehicle Dynamics Control warning light (Latin America-spec. models)/Traction Control OFF
indicator light (Latin America-spec. models) ..... 3-19
Security indicator light ....................................... 3-21
SPORT mode indicator light ............................... 3-21
Select lever/Gear position indicator .................... 3-21
Turn signal indicator lights ................................. 3-21
High beam indicator light ................................... 3-22
Cruise control indicator light .............................. 3-22
Cruise control set indicator light ........................ 3-22
Headlight indicator light ..................................... 3-22
Front fog light indicator light .............................. 3-22
Clock .................................................................. 3-22
Outside temperature indicator .......................... 3-23
Low outside temperature warning ...................... 3-24
Instruments and controls
3
Page 140 of 420

CAUTION
If the pointer exceeds the normal
operating range, safely stop the
vehicle as soon as possible.
Refer to “Engine overheating ”F9-
14. Warning and indicator lights
Several of the warning and indicator lights
illuminate momentarily and then turn off
when the ignition switch is initially turned
to the
“ON ”position. This permits check-
ing the operation of the bulbs.
Apply the parking brake and turn the
ignition switch to the “ON ”position. For
the system check, the following lights
illuminate and turn off after several sec-
onds or after the engine has started:
: Driver ’s seatbelt warning light
(The seatbelt warning light turns off
only when the driver fastens the seatbelt.)
: Front passenger ’s seatbelt warning
light
(The seatbelt warning light turns off
only when the front seat passenger
fastens the seatbelt.)
: SRS airbag system warning light
: CHECK ENGINE warning light/Mal- function indicator light
: Charge warning light
: Oil pressure warning light
: AT OIL TEMP warning light
/: ABS warning light
: Vehicle Dynamics Control warning light(U.S.-spec. models and Canada-spec.
models)/Vehicle Dynamics Control op-
eration indicator light (all models)
: Traction Control system OFF indicator light (U.S.-spec. models and Canada-
spec. models)
: Vehicle Dynamics Control warning light
(Latin America-spec. models)/Traction
Control system OFF indicator light
(Latin America-spec. models)
/: Brake system warning light
: AWD warning light
: Low tire pressure warning light
: SPORT mode indicator light
: Front passenger ’s frontal airbag ON
indicator light
: Front passenger ’s frontal airbag OFF
indicator light
: Low fuel warning light
: Cruise control indicator light
: Cruise control set indicator light
: Rear differential oil temperature warn-
ing light
: Windshield washer fluid warning light Instruments and controls
3-9
– CONTINUED –
Page 144 of 420

!If the light is blinking
If the light is blinking while driving, an
engine misfire condition has been de-
tected which may damage the emission
control system.
To prevent serious damage to the emis-
sion control system, you should do thefollowing. . Reduce vehicle speed.
. Avoid hard acceleration.
. Avoid steep uphill grades.
. Reduce the amount of cargo, if possi-
ble.. Stop towing a trailer as soon as
possible.
The CHECK ENGINE warning light may
stop blinking and illuminate steadily after
several driving trips. You should have your
vehicle checked by an authorized
SUBARU dealer immediately. & Charge warning light
If this light illuminates when the engine is
running, it may indicate that the charging
system is not working properly.
If the light illuminates while driving or does
not turn off after the engine starts, stop the
engine at the first safe opportunity and
check the alternator belt. If the belt is
loose, broken or if the belt is in good condition but the light remains illuminated,
contact your nearest SUBARU dealer
immediately.
& Oil pressure warning light
CAUTION
Do not operate the engine with the
oil pressure warning light illumi-
nated. This may cause serious en-
gine damage.
If this light illuminates when the engine is
running, it may indicate that the engine oil
pressure is low and the lubricating system
is not working properly.
If the light illuminates while driving or does
not turn off after the engine starts, stop the
engine at the first safe opportunity and
check the engine oil level. If the oil level is
low, add oil immediately. If the engine oil is
at the proper level but the light remains
illuminated, contact your nearest
SUBARU dealer immediately. & AT OIL TEMP warning light
If this light illuminates when the engine is
running, it may indicate that the automatic
transmission fluid temperature is too hot. If the light illuminates while driving, im-
mediately stop the vehicle in a safe place
and let the engine idle until the warning
light turns off. !
Automatic transmission control
system warning
If the light flashes after the engine starts, it
may indicate that the automatic transmis-
sion control system is not working prop-
erly. Contact your nearest SUBARU deal-
er for service immediately. & Rear differential oil
temperature warning light
CAUTION
Reduce vehicle speed and park the
vehicle in a safe place as soon as
possible if the R.DIFF TEMP light
illuminates. Continued driving with
this light illuminated can damage
the rear differential and other parts
of the powertrain.
If this light illuminates when the engine is
running, it may indicate that the rear
differential oil temperature is too hot.
If the light illuminates while driving, reduce
vehicle speed and stop the vehicle at the Instruments and controls
3-13
– CONTINUED –
Page 145 of 420
3-14Instruments and controls
nearest safe place.
Park the vehicle for several minutes. After
the light turns off, you can start driving.
If the light does not turn off, contact the
nearest SUBARU dealer for service. NOTE .If the tire pressures are not correct
and/or the tires are not all the same
size and brand, the rear differential will
be heavily loaded when the vehicle is
driven, resulting in an abnormally high
oil temperature.. The rear differential oil will deterio-
rate if its temperature increases en-
ough for the rear differential oil tem-
perature warning light to illuminate. It is
advisable to have the rear differential
oil replaced as soon as possible. & Low tire pressure
warning light
When the ignition switch is turned to the “ON ”position, the low tire pressure warn-
ing light will illuminate for approximately 2
seconds to check that the tire pressure
monitoring system (TPMS) is functioning
properly. If there is no problem and all tires
are properly inflated, the light will turn off.
Each tire, including the spare (if provided),
should be checked monthly when cold and inflated to the inflation pressure
recommended by the vehicle manufac-
turer on the vehicle placard or tire inflation
pressure label. (If your vehicle has tires of
a different size than the size indicated on
the vehicle placard or tire inflation pres-
sure label, you should determine the
proper tire inflation pressure for thosetires.)
As an added safety feature, your vehicle
has been equipped with a tire pressure
monitoring system (TPMS) that illuminates
a low tire pressure telltale when one or
more of your tires is significantly under-
inflated. Accordingly, when the low tire
pressure telltale illuminates, you should
stop and check your tires as soon as
possible, and inflate them to the proper
pressure. Driving on a significantly under-
inflated tire causes the tire to overheat and
can lead to tire failure. Under-inflation also
reduces fuel efficiency and tire tread life,
and may affect the vehicle
’s handling and
stopping ability.
Please note that the TPMS is not a
substitute for proper tire maintenance,
and it is the driver ’s responsibility to
maintain correct tire pressure, even if
under-inflation has not reached the level
to trigger illumination of the TPMS low tire
pressure telltale.
Your vehicle has also been equipped with a TPMS malfunction indicator to indicate
when the system is not operating properly.
The TPMS malfunction indicator is com-
bined with the low tire pressure telltale.
When the system detects a malfunction,
the telltale will flash for approximately one
minute and then remain continuously
illuminated. This sequence will continue
upon subsequent vehicle start-ups as long
as the malfunction exists. When the
malfunction indicator is illuminated, the
system may not be able to detect or signal
low tire pressure as intended. TPMS
malfunctions may occur for a variety of
reasons, including the installation of re-
placement or alternate tires or wheels on
the vehicle that prevent the TPMS from
functioning properly. Always check the
TPMS malfunction telltale after replacing
one or more tires or wheels on your
vehicle to ensure that the replacement or
alternate tires and wheels allow the TPMS
to continue to function properly.
Should the warning light illuminate stea-
dily after blinking for approximately one
minute, have the system inspected by
your nearest SUBARU dealer as soon aspossible.
WARNING
If this light does not illuminate
briefly after the ignition switch is