2012 SUBARU TRIBECA oil
[x] Cancel search: oilPage 339 of 420
11-8Maintenance and service
.Be careful not to spill engine oil
when adding it. If oil touches the
exhaust pipe, it may cause a bad
smell, smoke, and/or a fire. If
engine oil gets on the exhaust
pipe, be sure to wipe it off.
If you check the oil level just after stopping
the engine, wait a few minutes for the oil to
drain back into the oil pan before checking
the level.
To prevent overfilling the engine oil, do not
add any additional oil above the full level
when the engine is cold. & Changing the oil and oil filter
CAUTION
. If you change your own oil, be
sure to drain all the oil from the
filter before disposal.
. Do not dispose of used engine oil
by placing it in the trash, or by
pouring it onto the ground, into
sewers, or into any body of water.
Check with your local govern-
ment office for the proper dis-
posal options available to you.
Change the oil and oil filter according to
the maintenance schedule in the “War- ranty and Maintenance Booklet
”.
The engine oil and oil filter must be
changed more frequently than listed in
the maintenance schedule when driving
on dusty roads, when short trips are
frequently made, or when driving in
extremely cold weather.
1. Warm up the engine by letting the
engine idle for approximately 10 minutes
to ease draining the engine oil.
2. Park the vehicle on a level surface and
stop the engine.
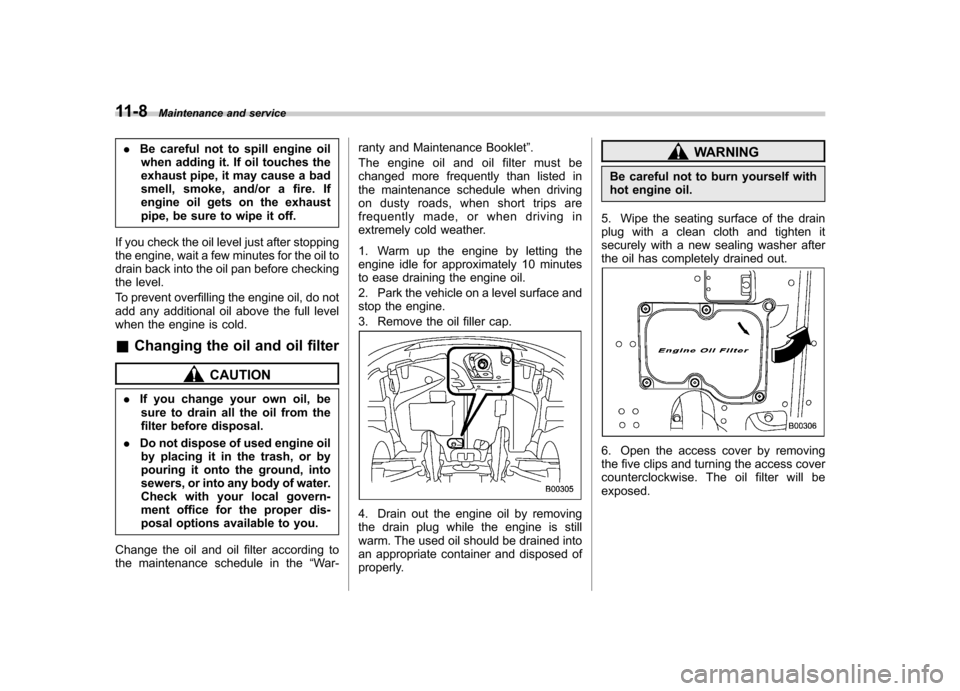
3. Remove the oil filler cap.
4. Drain out the engine oil by removing
the drain plug while the engine is still
warm. The used oil should be drained into
an appropriate container and disposed of
properly.
WARNING
Be careful not to burn yourself with
hot engine oil.
5. Wipe the seating surface of the drain
plug with a clean cloth and tighten it
securely with a new sealing washer after
the oil has completely drained out.
6. Open the access cover by removing
the five clips and turning the access cover
counterclockwise. The oil filter will beexposed.
Page 340 of 420
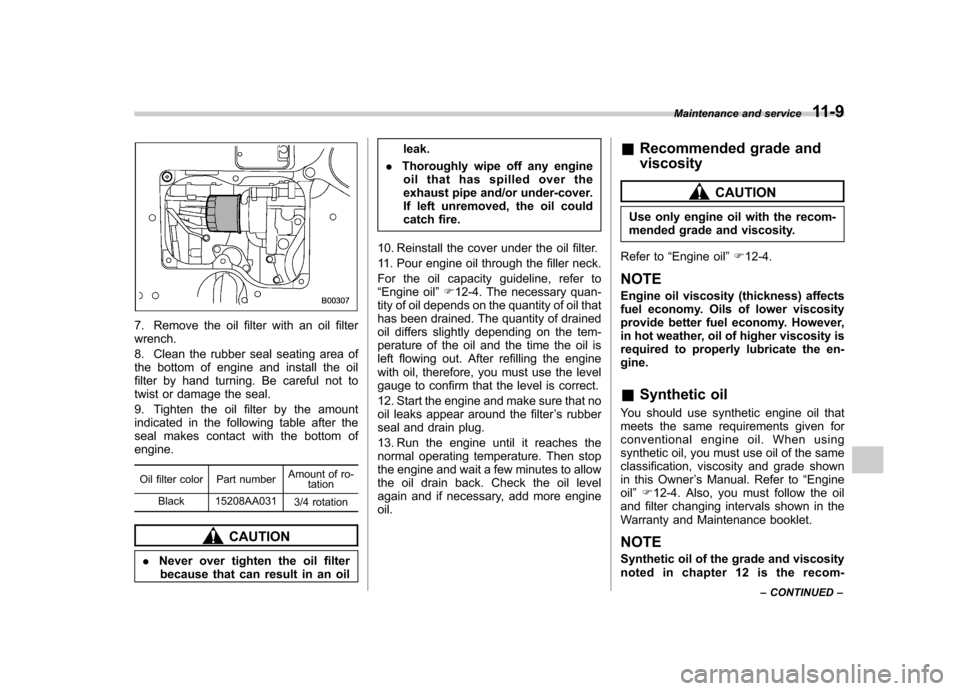
7. Remove the oil filter with an oil filter wrench.
8. Clean the rubber seal seating area of
the bottom of engine and install the oil
filter by hand turning. Be careful not to
twist or damage the seal.
9. Tighten the oil filter by the amount
indicated in the following table after the
seal makes contact with the bottom ofengine.Oil filter color Part number Amount of ro-
tation
Black 15208AA031 3/4 rotation
CAUTION
. Never over tighten the oil filter
because that can result in an oil leak.
. Thoroughly wipe off any engine
oil that has spilled over the
exhaust pipe and/or under-cover.
If left unremoved, the oil could
catch fire.
10. Reinstall the cover under the oil filter.
11. Pour engine oil through the filler neck.
For the oil capacity guideline, refer to “ Engine oil ”F 12-4. The necessary quan-
tity of oil depends on the quantity of oil that
has been drained. The quantity of drained
oil differs slightly depending on the tem-
perature of the oil and the time the oil is
left flowing out. After refilling the engine
with oil, therefore, you must use the level
gauge to confirm that the level is correct.
12. Start the engine and make sure that no
oil leaks appear around the filter ’s rubber
seal and drain plug.
13. Run the engine until it reaches the
normal operating temperature. Then stop
the engine and wait a few minutes to allow
the oil drain back. Check the oil level
again and if necessary, add more engineoil. &
Recommended grade and viscosity
CAUTION
Use only engine oil with the recom-
mended grade and viscosity.
Refer to “Engine oil ”F 12-4.
NOTE
Engine oil viscosity (thickness) affects
fuel economy. Oils of lower viscosity
provide better fuel economy. However,
in hot weather, oil of higher viscosity is
required to properly lubricate the en-gine. & Synthetic oil
You should use synthetic engine oil that
meets the same requirements given for
conventional engine oil. When using
synthetic oil, you must use oil of the same
classification, viscosity and grade shown
in this Owner ’s Manual. Refer to “Engine
oil ”F 12-4. Also, you must follow the oil
and filter changing intervals shown in the
Warranty and Maintenance booklet.
NOTE
Synthetic oil of the grade and viscosity
noted in chapter 12 is the recom- Maintenance and service
11-9
– CONTINUED –
Page 341 of 420
11-10Maintenance and service
mended engine oil for optimum engine
performance. Conventional oil may be
used if synthetic oil is unavailable. Cooling system
WARNING
Never attempt to remove the radia-
tor cap until the engine has been
shut off and has cooled down
completely. Since the coolant is
under pressure, you may suffer
serious burns from a spray of boil-
ing hot coolant when the cap isremoved.
CAUTION
. Vehicles are filled at the factory
with SUBARU Super Coolant that
does not require the first change
for 11 years/137,500 miles (11
years/220,000 km). This coolant
should not be mixed with any
other brand or type of coolant
during this period. Mixing with a
different coolant will reduce the
life of the coolant. Should it be
necessary to top off the coolant
for any reason, use only
SUBARU Super Coolant.
If the SUBARU Super Coolant is
diluted with another brand or
type, the maintenance interval is shortened to that of the mixingcoolant.
. Do not splash the engine coolant
over painted parts. The alcohol
contained in the engine coolant
may damage the paint surface.
& Hose and connections
Your vehicle employs an electric cooling
fan which is thermostatically controlled to
operate when the engine coolant reaches
a specific temperature.
If the radiator cooling fan does not operate
even when the engine coolant tempera-
ture gauge exceeds the normal operating
range, the cooling fan circuit may be
defective. Check the fuse and replace it
if necessary. If the fuse is not blown, have
the cooling system checked by your
SUBARU dealer.
If frequent addition of coolant is neces-
sary, there may be a leak in the engine
cooling system. It is recommended that
the cooling system and connections be
checked for leaks, damage, or looseness.
Page 346 of 420
&Recommended fluid
Refer to “Fluids ”F 12-7.
NOTE
Using any non-specified type of auto-
matic transmission fluid could result in
damage inside the transmission. When
replacing the automatic transmission
fluid, be sure to use the specified type. Front differential gear oil &
Checking the oil level
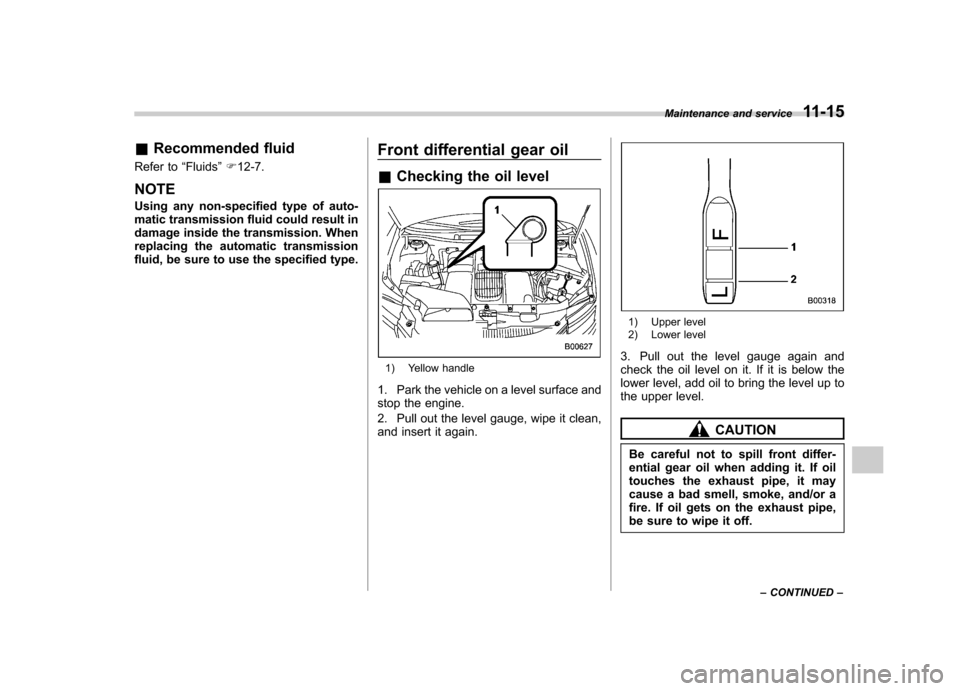
1) Yellow handle
1. Park the vehicle on a level surface and
stop the engine.
2. Pull out the level gauge, wipe it clean,
and insert it again.
1) Upper level
2) Lower level
3. Pull out the level gauge again and
check the oil level on it. If it is below the
lower level, add oil to bring the level up to
the upper level.
CAUTION
Be careful not to spill front differ-
ential gear oil when adding it. If oil
touches the exhaust pipe, it may
cause a bad smell, smoke, and/or a
fire. If oil gets on the exhaust pipe,
be sure to wipe it off. Maintenance and service
11-15
– CONTINUED –
Page 347 of 420
11-16Maintenance and service
&Recommended grade and viscosity
Each oil manufacturer has its own base
oils and additives. Never use different
brands together. For details, refer to “Front
differential and rear differential gear oil ”
F 12-6. Rear differential gear oil
There is no oil level gauge. To check the
rear differential gear oil level, consult your
SUBARU dealer for inspection. &
Recommended grade and viscosity
Each oil manufacturer has its own base
oils and additives. Never use different
brands together. For details, refer to “Front
differential and rear differential gear oil ”
F 12-6. Power steering fluid &
Checking the fluid level
WARNING
Be careful not to burn yourself
because the fluid may be hot.
CAUTION
. When power steering fluid is
being added, use only clean fluid,
and be careful not to allow any
dirt into the tank. And never use
different brands together.
. Be careful not to spill power
steering fluid when adding it. If
Page 348 of 420
power steering fluid touches the
exhaust pipe, it may cause a bad
smell, smoke, and/or a fire. If
power steering fluid gets on the
exhaust pipe, be sure to wipe itoff.
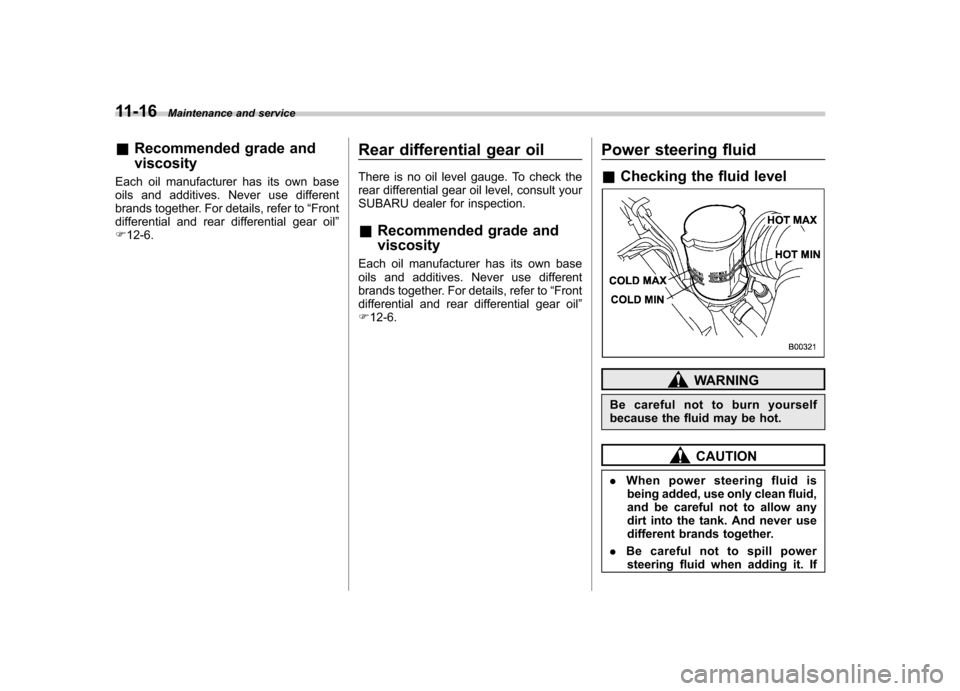
The power steering fluid expands greatly
as its temperature rises; the fluid level
differs according to fluid temperature.
Therefore, the reservoir tank has two
different checking ranges for hot and coldfluids.
Check the power steering fluid level
monthly.
1. Park the vehicle on a level surface,
and stop the engine.
2. Check the fluid level of the reservoir tank.
When the fluid is hot after the vehicle has
been run: Check that the oil level isbetween “HOT MIN ”and “HOT MAX ”on
the surface of the reservoir tank.
When the fluid is cool before the vehicle is
run: Check that the oil level is between“ COLD MIN ”and “COLD MAX ”on the
surface of the reservoir tank.
3. If the fluid level is lower than the
applicable “MIN ”line, add the recom-
mended fluid as necessary to bring the
level between the “MIN ”and “MAX ”line. If the fluid level is extreme low, it may
indicate possible leakage. Consult your
SUBARU dealer for inspection.
& Recommended fluid
Refer to “Fluids ”F 12-7. Brake fluid &
Checking the fluid level
WARNING
. Never let brake fluid contact your
eyes because brake fluid can be
harmful to your eyes. If brake
fluid gets in your eyes, immedi-
ately flush them thoroughly with
clean water. For safety, when
performing this work, wearing
eye protection is advisable.
. Brake fluid absorbs moisture
from the air. Any absorbed moist-
ure can cause a dangerous loss
of braking performance.
. If the vehicle requires frequent
refilling, there may be a leak. If
you suspect a problem, have the
vehicle checked at your SUBARU
dealer.
CAUTION
. When adding brake fluid, be care-
ful not to allow any dirt into the
reservoir.
. Never splash the brake fluid over
painted surfaces or rubber parts. Maintenance and service
11-17
– CONTINUED –
Page 358 of 420
WARNING
. When replacing a tire, you must
use a tire that is of the same size,
circumference, construction,
brand (tread pattern), speed sym-
bol and load index as the original
tires listed on the tire placard.
Using tires of other sizes, cir-
cumferences or constructions
may result in severe mechanical
damage to the drive train of your
vehicle and may affect ride,
handling, braking, speedometer/
odometer calibration, and clear-
ance between the body and tires.
It also may be dangerous and
lead to loss of vehicle control.
. You must install four tires that are
of the same size, circumference,
construction, manufacturer,
brand (tread pattern), degree of
wear, speed symbol and load
index. Mixing tires of different
types, sizes or degrees of wear
can result in damage to the
vehicle ’s power train. Use of
different types or sizes of tires
can also dangerously reduce
controllability and braking per-
formance and can lead to anaccident. .
Use only radial tires. Do not use
radial tires together with belted
bias tires and/or bias-ply tires.
Doing so can dangerously re-
duce controllability, resulting in
an accident.
& Wheel replacement
When replacing wheels due, for example,
to damage, make sure the replacement
wheels match the specifications of the
wheels that are fitted as standard equip-
ment. Replacement wheels are available
from SUBARU dealers.
WARNING
Use only those wheels that are
specified for your vehicle. Wheels
not meeting specifications could
interfere with brake caliper opera-
tion and may cause the tires to rub
against the wheel well housing dur-
ing turns. The resulting loss of
vehicle control could lead to anaccident. Aluminum wheels .
Aluminum wheels can be scratched
and damaged easily. Handle them care-
fully to maintain their appearance, perfor-
mance, and safety. . When any of the wheels are removed
and replaced for tire rotation or to change
a flat tire, always check the tightness of
the wheel nuts after driving approximately
600 miles (1,000 km). If any nut is loose,
tighten it to the specified torque.
–For the wheel nut tightening torque,
refer to “Tires ”F 12-8.
– For the wheel nut tightening proce-
dure, refer to “Changing a flat tire ”F 9-
6.
. Never apply oil to the threaded parts,
wheel nuts, or tapered surface of thewheel. . Never let the wheel rub against sharp
protrusions or curbs.. When wheel nuts, balance weights, or
the center cap is replaced, be sure to
replace them with genuine SUBARU parts
designed for the specific wheel. Maintenance and service
11-27
Page 376 of 420
Specifications........................................................ 12-2
Dimensions ........................................................... 12-2
Engine .................................................................. 12-2
Fuel ...................................................................... 12-3
Engine oil ............................................................. 12-4
Front differential and rear differential gear oil ......... 12-6
Fluids ................................................................... 12-7
Engine coolant ...................................................... 12-7
Electrical system ................................................... 12-7 Tires
..................................................................... 12-8
Fuses and circuits .................................................12-9
Fuse panel located in the passenger compartment ...................................................... 12-9
Fuse panel located in the engine compartment ..................................................... 12-11
Bulb chart .............................................................12-12
Vehicle identification ...........................................12-15Specifications
12