2012 SUBARU TRIBECA clock
[x] Cancel search: clockPage 308 of 420
carefully read“Temporary spare tire ”F 9-5
for instructions and precautions. & Removing the spare tire
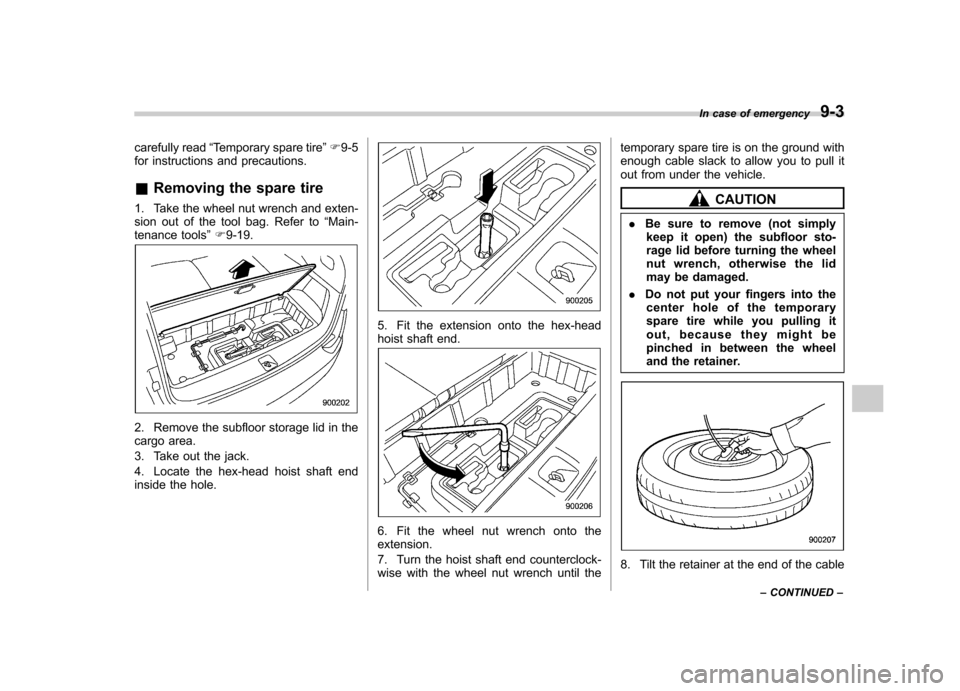
1. Take the wheel nut wrench and exten-
sion out of the tool bag. Refer to “Main-
tenance tools ”F 9-19.
2. Remove the subfloor storage lid in the
cargo area.
3. Take out the jack.
4. Locate the hex-head hoist shaft end
inside the hole.
5. Fit the extension onto the hex-head
hoist shaft end.
6. Fit the wheel nut wrench onto the extension.
7. Turn the hoist shaft end counterclock-
wise with the wheel nut wrench until the temporary spare tire is on the ground with
enough cable slack to allow you to pull it
out from under the vehicle.
CAUTION
. Be sure to remove (not simply
keep it open) the subfloor sto-
rage lid before turning the wheel
nut wrench, otherwise the lid
may be damaged.
. Do not put your fingers into the
center hole of the temporary
spare tire while you pulling it
out, because they might be
pinched in between the wheel
and the retainer.
8. Tilt the retainer at the end of the cable In case of emergency
9-3
– CONTINUED –
Page 309 of 420
9-4In case of emergency
and pull it through the center of the
temporary spare tire.
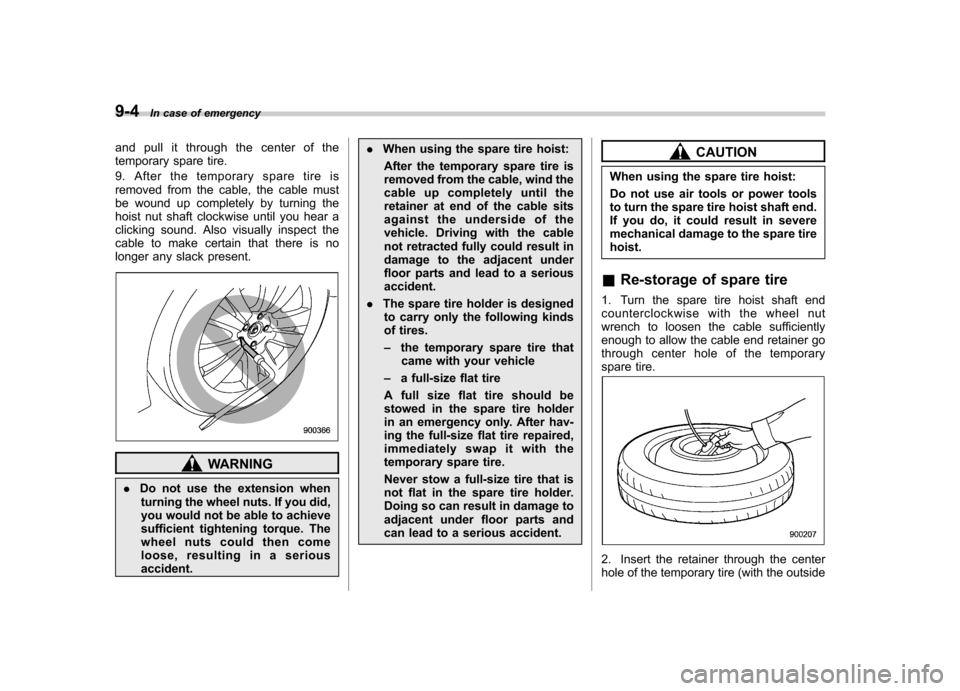
9. After the temporary spare tire is
removed from the cable, the cable must
be wound up completely by turning the
hoist nut shaft clockwise until you hear a
clicking sound. Also visually inspect the
cable to make certain that there is no
longer any slack present.
WARNING
. Do not use the extension when
turning the wheel nuts. If you did,
you would not be able to achieve
sufficient tightening torque. The
wheel nuts could then come
loose, resulting in a seriousaccident. .
When using the spare tire hoist:
After the temporary spare tire is
removed from the cable, wind the
cable up completely until the
retainer at end of the cable sits
against the underside of the
vehicle. Driving with the cable
not retracted fully could result in
damage to the adjacent under
floor parts and lead to a seriousaccident.
. The spare tire holder is designed
to carry only the following kinds
of tires. – the temporary spare tire that
came with your vehicle
– a full-size flat tire
A full size flat tire should be
stowed in the spare tire holder
in an emergency only. After hav-
ing the full-size flat tire repaired,
immediatelyswapitwiththe
temporary spare tire.
Never stow a full-size tire that is
not flat in the spare tire holder.
Doing so can result in damage to
adjacent under floor parts and
can lead to a serious accident.
CAUTION
When using the spare tire hoist:
Do not use air tools or power tools
to turn the spare tire hoist shaft end.
If you do, it could result in severe
mechanical damage to the spare tirehoist.
& Re-storage of spare tire
1. Turn the spare tire hoist shaft end
counterclockwise with the wheel nut
wrench to loosen the cable sufficiently
enough to allow the cable end retainer go
through center hole of the temporary
spare tire.
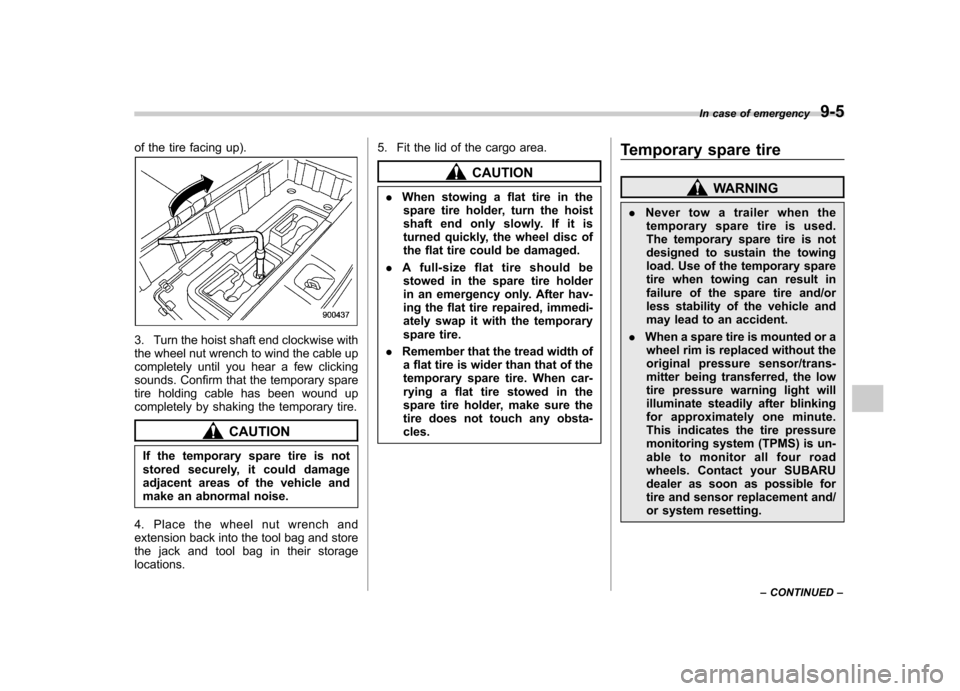
2. Insert the retainer through the center
hole of the temporary tire (with the outside
Page 310 of 420
of the tire facing up).
3. Turn the hoist shaft end clockwise with
the wheel nut wrench to wind the cable up
completely until you hear a few clicking
sounds. Confirm that the temporary spare
tire holding cable has been wound up
completely by shaking the temporary tire.
CAUTION
If the temporary spare tire is not
stored securely, it could damage
adjacent areas of the vehicle and
make an abnormal noise.
4. Place the wheel nut wrench and
extension back into the tool bag and store
the jack and tool bag in their storagelocations. 5. Fit the lid of the cargo area.
CAUTION
. When stowing a flat tire in the
spare tire holder, turn the hoist
shaft end only slowly. If it is
turned quickly, the wheel disc of
the flat tire could be damaged.
. A full-size flat tire should be
stowed in the spare tire holder
in an emergency only. After hav-
ing the flat tire repaired, immedi-
ately swap it with the temporary
spare tire.
. Remember that the tread width of
a flat tire is wider than that of the
temporary spare tire. When car-
rying a flat tire stowed in the
spare tire holder, make sure the
tire does not touch any obsta-cles. Temporary spare tire
WARNING
. Never tow a trailer when the
temporary spare tire is used.
The temporary spare tire is not
designed to sustain the towing
load. Use of the temporary spare
tire when towing can result in
failure of the spare tire and/or
less stability of the vehicle and
may lead to an accident.
. When a spare tire is mounted or a
wheel rim is replaced without the
original pressure sensor/trans-
mitter being transferred, the low
tire pressure warning light will
illuminate steadily after blinking
for approximately one minute.
This indicates the tire pressure
monitoring system (TPMS) is un-
able to monitor all four road
wheels. Contact your SUBARU
dealer as soon as possible for
tire and sensor replacement and/
or system resetting. In case of emergency
9-5
– CONTINUED –
Page 314 of 420
WARNING
Do not use oil or grease on the
wheel studs or nuts when the spare
tire is installed. This could cause the
nuts to become loose and lead to anaccident.
15. Turn the jack handle counterclockwise
to lower the vehicle.
CAUTION
There are 2 types of wheel nut
wrenches that apply to differentlengths.
For models with silver-colored alu-
minum wheels, the 10.8-inch (275
mm) wheel nut wrench is equipped
as a maintenance tool. And for
models with optional chrome-fin-
ished wheels, the 13.2-inch (335
mm) wheel nut wrench is equipped
as well. Confirm the equipped wheel
nut wrench type when you replace a
tire. If the wheel nut wrench is the
different type, it cannot be tightened
to the specified torque.
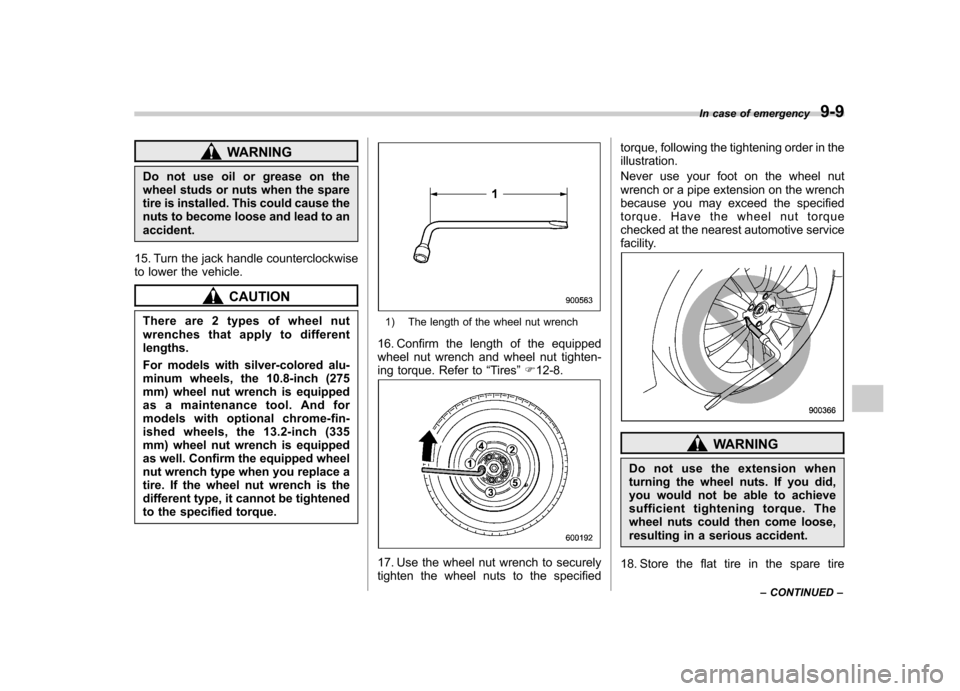
1) The length of the wheel nut wrench
16. Confirm the length of the equipped
wheel nut wrench and wheel nut tighten-
ing torque. Refer to “Tires ”F 12-8.
17. Use the wheel nut wrench to securely
tighten the wheel nuts to the specified torque, following the tightening order in theillustration.
Never use your foot on the wheel nut
wrench or a pipe extension on the wrench
because you may exceed the specified
torque. Have the wheel nut torque
checked at the nearest automotive service
facility.
WARNING
Do not use the extension when
turning the wheel nuts. If you did,
you would not be able to achieve
sufficient tightening torque. The
wheel nuts could then come loose,
resulting in a serious accident.
18. Store the flat tire in the spare tire In case of emergency
9-9
– CONTINUED –
Page 319 of 420
9-14In case of emergency
Engine overheating
WARNING
Never attempt to remove the radia-
tor cap until the engine has been
shut off and has fully cooled down.
When the engine is hot, the coolant
is under pressure. Removing the
cap while the engine is still hot
could release a spray of boiling hot
coolant, which could burn you very
seriously.
If the engine overheats, safely pull off the
road and stop the vehicle in a safe place. & If steam is coming from the
engine compartment
Turn off the engine and get everyone
away from the vehicle until it cools down. & If no steam is coming from
the engine compartment
NOTE
For details about how to check the
coolant level or how to add coolant,
refer to “Engine coolant ”F 11-11.
1. Keep the engine running at idlingspeed. 2. Open the hood to ventilate the engine
compartment. Refer to
“Engine hood ”
F 11-4.
Confirm that the cooling fan is turning. If
the fan is not turning, immediately turn off
the engine and contact your authorized
dealer for repair.
3. After the engine coolant temperature
has dropped, turn off the engine.
If the temperature gauge stays at the
overheated zone, turn off the engine.
4. After the engine has fully cooled down,
check the coolant level in the reservetank.
If the coolant level is below the “LOW ”
mark, add coolant up to the “FULL ”mark.
5. If there is no coolant in the reserve
tank, add coolant to the reserve tank.
Then remove the radiator cap and fill the
radiator with coolant.
If you remove the radiator cap from a hot
radiator, first wrap a thick cloth around the
radiator cap, then turn the cap counter-
clockwise slowly without pressing down
until it stops. Release the pressure from
the radiator. After the pressure has been
fully released, remove the cap by pressing
down and turning it. TowingWARNING
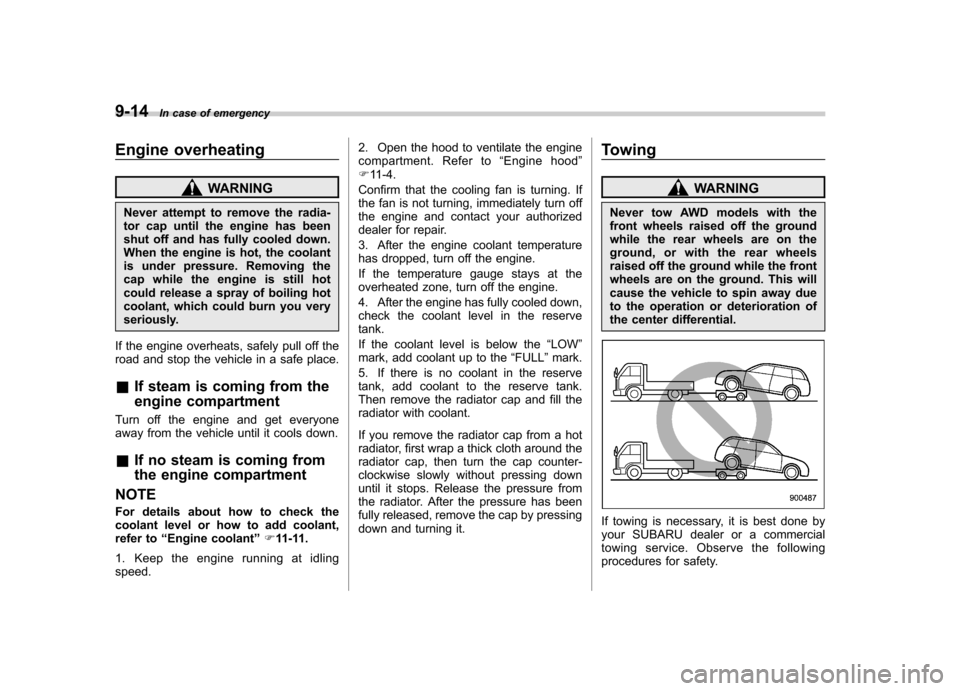
Never tow AWD models with the
front wheels raised off the ground
while the rear wheels are on the
ground, or with the rear wheels
raised off the ground while the front
wheels are on the ground. This will
cause the vehicle to spin away due
to the operation or deterioration of
the center differential.
If towing is necessary, it is best done by
your SUBARU dealer or a commercial
towing service. Observe the following
procedures for safety.
Page 339 of 420
11-8Maintenance and service
.Be careful not to spill engine oil
when adding it. If oil touches the
exhaust pipe, it may cause a bad
smell, smoke, and/or a fire. If
engine oil gets on the exhaust
pipe, be sure to wipe it off.
If you check the oil level just after stopping
the engine, wait a few minutes for the oil to
drain back into the oil pan before checking
the level.
To prevent overfilling the engine oil, do not
add any additional oil above the full level
when the engine is cold. & Changing the oil and oil filter
CAUTION
. If you change your own oil, be
sure to drain all the oil from the
filter before disposal.
. Do not dispose of used engine oil
by placing it in the trash, or by
pouring it onto the ground, into
sewers, or into any body of water.
Check with your local govern-
ment office for the proper dis-
posal options available to you.
Change the oil and oil filter according to
the maintenance schedule in the “War- ranty and Maintenance Booklet
”.
The engine oil and oil filter must be
changed more frequently than listed in
the maintenance schedule when driving
on dusty roads, when short trips are
frequently made, or when driving in
extremely cold weather.
1. Warm up the engine by letting the
engine idle for approximately 10 minutes
to ease draining the engine oil.
2. Park the vehicle on a level surface and
stop the engine.
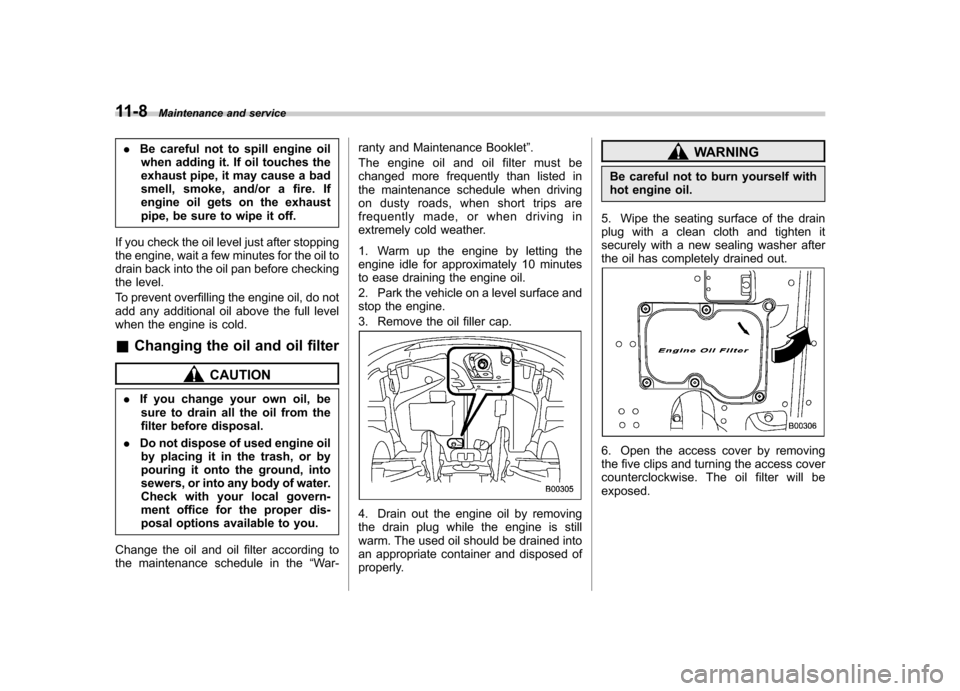
3. Remove the oil filler cap.
4. Drain out the engine oil by removing
the drain plug while the engine is still
warm. The used oil should be drained into
an appropriate container and disposed of
properly.
WARNING
Be careful not to burn yourself with
hot engine oil.
5. Wipe the seating surface of the drain
plug with a clean cloth and tighten it
securely with a new sealing washer after
the oil has completely drained out.
6. Open the access cover by removing
the five clips and turning the access cover
counterclockwise. The oil filter will beexposed.
Page 362 of 420
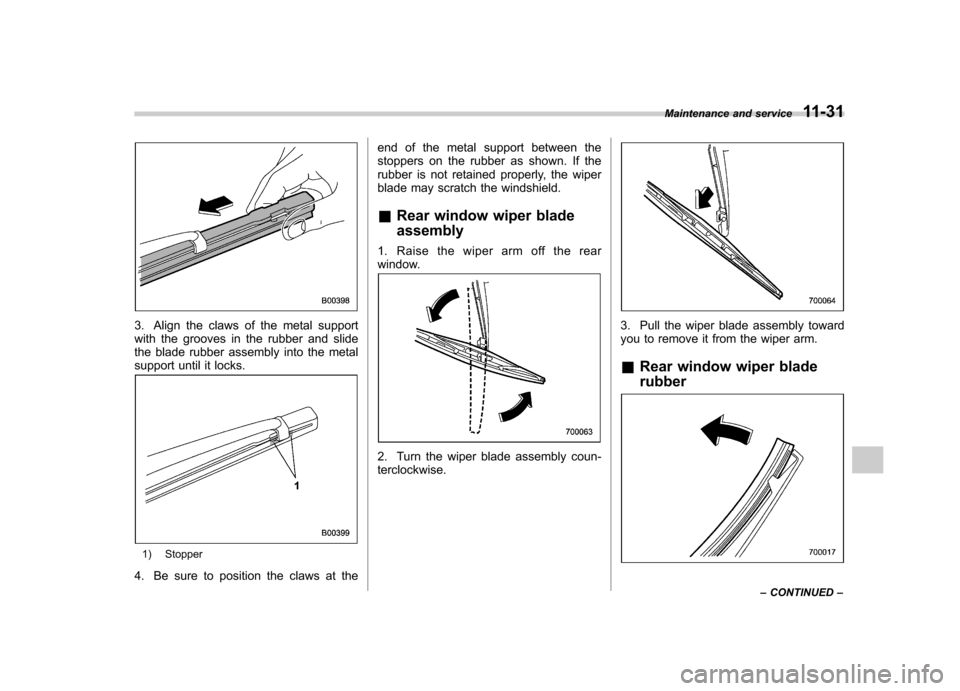
3. Align the claws of the metal support
with the grooves in the rubber and slide
the blade rubber assembly into the metal
support until it locks.
1) Stopper
4. Be sure to position the claws at the end of the metal support between the
stoppers on the rubber as shown. If the
rubber is not retained properly, the wiper
blade may scratch the windshield.
& Rear window wiper blade assembly
1. Raise the wiper arm off the rear
window.
2. Turn the wiper blade assembly coun- terclockwise.
3. Pull the wiper blade assembly toward
you to remove it from the wiper arm. & Rear window wiper blade rubber
Maintenance and service 11-31
– CONTINUED –
Page 369 of 420
11-38Maintenance and service
Left-hand side
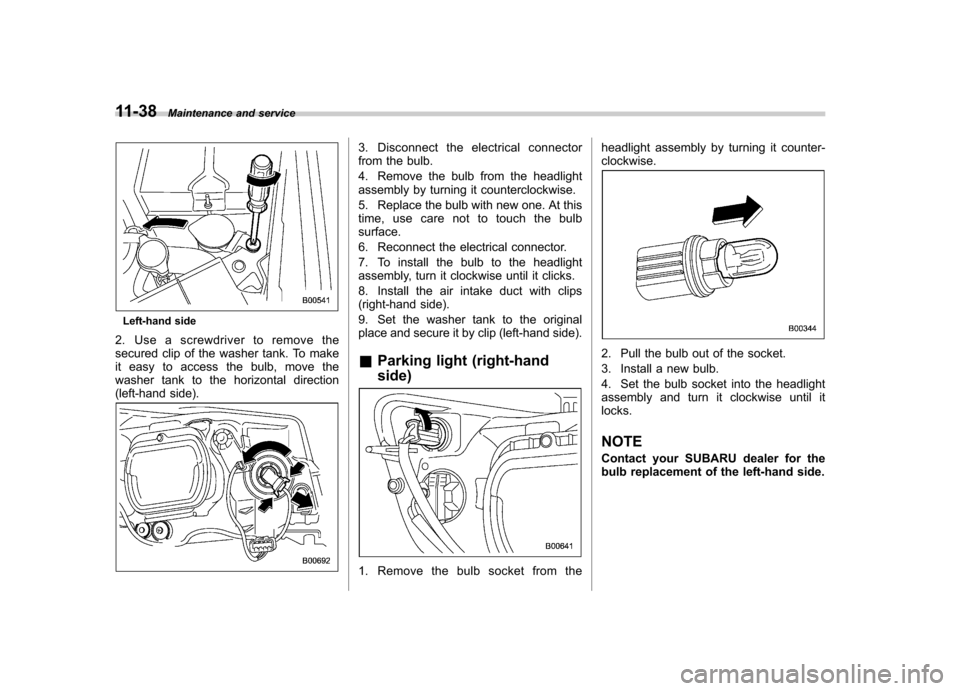
2. Use a screwdriver to remove the
secured clip of the washer tank. To make
it easy to access the bulb, move the
washer tank to the horizontal direction
(left-hand side).
3. Disconnect the electrical connector
from the bulb.
4. Remove the bulb from the headlight
assembly by turning it counterclockwise.
5. Replace the bulb with new one. At this
time, use care not to touch the bulbsurface.
6. Reconnect the electrical connector.
7. To install the bulb to the headlight
assembly, turn it clockwise until it clicks.
8. Install the air intake duct with clips
(right-hand side).
9. Set the washer tank to the original
place and secure it by clip (left-hand side). & Parking light (right-hand side)
1. Remove the bulb socket from the headlight assembly by turning it counter- clockwise.
2. Pull the bulb out of the socket.
3. Install a new bulb.
4. Set the bulb socket into the headlight
assembly and turn it clockwise until itlocks. NOTE
Contact your SUBARU dealer for the
bulb replacement of the left-hand side.