2012 SUBARU OUTBACK rear door safety lock
[x] Cancel search: rear door safety lockPage 7 of 474

4
Mark Name
Turn signal
Illumination brightness
Engine hood
Trunk lid (Legacy)
Fan speed
Instrument panel outlets
Instrument panel outlets and
foot outlets
Foot outlets
Windshield defroster and foot outlets
Windshield defroster
Rear window defogger/Out-
side mirror defogger/Wind-
shield wiper deicerMark Name
Air recirculation
Engine oil
Washer
Door lock (transmitter)
Door unlock (transmitter)
Trunk lid open (Legacy) or
rear gate unlock (Outback) (transmitter)
Safety precautions when driving &
Seatbelt and SRS airbag
WARNING
. All persons in the vehicle should
fasten their seatbelts BEFORE
the vehicle starts to move. Other-
wise, the possibility of serious
injury becomes greater in the
event of a sudden stop or acci-dent.
. To obtain maximum protection in
the event of an accident, the
driver and all passengers in the
vehicle should always wear seat-
belts when the vehicle is moving.
The SRS (Supplemental Restraint
System) airbag does not do away
with the need to fasten seatbelts.
In combination with the seat-
belts, it offers the best combined
protection in case of a seriousaccident.
Not wearing a seatbelt increases
the chance of severe injury or
death in a crash even when the
vehicle has the SRS airbag.
Page 8 of 474

.The SRS airbags deploy with
considerable speed and force.
Occupants who are out of proper
position when the SRS airbag
deploys could suffer very serious
injuries. Because the SRS airbag
needs enough space for deploy-
ment, the driver should always
sit upright and well back in the
seat as far from the steering
wheel as practical while still
maintaining full vehicle control
and the front passenger should
move the seat as far back as
possible and sit upright and well
back in the seat.
For instructions and precautions, carefully
read the following sections. . For the seatbelt system, refer to “Seat-
belts ”F 1-12.
. For the SRS airbag system, refer to
“ *SRS airbag (Supplemental Restraint
System airbag) ”F 1-36. &
Child safety
WARNING
. Never hold a child on your lap or
in your arms while the vehicle is
moving. The passenger cannot
protect the child from injury in a
collision, because the child will
be caught between the passen-
ger and objects inside the vehi-cle.
. While riding in the vehicle, in-
fants and small children should
always be placed in the REAR
seat in an infant or child restraint
system which is appropriate for
the child ’s age, height and
weight. If a child is too big for a
child restraint system, the child
should sit in the REAR seat and
be restrained using the seatbelts.
According to accident statistics,
children are safer when properly
restrained in the rear seating
positions than in the front seat-
ing positions. Never allow a child
to stand up or kneel on the seat.
. Put children in the REAR seat
properly restrained at all times in
a child restraint device or in a
seatbelt. The SRS airbag deploys with considerable speed and
force and can injure or even kill
children, especially if they are
not restrained or improperly re-
strained. Because children are
lighter and weaker than adults,
their risk of being injured from
deployment is greater.
. NEVER INSTALL A REARWARD
FACING CHILD SAFETY SEAT IN
THE FRONT SEAT. DOING SO
RISKS SERIOUS INJURY OR
DEATH TO THE CHILD BY PLA-
CING THE CHILD ’S HEAD TOO
CLOSE TO THE SRS AIRBAG.
. Always turn the child safety locks
to the “LOCK ”position whenever
a child rides in the rear seat.
Serious injury could result if a
child accidentally opened the
door and fell out. Refer to “Child
safety locks ”F 2-19.
. Always lock the passengers ’win-
dows using the lock switch when
children are riding in the vehicle.
Failure to follow this procedure
could result in injury to a child
operating the power window. Re-
fer to “Windows ”F 2-20.
. Never leave unattended children,
adults or animals in the vehicle. 5
– CONTINUED –
Page 90 of 474

Keys..................................................................... 2-2
Key number ........................................................ 2-2
Immobilizer .......................................................... 2-3
Security ID plate .................................................. 2-3
Security indicator light ........................................ 2-4
Key replacement ................................................. 2-4
Door locks ........................................................... 2-4
Locking and unlocking from the outside .. ............ 2-4
Locking and unlocking from the inside ................ 2-5
Battery drainage prevention function ................... 2-6
Power door locking switches ............................. 2-6
Key lock-in prevention function ........................... 2-7
Remote keyless entry system ............................ 2-7
Locking the doors ............................................... 2-8
Unlocking the doors ............................................ 2-9
Opening the trunk lid (Legacy) ............................. 2-9
Unlocking the rear gate (Outback) ........................ 2-9
Vehicle finder function ......................................... 2-9
Sounding a panic alarm ...................................... 2-10
Selecting audible signal operation ...................... 2-10
Replacing the battery ......................................... 2-10
Replacing lost transmitters ................................. 2-12 Alarm system
..................................................... 2-15
System alarm operation ..................................... 2-15
Activating and deactivating the alarm system ..... 2-15
If you have accidentally triggered the alarm system ............................................................ 2-16
Arming the system ............................................ 2-16
Disarming the system ........................................ 2-17
Valet mode ........................................................ 2-18
Passive arming .................................................. 2-18
Tripped sensor identification .............................. 2-19
Shock sensors (dealer option).. .......................... 2-19
Child safety locks .............................................. 2-19
Windows ............................................................. 2-20
Power window operation by driver ..................... 2-20
Power window operation by passengers ............. 2-22
Initialization of power window .. .......................... 2-23
Trunk lid (Legacy) .............................................. 2-23
To open and close the trunk lid from outside . ..... 2-23
To open the trunk lid from inside. ....................... 2-24
Internal trunk lid release handle ......................... 2-24
Rear gate (Outback) ........................................... 2-26
Moonroof (if equipped) ...................................... 2-27
Moonroof switches ............................................ 2-28
Sun shade ......................................................... 2-29 Keys and doors
2
Page 108 of 474

!Disarming the system
To disarm the system, briefly press the “
” button on the transmitter.
& Tripped sensor identification
The security indicator light flashes when
the alarm system has been triggered.
Also, the number of flashes indicates the
location of unauthorized intrusion or the
severity of impact on the vehicle.
When the ignition switch is turned to the “ ON ”position, the indicator light will
illuminate for 1 second and then flash asfollows: . When a door or rear gate (Outback)
was opened: 5 times. When the trunk (Legacy) was opened:
4 times . When a strong impact or multiple
impacts were sensed: twice (only models
with shock sensors (dealer option)) . When a light impact was sensed: once
(only models with shock sensors (dealer option))
& Shock sensors (dealer op- tion)
The shock sensors trigger the alarm
system when they sense impacts applied
to the vehicle and when any of their
electric wires is cut. The alarm system causes the horn to sound and the turn
signal lights to flash for a short time when
the sensed impact is weak, but it warns of
a strong impact or multiple impacts by
sounding the horn and flashing the turn
signal lights, both lasting approximately 30seconds.
If you desire, your SUBARU dealer can
connect them and set them for activation
or deactivation.
NOTE . The shock sensors are not always
able to sense impacts caused by break-
ing in, and cannot sense an impact that
does not cause vibration (such as
breaking the glass using a rescuehammer).. The shock sensors may sense vi-
bration like those shown in the follow-
ing and trigger the alarm system.
Select the settings of the alarm system
and shock sensors appropriately de-
pending on where you usually park
your vehicle.Examples:
–Vibration from construction site
– Vibration in multistory car park
– Vibration from trains
. You can have the sensitivity of the
shock sensors adjusted to your pre-
ference by your SUBARU dealer. Child safety locksWARNING
Always turn the child safety locks to the “LOCK ”position when children
sit on the rear seat. Serious injury
could result if a child accidentally
opens the door and falls out.
Each rear door has a child safety lock that
prevents the door from being opened even
if the inside door handle is pulled.
When the child safety lock lever is in the “ LOCK ”position, the door cannot be
opened from inside regardless of the
position of the inner door handle lock
lever. The door can only be opened from Keys and doors
2-19
– CONTINUED –
Page 109 of 474

2-20Keys and doors
the outside.
Windows
WARNING
To avoid serious personal injury
caused by entrapment, always con-
form to the following instructions
without exception. . When operating the power win-
dows, be extremely careful to
prevent anyone ’s fingers, arms,
neck, head or other objects from
being caught in the window.
. Always lock the passengers ’win-
dows using the lock switch when
children are riding in the vehicle.
. Before leaving the vehicle, al-
ways remove the key from the
ignition switch for safety and
never allow an unattended child
to remain in the vehicle. Failure
to follow this procedure could
result in injury to a child operat-
ing the power window.
The power windows operate only when
the ignition switch is in the “ON ”position. &
Power window operation by driver
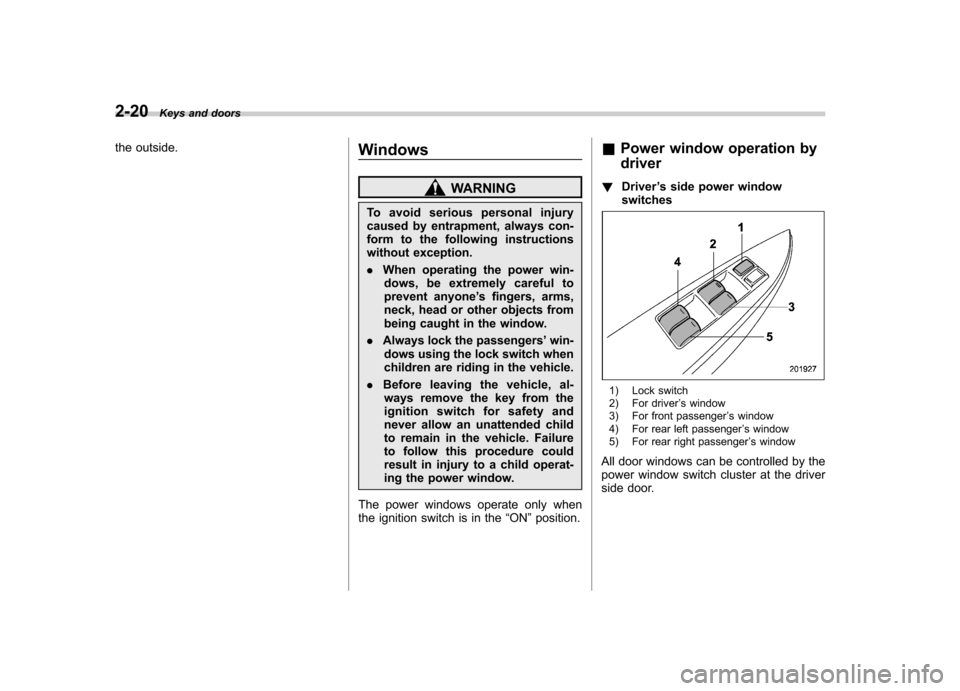
! Driver ’s side power window
switches
1) Lock switch
2) For driver ’s window
3) For front passenger ’s window
4) For rear left passenger ’s window
5) For rear right passenger ’s window
All door windows can be controlled by the
power window switch cluster at the driver
side door.
Page 116 of 474

WARNING
. To prevent dangerous exhaust
gas from entering the vehicle,
always keep the rear gate closed
while driving.
. Do not attempt to shut the rear
gate while holding the recessed
grip. Also avoid closing the rear
gate by pulling on the recessed
grip from inside the cargo space.
There is a danger of your hand
being caught and injured.
CAUTION
. Do not jam a plastic bag in or
place cellophane tape on the rear
gate stays or scratch the stays
while loading or unloading cargo.
That could cause leakage of gas
from the stays, which may result
in their inability to hold the rear
gate open.
. Be careful not to hit your head or
face on the rear gate when open-
ing or closing the rear gate and
when loading or unloading car-go. NOTE
If the rear gate cannot be unlocked due
to a discharged vehicle battery, a
malfunction in the door locking/unlock-
ing system or other causes, you can
unlock it by manually operating the
rear gate lock release lever. For the
procedure, refer to
“Rear gate (Out-
back) –if the rear gate cannot be
unlocked ”F 9-20. Moonroof (if equipped)
WARNING
Never let anyone ’shands,arms,
head or any objects protrude from
the moonroof. A person could be
seriously injured if the vehicle stops
suddenly or turns sharply or if the
vehicle is involved in an accident.
To avoid serious personal injury
caused by entrapment, you must
conform to the following instruc-
tions without exception. . Before closing the moonroof,
make sure that no one ’s hands,
arms, head or other objects will
be accidentally caught in themoonroof.
. Before leaving the vehicle, al-
ways remove the key from the
ignition switch for safety and
never allow an unattended child
to remain in the vehicle. Failure
to follow this procedure could
result in injury to a child operat-
ing the moonroof. Keys and doors
2-27
– CONTINUED –
Page 158 of 474

!Compass calibration
1. For optimum calibration, switch off all
nonessential electrical accessories (rear
window defogger, heater/air conditioning
system, spotlight, etc.) and ensure all
doors are shut.
2. Drive to an open, level area away from
large metallic objects or structures and
make certain the ignition switch is in the“ ON ”position.
3. Press and hold the compass button for
6 to 9 seconds, and then release it. The
compass will enter the calibration mode,then “C ” and the direction will be dis-
played.
4. Drive slowly in a circle until “C ”
disappears from the display. Driving in
two or three circles might be necessary.
The compass is now calibrated.
5. Further calibration may be necessary
should outside influences cause the com-
pass to read inaccurately. You will notice
any outside influence if the compass tends
to read in only one particular direction.
Should you encounter this situation, return
to step 1 of the above procedure and
recalibrate the compass. !
HomeLink®Wireless Control Sys-
tem
The HomeLink
®Wireless Control System
can be used to activate remote control
devices such as gate operators, garage
door openers, door locks, home lighting
and security systems.
There are three HomeLink
®buttons on the
mirror, each of which can be programmed
for operation of one desired device. For
details on the device types which can be
operated by this system, consult theHomeLink
®website at:
www.homelink.com or call 1-800-355-3515.
Note the following information about this system.
Ifyourvehicleisequippedwiththe HomeLink
®Wireless Control System, it
complies with Part 15 of the Federal
Communications Commission Rules in
the U.S. and the RSS-210 of Industry
Canada in Canada. Its operation is subject
to the following two conditions:
(1) this device may not cause harmful
interference, and (2) this device must
accept any interference received, includ-
ing interference that may cause undesiredoperation.
Changes and modifications to this system by anyone other than an authorized
service facility could void authorization to
use this equipment. HomeLink
®and the HomeLink®house are
registered trademarks of Johnson Con-
trols, Inc.
WARNING
. When programming the
HomeLink
®Wireless Control Sys-
tem, you may be operating a
garage door opener or other
device. Make sure that people
and objects are out of the way
ofthegaragedoororother
device to prevent potential harm
or damage.
. Do not use the HomeLink
®Wire-
less Control System with a gar-
age door opener that lacks the
safety stop and reverse feature
as required by applicable safety
standards. A garage door opener
which cannot detect an object,
signaling the door to stop and
reverse, does not meet these
safety standards. Using a garage
door opener without these fea-
tures increases risk of serious
injury or death. For more infor-
mation, consult the HomeLink
®
Instruments and controls 3-39
– CONTINUED –
Page 288 of 474

preconditions before starting, and if all
safety parameters are correct, the engine
will start within 5 seconds. Upon success-
ful engine start, the remote start confirma-
tion transmitter button will flash twice
every 5 seconds* and the vehicle will
honk the horn and flash the side marker
lights, tail lights and the front position
lights once, then the lights will illuminate
and remain illuminated, indicating that the
engine is running. While the vehicle is
operating via the remote engine start
function, the power window features will
be disabled. Also, the system has a timer
and will shut down after 15 minutes if you
do not operate the vehicle. Press and hold the“
”button for 2 seconds to turn the
engine off. The remote start confirmation
transmitter button will flash three times*
indicating that the engine has shut down.
If the starter cranks but does not start or
starts and stalls, the remote engine start
system will power off and then attempt to
start the engine an additional three times
unless the remote engine start system
determines that a vehicle malfunction is
preventing the system from starting. If the
engine does not start after additional
attempts, the remote engine start system
will abort and return to a non-activatestate.
*: Provided that the remote engine start transmitter is within the operating range of
the system. &
Remote start safety features
For safety and security reasons, the
system will fail to start and honk the horn
twice or shut down the engine during
remote start operation if any of the
following occur: . Any of the doors or the trunk / rear gate
are open / opened (*the vehicle ’s horn will
honk six times and the side marker lights,
tail lights and the front position lights will
flash six times indicating that a vehicle
door or trunk / rear gate was open when
the remote engine start system wasactivated). . The brake pedal is depressed
. The key was already in the ignition
switch. The engine hood is opened
. The remote start system “Service
mode ”is engaged
. The vehicle ’s engine idle speed has
reached a level over 3,500 RPM. The alarm is triggered by opening a
door or the rear gate.. The select lever is not in the “P ”
position (AT and CVT models)
In addition to the items above, if the vehicle
’s engine management system
determines there is a safety risk due to a
vehicle related problem, the vehicle will
shut down and the vehicle ’s horn will honk
three times.
NOTE . If the alarm system is armed at the
time of remote engine start activation
(the security indicator light on the
combination meter is flashing), the
alarm system will remain armed
throughout the remote start run cycle.. If the alarm system is disarmed at
the time of remote engine start activa-
tion (the security indicator light on the
combination meter is not flashing), the
alarm system will remain disarmed
throughout the remote start run cycle. & Entering the vehicle while it
is running via remote start
1. Unlock the vehicle doors using the
remote keyless entry system. If the vehi-cle ’s doors are unlocked manually using
the key, the vehicle ’s alarm system will
trigger (if the alarm system is armed prior
to activating the remote engine start
system) and the engine will turn off.
Inserting the key into the ignition switch
and turning it to the “ON ”position or
pressing the unlock button “
”on the
Starting and operating
7-11
– CONTINUED –