2012 SUBARU OUTBACK lights
[x] Cancel search: lightsPage 162 of 474

begins to flash slowly (after approximately
20 seconds), position the hand-held trans-
mitter of the device between 1 to 3 inches
(25 to 76 mm) away from the HomeLink
®button you wish to program.
3. Press and hold the hand-held trans-
mitter button. The HomeLink
®indicator
light will flash, first slowly and then rapidly.
4. When the indicator light begins to flash
rapidly, release both buttons.
The programming for the previous device
is now erased and the new device can be
operated by pressing the HomeLink
®button. ! Erasing HomeLink
®button memory
NOTE . Performing this procedure erases
the memory of all the preprogrammed
buttons simultaneously. The memory
of individual buttons cannot be erased.. It is recommended that upon the
sale of the vehicle, the memory of all
programmed HomeLink
®buttons be
erased for security purposes.
1) HomeLink®button 1
2) HomeLink®button 2
3) HomeLink®button 3
1. Press and hold the two outer buttons
(button 1 and button 3) until the indicator
light begins to flash (after approximately
20 seconds).
2. Release both buttons. ! In case a problem occurs
If you cannot activate a device using the
corresponding HomeLink
®button after
programming, contact HomeLink®at
www.homelink.com or call 1-800-355-
3515 for assistance. &
Auto-dimming mirror with
compass (if equipped)
1) LED
2) Switch
3) Sensor
4) Compass display
The auto-dimming mirror has an anti-glare
feature which automatically reduces glare
coming from headlights of vehicles behind
you. It also contains a built-in compass. . By pressing and holding the switch for
less than 3 seconds, the automatic dim-
ming function is toggled on or off. When
the automatic dimming function is on, the
LED indicator will illuminate.
Even with the mirror in anti-glare mode,
the mirror surface turns bright if the
transmission is shifted into reverse. This Instruments and controls
3-43
– CONTINUED –
Page 163 of 474

3-44Instruments and controls
is to ensure good reward visibility during reversing. . By pressing and releasing the switch
for 3 seconds, the compass display is
toggled on or off. When the compass is
on, an illuminated compass reading will
appear in the upper right corner of the
mirror.
When cleaning the mirror, use a paper
towel or similar material dampened with
glass cleaner. Do not spray glass cleaner
directly on the mirror as that may cause
theliquidcleanertoenterthemirror
housing and damage the mirror. ! Photosensors
The mirror has a photosensor attached on
the front and back sides. During nighttime
driving, these sensors detect distracting glare from vehicle headlights behind you
and automatically dim the mirror to elim-
inate glare and preserve your vision. For
this reason, use care not to cover the
sensors with stickers, or other similar
items. Periodically wipe the sensors clean
using a piece of dry soft cotton cloth or an
applicator. !
Compass zone adjustment
Compass calibration zones
1. Refer to the “Compass calibration
zones ”map shown above to verify that
the compass zone setting is correct for
your geographical location.
2. Press and hold the switch for 6
seconds until the zone selection comes
up (a number will be displayed in the
mirror compass window). 3. Press the switch repeatedly until the
correct zone setting for your location isdisplayed.
4. Releasing the button for 10 seconds
will exit the zone setting mode. !
Compass calibration
1. If a “C ” is displayed in the compass
window, the compass needs to be cali- brated.
2. Drive the vehicle in a circle at 5 mph (8
km/h) or less until the display reads adirection.
3. You can also calibrate the compass by
driving your vehicle on your everyday
routine. The compass will be calibrated
once it has tracked a complete circle.
4. To recalibrate your compass, push and
hold the switch for 9 seconds until a “C ”
appears in the compass window.
5. Calibrate the compass according to
step 2 or step 3.
Page 164 of 474

&Auto-dimming mirror with
compass and HomeLink
®(if
equipped)
1) HomeLink®button 1
2) HomeLink®button 2
3) LED
4) HomeLink
®button 3
5) Sensor
6) Automatic dimming on/off button
7) Compass display button
8) Compass display
The auto-dimming mirror has an anti-glare
feature which automatically reduces glare
coming from headlights of vehicles behind
you. It also contains a built-in compass
and HomeLink
®wireless control system.
. By pressing the automatic dimming on/
off button, the automatic dimming function
is toggled on or off. When the automatic dimming function is on, the LED indicator
will illuminate.
Even with the mirror in the automatic
dimming mode, the mirror surface turns
bright if the transmission is shifted into
reverse. This is to ensure good rearward
visibility during reversing. .
By pressing the compass display but-
ton, the compass display is toggled on or
off. When the compass is on, an illumi-
nated compass reading will appear in the
upper right corner of the mirror.
When cleaning the mirror, use a paper
towel or similar material dampened with
glass cleaner. Do not spray glass cleaner
directly on the mirror as that may cause
the liquid cleaner to enter the mirror
housing and damage the mirror. !
Photosensors
The mirror has a photosensor attached on
both the front and back sides. During
nighttime driving, these sensors detect
distracting glare from vehicle headlights
behind you and automatically dim the
mirror to eliminate glare and preserve
your vision. For this reason, use care not
to cover the sensors with stickers, or other
similar items. Periodically wipe the sen-
sors clean using a piece of dry soft cotton
cloth or an applicator. Instruments and controls
3-45
– CONTINUED –
Page 255 of 474

6-2Interior equipment
Interior light
When leaving your vehicle, make sure the
lights are turned off to avoid batterydischarge. &Dome light
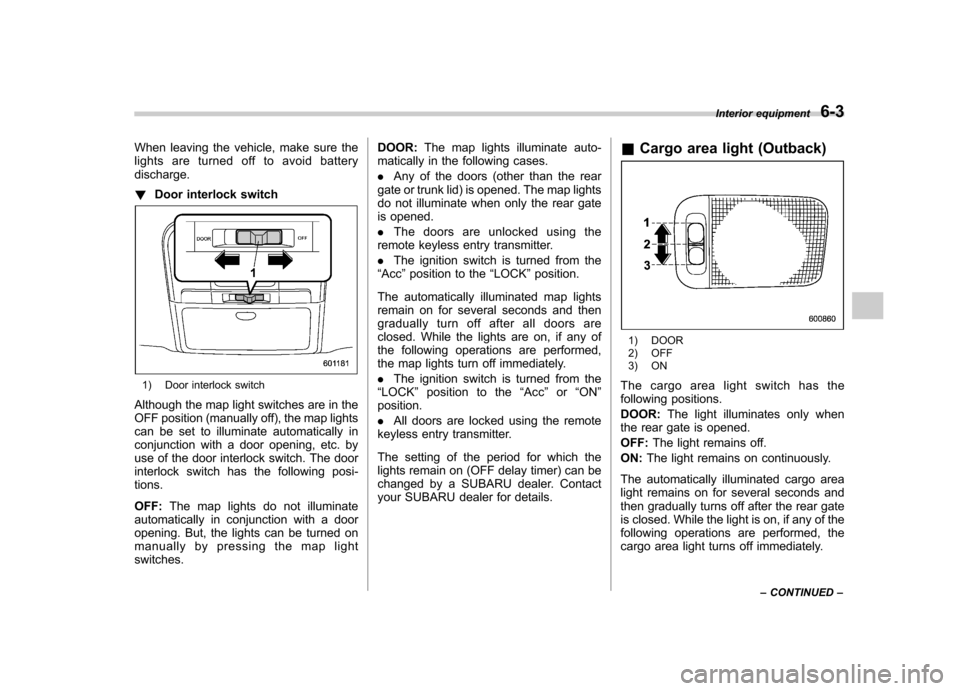
1) ON
2) DOOR
3) OFF
The dome light switch has three positions: ON: The light remains on continuously.
OFF: The light remains off.
DOOR: The dome light illuminates auto-
matically in the following cases. . Any of the doors or the rear gate
(Outback) is opened. .
The doors or the rear gate (Outback)
are unlocked using the remote keyless
entry transmitter. . The ignition switch is turned from the
“ Acc ”position to the “LOCK ”position.
The automatically illuminated dome light
remains on for several seconds and then
gradually turns off after all doors and the
rear gate (Outback) are closed. While the
light is on, if any of the following opera-
tions are performed, the dome light turns
off immediately. . The ignition switch is turned from the
“ LOCK ”position to “Acc ”or “ON ”position.
. All doors and the rear gate (Outback)
are locked using the remote keyless entry
transmitter.
The setting of the period for which the light
remains on (OFF delay timer) can be
changed by a SUBARU dealer. Contact
your SUBARU dealer for details. &
Map light
Models with moonroof
Models without moonroof
To turn on the map light, press the switch.
To turn it off, press the switch again.
Page 256 of 474

When leaving the vehicle, make sure the
lights are turned off to avoid batterydischarge. !Door interlock switch
1) Door interlock switch
Although the map light switches are in the
OFF position (manually off), the map lights
can be set to illuminate automatically in
conjunction with a door opening, etc. by
use of the door interlock switch. The door
interlock switch has the following posi-tions. OFF: The map lights do not illuminate
automatically in conjunction with a door
opening. But, the lights can be turned on
manually by pressing the map lightswitches. DOOR:
The map lights illuminate auto-
matically in the following cases. . Any of the doors (other than the rear
gate or trunk lid) is opened. The map lights
do not illuminate when only the rear gate
is opened. . The doors are unlocked using the
remote keyless entry transmitter.. The ignition switch is turned from the
“ Acc ”position to the “LOCK ”position.
The automatically illuminated map lights
remain on for several seconds and then
gradually turn off after all doors are
closed. While the lights are on, if any of
the following operations are performed,
the map lights turn off immediately. . The ignition switch is turned from the
“ LOCK ”position to the “Acc ”or “ON ”
position. . All doors are locked using the remote
keyless entry transmitter.
The setting of the period for which the
lights remain on (OFF delay timer) can be
changed by a SUBARU dealer. Contact
your SUBARU dealer for details. &
Cargo area light (Outback)
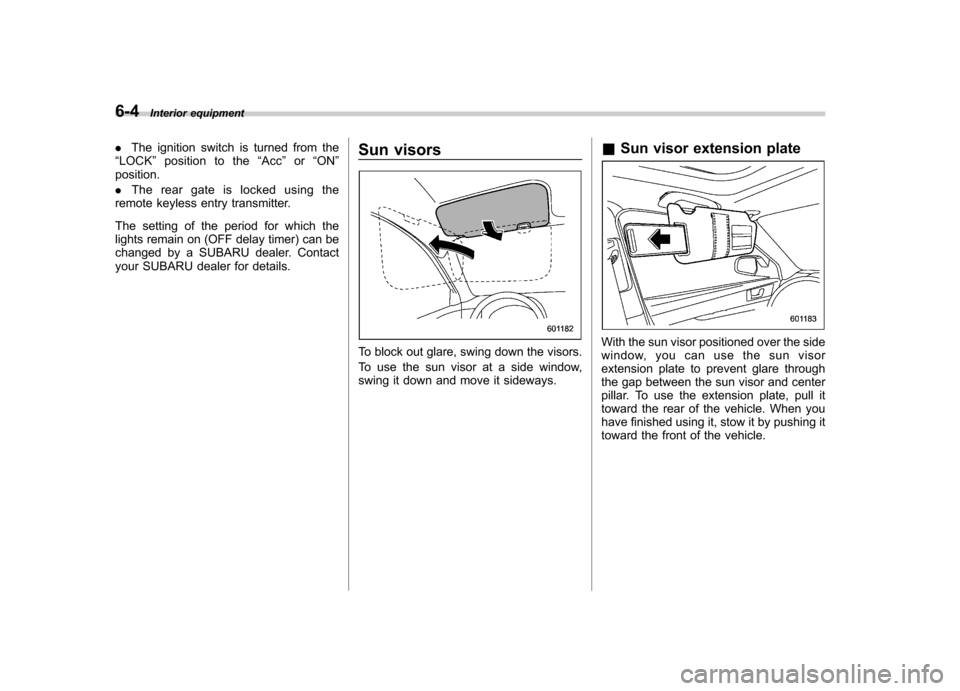
1) DOOR
2) OFF
3) ON
The cargo area light switch has the
following positions. DOOR: The light illuminates only when
the rear gate is opened.OFF: The light remains off.
ON: The light remains on continuously.
The automatically illuminated cargo area
light remains on for several seconds and
then gradually turns off after the rear gate
is closed. While the light is on, if any of the
following operations are performed, the
cargo area light turns off immediately. Interior equipment
6-3
– CONTINUED –
Page 257 of 474

6-4Interior equipment
.The ignition switch is turned from the
“ LOCK ”position to the “Acc ”or “ON ”
position. . The rear gate is locked using the
remote keyless entry transmitter.
The setting of the period for which the
lights remain on (OFF delay timer) can be
changed by a SUBARU dealer. Contact
your SUBARU dealer for details. Sun visors
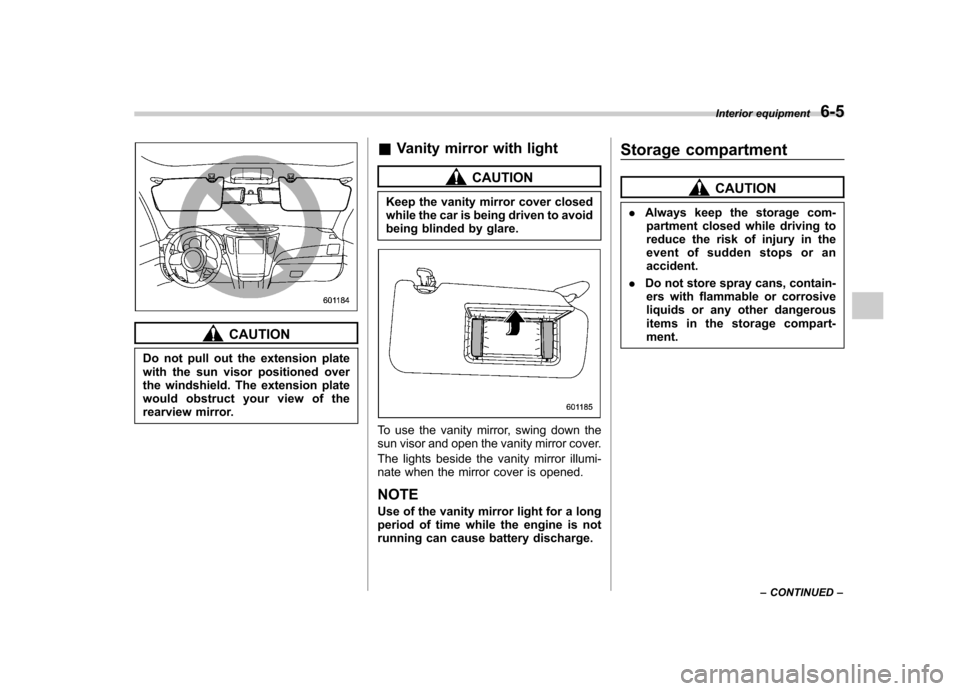
To block out glare, swing down the visors.
To use the sun visor at a side window,
swing it down and move it sideways.&
Sun visor extension plateWith the sun visor positioned over the side
window, you can use the sun visor
extension plate to prevent glare through
the gap between the sun visor and center
pillar. To use the extension plate, pull it
toward the rear of the vehicle. When you
have finished using it, stow it by pushing it
toward the front of the vehicle.
Page 258 of 474

CAUTION
Do not pull out the extension plate
with the sun visor positioned over
the windshield. The extension plate
would obstruct your view of the
rearview mirror. &
Vanity mirror with light
CAUTION
Keep the vanity mirror cover closed
while the car is being driven to avoid
being blinded by glare.
To use the vanity mirror, swing down the
sun visor and open the vanity mirror cover.
The lights beside the vanity mirror illumi-
nate when the mirror cover is opened. NOTE
Use of the vanity mirror light for a long
period of time while the engine is not
running can cause battery discharge. Storage compartment
CAUTION
. Always keep the storage com-
partment closed while driving to
reduce the risk of injury in the
event of sudden stops or anaccident.
. Do not store spray cans, contain-
ers with flammable or corrosive
liquids or any other dangerous
items in the storage compart-ment. Interior equipment
6-5
– CONTINUED –
Page 284 of 474

.A vehiclefails the OBDII inspection if
the “CHECK ENGINE ”warning light is not
properly operating (light is illuminated or is
not working due to a burned out bulb) or
there is one or more diagnostic trouble
codes stored in the vehicle ’s computer.
. A state emission inspection may reject
(not pass or fail) a vehicle if the number of
OBDII system readiness monitors “NOT
READY ”is greater than one. If the
vehicle ’s battery has been recently re-
placed or disconnected, the OBDII system
inspection may indicate that the vehicle is
not ready for the emission test. Under this
condition, the vehicle driver should be
instructed to drive his/her vehicle for a few
days to reset the readiness monitors and
return for an emission re-inspection. . Owners of rejected or failing vehicles
should contact their SUBARU Dealer for service.
Some states still use dynamometers in
their emission inspection program. A
dynamometer is a treadmill or roller-like
testing device that allows your vehicle ’s
wheels to turn while the vehicle remains in
one place. Prior to your vehicle being put
on a dynamometer, tell your emission
inspector
not to place your SUBARU
AWD vehicle on a two-wheel dynam-
ometer. Otherwise, serious transmis-
sion damage will result. The U.S. Environmental Protection
Agency (EPA) and states using two-wheel
dynamometers in their emission testing
program have EXEMPTED SUBARU
AWD vehicles from the portion of the
testing program that involves a two-wheel
dynamometer. There are some states that
use four-wheel dynamometers in their
testing program. When properly used, this
equipment should not damage a SUBARU
AWD vehicle.
Under no circumstances should the rear
wheels be jacked off the ground, nor
should the driveshaft be disconnected for
state emission testing.
Preparing to drive
You should perform the following checks
and adjustments every day before you
start driving.
1. Check that all windows, mirrors, and
lights are clean and unobstructed.
2. Check the appearance and condition
of the tires. Also check tires for properinflation.
3. Look under the vehicle for any sign of leaks.
4. Check that the hood, trunk (Legacy)
and rear gate (Outback) are fully closed.
5. Check the adjustment of the seat.
6. Check the adjustment of the inside
and outside mirrors.
7. Fasten your seatbelt. Check that your
passengers have fastened their seatbelts.
8. Check the operation of the warning
and indicator lights when the ignition
switch is turned to the
“ON ”position.
9. Check the gauges, indicator and warn-
ing lights after starting the engine. Starting and operating
7-7
– CONTINUED –