2012 SUBARU OUTBACK steering wheel
[x] Cancel search: steering wheelPage 121 of 474

Instruments and controlsHigh/low beam change (dimmer) ......................... 3-28
Headlight flasher ................................................ 3-28
Daytime running light system ............................. 3-28
Turn signal lever ................................................ 3-29
Illumination brightness control ......................... 3-29
Front fog light switch (if equipped) .................. 3-30
Wiper and washer .............................................. 3-30
Windshield wiper and washer switches ............... 3-32
Rear window wiper and washer switch (Outback) ......................................................... 3-33 Defogger and deicer
.......................................... 3-34
Mirrors ................................................................ 3-35
Type A inside mirror (if equipped) . ..................... 3-35
Type B inside mirror (if equipped) . ..................... 3-36
Auto-dimming mirror with compass (if equipped) .................................................... 3-43
Auto-dimming mirror with compass and HomeLink
®(if equipped) ................................... 3-45
Outside mirrors ................................................. 3-50
Tilt/telescopic steering wheel ........................... 3-52
Horn .................................................................... 3-52
Page 122 of 474
Ignition switch
WARNING
. Never turn the ignition switch to
“ LOCK ”while the vehicle is
being driven or towed because
that will lock the steering wheel,
preventing steering control. And
when the engine is turned off, it
takes a much greater effort than
usual to steer.
. Before leaving the vehicle, al-
ways remove the key from the
ignition switch for safety and
never allow an unattended child
to remain in the vehicle. Failure
to follow this procedure could
result in injury to a child or
others. Children could operate
the power windows, the moon-
roof or other controls or even
make the vehicle move.
CAUTION
Do not attach a large key holder or
key case to either key. If it banged
against your knees or hands while
you are driving, it could turn the
ignition switch from the “ON ”posi- tion to the
“Acc ”or “LOCK ”posi-
tion, thereby stopping the engine.
Also, if the key is attached to a
keyholder or to a large bunch of
other keys, centrifugal force may act
on it as the vehicle moves, resulting
in unwanted turning of the ignitionswitch.
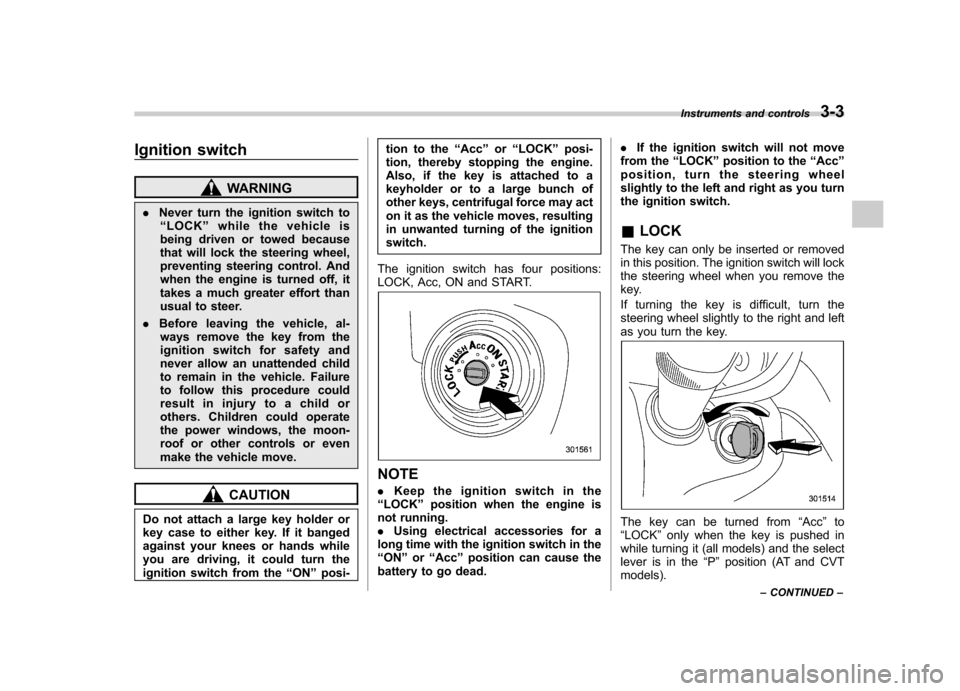
The ignition switch has four positions:
LOCK, Acc, ON and START.
NOTE . Keep the ignition switch in the
“ LOCK ”position when the engine is
not running. . Using electrical accessories for a
long time with the ignition switch in the“ ON ”or “Acc ”position can cause the
battery to go dead. .
If the ignition switch will not move
from the “LOCK ”position to the “Acc ”
position, turn the steering wheel
slightly to the left and right as you turn
the ignition switch. & LOCK
The key can only be inserted or removed
in this position. The ignition switch will lock
the steering wheel when you remove the
key.
If turning the key is difficult, turn the
steering wheel slightly to the right and left
as you turn the key.
The key can be turned from “Acc ”to
“ LOCK ”only when the key is pushed in
while turning it (all models) and the select
lever is in the “P ” position (AT and CVT
models). Instruments and controls
3-3
– CONTINUED –
Page 171 of 474
3-52Instruments and controls
Tilt/telescopic steering wheel
WARNING
Do not adjust the steering wheel tilt/
telescopic position while driving.
This may cause loss of vehicle
control and result in personal injury.
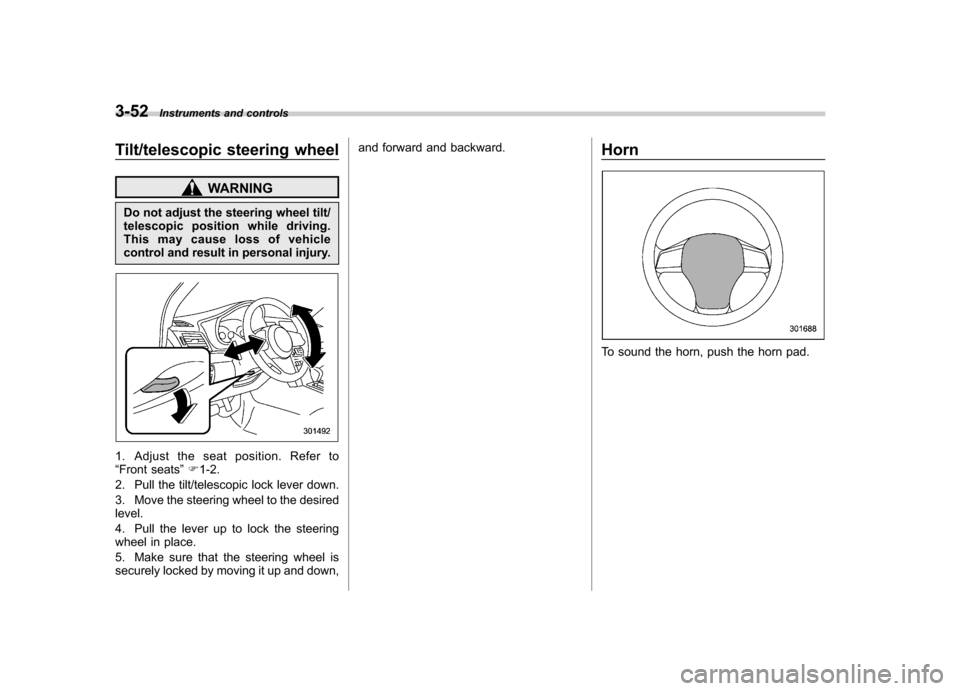
1. Adjust the seat position. Refer to “ Front seats ”F 1-2.
2. Pull the tilt/telescopic lock lever down.
3. Move the steering wheel to the desired level.
4. Pull the lever up to lock the steering
wheel in place.
5. Make sure that the steering wheel is
securely locked by moving it up and down, and forward and backward.
Horn
To sound the horn, push the horn pad.
Page 224 of 474
Audio control buttons NOTE
For models with the genuine SUBARU
navigation system, refer to the Owner’s
Manual supplement for the navigationsystem.
Models without Hands-free system
Models with Hands-free system
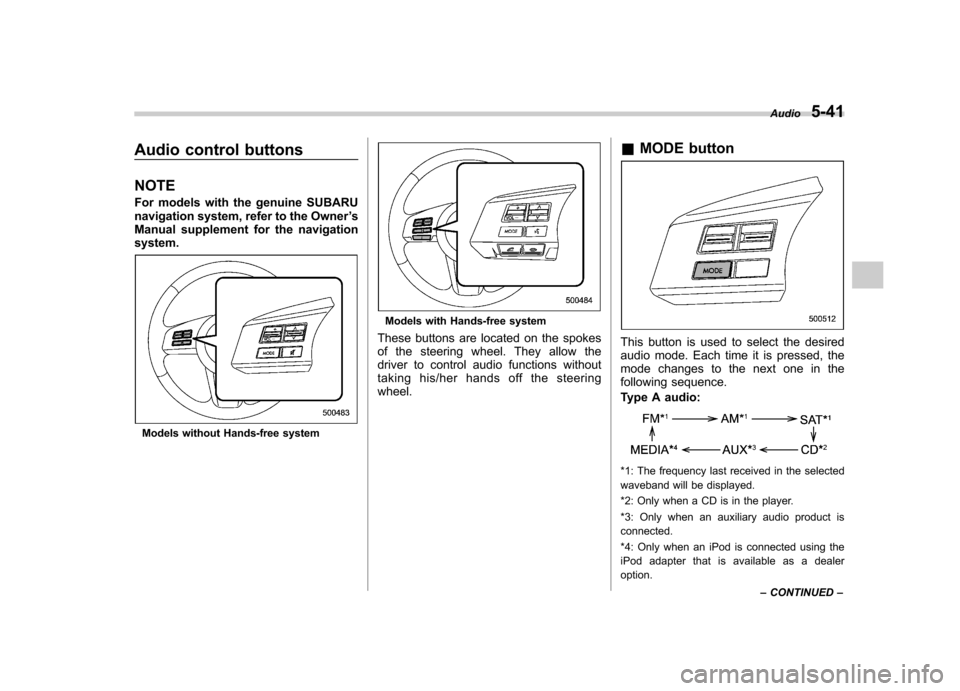
These buttons are located on the spokes
of the steering wheel. They allow the
driver to control audio functions without
taking his/her hands off the steeringwheel. &
MODE button
This button is used to select the desired
audio mode. Each time it is pressed, the
mode changes to the next one in the
following sequence.
Type A audio:
*1: The frequency last received in the selected
waveband will be displayed.
*2: Only when a CD is in the player.
*3: Only when an auxiliary audio product is connected.
*4: Only when an iPod is connected using the
iPod adapter that is available as a dealer option. Audio
5-41
– CONTINUED –
Page 287 of 474
7-10Starting and operating
Stopping the engine
WARNING
Do not stop the engine when the
vehicle is moving. This will cause
loss of power to the power steering
and the brake booster, making steer-
ing and braking more difficult. It
could also result in accidental acti-
vation of the “LOCK ”position on the
ignition switch, causing the steering
wheel to lock.
The ignition switch should be turned off
only when the vehicle is stopped and the
engine is idling. Remote engine start system
(dealer option)
WARNING
. Do not remote start a vehicle in
an enclosed environment (e.g.
closed garage). Prolonged opera-
tion of a motor vehicle in an
enclosed environment can cause
a harmful build-up of Carbon
Monoxide. Carbon Monoxide is
harmful to your health. Exposure
to high levels of Carbon Monox-
ide can cause headaches, dizzi-
ness or in extreme cases uncon-
sciousness and/or death.
. Before performing any servicing
of the vehicle, temporarily place
the remote engine start system in
service mode to prevent the
system from unexpectedly start-
ing the engine.
& Starting your vehicle
NOTE
All vehicle doors, the engine hood and
trunk / rear gate must be closed prior to
activating the remote engine start sys-
tem. Any open entry point will prevent
starting or cause the system to shutdown.
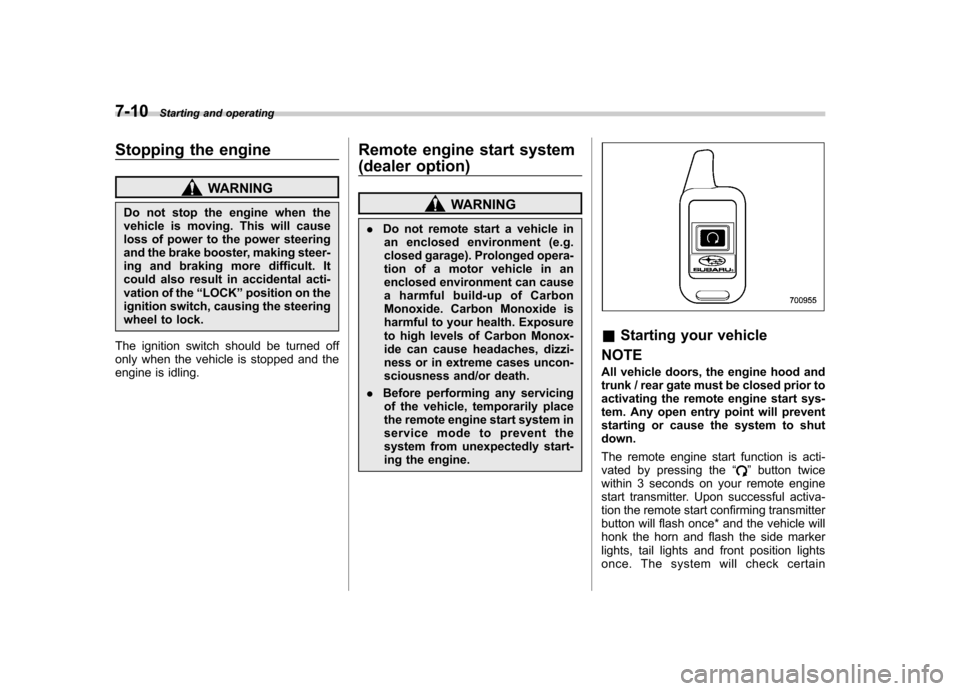
The remote engine start function is acti-
vated by pressing the “
”button twice
within 3 seconds on your remote engine
start transmitter. Upon successful activa-
tion the remote start confirming transmitter
button will flash once* and the vehicle will
honk the horn and flash the side marker
lights, tail lights and front position lights
once. The system will check certain
Page 299 of 474
7-22Starting and operating
turns off.
Gearshifts can be performed using the
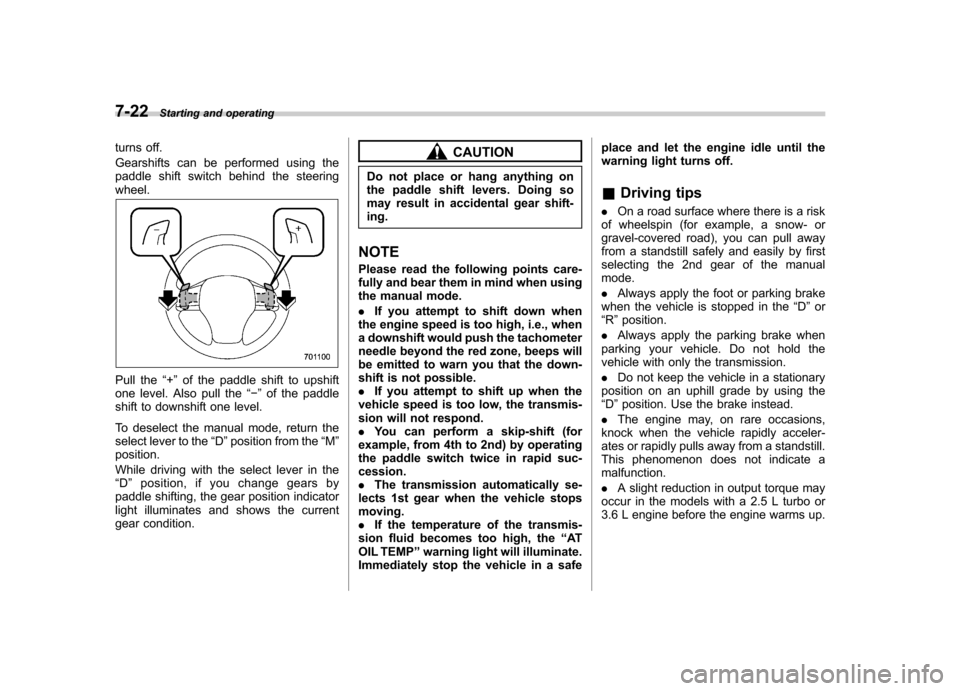
paddle shift switch behind the steeringwheel.
Pull the “+ ” of the paddle shift to upshift
one level. Also pull the “� ” of the paddle
shift to downshift one level.
To deselect the manual mode, return the
select lever to the “D ”position from the “M ”
position.
While driving with the select lever in the “ D ” position, if you change gears by
paddle shifting, the gear position indicator
light illuminates and shows the current
gear condition.
CAUTION
Do not place or hang anything on
the paddle shift levers. Doing so
may result in accidental gear shift-ing.
NOTE
Please read the following points care-
fully and bear them in mind when using
the manual mode. . If you attempt to shift down when
the engine speed is too high, i.e., when
a downshift would push the tachometer
needle beyond the red zone, beeps will
be emitted to warn you that the down-
shift is not possible.. If you attempt to shift up when the
vehicle speed is too low, the transmis-
sion will not respond.. You can perform a skip-shift (for
example, from 4th to 2nd) by operating
the paddle switch twice in rapid suc-cession.. The transmission automatically se-
lects 1st gear when the vehicle stopsmoving.. If the temperature of the transmis-
sion fluid becomes too high, the “AT
OIL TEMP ”warning light will illuminate.
Immediately stop the vehicle in a safe place and let the engine idle until the
warning light turns off. &
Driving tips
. On a road surface where there is a risk
of wheelspin (for example, a snow- or
gravel-covered road), you can pull away
from a standstill safely and easily by first
selecting the 2nd gear of the manualmode. . Always apply the foot or parking brake
when the vehicle is stopped in the “D ”or
“ R ”position.
. Always apply the parking brake when
parking your vehicle. Do not hold the
vehicle with only the transmission. . Do not keep the vehicle in a stationary
position on an uphill grade by using the “ D ”position. Use the brake instead.
. The engine may, on rare occasions,
knock when the vehicle rapidly acceler-
ates or rapidly pulls away from a standstill.
This phenomenon does not indicate amalfunction. . A slight reduction in output torque may
occur in the models with a 2.5 L turbo or
3.6 L engine before the engine warms up.
Page 300 of 474

Power steering
CAUTION
Do not hold the steering wheel at the
fully locked position left or right for
more than 5 seconds. This may
damage the power steering pump.
The power steering system operates only
when the engine is running.
If you lose power steering assist because
the engine stops or the system fails to
function, you can steer but it will take
much more effort. NOTE
Right after the engine has been started
and before it has warmed up, you may
hear a noise coming from areas adja-
cent to the power steering pump which
is located at the right-front area of the
engine compartment. This noise is
normal. It does not indicate power
steering system trouble. Braking &
Braking tips
WARNING
Never rest your foot on the brake
pedal while driving. This can cause
dangerous overheating of the
brakes and needless wear on the
brake pads and linings.
! When the brakes get wet
When driving in rain or after washing the
vehicle, the brakes may get wet. As a
result, brake stopping distance will be
longer. To dry the brakes, drive the vehicle
at a safe speed while lightly depressing
the brake pedal to heat up the brakes. ! Use of engine braking
Remember to make use of engine braking
in addition to foot braking. When descend-
ing a grade, if only the foot brake is used,
the brakes may start working improperly
because of brake fluid overheating,
caused by overheated brake pads. To
help prevent this, shift into a lower gear to
get stronger engine braking. ! Braking when a tire is punctured
Do not depress the brake pedal suddenly
when a tire is punctured. This could cause a loss of control of the vehicle. Keep
driving straight ahead while gradually
reducing speed. Then slowly pull off the
road to a safe place. &
Brake system
! Two separate circuits
Your vehicle has a dual circuit brake
system. Each circuit works diagonally
across the vehicle. If one circuit of the
brake system should fail, the other half of
the system still works. If one circuit fails,
the brake pedal will go down much closer
to the floor than usual and you will need to
press it down much harder. And a much
longer distance will be needed to stop thevehicle. ! Brake booster
The brake booster uses engine manifold
vacuum to assist braking force. Do not
turn off the engine while driving because
that will turn off the brake booster, result-
ing in poor braking power.
The brakes will continue to work even
when the brake booster completely stops
functioning. If this happens, however, you
will have to depress the pedal much
harder than normal and the braking dis-
tance will increase. Starting and operating
7-23
– CONTINUED –
Page 302 of 474
constant brake pedal pressure.
Do not pump the brake pedal
since doing so may defeat the
operation of the ABS system.
The ABS system prevents the lock-up of
wheels which may occur during sudden
braking or braking on slippery road sur-
faces. This helps prevent the loss of
steering control and directional stability
caused by wheel lock-up.
When the ABS system is operating, you
may hear a chattering noise or feel a slight
vibration in the brake pedal. This is normal
when the ABS operates.
The ABS system will not operate when the
vehicle speed is below approximately 6
mph (10 km/h). & ABS system self-check
You may feel a slight shock in the brake
pedal and hear the operating sound of
ABS from the engine compartment just
after the vehicle is started. This is caused
by an automatic functional test of the ABS
system being carried out and does not
indicate any abnormal condition. & ABS warning light
Refer to “ABS warning light ”F 3-16. Electronic Brake Force Dis-
tribution (EBD) system
The EBD system maximizes the effective-
ness of the brakes by allowing the rear
brakes to supply a greater proportion of
the braking force. It functions by adjusting
the distribution of braking force to the rear
wheels in accordance with the vehicle
’s
loading condition and speed.
The EBD system is an integral part of the
ABS system and uses some of the ABSsystem ’s components to perform its func-
tion of optimizing the distribution of brak-
ing force. If any of the ABS components
used by the EBD function fails, the EBD
system also stops working.
When the EBD system is operating, you
may hear a chattering noise or feel a slight
vibration in the brake pedal. This is normal
and does not indicate a malfunction. &
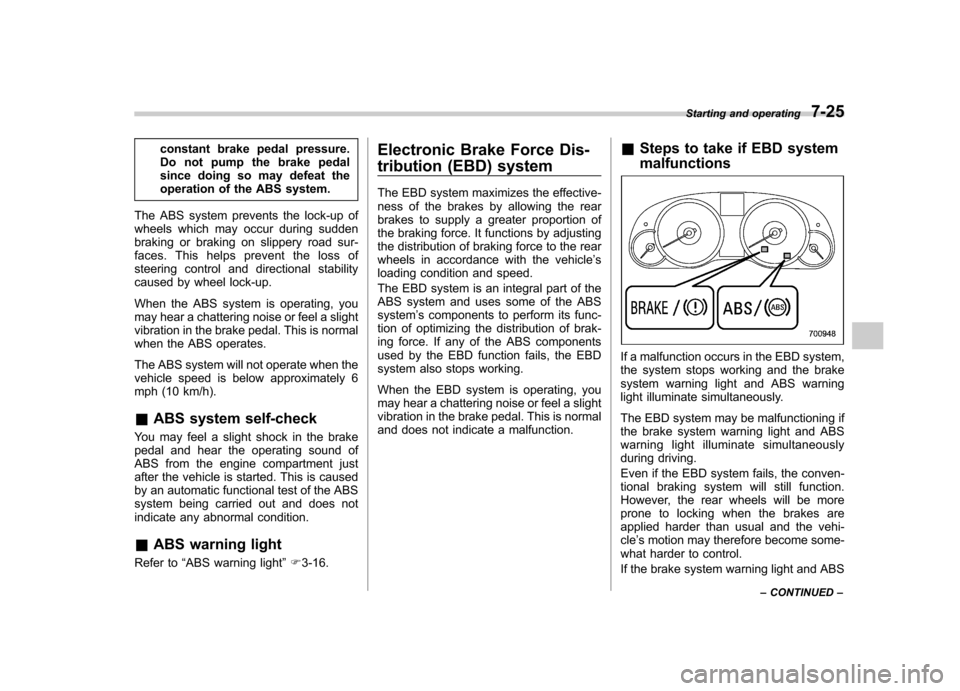
Steps to take if EBD system malfunctions
If a malfunction occurs in the EBD system,
the system stops working and the brake
system warning light and ABS warning
light illuminate simultaneously.
The EBD system may be malfunctioning if
the brake system warning light and ABS
warning light illuminate simultaneously
during driving.
Even if the EBD system fails, the conven-
tional braking system will still function.
However, the rear wheels will be more
prone to locking when the brakes are
applied harder than usual and the vehi-cle’s motion may therefore become some-
what harder to control.
If the brake system warning light and ABS Starting and operating
7-25
– CONTINUED –