2012 SUBARU IMPREZA WRX mirror
[x] Cancel search: mirrorPage 7 of 416

4
Mark Name
Hazard warning flasher
Engine hood
Trunk lid (4-door)
Seat heater
Child restraint top tether an- chorages
Child restraint lower an- chorages
Horn
Wiper intermittent
Windshield washer
Windshield wiper mist (for
single wipe)
Rear window wiperMark Name
Rear window washer
Lights
Tail lights, license plate light
and instrument panel illumi- nation
Headlights
Turn signal
Illumination brightness
Fan speed
Instrument panel outlets
Instrument panel outlets and
foot outlets
Foot outlets
Windshield defroster and foot outletsMark Name
Windshield defroster
Rear window defogger/Out-
side mirror defogger/Wind-
shield wiper deicer
Air recirculation
Engine oil
Washer
Door lock (transmitter)
Door unlock (transmitter)
Trunk lid open (4-door) or rear
gate unlock (5-door) (trans- mitter)
Page 19 of 416

16 &Instrument panel
1) Door locks (page 2-4)
2) Outside mirror switch (page 3-44)
3) Illumination brightness control
(page 3-31)
4) Headlight beam leveler (page 3-31)
5) Light control switch (page 3-29)
6) Combination meter (page 3-5)
7) Wiper control lever (page 3-33)
8) Hazard warning flasher switch (page 3-5)
9) Audio (page 5-1)
10) Shift lever (page 7-14/page 7-16)
11) Climate control (page 4-1)
12) Cruise control (page 7-37)
13) Horn (page 3-48)
14) SRS airbag (page 1-34)
15) Tilt/telescopic steering (page 3-47)
16) Hands-free switches (page 5-35)
17) Audio control buttons (page 5-31)
18) Fuse box (page 11-37)
19) Vehicle Dynamics Control OFF switch (page 7-30)/Vehicle Dynamics Control
mode switch (page 7-29)
20) Hood lock release knob (page 11-5)
21) Power windows (page 2-20)
Page 27 of 416

24
Function settings
A SUBARU dealer can change the settings of the functions shown in the following table to meet your personal requirements. Contact
the nearest SUBARU dealer for details. If your vehicle is equipped with the genuine SUBARU navigation system, the settings for some
of these functions can be changed using the navigation monitor. For details, please refer to the Owner’s Manual supplement for the
navigation system.
Item Function Possible settings Default setting Page
Alarm system Alarm system Operation/Non-operation Operation 2-15 Monitoring start delay time (after closure of doors) 0 second/30 seconds 30 seconds 2-16
Impact sensor operation (only models with
shock sensors (dealer option)) Operation/Non-operation Non-operation 2-19
Passive arming Operation/Non-operation Non-operation 2-18
Dome light and map lights illumination
(models with moonroof) ON/OFF OFF 2-15
Dome light illumination
(models without moonroof)
Remote keyless entry system Hazard warning flasher Operation/Non-operation Operation 2-7 Audible signal Operation/Non-operation Operation 2-10
Key lock-in prevention Key lock-in prevention Operation/Non-operation Operation 2-7
Remote engine start system
(dealer option) Horn chirp confirmation ON/OFF ON 7-12
Defogger and deicer system for
models with the automatic climate
control system Rear window defogger, outside mirror
defogger and windshield wiper deicer
Operation for 15 minutes/
Continuous operationOperation for 15 minutes 3-45
Dome light Operation of dome light/map light OFF delay timer OFF/Short/Normal/Long Long 6-2, 6-3
Map light for models with a moonroof
Battery drainage prevention function Battery drainage prevention function Operation/Non-operation Operation 2-5
Page 65 of 416

1-36Seat, seatbelt and SRS airbags
It is also important to wear your
seatbelt to help avoid injuries
that can result when the SRS
airbag contacts an occupant not
in proper position such as one
thrown forward during pre-acci-
dent braking.
Even when properly positioned,
there remains a possibility that
an occupant may suffer minor
injuries such as abrasions and
bruises to the face or arms
because of the SRS airbag de-
ployment force.WARNING
. Do not rest your arm on either
front door or its internal trim. You
could be injured in the event of
SRS side airbag deployment.
. Do not place any objects over or
near the SRS airbag cover or
between you and the SRS airbag.
If the SRS airbag deploys, those
objects could interfere with its
proper operation and could be
propelled inside the vehicle and
cause injury.WARNING
Do not put any objects over the
steering wheel pad and dashboard.
If the SRS frontal airbag deploys,
these objects could interfere with its
proper operation and could be pro-
pelled inside the vehicle, causing
injury.
WARNING
Do not attach accessories to the
windshield, or fit an extra-wide mir-
ror over the rear view mirror. If the
SRS airbag deploys, those objects
could become projectiles that could
seriously injure vehicle occupants.
Page 119 of 416

Instruments and controlsCurrent fuel consumption (if equipped) ............... 3-27
Average fuel consumption .................................. 3-28
Turn off display of fuel consumption indicator .......................................................... 3-28
Light control switch ........................................... 3-29
Headlights. ......................................................... 3-29
High/low beam change (dimmer) ......................... 3-29
Headlight flasher ................................................ 3-30
Daytime running light system ............................. 3-30
Turn signal lever ................................................ 3-30
Illumination brightness control ......................... 3-31
Headlight beam leveler (if equipped) ................ 3-31
Front fog light switch (if equipped) .................. 3-33Wiper and washer
.............................................. 3-33
Windshield wiper and washer switches .............. 3-35
Rear window wiper and washer switch –
5-door ............................................................. 3-36
Mirrors ................................................................ 3-37
Inside mirror ...................................................... 3-37
Auto-dimming mirror/compass (if equipped) ....... 3-37
Auto-dimming mirror/compass with HomeLink
®(if equipped) .................................................... 3-38
Outside mirrors ................................................. 3-44
Defogger and deicer .......................................... 3-45
Tilt/telescopic steering wheel ........................... 3-47
Horn .................................................................... 3-48
Page 154 of 416

Mirrors
Always check that the inside and outside
mirrors are properly adjusted before you
start driving. &Inside mirror
The inside mirror has a day and night
position. Pull the tab at the bottom of the
mirror toward you for the night position.
Push it away for the day position. The
night position reduces glare from head-lights. &
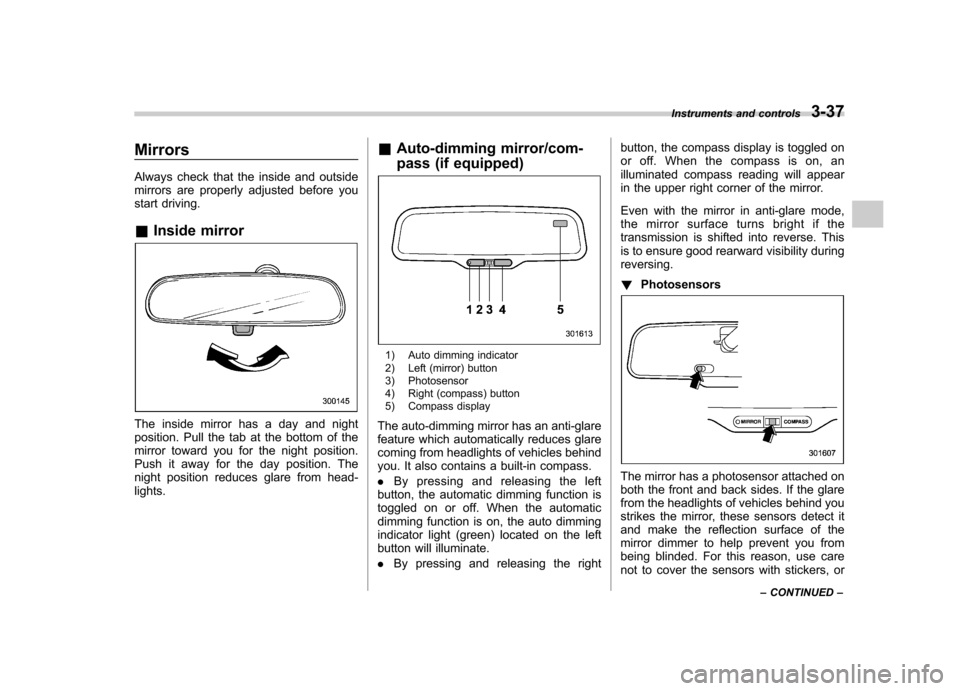
Auto-dimming mirror/com-
pass (if equipped)
1) Auto dimming indicator
2) Left (mirror) button
3) Photosensor
4) Right (compass) button
5) Compass display
The auto-dimming mirror has an anti-glare
feature which automatically reduces glare
coming from headlights of vehicles behind
you. It also contains a built-in compass. . By pressing and releasing the left
button, the automatic dimming function is
toggled on or off. When the automatic
dimming function is on, the auto dimming
indicator light (green) located on the left
button will illuminate. . By pressing and releasing the right button, the compass display is toggled on
or off. When the compass is on, an
illuminated compass reading will appear
in the upper right corner of the mirror.
Even with the mirror in anti-glare mode,
the mirror surface turns bright if the
transmission is shifted into reverse. This
is to ensure good rearward visibility duringreversing. !
Photosensors
The mirror has a photosensor attached on
both the front and back sides. If the glare
from the headlights of vehicles behind you
strikes the mirror, these sensors detect it
and make the reflection surface of the
mirror dimmer to help prevent you from
being blinded. For this reason, use care
not to cover the sensors with stickers, or Instruments and controls
3-37
– CONTINUED –
Page 155 of 416

3-38Instruments and controls
other similar items. Periodically wipe the
sensors clean using a piece of dry soft
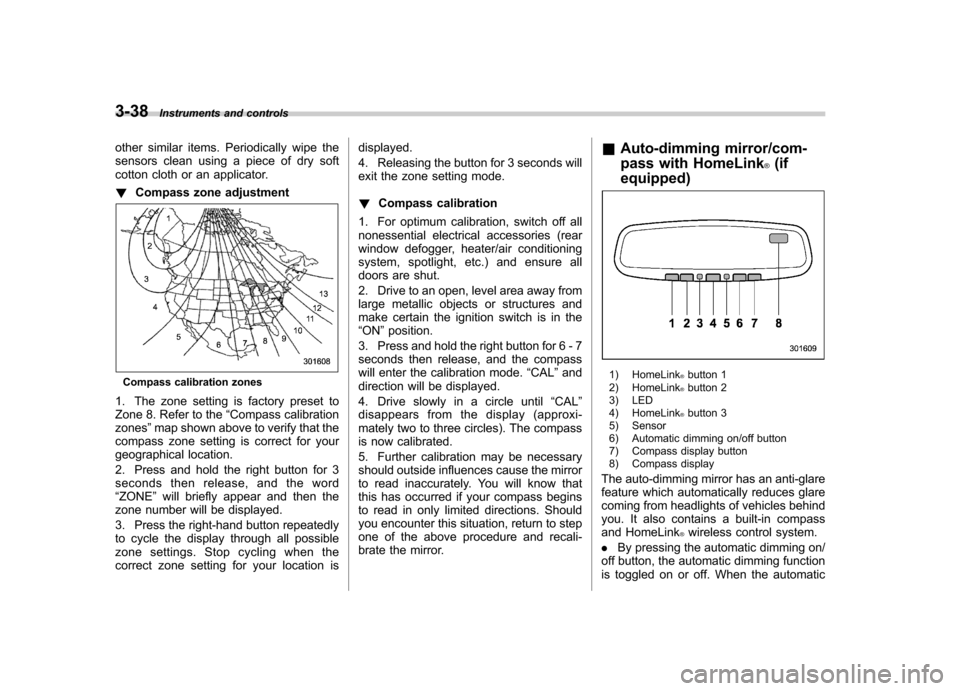
cotton cloth or an applicator. ! Compass zone adjustment
Compass calibration zones
1. The zone setting is factory preset to
Zone 8. Refer to the “Compass calibration
zones ”map shown above to verify that the
compass zone setting is correct for your
geographical location.
2. Press and hold the right button for 3
seconds then release, and the word“ ZONE ”will briefly appear and then the
zone number will be displayed.
3. Press the right-hand button repeatedly
to cycle the display through all possible
zone settings. Stop cycling when the
correct zone setting for your location is displayed.
4. Releasing the button for 3 seconds will
exit the zone setting mode. !
Compass calibration
1. For optimum calibration, switch off all
nonessential electrical accessories (rear
window defogger, heater/air conditioning
system, spotlight, etc.) and ensure all
doors are shut.
2. Drive to an open, level area away from
large metallic objects or structures and
make certain the ignition switch is in the“ ON ”position.
3. Press and hold the right button for 6 - 7
seconds then release, and the compass
will enter the calibration mode. “CAL ”and
direction will be displayed.
4. Drive slowly in a circle until “CAL ”
disappears from the display (approxi-
mately two to three circles). The compass
is now calibrated.
5. Further calibration may be necessary
should outside influences cause the mirror
to read inaccurately. You will know that
this has occurred if your compass begins
to read in only limited directions. Should
you encounter this situation, return to step
one of the above procedure and recali-
brate the mirror. &
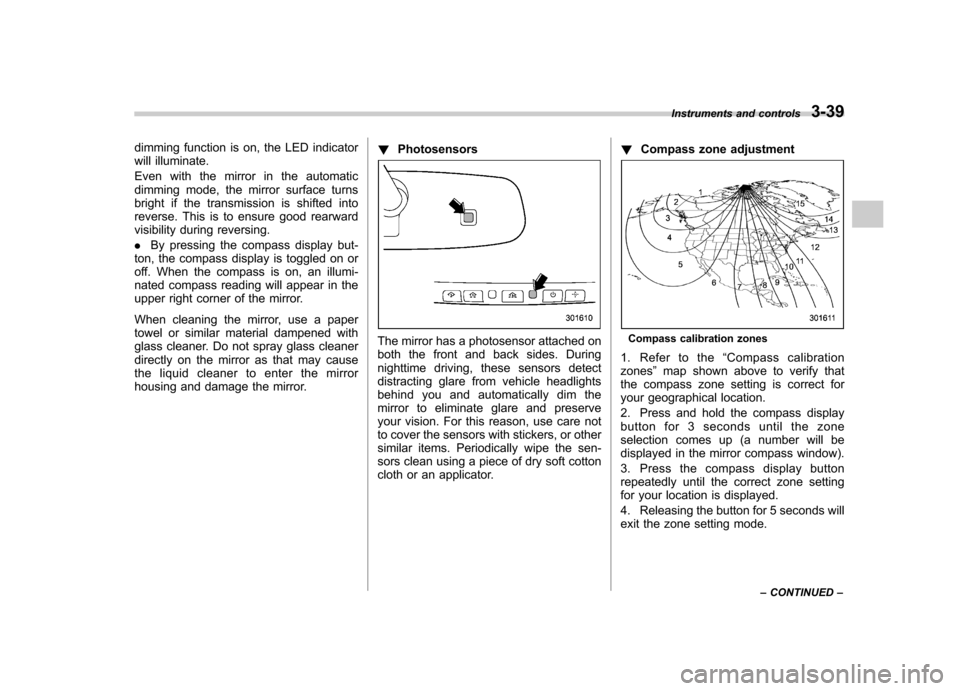
Auto-dimming mirror/com-
pass with HomeLink
®(if
equipped)
1) HomeLink®button 1
2) HomeLink®button 2
3) LED
4) HomeLink
®button 3
5) Sensor
6) Automatic dimming on/off button
7) Compass display button
8) Compass display
The auto-dimming mirror has an anti-glare
feature which automatically reduces glare
coming from headlights of vehicles behind
you. It also contains a built-in compass
and HomeLink
®wireless control system.
. By pressing the automatic dimming on/
off button, the automatic dimming function
is toggled on or off. When the automatic
Page 156 of 416

dimming function is on, the LED indicator
will illuminate.
Even with the mirror in the automatic
dimming mode, the mirror surface turns
bright if the transmission is shifted into
reverse. This is to ensure good rearward
visibility during reversing. .By pressing the compass display but-
ton, the compass display is toggled on or
off. When the compass is on, an illumi-
nated compass reading will appear in the
upper right corner of the mirror.
When cleaning the mirror, use a paper
towel or similar material dampened with
glass cleaner. Do not spray glass cleaner
directly on the mirror as that may cause
theliquidcleanertoenterthemirror
housing and damage the mirror. !
Photosensors
The mirror has a photosensor attached on
both the front and back sides. During
nighttime driving, these sensors detect
distracting glare from vehicle headlights
behind you and automatically dim the
mirror to eliminate glare and preserve
your vision. For this reason, use care not
to cover the sensors with stickers, or other
similar items. Periodically wipe the sen-
sors clean using a piece of dry soft cotton
cloth or an applicator. !
Compass zone adjustmentCompass calibration zones
1. Refer to the “Compass calibration
zones ”map shown above to verify that
the compass zone setting is correct for
your geographical location.
2. Press and hold the compass display
button for 3 seconds until the zone
selection comes up (a number will be
displayed in the mirror compass window).
3. Press the compass display button
repeatedly until the correct zone setting
for your location is displayed.
4. Releasing the button for 5 seconds will
exit the zone setting mode. Instruments and controls
3-39
– CONTINUED –