2012 SUBARU IMPREZA WRX high beam
[x] Cancel search: high beamPage 20 of 416
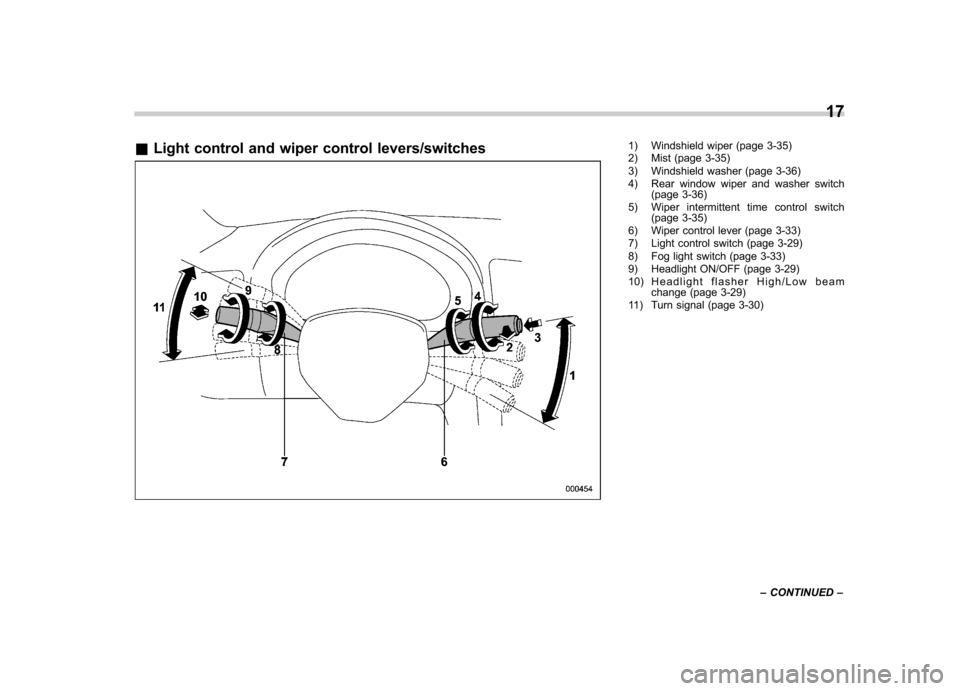
&Light control and wiper control levers/switches1) Windshield wiper (page 3-35)
2) Mist (page 3-35)
3) Windshield washer (page 3-36)
4) Rear window wiper and washer switch
(page 3-36)
5) Wiper intermittent time control switch (page 3-35)
6) Wiper control lever (page 3-33)
7) Light control switch (page 3-29)
8) Fog light switch (page 3-33)
9) Headlight ON/OFF (page 3-29)
10) Headlight flasher High/Low beam change (page 3-29)
11) Turn signal (page 3-30) 17
– CONTINUED –
Page 25 of 416

22
&Warning and indicator lights
Mark Name Page
Seatbelt warning light 3-13
Front passenger ’s
seatbelt warning light 3-13
SRS airbag system
warning light3-14
/Front passenger
’s
frontal airbag ON indi- cator 3-14
/Front passenger
’s
frontal airbag OFF in- dicator 3-14
CHECK ENGINE
warning light/Malfunc-
tion indicator light3-15
Charge warning light 3-16
Oil pressure warning light
3-16
Rear differential oil
temperature warning
light (STI)3-16
ABS warning light 3-18 Mark Name Page
Brake system warning light
3-19
Door open warning light3-20
Hill start assist warn-
ing light/Hill start assist
OFF indicator light (STI)3-20
Vehicle Dynamics
Control warning light/
Vehicle Dynamics
Control operation indi-
cator light3-20
Vehicle Dynamics
Control OFF indicator
light/Traction Control
OFF indicator light (STI)3-21
Turn signal indicator lights
3-24
High beam indicator light3-24
Front fog light indicator
light (if equipped)
3-24
Security indicator light 3-23
Headlight indicator light
3-24Mark Name Page
Cruise control indica-
tor light
3-24
Cruise control set in-
dicator light3-24
Low fuel warning light 3-20
Low tire pressure
warning light
(U.S.-spec. models)3-16
Shift-up indicator light (STI)
3-23
Driver
’s control center
differential auto indi-
cator light (STI) 3-24
Auto [+] mode indica-
tor light (STI)
3-24
Auto [
�] mode indica-
tor light (STI) 3-25
Driver
’s control center
differential indicator
and warning lights (STI) 3-25
REV indicator light (STI)
3-25
Sport (S) mode indi-
cator light (STI)3-23
Page 118 of 416

Ignition switch..................................................... 3-3
LOCK .................................................................. 3-3
Acc..................................................................... 3-4
ON...................................................................... 3-4
START ................................................................ 3-4
Key reminder chime ............................................ 3-4
Ignition switch light ............................................. 3-4
Hazard warning flasher ....................................... 3-5
Meters and gauges. ............................................. 3-5
Combination meter illumination ........................... 3-5
Canceling the function for meter/gauge needle movement upon turning on the ignition switch ............................................................... 3-6
Meter/Gauge needle illumination setting (except STI) ................................................................... 3-6
Speedometer ....................................................... 3-7
Odometer/Trip meter ............................................ 3-7
Tachometer ......................................................... 3-9
Fuel gauge .......................................................... 3-9
Temperature gauge ............................................ 3-10
REV indicator light and buzzer (STI). ................ 3-10
Setting the alarm-level engine speed ................... 3-11
Deactivating the REV alarm system ..................... 3-12
Warning and indicator lights ............................. 3-12
Seatbelt warning light and chime ........................ 3-13
SRS airbag system warning light ........................ 3-14
Front passenger ’s frontal airbag ON and OFF
indicators ......................................................... 3-14
CHECK ENGINE warning light/Malfunction indicator light ................................................... 3-15
Charge warning light .......................................... 3-16 Oil pressure warning light
.................................. 3-16
Rear differential oil temperature warning light (STI) ................................................................ 3-16
Low tire pressure warning light (U.S.-spec. models) ........................................................... 3-16
ABS warning light .............................................. 3-18
Brake system warning light ................................ 3-19
Low fuel warning light ....................................... 3-20
Hill start assist warning light/Hill start assist OFF indicator light (STI) .......................................... 3-20
Door open warning light .................................... 3-20
Vehicle Dynamics Control warning light/Vehicle Dynamics Control operation indicator light .. ..... 3-20
Vehicle Dynamics Control OFF indicator light/ Traction Control OFF indicator light (STI)..... ..... 3-21
Security indicator light ....................................... 3-23
SI-DRIVE indicator light (STI) .............................. 3-23
Shift-up indicator light (STI) ............................... 3-23
Turn signal indicator lights ................................. 3-24
High beam indicator light ................................... 3-24
Cruise control indicator light .............................. 3-24
Cruise control set indicator light ........................ 3-24
Front fog light indicator light (if equipped) ..... ..... 3-24
Headlight indicator light ..................................... 3-24
Driver ’s control center differential auto indicator
light (STI) ........................................................ 3-24
Driver ’s control center differential indicator and
warning lights (STI) .......................................... 3-25
REV indicator light (STI) ..................................... 3-25
Clock .................................................................. 3-25
Information display ............................................ 3-26
Outside temperature indicator .. .......................... 3-27
Instruments and controls
3
Page 119 of 416
Instruments and controlsCurrent fuel consumption (if equipped) ............... 3-27
Average fuel consumption .................................. 3-28
Turn off display of fuel consumption indicator .......................................................... 3-28
Light control switch ........................................... 3-29
Headlights. ......................................................... 3-29
High/low beam change (dimmer) ......................... 3-29
Headlight flasher ................................................ 3-30
Daytime running light system ............................. 3-30
Turn signal lever ................................................ 3-30
Illumination brightness control ......................... 3-31
Headlight beam leveler (if equipped) ................ 3-31
Front fog light switch (if equipped) .................. 3-33Wiper and washer
.............................................. 3-33
Windshield wiper and washer switches .............. 3-35
Rear window wiper and washer switch –
5-door ............................................................. 3-36
Mirrors ................................................................ 3-37
Inside mirror ...................................................... 3-37
Auto-dimming mirror/compass (if equipped) ....... 3-37
Auto-dimming mirror/compass with HomeLink
®(if equipped) .................................................... 3-38
Outside mirrors ................................................. 3-44
Defogger and deicer .......................................... 3-45
Tilt/telescopic steering wheel ........................... 3-47
Horn .................................................................... 3-48
Page 141 of 416

3-24Instruments and controls
& Turn signal indicator lights
These lights show the operation of the turn
signal or lane change signal.
If the indicator lights do not blink or blink
rapidly, the turn signal bulb may be burned
out. Replace the bulb as soon as possible.
Refer to “Replacing bulbs ”F 11-39.
& High beam indicator light
This light shows that the headlights are in
the high beam mode.
This indicator light also illuminates when
the headlight flasher is operated. &Cruise control indica-
tor light
This light illuminates when the “CRUISE ”
main switch is pressed to activate the
cruise control function. NOTE . If you press the “CRUISE ”main
switch button while turning the ignition switch “ON ”, the cruise control func-
tion is deactivated and the cruise
control indicator light flashes. To re-
activate the cruise control function,
turn the ignition switch back to the “
Acc ”or “LOCK ”position, and then
turn it again to the “ON ”position.
. If this indicator light and the CHECK
ENGINE warning light/malfunction in-
dicator light flash simultaneously dur-
ing driving, have the vehicle checked
by your nearest SUBARU dealer.
& Cruise control set in-
dicator light
This light illuminates when vehicle speed
has been set to use the cruise controlfunction. &Front fog light indicator
light (if equipped)
This indicator light illuminates while the
front fog lights are illuminated. & Headlight indicator light
This indicator light illuminates when the
headlight switch is placed in the “”or
“” position. &
Driver ’s control center differ-
ential auto indicator light (STI)
This light functions while the ignition
switch is “ON ”. When illuminated, it
indicates that the driver ’s control center
differential is set to the auto mode. It turns
off when the driver ’s control center differ-
ential is set to the manual mode. For
details, refer to “Driver ’s Control Center
Differential (DCCD) (STI) ”F 7-18.
! Driver ’s control center dif-
ferential auto [+] indicatorlight
When the AUTO [+] mode is set, the
AUTO [+] indicator light illuminates.
For details, refer to “Driver ’s Control
Center Differential (DCCD) (STI) ”F 7-18.
Page 146 of 416
Light control switch
The light control switch operates when the
key is inserted into the ignition switch.
Regardless of the position of the light
control switch, the illuminated lights are
turned off when the key is removed from
the ignition switch. NOTE
Even if the key is removed from the
ignition switch, the lights can be illu-
minated by operating the light control
switch from“OFF ”to the “
”or “”
position. In this case, if the driver ’s
door is opened, a chirp sound will
inform the driver that the lights are illuminated.
CAUTION
. Use of any lights for a long period
of time while the engine is not
running can cause the battery todischarge.
. Before leaving the vehicle, make
sure that the light control switch
is turned to the “OFF ”position. If
the vehicle is left unattended for
a long time with the light control
switch set to a position otherthan “OFF ”, the battery may be discharged.
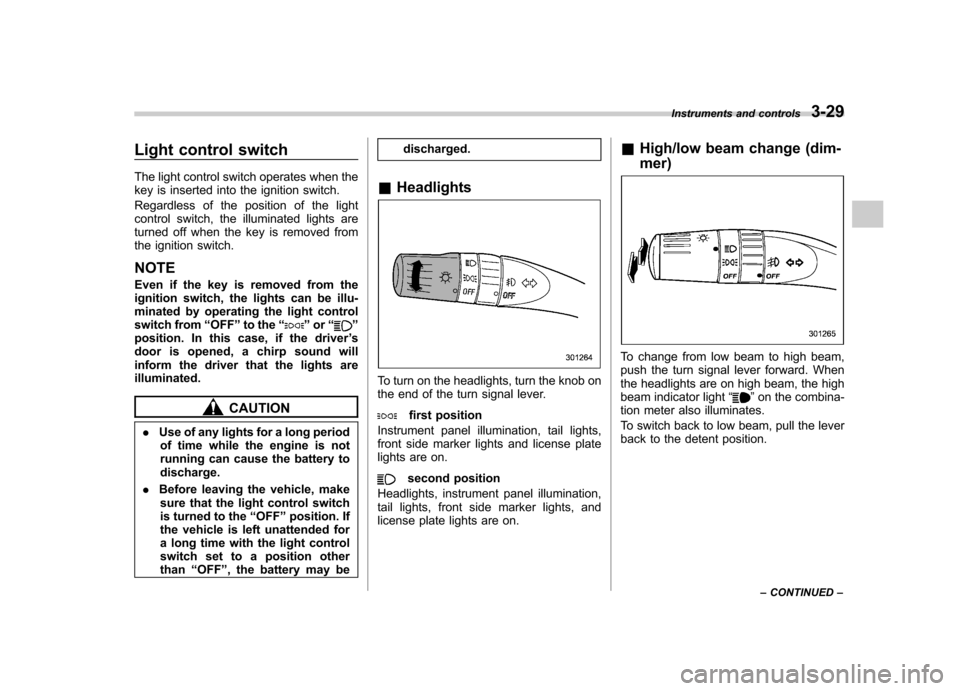
& Headlights
To turn on the headlights, turn the knob on
the end of the turn signal lever.
first position
Instrument panel illumination, tail lights,
front side marker lights and license plate
lights are on.
second position
Headlights, instrument panel illumination,
tail lights, front side marker lights, and
license plate lights are on. &
High/low beam change (dim- mer)
To change from low beam to high beam,
push the turn signal lever forward. When
the headlights are on high beam, the high
beam indicator light “
”on the combina-
tion meter also illuminates.
To switch back to low beam, pull the lever
back to the detent position. Instruments and controls
3-29
– CONTINUED –
Page 147 of 416
3-30Instruments and controls
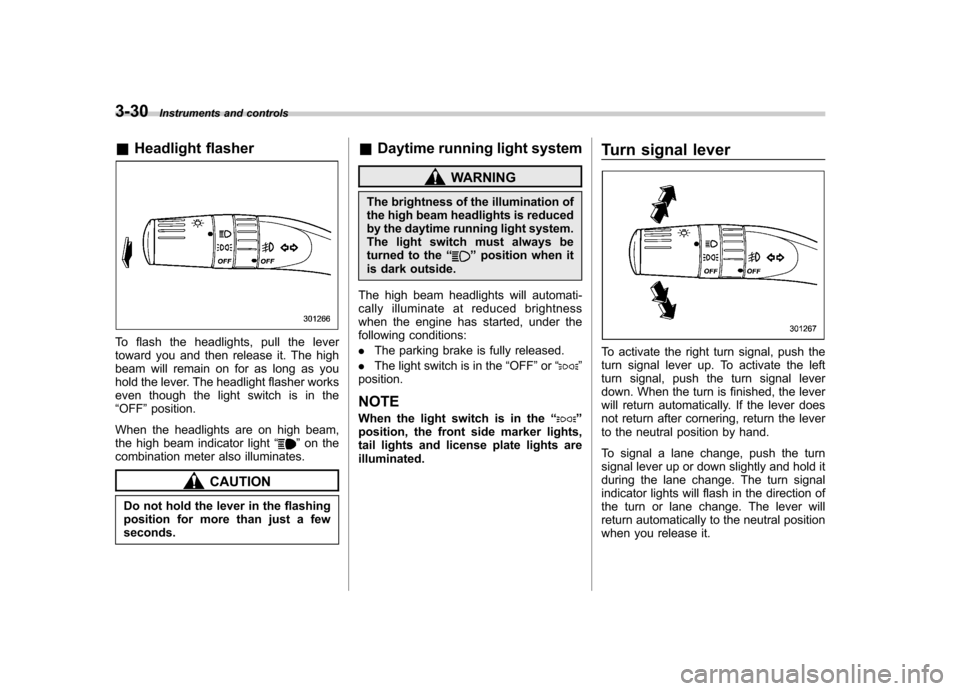
&Headlight flasher
To flash the headlights, pull the lever
toward you and then release it. The high
beam will remain on for as long as you
hold the lever. The headlight flasher works
even though the light switch is in the“OFF ”position.
When the headlights are on high beam,
the high beam indicator light “
”on the
combination meter also illuminates.
CAUTION
Do not hold the lever in the flashing
position for more than just a fewseconds. &
Daytime running light system
WARNING
The brightness of the illumination of
the high beam headlights is reduced
by the daytime running light system.
The light switch must always be
turned to the “
”position when it
is dark outside.
The high beam headlights will automati-
cally illuminate at reduced brightness
when the engine has started, under the
following conditions: . The parking brake is fully released.
. The light switch is in the “OFF ”or “
”
position. NOTE
When the light switch is in the “
”
position, the front side marker lights,
tail lights and license plate lights areilluminated. Turn signal lever
To activate the right turn signal, push the
turn signal lever up. To activate the left
turn signal, push the turn signal lever
down. When the turn is finished, the lever
will return automatically. If the lever does
not return after cornering, return the lever
to the neutral position by hand.
To signal a lane change, push the turn
signal lever up or down slightly and hold it
during the lane change. The turn signal
indicator lights will flash in the direction of
the turn or lane change. The lever will
return automatically to the neutral position
when you release it.
Page 148 of 416
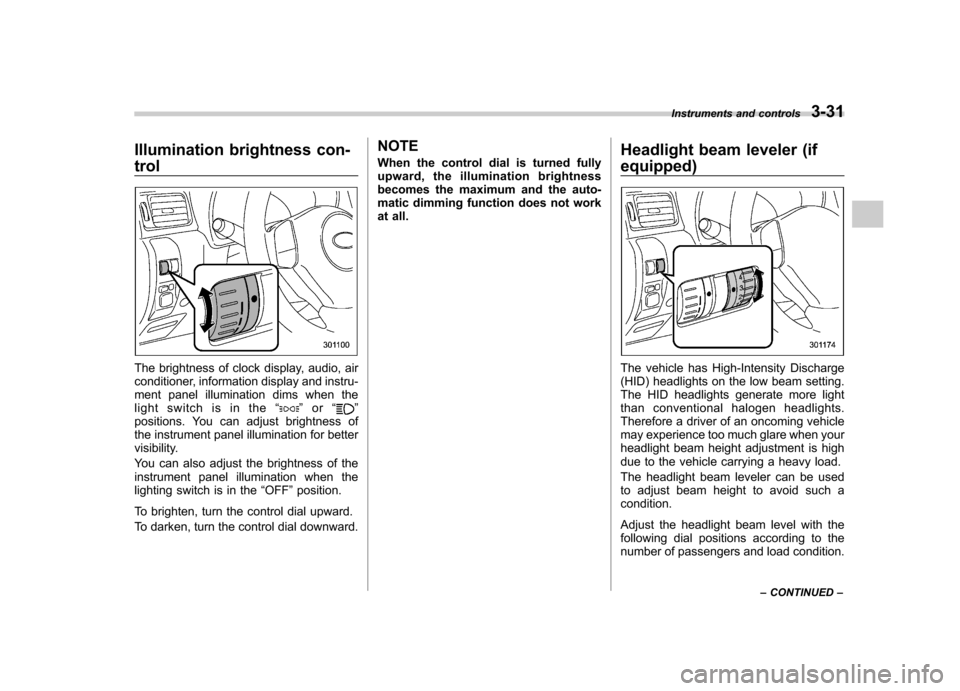
Illumination brightness con- trol
The brightness of clock display, audio, air
conditioner, information display and instru-
ment panel illumination dims when the
light switch is in the“
”or “”
positions. You can adjust brightness of
the instrument panel illumination for better
visibility.
You can also adjust the brightness of the
instrument panel illumination when the
lighting switch is in the “OFF ”position.
To brighten, turn the control dial upward.
To darken, turn the control dial downward. NOTE
When the control dial is turned fully
upward, the illumination brightness
becomes the maximum and the auto-
matic dimming function does not work
at all.
Headlight beam leveler (if
equipped)
The vehicle has High-Intensity Discharge
(HID) headlights on the low beam setting.
The HID headlights generate more light
than conventional halogen headlights.
Therefore a driver of an oncoming vehicle
may experience too much glare when your
headlight beam height adjustment is high
due to the vehicle carrying a heavy load.
The headlight beam leveler can be used
to adjust beam height to avoid such acondition.
Adjust the headlight beam level with the
following dial positions according to the
number of passengers and load condition.Instruments and controls
3-31
– CONTINUED –